Page 1 of 1
Let's Ride Naked!! (warning, graphic nudity inside)
Posted: Tue Jul 21, 2009 10:27 pm
by naptime
so, i wanted to ride my buddy naked.....

what.... you thought i meant me.... go stand in the corner with the other perverts

actually.... i decided to wash the buddy yesterday.... which somehow turned into a full on, teardown and repaint lol
i'll post more pics tonight... but in the meantime..... here is a teaser.....
Posted: Tue Jul 21, 2009 10:30 pm
by Skootz Kabootz
Hubba Hubba!

Can't wait to see what the new paint scheme is going to be!
Posted: Wed Jul 22, 2009 12:10 am
by KRUSTYburger
That's some serious nekkidness there... to the frame!

What color are you getting?
Posted: Wed Jul 22, 2009 12:22 am
by Vic
Oh my gawd! Scooter porn! Nekkid scooters posted on MB! Somebody grab a sheet or something!
Your poor scooter, I hope its new duds are beautiful. Post some pics when you get that thing dressed up again.

What bits are you painting?
-v
Posted: Wed Jul 22, 2009 1:17 am
by A_Hunter

WHAT IS THE NEW COLOR SCHEME? We, the poeole, want to know. I am sure it will look good no matter what.
Posted: Wed Jul 22, 2009 4:01 pm
by r0sa
do i see a BARE NAKED CHEST?!?!
Posted: Wed Jul 22, 2009 4:39 pm
by polianarchy

(Thanks,
bluefox!)
Posted: Wed Jul 22, 2009 5:58 pm
by carreybat
i love the pizza boxes on the ground.
Posted: Wed Jul 22, 2009 11:13 pm
by naptime
polianarchy wrote:
(Thanks,
bluefox!)
ahhhh topless !!! lol
Posted: Wed Jul 22, 2009 11:14 pm
by naptime
carreybat wrote:i love the pizza boxes on the ground.
lol. yeah, i own a pizza shop. so i tend to have lots of boxes laying around... i end up using them for everythign from "kneepads" "mechanics creepers" "oil catches" and more lol.
i got tired of moving my blanket aorund from side to side, so i just thrw down a few boxes ... not that they do a whole lot of good as knee pads though .
Posted: Wed Jul 22, 2009 11:20 pm
by carreybat
naptime wrote:carreybat wrote:i love the pizza boxes on the ground.
lol. yeah, i own a pizza shop. so i tend to have lots of boxes laying around... i end up using them for everythign from "kneepads" "mechanics creepers" "oil catches" and more lol.
i got tired of moving my blanket aorund from side to side, so i just thrw down a few boxes ... not that they do a whole lot of good as knee pads though .
i have a section in my shed with old boxes just for that.
Posted: Wed Jul 22, 2009 11:23 pm
by naptime
i'll get the pics all edited and posted up...
i'm not entirely happy with the outcome..
mostly just the color layout.. it sounded better in my head than it came out

i went with krylon fusion, and wanted to do a combination of navy and white. but then i painted a lot of the center pieces in black.
now the white just seems out of place..
i'm thinking of changing the white pieces to navy. so the whole scoot will be navy and black.
or... i've had about 5 people suggest changing the white to silver, since there is so much chrome on the scoot ... but the only silver i can find from fusion, is the hammered finish silver...
ahh not sure...
eitehr way, i'll keep it like it is, and plan out a new color scheme this winter..
still need to paint the rims as well. either gonna go with black or navy for the rims. i'de like navy if i can get a high heat rim paint that matches close enough. otherwise i'll go with black. since the st.tropez rims are a bit out of place now lol
pics in a few.
Posted: Thu Jul 23, 2009 12:10 am
by naptime
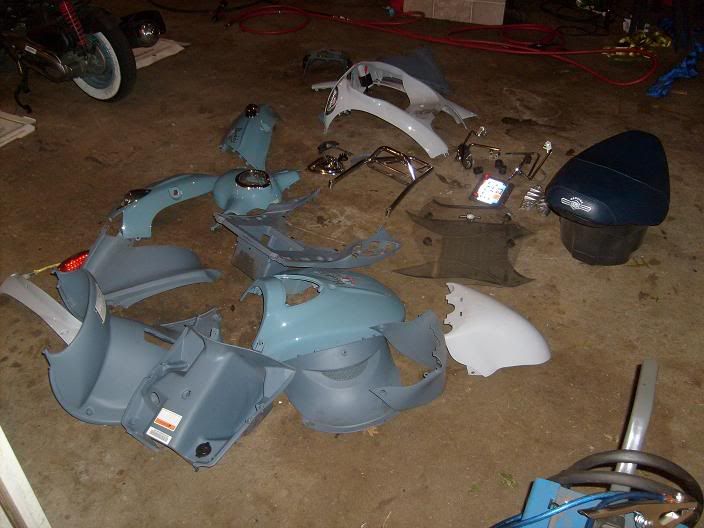
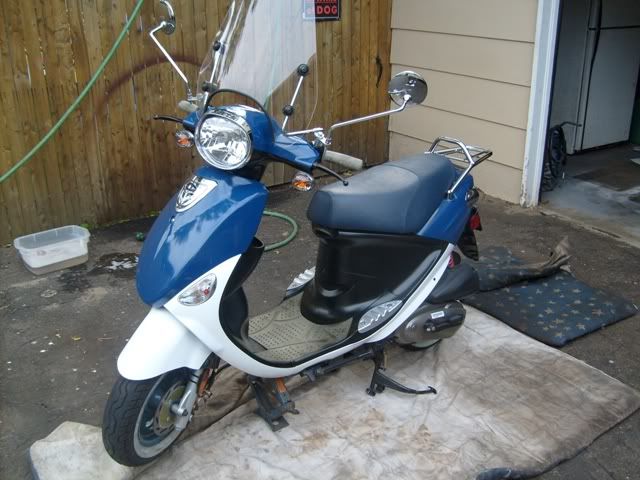
so here we gooo.....
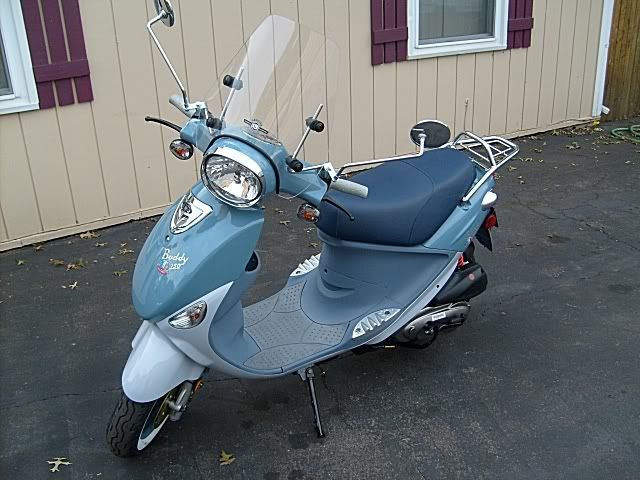
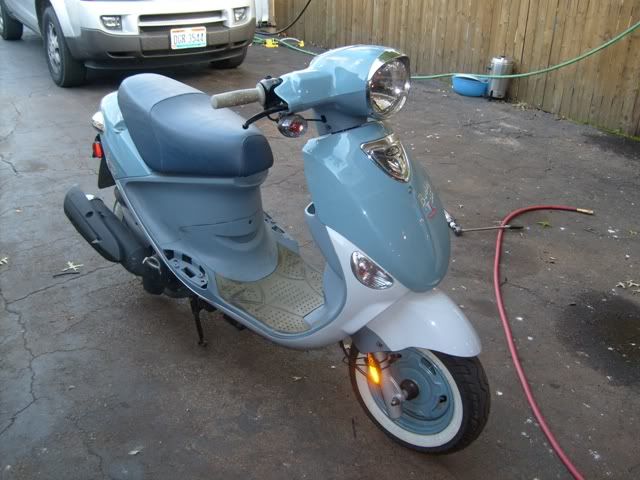
started with a 2008 St.tropez. stock, except for the genuine windshield and chrome rear rack.
this whole project started because i wanted to do a good complete cleaning on the scoot.
so, i pulled off the windshield and mirrors, etc.. simply so i could clean the headset/dashboard better.
then i decided to remove the seat and pet carrier, so i could clean in all the nooks and crannies.
next thing ya know, i'm in the middle of a full on teardown.
once i had it all tore down. i figured... hmm i guess i might as well go ahead and paint it

lol
Posted: Thu Jul 23, 2009 12:19 am
by naptime
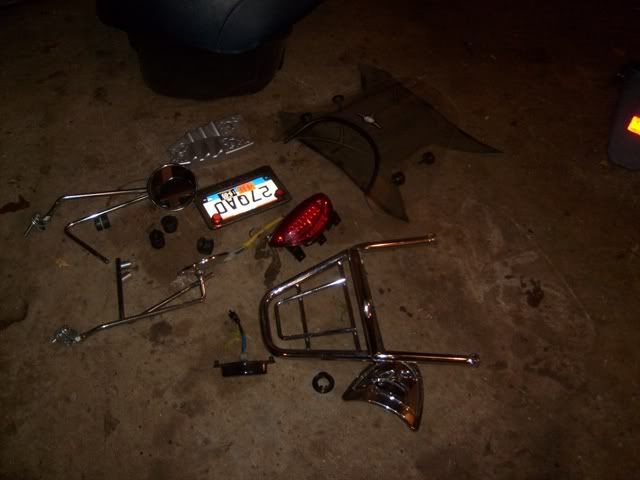
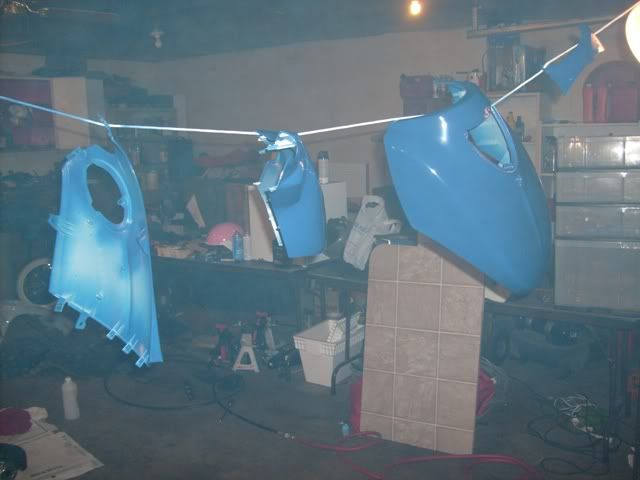
after everythign was tore down i separated into color matching piles.
i figured for my first paintjob on the scoot. i'd stick with the layout that genuine already had, as far panels with like colors.
all of the light blue pieces i decided would get painted navy.
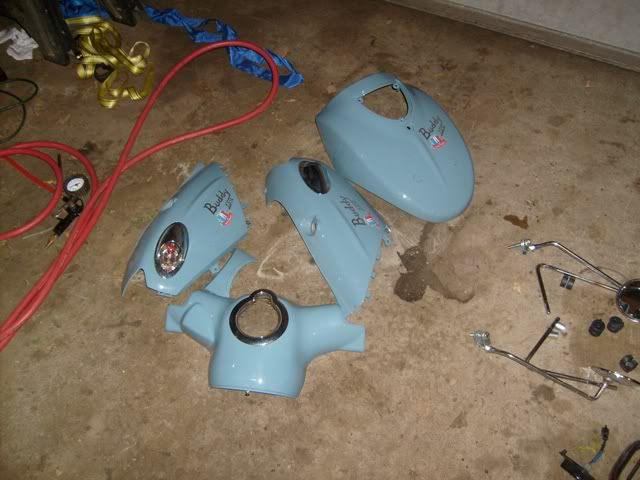
all of the powder bluepieces i decided would get painted white.
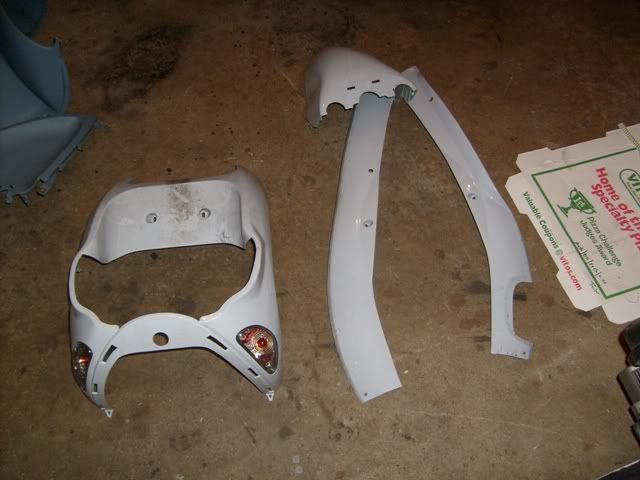
and all of the slate pieces i would paint black.
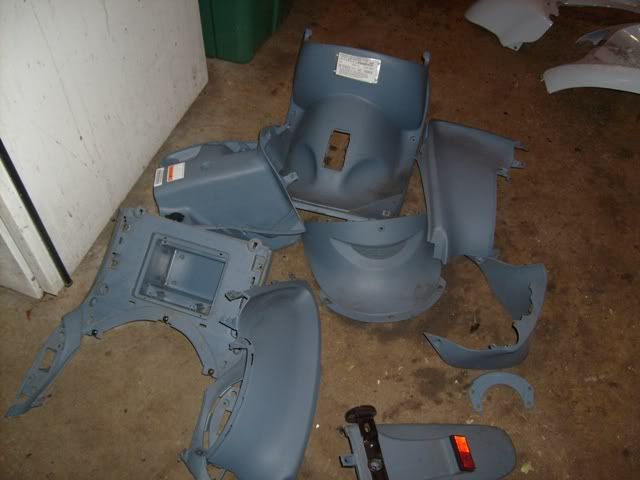
and then, all the chrome and what not, would just get cleaned and polished.
Posted: Thu Jul 23, 2009 12:29 am
by naptime
time to start painting..
i did an initial very light coat. let it flash over, then did a light coat over that.
i did 4 coats, with about 30 minutes between each coat.

Posted: Thu Jul 23, 2009 12:32 am
by A_Hunter
Looking good. Keep the post coming. I cant wait to see the end result.
Posted: Thu Jul 23, 2009 12:34 am
by naptime
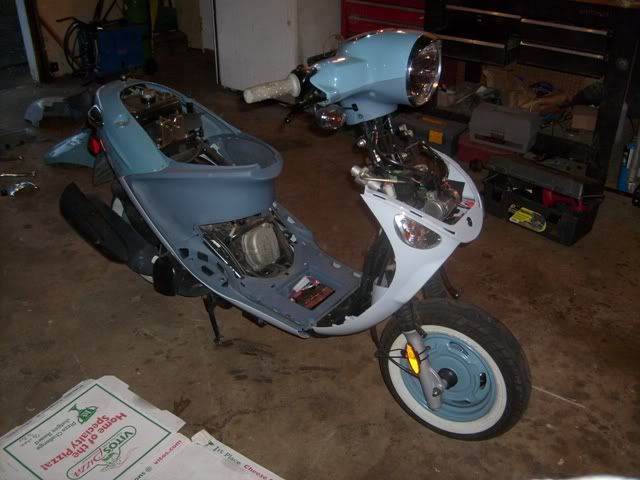
everything painted....
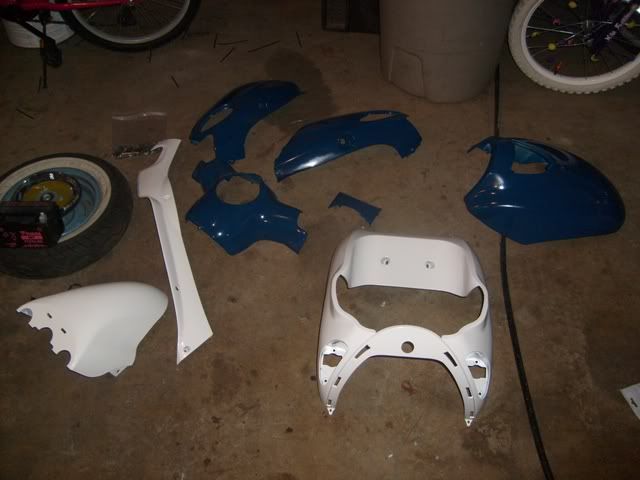
now for the fun of trying to put it all back together

Posted: Thu Jul 23, 2009 12:36 am
by naptime
reassembly was not as bad as i thought it would be..
i had all my screws separated during dismantling.. so i was good there.
biggest problem i had was trying to remember the order some thing went back together.
once i had it figured out, it was all downhill from there.
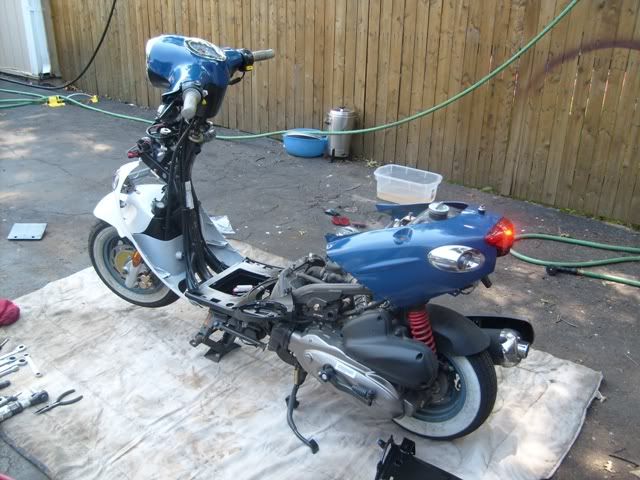
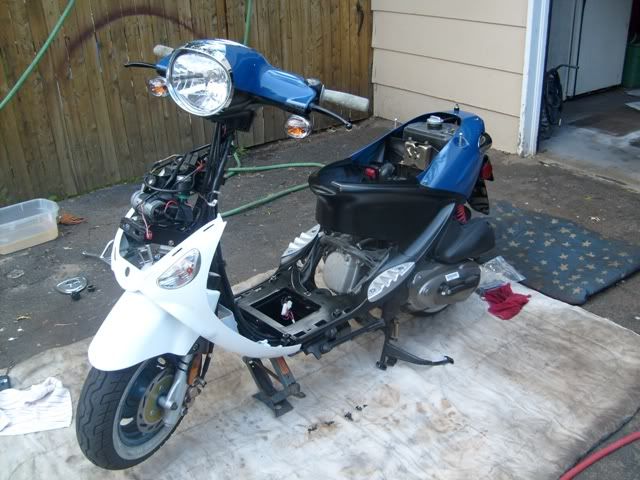
and the final product............
Posted: Thu Jul 23, 2009 12:42 am
by A_Hunter
I like the look. It classy.
Posted: Thu Jul 23, 2009 12:52 am
by naptime
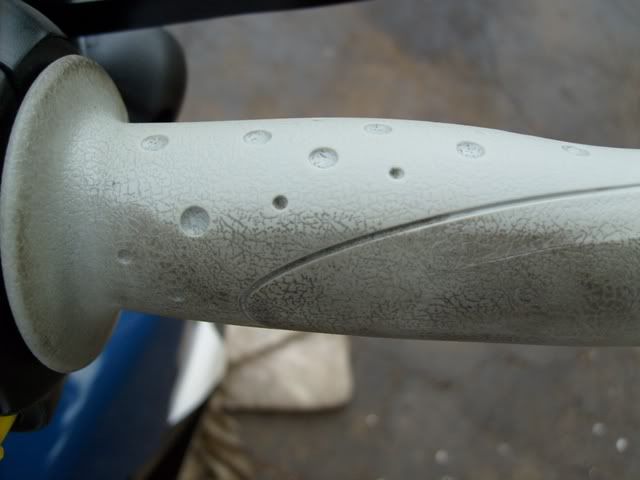
almost forgot....
this is what sparked the whole cleaning debacle..
i ALWAYS wear my icon tarmac v2 gloves when riding. i honestly dont think my bare hands have ever touched the handle grips.
well, its a good thing.... when i started to clean the grips... well, lets just say.. nasty and disgusting would be an understatement...
here's one of the grips cleaned on oneside and not on the other. a picture speaks 350 trillion words lol.
thankfully i never put my hands on these things!
Posted: Thu Jul 23, 2009 12:54 am
by naptime
i think its mostly leather abrasion from the gloves, but surely some of that is road grime and normal dirt .. it was kinda ground in from the gloves.
i ended up cleaning the grips with goof off to get them clean.
Posted: Thu Jul 23, 2009 1:37 am
by Lostmycage
That looks fantastic. I'd make one suggestion, new grips. I've had "ProGrips" on both my Buddy and my Blur and they feel a ton better than the stock. Plus, the dye from the leather in your gloves won't show up like they do on the stock white/grey/slate grips.
Posted: Thu Jul 23, 2009 4:27 am
by mattgordon
naptime wrote:reassembly was not as bad as i thought it would be..
i had all my screws separated during dismantling.. so i was good there.
biggest problem i had was trying to remember the order some thing went back together.
once i had it figured out, it was all downhill from there.
and the final product............
Nicely done...not drastic but definitely one-of-a-kind. I like the way you retained the original two-toned theme.
Posted: Thu Jul 23, 2009 5:16 am
by bluefox
I'm actually a fan of that buddy. If that was a lineup scoot, I would take that over the st. tropez
Posted: Sun Jul 26, 2009 3:19 pm
by redcass
Lostmycage wrote:That looks fantastic. I'd make one suggestion, new grips. I've had "ProGrips" on both my Buddy and my Blur and they feel a ton better than the stock. Plus, the dye from the leather in your gloves won't show up like they do on the stock white/grey/slate grips.
could you post a link to the grips you have?
Posted: Sun Jul 26, 2009 4:11 pm
by Vic
How has the durability been going?
I have a Sunset Buddy and I like the sparkly orange, the brown seat floormat and grips have grown on me and I like them well enough, but the weird orangish color of the textured interior is just plain ugly.
It is such an odd color and looks like someone had originally wanted to match the orange of the body panels but when they went to order the color from a vendor or something they could only get the orange that only goes with fashion-"camo" designs on silly looking runway garments. So some underling nearly burned out from their job just said, "ok, fine go with that." And the rest is history, we now have a Sunset Buddy that has ugly orangish interior panels that don't look right. IMHO.
Yeah, I know, I have spent waaaay too much time tinking about this, probably several hundred miles, truth be told.
Anyway, so I am curious about painting the interior. Brown would maybe make a very nice change for my Buddy.
Yours looks great, BTW! Very inspiring!
-v
Posted: Sun Jul 26, 2009 5:06 pm
by ScootStevie
I like what you did. Nice job

Posted: Sun Jul 26, 2009 5:09 pm
by db
Very nice paint scheme. I love the color. It looks really sharp. Nice job
I wish I had the knowhow and tools/skills to do that
Posted: Sun Jul 26, 2009 8:22 pm
by blue88
I like the new colours!
Though the naked pics make me wonder what it would look like bobbed.

Interior Panels
Posted: Sun Jul 26, 2009 11:00 pm
by Carbolic
Does the paint work well on the softer plastic of the interior panels? I might paint my scooter some day, and this is my main concern.
It seems like the paint might not stand up well to the extra abrasion the foot area gets.
Posted: Sun Jul 26, 2009 11:04 pm
by jijifer
you're a brave one! looks great!
Posted: Mon Jul 27, 2009 7:29 am
by holden
Man, looks so great. That is an ideal paint job for me. Not sure i will ever get brave enough to do this
Posted: Mon Jul 27, 2009 7:45 am
by holden
oh, what did you do to take off the decals?
Posted: Tue Jul 28, 2009 4:51 am
by naptime
thanks for the comments everyone. i appreciate it.
lets see if i can try and answer all the questions...
decal removal. - i gathered a few things ahead of time.. a flat razor blade, a washcloth, and a bottle of goof off.
all iended up doing was using my fingernail to peel up an edge of each decal, and they peeled off surprisingly easy. i cleaned up the few spots of left over sticky residue with the goof off.
for the interior panels: i had the same concern over the durability on the textured surface. i figured the worst that could happen is that it wouldnt hold up, and i'd have to repaint or replace.
the i prepped the surface the same as i did all the other panels.. that is, i too keach panel, and washed it in the bathtub, using dishsoap and hot water, and scrubbing with a BLUE scotchbrite dish sponge. this has the sponge on one side and the blue non scratch scuff pad on the other side.
i then used automotive wax and grease remover to further degrease all panels, after they had dried.
then i sprayed with the fusion paint.
i did this for all the panels interior and exterior.
the paint stuck just the same on all of them. obviously though, the interior panels have the same original texture, where as the exterior panels are smooth.
durability: i have one major suggestion... do not rush to paint your scooter. i WILL be repainting this winter...
reason is curing. the longer you let your paint cure, the harder and more durable it will be. in addition, the more coats you put on, the more resiliant the paint will be to wear and chipping.
i knew this going into the project as i have painted a few cars in the past.
however, what started out as a simple wash job, turned into a paint job, and it was a gorgeous week, so i rused to get it all done in one day.
it took me 8 hours to dismantle the scooter and wash all the parts.
it took me 8 hours to paint all the panels.i did 4 coats on each with about 30 minutes betweek each coat.
what i SHOULD have done was 5-6 coats, with about 50 minutes between each coat.
i let the panels all dry and cure for about 8 hours after the last coat, before reassembly.
what i SHOULD have done, was let the panels sit and cure for about 5-7 days to harden before reassembly.
the exterior panels are all holding up jsut fine. however, the front fender was scratched a little while trying to get it put backtogether. and there are a few small drips where you can tell i was beginning to rush at the end of the night, and my coats were goign on a little too thick.
the scratches could have been avoided had i allowed the paint to properly cure before reassembly.
as for the interior panels. they too are holding up well.
when i ride alone, i tend to sit at the back of the seat, and put my feet up on the plastic sort of like one would do on a street cruiser. and i have not scratched that with my shoes. though, i did rub some of the satic off. and again i feel that could have been avoided by giving the paint more time to cure.
the biggest issue is where my daughters feet go on the rear "pegs" and her shoes rub the rear interior panel. it clearly shows marks from her shoes in the paint. that again, i think can be avoided by longer curing. however i should note, that while there are marks.. the paint is NOT scratched or rubbed off. the paint has held just fine. you just see marks on it.
i intend to repaint this winter when i can do it "properly" and not be in a rush to ride it.
and i'll probably using my spray gun and do a truly custom paint job as well. with graphics and clearcoat.