Page 1 of 1
Big Bore Kit
Posted: Wed Aug 12, 2009 8:11 pm
by Kaos
Well, it finally showed up yesterday after 10 days of nail biting suspense.
This afternoon I was lucky enough to be already working from home, so I figured I'd start on my lunch break and finish anything I didn't get done after work.
I'll also mention here that I apologize for not having the pictures I promised I'd have, my camera's lense wouldn't come out and I suspect my 2 year old got his hands on it sometime this week, so I'll try to be verbose and you can imagine the parts

<b>
The first thing I'll note is that after opening the box to inspect and verify all the parts that while there is a sheet with some tips you need to know about the kit, there are no installation instructions of any sort. This is not the sort of upgrade that you should try if you don't ALREADY know how to pull apart a motor.</b>
The first thing I did was remove the petcarrier/seat assembly as well as the front panel (the one with the cooling vent behind where your feet sit)
to reveal the motor.
Next I removed the fan and flywheel cover to reveal the timing marks. This is important so you can get the motor timed properly for reassembly.
Note that when the "T" mark is aligned with the indicator arm, the crankshaft is at top dead center(TDC)
I then removed the vent return hose from the valve cover and the valve cover itself via the 4 bolts at the corners revealing the camshaft and rocker assembly.
The rockers are held in by 4 nuts with lock washers. These nuts are attached directly to the engine studs that hold the whole engine together.
After you remove those nuts the rockers should come off with some gentle pulling. Note the side labeled E X as this is the exhaust valve rocker and must end up on the same side of the head when re-installed.
After you remove the rockers, the camshaft will be mostly free of the head, though still held in place by the timing chain. Note that there is a line etched across the sproket on the end of the cam. When this line is parallel to the head and the hole in the sprocket is up, the cam is at top dead center(TDC). Gently pull up on the back of the camshaft to tilt it out of the timing chain and remove the cam.
Next I unbolted the two bolts holding the intake to the head and separated the intake from the head. Note that there is a tiny rubber O-ring on the end of the intake. Don't loose it!
Then I unbolted the two bolts that hold the exhaust to the head, and the two rear mounting bolts and removed the exhaust pipe from the bike.
Next you need to remove the plastic cover from the engine. It has two screws, one on each side of the motor, several tabs, and a bolt on the left side of the motor. Pull the top cover up and out(its a tight fit). You can leave the lower cover in place.
Now you can see the chain tensioner sticking out from the side of the cylinder. It looks like a tube sticking out of the top side of the cylinder with a bolt in the end and two bolts near the base. Remove the two bolts and the tensioner will come out of the cylinder.
After that I removed the two long gold bolts from the head that are on the left side of the engine. These bolts hold the head to the block directly.
The head should now be loose on the block, but you'll notice that the intake studs are too tall to clear the bike. There's a simple fix for this.
Unbolt the lower rear shock bolt and pull the shock out of the way of the motor. Now you can pull up on the rear tire to tilt the front of the motor forward so those bolts clear. This can be done by yourself, but would likely be easier with 2 people.
Remove the head now, being sure to pull it straight so as not to put any strain on the engine studs.
Now you should be able to remove the lower chain guide. It just pulls out now. The upper chain guide can stay in place.
At this point the cylinder should be free of the block, and you can pull it out and remove it. Again, be careful of the studs.
Now the piston should be free and open on the end of the rod. There are two C-Clips on the ends of the wrist pin on each side of the piston. Use a small flat blade screwdriver(Or a C-clip tool if you have one) and remove them, then push the wrist pin out of the piston with your finger. Now the piston will come off the end of the rod.
At this point its basically the whole process in reverse with one notable exception. The new cylinder comes with a different style chain tensioner that will not fit under the engine cover. You have to cut a chunk out of the cover to clear the new tensioner. DON'T opt to leave the cover off. Its needed for cooling.
If you've actually READ this far I'll just preface this again. You're replacing 1/2 of your motor to do this upgrade. If you've never done this before you probably shouldn't try now! <B>THIS IS NOT A MOD FOR BEGINNERS!</B>
Posted: Wed Aug 12, 2009 8:18 pm
by Lostmycage
Nice Kaos!
That a shame about the camera

I'm curious as to how this kit's going to perform on your bike

Posted: Wed Aug 12, 2009 8:19 pm
by jijifer
oh boy! I can't wait to hear what your scoot does with this bad boy installed!!!
Posted: Wed Aug 12, 2009 10:52 pm
by Kaos
Well, I just got back from a 35 mile shakedown.
The first thing I noticed was that the exhaust note was a LOT deeper.
It really sounds quite bad-ass
At first it didn't seem a whole lot different than with the 125 top end, but once everything got seated it really started to pick up. Its pulling insanely hard off the line. Like doesn't want to keep the wheel down hard. It flies up to 65 indicated in an instant, but thats about where I let off on it. I don't want to run it all the way WOT like that for a bit until its got a few miles under it's belt.
I can tell my carb is off, and the valves need some playing with but for only having 35 miles on the top end, I'm happy so far!

Posted: Wed Aug 12, 2009 10:59 pm
by Skootz Kabootz
Man I can't wait to read your reports when you've got this baby dialed in. Your gonna need to update your YouTube videos too Kaos

Posted: Wed Aug 12, 2009 11:02 pm
by Kaos
Skootz Kabootz wrote:Man I can't wait to read your reports when you've got this baby dialed in. Your gonna need to update your YouTube videos too Kaos
Heh, thats funny, I was thinking that on my ride. See if I can get a much quicker speedo pegging video on there
Posted: Wed Aug 12, 2009 11:24 pm
by jijifer
Kaos wrote:Well, I just got back from a 35 mile shakedown.
The first thing I noticed was that the exhaust note was a LOT deeper.
It really sounds quite bad-ass
At first it didn't seem a whole lot different than with the 125 top end, but once everything got seated it really started to pick up. Its pulling insanely hard off the line. Like doesn't want to keep the wheel down hard. It flies up to 65 indicated in an instant, but thats about where I let off on it. I don't want to run it all the way WOT like that for a bit until its got a few miles under it's belt.
I can tell my carb is off, and the valves need some playing with but for only having 35 miles on the top end, I'm happy so far!
how far is the throttle pulled to get to 65mph? That's what I get - I get to my top end in SECONDS. A little slower now with the 11g sliders, though.
I don't get too much higher than 70mph WOT. If I feathered the throttle, do you think it would go higher in the long run? (vs pulling it all on at once?)
Have fun. I like the grumble of the pipe! I rode a stock last week just to the bank and back while mine was on the lift and holy crap is stock quiet!
VROOM VROOM!
Posted: Wed Aug 12, 2009 11:28 pm
by Kaos
jijifer wrote:Kaos wrote:Well, I just got back from a 35 mile shakedown.
The first thing I noticed was that the exhaust note was a LOT deeper.
It really sounds quite bad-ass
At first it didn't seem a whole lot different than with the 125 top end, but once everything got seated it really started to pick up. Its pulling insanely hard off the line. Like doesn't want to keep the wheel down hard. It flies up to 65 indicated in an instant, but thats about where I let off on it. I don't want to run it all the way WOT like that for a bit until its got a few miles under it's belt.
I can tell my carb is off, and the valves need some playing with but for only having 35 miles on the top end, I'm happy so far!
how far is the throttle pulled to get to 65mph? That's what I get - I get to my top end in SECONDS. A little slower now with the 11g sliders, though.
I don't get too much higher than 70mph WOT. If I feathered the throttle, do you think it would go higher in the long run? (vs pulling it all on at once?)
Have fun. I like the grumble of the pipe! I rode a stock last week just to the bank and back while mine was on the lift and holy crap is stock quiet!
VROOM VROOM!
Well, I held WOT to get to 65, but I could hold 65 easily at about 1/3 throttle. I'll also mention that there was SERIOUS headwinds today, that would have likely limited my bike's top speed to around 65-70 total with the old top end.
Posted: Thu Aug 13, 2009 2:17 pm
by rajron
It all FUN! – the exhaust does sound deeper doesn’t it.
Put a few thousand miles on the kit, then it starts coming alive.
Posted: Thu Aug 13, 2009 2:59 pm
by Kaos
rajron wrote:It all FUN! – the exhaust does sound deeper doesn’t it.
Put a few thousand miles on the kit, then it starts coming alive.
That's about what I figured, since the stock top end didn't really come into. Its own until
About 1500 miles. I've got 75 on it now, and I'm really surprised at how hard its pulling already. Its gonna be kinda scarry when it breaks in.
Posted: Thu Aug 13, 2009 3:40 pm
by djelliott
Kaos wrote:rajron wrote:It all FUN! – the exhaust does sound deeper doesn’t it.
Put a few thousand miles on the kit, then it starts coming alive.
That's about what I figured, since the stock top end didn't really come into. Its own until
About 1500 miles. I've got 75 on it now, and I'm really surprised at how hard its pulling already. Its gonna be kinda scarry when it breaks in.
I've got about 3000 or so on my kit and it's so alive it's crazy. Still a bit lean. I'm gonna need a 28MM carb I'm sure. Congrats kaos. Welcome aboard!
Posted: Thu Aug 13, 2009 3:43 pm
by rajron
re: the kit;
My daughter thinks my scooter is dorky; but I let her ride it when we were on vacation in Calif, at around sea level. She, is eighteen years old, and is small, got on the scooter and twisted the throttle, proceeded to pull a wheelie across the parking lot, jammed on the brakes and stopped, put the kick stand down, and walked away, never to ride again, or criticize again. The kit can be surprising and to the unexpected scary – up here in NM we have a little less of the initial grunt than you guys near the sea – maybe I should have let her try it here.
Posted: Thu Aug 13, 2009 3:56 pm
by Kaos
rajron wrote:re: the kit;
My daughter thinks my scooter is dorky; but I let her ride it when we were on vacation in Calif, at around sea level. She, is eighteen years old, and is small, got on the scooter and twisted the throttle, proceeded to pull a wheelie across the parking lot, jammed on the brakes and stopped, put the kick stand down, and walked away, never to ride again, or criticize again. The kit can be surprising and to the unexpected scary – up here in NM we have a little less of the initial grunt than you guys near the sea – maybe I should have let her try it here.
Yeah, people just don't realize that scooters are NOT all that slow, even un-modified. People have the Harley mentality that you need 1600cc to even get moving.
I let a friend of mine who is a avid street-biker and rides a very fast modded GSX-R ride mine before I kitted it and he was REALLY impressed at how well it moved.
The only downside to kitting it is that I don't want to be in my office right now, I want to be breaking it in

Posted: Thu Aug 13, 2009 3:59 pm
by rajron
I give you permission – bet everyone here on MB will let you go for a ride as well – just tell um you have MB’s permission to ride, and work is over rated.
Posted: Thu Aug 13, 2009 4:18 pm
by Kaos
rajron wrote:I give you permission – bet everyone here on MB will let you go for a ride as well – just tell um you have MB’s permission to ride, and work is over rated.
Ok, I'll go tell my boss right now. He rides too, I'm sure he'll understand
Posted: Thu Sep 10, 2009 12:13 pm
by Orange Guy
Thanks for the write-up! With this and the service manual (which has no page 75, btw?), the kit is installed. What was going to be a scooter club ride night turned into a wrenching session in my garage. Three strictly vintage guys came over and we got the Buddy torn apart and back together in a few hours. I put up with a lot of plastic jokes ... "Think this will fit in the recycle bin?" "Where do you stick the magnetic parts tray?" "Is this where the hamster runs?" But when it was all done, they were very eager to take it for a spin. Grins all around.
Posted: Thu Sep 10, 2009 2:28 pm
by Kaos
Orange Guy wrote:Thanks for the write-up! With this and the service manual (which has no page 75, btw?), the kit is installed. What was going to be a scooter club ride night turned into a wrenching session in my garage. Three strictly vintage guys came over and we got the Buddy torn apart and back together in a few hours. I put up with a lot of plastic jokes ... "Think this will fit in the recycle bin?" "Where do you stick the magnetic parts tray?" "Is this where the hamster runs?" But when it was all done, they were very eager to take it for a spin. Grins all around.
Sweet, glad it helped! I've noticed that dispite the jokes, most vintage guys are happy to wrench on ANYTHING
And I never noticed the missing page 75, but I just checked mine... 74.... 76. Funny stuff.
Posted: Thu Sep 10, 2009 7:28 pm
by Orange Guy
It's a freakin' blast. Hard to describe, but it feels like it's how the Buddy should have been all along.
You stress that it's not a mod for beginners and I'm about as beginner as it gets. Other than carb work on my allstate, running cables, and some light work on the yard machines in the shed, I had zero engine experience. This is a big-deal project, but it's not impossible. There are several small steps that aren't covered in your write-up, the service manual or the sheet that comes with the kit. For the folks who require detailed step-by-step instructions and have never done something like this before, you probably shouldn't.
Posted: Thu Sep 10, 2009 7:56 pm
by Kaos
Orange Guy wrote:It's a freakin' blast. Hard to describe, but it feels like it's how the Buddy should have been all along.
You stress that it's not a mod for beginners and I'm about as beginner as it gets. Other than carb work on my allstate, running cables, and some light work on the yard machines in the shed, I had zero engine experience. This is a big-deal project, but it's not impossible. There are several small steps that aren't covered in your write-up, the service manual or the sheet that comes with the kit. For the folks who require detailed step-by-step instructions and have never done something like this before, you probably shouldn't.
Well even better then
I worried that I might have forgotten several small things, as I wrote this all after the fact, and my camera was broken, so I couldn't photo as I went. Do you remember off the top of my head what I forgot, so I can add it back?
And yeah, it adds a ton to the Bud. And it gets better with age
I've got a hair over 1000mi on my kit now, and its REALLY starting to wake up. I had to upgrade my Contra spring today because I was getting some really bad belt slip due to all the new torque
Posted: Thu Sep 10, 2009 9:55 pm
by Orange Guy
Kaos wrote:Do you remember off the top of my head what I forgot, so I can add it back?
Your write-up covered 99.9% of the procedure. The area that was vague was installing the rings on the piston and no mention of reinstalling the lower chain guide. Common sense stuff for the pro, but a head-scratcher for the rookie.
Posted: Thu Sep 10, 2009 10:32 pm
by babblefish
And: :needpics:
Posted: Thu Sep 10, 2009 10:42 pm
by Orange Guy
I meant to take pics, but my camera ... um ... my 2 year old got his hands on it?
Posted: Thu Sep 10, 2009 10:44 pm
by Syd
My dog ate the files?
Posted: Thu Sep 10, 2009 11:41 pm
by Kaos
Orange Guy wrote:Kaos wrote:Do you remember off the top of my head what I forgot, so I can add it back?
Your write-up covered 99.9% of the procedure. The area that was vague was installing the rings on the piston and no mention of reinstalling the lower chain guide. Common sense stuff for the pro, but a head-scratcher for the rookie.
Ahh, well at least thats all I missed
And you're right, they're two things I didn't even think about, but that are important not to miss!
Posted: Fri Sep 11, 2009 1:24 am
by Orange Guy
Oh yeah! One more thing ... the chain tensioner. I hope we did it right. We left the key tab in to install it, removed the key tab and installed the ring and screw.
Posted: Fri Sep 11, 2009 1:27 am
by Kaos
Orange Guy wrote:Oh yeah! One more thing ... the chain tensioner. I hope we did it right. We left the key tab in to install it, removed the key tab and installed the ring and screw.
Thats how I did it, and its not failed on me yet
Actually, to be honest I was a bit fuzzy about that myself. That tensioner is a bit different than the stock one
I also did a horrible job with trimming the engine cover to fit the new tensioner... My sawsall was out on loan, and I was impatient to get it running.
Posted: Fri Sep 11, 2009 1:38 am
by Orange Guy
Kaos wrote:I also did a horrible job with trimming the engine cover to fit the new tensioner... My sawsall was out on loan, and I was impatient to get it running.
I used my dremel with a roto-zip type bit. My cut job looks like I had my eyes closed and used my feet to hold the dremel.
Posted: Fri Sep 11, 2009 1:40 am
by Kaos
Orange Guy wrote:Kaos wrote:I also did a horrible job with trimming the engine cover to fit the new tensioner... My sawsall was out on loan, and I was impatient to get it running.
I used my dremel with a roto-zip type bit. My cut job looks like I had my eyes closed and used my feet to hold the dremel.
I won't tell you what mine looks like but I'll admit I cut it with a pair of sturdy wirecutters...
Posted: Thu Feb 10, 2011 2:41 am
by BuddyRaton
Just finished the 161 kit install! I thought I might add a few thips and things I ran into and...of course...I have a few questions.
.
First off..Kaos' tutioral is da bomb! Thanks Dude!
OK first off...when pulling off the head and cylinder 4 line up/spacers will fall out. Don't let them roll away and don't forget to re install them!
Second...when I pulled the chain through the jug it got a twist and hung up. Took me about a half hour to free it up without forcing things.
I would also suggest making a template out of the tensioner gasket for cutting the shroud later.
OK...so here is where I'm at.
Air box baffle removed drilled out to 1/2"
161 Kit with stock 125 head
Adjusted valves to.074 mm
NCY pipe (too many bad prima stories!)
Installed 115 mainjet
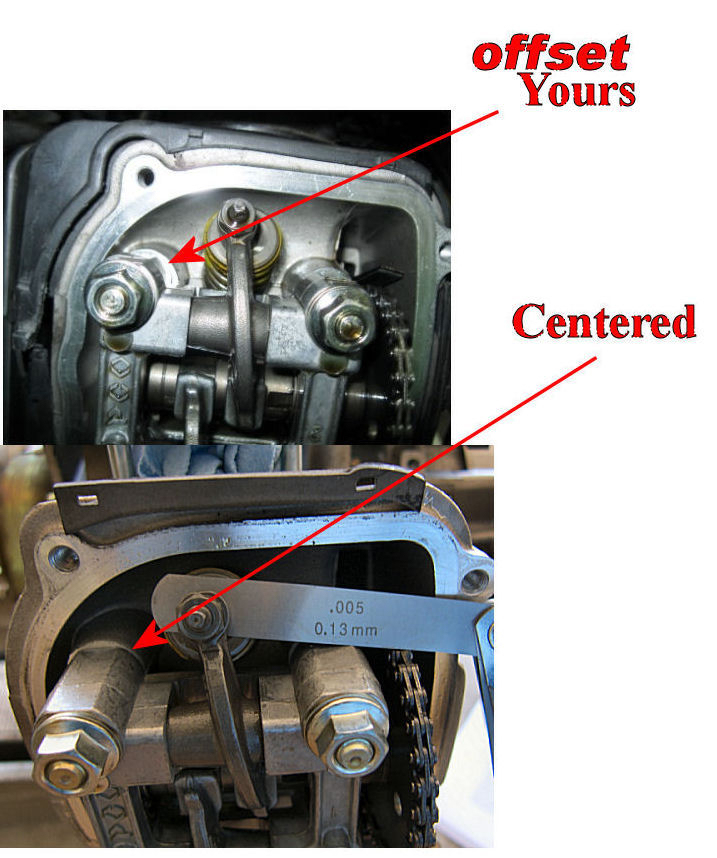
I noticed that the intake rocker is not square on the valve. I also saw a screw on the air intake side behind the the cam gear. Does this need to be adjusted to square over the valve?(Hey...cut me some slack...I'm a 2T tuner!!!!)
I haven't had it off the lift yet but I do hear an occasional knock
Any advice appreciated!
I am hearing an occasional knock idling
Posted: Thu Feb 10, 2011 3:05 am
by ScooterTrash
You shouldn't hear any knock with the stock head and cam. There also shouldn't be any issue with rocker alignment. Sounds like something is off to me. Post a picture if you can
Posted: Thu Feb 10, 2011 1:27 pm
by BuddyRaton
Thanks!
I'll pull the valve cover and take a couple of shots this evening.
I'm dying to get it off the lift and take it for a ride but I want to get it set up properly first.
Oh...another tip, when fitting the scraper (lowest ring assembly) to the piston, fit the "crinkle" part first and then the two retaining rings, don't forget to offset the gaps.
Posted: Fri Feb 11, 2011 2:23 am
by BuddyRaton
OK so I took it out, started right up. Rand a little rough..but hey...it's a new top end. I rode it around the block nice and easy. 3/4 of the way around it stalled under power then did not want to restart. I need to get some new plugs but thought maybe I fouled with assembly grease. Plug was pretty black.
Here are photos of the rockers.
Sorry about the photo quality...I know they are supposed to be out of focus and really blurry!
This isn't my firs top end job, but first on a 4T...any tips or suggestions appreciated!
Posted: Fri Feb 11, 2011 2:52 am
by ScooterTrash
were the alignment pins for the rockers still in place? Something looks very wrong here. I would pull the head and make sure nothing fell in to the cylinder. Double check that everything is installed properly
Posted: Fri Feb 11, 2011 3:10 am
by BuddyRaton
Yeah I'll pull it a part again, it didn't look right tome either.
I'll keep you updated.
Thanks ST
Posted: Fri Feb 11, 2011 5:13 am
by wifiducky
rose had a big bore put on <3
cant wait too get her back tomorrow morning OMG I CANT WAIT ITS KILLING MEEEEE
Posted: Fri Feb 11, 2011 2:19 pm
by Kaos
ScooterTrash wrote:were the alignment pins for the rockers still in place? Something looks very wrong here. I would pull the head and make sure nothing fell in to the cylinder. Double check that everything is installed properly
Yeah, your geometry is off. Occasionally they'll be a LITTLE off but that looks more than a little
Posted: Fri Feb 11, 2011 4:50 pm
by BuddyRaton
I'm not sure if I know what the rocker alignment pins are.
I had two "pins" spacers between the case and jug and two between the jug and head.
Posted: Fri Feb 11, 2011 4:53 pm
by wifiducky
batts dead from the cold but man does the big bore make you fly XD now i need a big header SOON MY LOVE SOON I WILL GO BACK TO THE FUTURE!!!!
Posted: Fri Feb 11, 2011 5:52 pm
by rajron
I wish I had more pictures; this is the only one I could find of the Buddy 125 head.
Not sure why, but, your rocker assembly is not centered on the posts, see pics for comparison.
Posted: Fri Feb 11, 2011 6:14 pm
by BuddyRaton
Thanks rajron, thats a great illustration.
Time to give SW a call...wish me luck!
Posted: Fri Feb 11, 2011 6:18 pm
by rajron
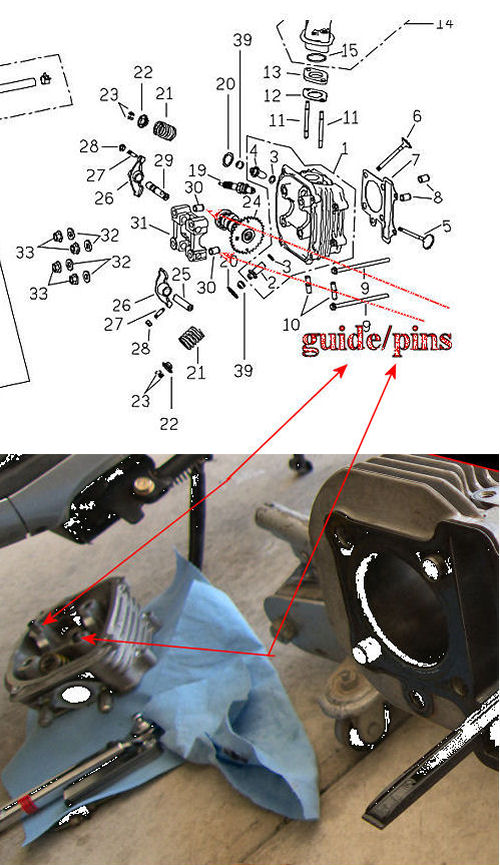
see this:
Like it was said; the only thing it could be is:
Posted: Fri Feb 11, 2011 10:18 pm
by ScooterTrash
Ah, you didn't transfer the guide pins from the old cylinder to the new did you? For the record that was the first thing I asked
Posted: Sat Feb 12, 2011 2:07 am
by BuddyRaton
ScooterTrash wrote:Ah, you didn't transfer the guide pins from the old cylinder to the new did you? For the record that was the first thing I asked
Your right...I thought I had gotten them all but there were two hiding in the old jug.
Yep! I'm an idiot! But you know what...not the worst mistake I have ever made...and it will not be the last either! At leas tit wasn't the ones further in!
Thanks all!
Posted: Sat Feb 12, 2011 3:21 am
by ScooterTrash
Hope it didn't cause any other damage on your ride, good luck!
Posted: Sun Feb 13, 2011 7:42 pm
by BuddyRaton
Done!
Need to break in. First impression - nice!
With the air box mod, NCY pipe, Dr pulley and 11 gram sliders its what I was looking for, a good general power increase. I know it will get better as it breaks in.
Diva Bocette took it out for a test and came back with a huge grin!
Thanks for all the help!