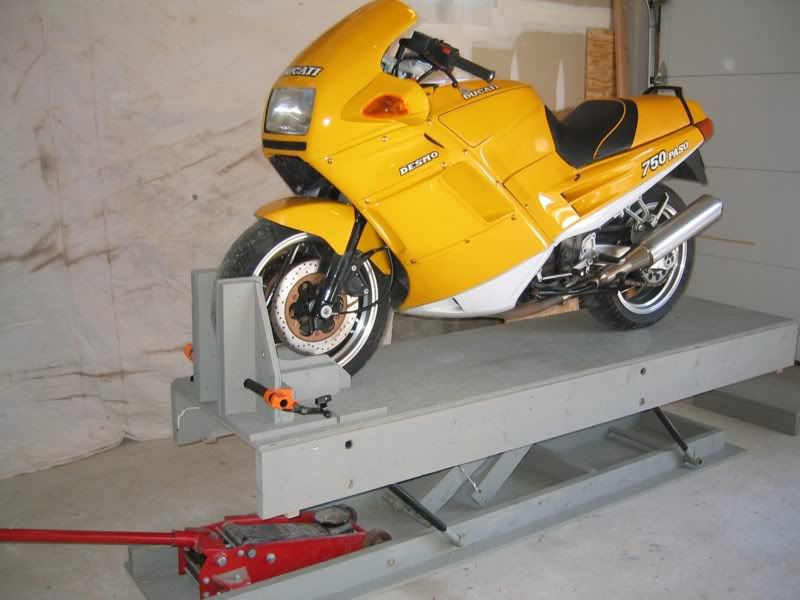
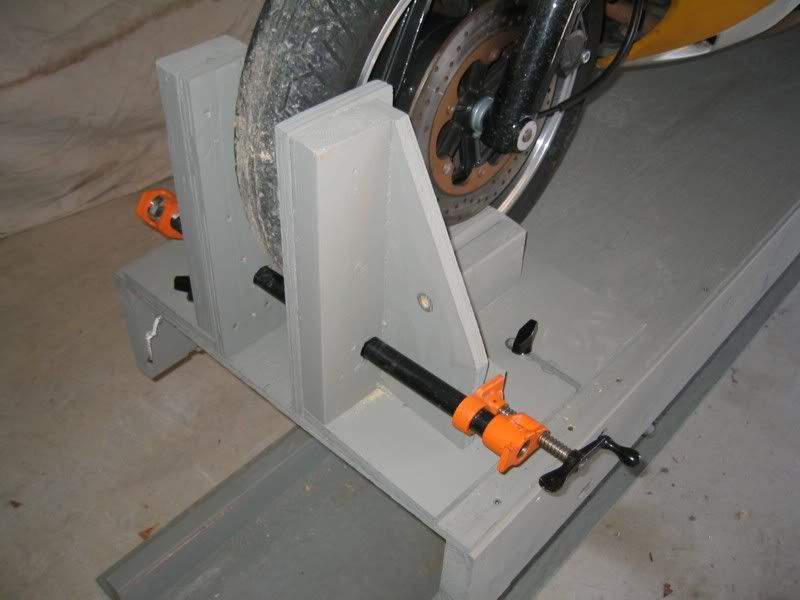
home built lift

Discussion of the Genuine Buddy, Hooligan, Black Jack and other topics, both scooter related and not

Moderator: Modern Buddy Staff

Post Reply
User avatar
jmkjr72
Member
Posts: 783
Joined: Sat Jul 11, 2009 11:07 pm
Location: green bay wi
Contact:

home built lift

Post by jmkjr72 »

well i was looking around one day and found some plans on ebay for a lift but i decided to wing it

his pics
http://s70.photobucket.com/albums/i103/ ... ftver1.flv
Image
Image
Image
Image

his ebay add

http://cgi.ebay.com/ebaymotors/ws/eBayI ... 0533896487
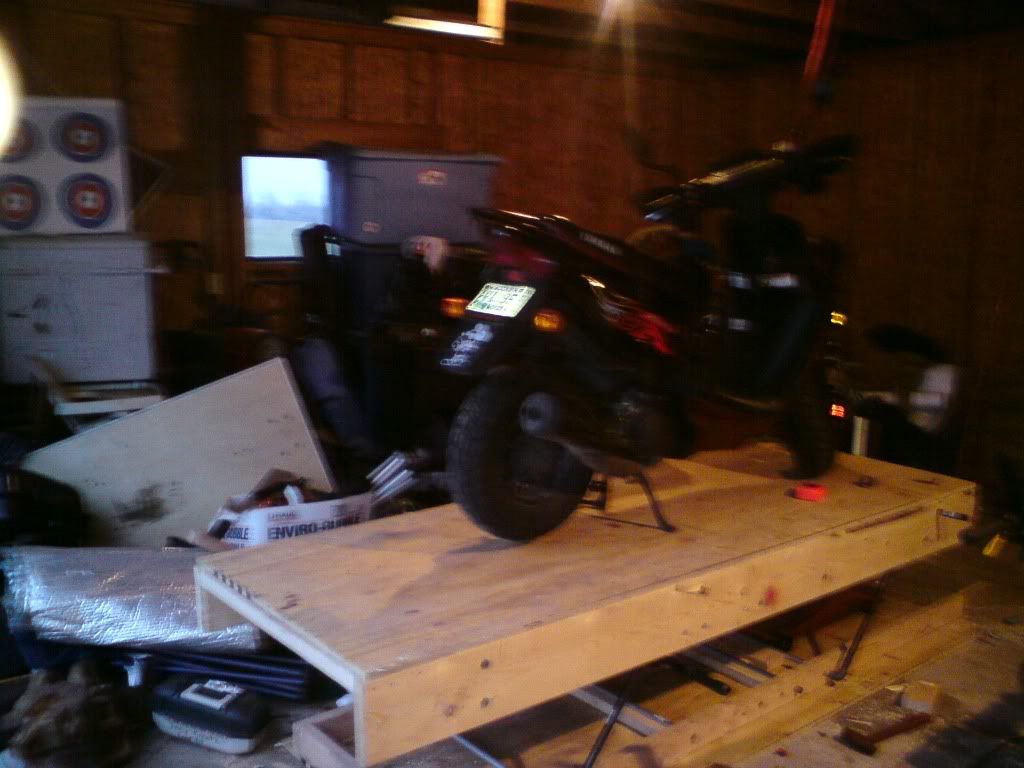
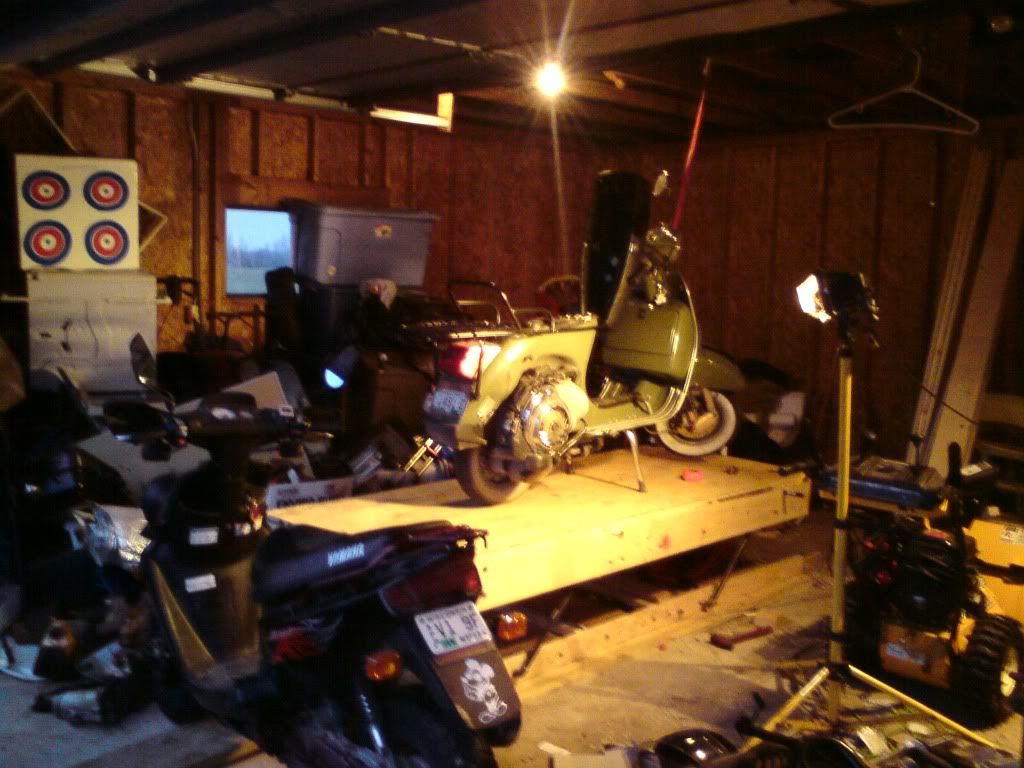
my lift
Image
Image
Image
Image

materials
2 2x2x8
2 2x8x8
6 2x4x8
2 4x8 sheets of plywood cut into 3X8 i used 21/32 thick it was on sale you could proably use thiner

now onto the black or galvanized threaded pipe
2 30" long 1/2 dia if you have a heavy bike upgrade all pipe to 3/4"
4 24" long
4 elbows
4 tees
2 unions (not couplers but unions they give you some flex and alow you to thred together)
now you will need to do some math on your own at the hardwear store you will need to make 2 sections that have the tees that measure t
32 inches T-------union------T from outs side to out side
4 6" long
1 36" long
2 3/4" tee (with a heavy bike up grade to 1" for these parts)
1 48" long 3/4" pipe
2 6" long 3/4" pipe

a bit of rope

and a shit load of wood screws some long and a bunch of short

start by drilling some holes lagre enough for the pipe to slide thru put one at the front end on the 2x8s 1' from the front 1 1/2 inches from the top of the board(stack the 2x4s so your holes are in the same spot)
and put one 1' from the ramp end on the 2x4s centered
now make a quick mock up pipe elbow and tee on a 24" pipe
now place the 2x4 on top of a 2x8 alinged flush with the bottem(you should still see the hole you drilled in the 2x8
now with the mocked up pipe part aling the elbow with the hole in the 2x4 and angle the pipe forward and mark where to drill your hole in the 2x8 1 1/2 inches from the top of the 2x8
now take the mocked up pipe and aling the tee with the hole in the 2x8 angle it back and mark where to drill your hole in the 2x4
now stack the boards up and drill the holes
drill an extra set of holes in the 2x8s 1' from the ramp end(this is for the lock mechanism)

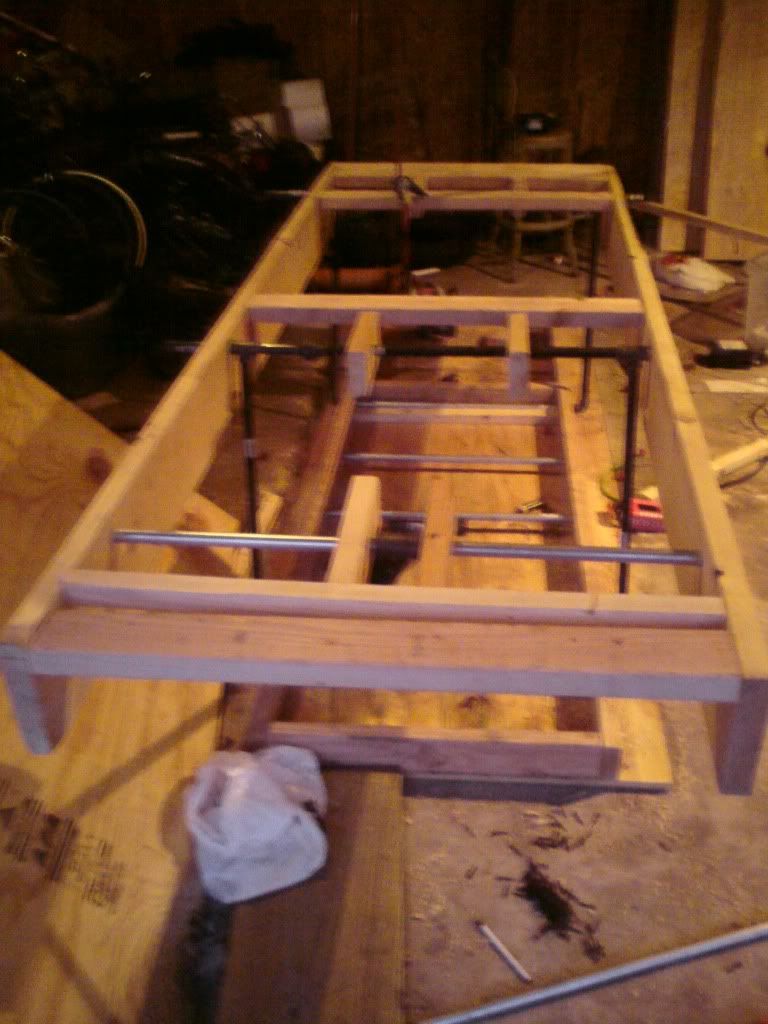
now its time to start assembly
place the 2x4s on the base (one of the sheets of plywood)
6 inches from the out side edge
out of the other 2x4s cut a brace to put between the bases 2x4s at the ramp end (dont put any braces in the front this needs to be open for your jack to lift it)
now run the 30" pipes thru the 2x4s place the elbows on the pipes
now screw the 24" pipes into the elbows and place the tees on the ends of these pipes
take some parts of 2x4 6" to 8" long and drill holes centerd in them (you need 6 in total 2 front and 2 rear and 2 for the lock
now between the tees put the filler pipes and unions in with 2 blocks on the front and 2 on the rear bar (these are to help supprt the pipes that run right unter the top of the lift
run the lock pipe thru the holes farthest back on the 2x8 slip the 3/4 tee thru the pipe so it "floats" the assemble the lock 48"pipe between the 2 tees and 6" pipes on the tee that isnt run thru the 1/2" pipe

put the s6" sections of pipe on the tees and slide the 2x8s over them
now its time to cut up some 2x4s to brace the 2x8s they should lay flat in the front and rear flush with the top of the 2x8s the front should be just about soild as clost to the pipe as you can get as this is where you are lifting from and in front of and behind each pipe except the lock pipe (this only gets braced behind)

now its time to get your floor jack out and use it to figure out where to put bottem braces(these double as part of the lock) jack it up and figure out where you need stops and screw them in(you will have to flip the lift over to secure them

now tie the rope onto the 3/4 pipe where the tee locks in the bottem and run it over the lift arms to the front(this is the release for the lock)

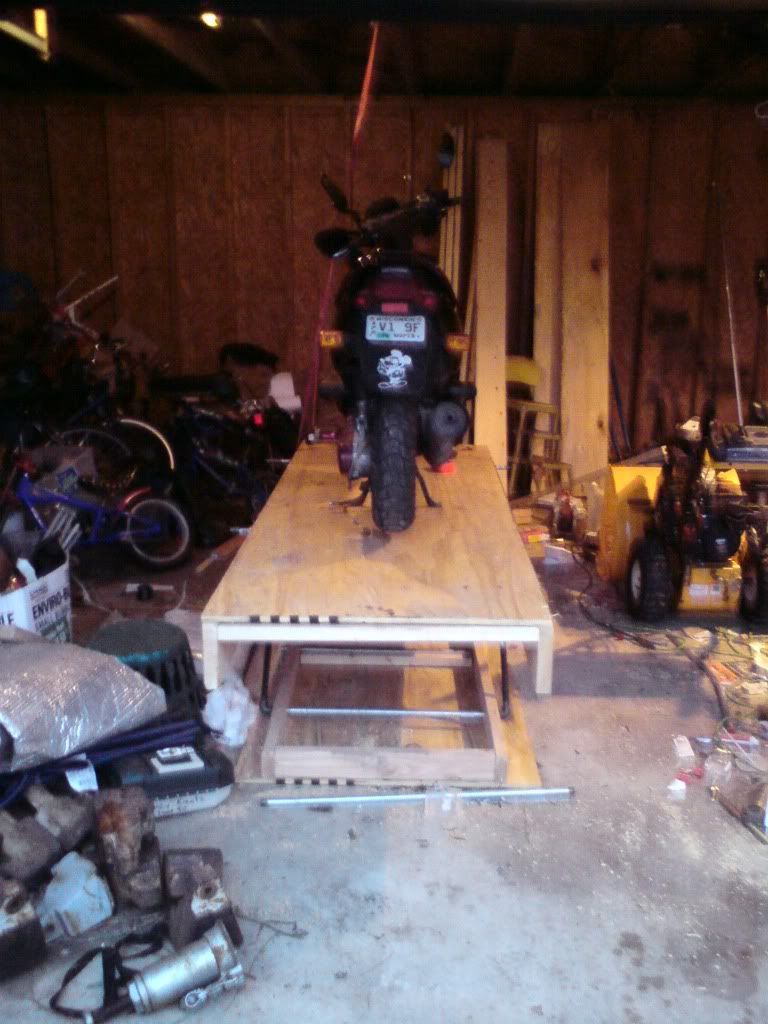
now is the time to make sure everthing seems to be lifting properly

if all looks good its time to secure the top deck to the 2x8s (all the 2xs should be screwed into the plywood every 6" or closer
z 2008 zuma 50
olive 2008 setlla
1979 tomos
Image
User avatar
Wheelz
Member
Posts: 909
Joined: Fri May 08, 2009 6:13 pm
Location: Chi-City Ill-noise

Post by Wheelz »

nice lookin lift, maybe someday i will find the time to do something like that. First, must clean out shed, to have a proper "shop" i can't even see my bike stand in the damn thing.......
"Hey You, yeah, all you'se thoughts, specially you, creepy wierd one in the corner, Screw you guys, I'm going for a ride..."
User avatar
jmkjr72
Member
Posts: 783
Joined: Sat Jul 11, 2009 11:07 pm
Location: green bay wi
Contact:

Post by jmkjr72 »

well betweent the next 2 summers im hoping to build a seprate garge just for my scooters
z 2008 zuma 50
olive 2008 setlla
1979 tomos
Image
User avatar
Lostmycage
FAQ Moderator
Posts: 4062
Joined: Tue Jun 17, 2008 3:36 am
Location: The Interwebz!

Post by Lostmycage »

Very cool! Thanks for posting this. I love home made stuff. That looks sturdy and simple - the perfect combination.
Check out :arrow: Scoot Richmond's new site: My awesome local shop.
User avatar
BuddyRaton
Scooter Dork
Posts: 3887
Joined: Sat Sep 09, 2006 10:08 pm
Location: Boca Raton, Florida
Contact:

Post by BuddyRaton »

Nice job!
"Things fall apart - it's scientific" - David Byrne
www.teamscootertrash.com

'06 Cream Buddy 125, 11 Blur 220, 13 BMW C 650 GT, 68 Vespa SS180, 64 Vespa GS MK II, 65 Lambretta TV 175, 67 Vespa GT, 64 Vespa 150 VBB 64 Vespa GL
iwabj

Post by iwabj »

oops
Last edited by iwabj on Fri Jun 25, 2010 3:41 am, edited 1 time in total.
User avatar
easy
Member
Posts: 582
Joined: Sun Feb 15, 2009 4:58 pm
Location: whitwell tn

Post by easy »

i got to come up with something over Christmas. I got to drop the engine out of my Chetak to replace the head gasket. I just got a transmission jack to help with replacing the transmission in my crx. lift range is 8 in to 2 ft just need to modify it
User avatar
ericalm
Site Admin
Posts: 16842
Joined: Sat Jun 10, 2006 3:01 am
Location: Los Angeles, CA
Contact:

Post by ericalm »

I love this. Is it possible to store this vertically—upright?

What would you say the cost was for the whole project?
Eric // LA Scooter Meetup Group // Stella 4T // Vespa LX // Vespa LXS // Honda Helix // some, uh, projects…
User avatar
Lostmycage
FAQ Moderator
Posts: 4062
Joined: Tue Jun 17, 2008 3:36 am
Location: The Interwebz!

Post by Lostmycage »

ericalm wrote:I love this. Is it possible to store this vertically—upright?

What would you say the cost was for the whole project?
$ 150. <a href="viewtopic.php?t=13726&start=0#177872"> jmkjr72 mentioned this in the Spend-a-thon</a> and I asked him to post a pic or two if he could. I had no idea he'd be so thorough. This is a really great summary of the project!

You could probably make a bracket and hang it by the pipes on a wall if you were so inclined.
Check out :arrow: Scoot Richmond's new site: My awesome local shop.
User avatar
ericalm
Site Admin
Posts: 16842
Joined: Sat Jun 10, 2006 3:01 am
Location: Los Angeles, CA
Contact:

Post by ericalm »

Me: "If there was something a little smaller than a twin mattress that I could store upright in the garage, could I…"
Wife: "That's pretty big."
Me: "You don't even know what it is yet!"
Wife: "Yeah, but a twin size, that's kind of big no matter what it is."
Me: "It's, uh, smaller…"
Wife: "Does it go with our plan for the garage?"

This is the point at which I decide not to ruin Christmas by saying something along the lines of, "OUR plan? No. MY plan? Hell yeah."
Eric // LA Scooter Meetup Group // Stella 4T // Vespa LX // Vespa LXS // Honda Helix // some, uh, projects…
User avatar
jmkjr72
Member
Posts: 783
Joined: Sat Jul 11, 2009 11:07 pm
Location: green bay wi
Contact:

Post by jmkjr72 »

the way this is built you can tip it on it side or stand it up right and push it up against the wall in the garage
yes you can build it smaller to suit your needs as long as your scooter fits on it
i picked the size i did so i can use it as a big work bench too
i spent 150 on materials but a lot is going to depend upon your local market and where you shop i could have gotten the plywood cheaper at menards or fleet farm but they dont rip cut it for you

the same thing goes for the pipeing you should look around before you buy to find the best price as prices can very widely from one place to another i belive home depot had the best prices but then you have to figure in the time to wait for some one to cut and thread the pipe
z 2008 zuma 50
olive 2008 setlla
1979 tomos
Image
User avatar
Lostmycage
FAQ Moderator
Posts: 4062
Joined: Tue Jun 17, 2008 3:36 am
Location: The Interwebz!

Post by Lostmycage »

This was the first link in the new FAQ section for DIY tools and accessories.
Check out :arrow: Scoot Richmond's new site: My awesome local shop.
User avatar
kymur
Member
Posts: 49
Joined: Wed Feb 27, 2013 11:15 am
Location: Midlothian, Virginia

Great work!

Post by kymur »

Thanks for the idea man!
Ride Ride Ride ~Kymur
User avatar
Scooterboi
Member
Posts: 157
Joined: Thu Sep 08, 2011 7:06 pm
Location: Lakewood, CO

Post by Scooterboi »

My take on a lift is a simple knock down table. see pic.

I'll use a ramp to get it up there:
http://www.discountramps.com/bike-ramp.htm

and mount a folding/adjustable chock to hold it in place:
http://www.discountramps.com/black-wido ... -chock.htm

Cheap, sturdy, stores flat, the ramp and chock can be used independent of the table (truck transport), and, for as often as I will be working on my only bike, perfect.

My bike (BV350) has 16" front wheel but I may want to invite others over for a wrench day. Most have smaller wheels than the chock can accommodate so (when I need it) I will some add attachment points to the table in the form of drilled angle iron track so it can adjust to fit. I am also going to modify the design to add another cross support using the same two sheets of ply. Regardless, it will still break down. Four stacked sheets of 7/8 plywood, 2x6.
Attachments
M-C Work Table.jpg
M-C Work Table.jpg (76.44 KiB) Viewed 2738 times
User avatar
kymur
Member
Posts: 49
Joined: Wed Feb 27, 2013 11:15 am
Location: Midlothian, Virginia

SmArT

Post by kymur »

Now THAT is smart ^^^^
Ride Ride Ride ~Kymur
Lokky
Member
Posts: 763
Joined: Fri Feb 18, 2011 6:52 am
Location: Richmond VA

Post by Lokky »

I swear to god, getting a place to work on my bikes is what will finally get me to settle down somewhere.
User avatar
PeteH
Member
Posts: 2281
Joined: Mon Jan 17, 2011 4:32 pm
Location: 3603mi SE of Dutch Harbor

Post by PeteH »

Say, Scooterboi - got any rough dimensions for those pieces and cuts? I could really use a kit like that.
Feel da rhythm! Feel da rhyme! Get on up! It's Buddy Time!
User avatar
ericalm
Site Admin
Posts: 16842
Joined: Sat Jun 10, 2006 3:01 am
Location: Los Angeles, CA
Contact:

Post by ericalm »

PeteH wrote:Say, Scooterboi - got any rough dimensions for those pieces and cuts? I could really use a kit like that.
Check this out:
http://modernvespa.com/forum/post1183960#1183960
Eric // LA Scooter Meetup Group // Stella 4T // Vespa LX // Vespa LXS // Honda Helix // some, uh, projects…
User avatar
PeteH
Member
Posts: 2281
Joined: Mon Jan 17, 2011 4:32 pm
Location: 3603mi SE of Dutch Harbor

Post by PeteH »

Hey, I like that even better, as the ramp's built in! The takedown/flat storage aspect is huge as I don't have a garage,

Looks like I have a little project before spring maintenance.
Feel da rhythm! Feel da rhyme! Get on up! It's Buddy Time!
User avatar
Scooterboi
Member
Posts: 157
Joined: Thu Sep 08, 2011 7:06 pm
Location: Lakewood, CO

Post by Scooterboi »

PeteH wrote:Say, Scooterboi - got any rough dimensions for those pieces and cuts? I could really use a kit like that.
Very rough! The only required dimension is to rip the two 4X8's down the center so you have four pieces that are all 2' wide. After that you make it to the needed dimensions. For example I am making mine 6' rather than 8' long and using the left over 2x2 piece to add another cross support.
ericalm wrote:
PeteH wrote:Say, Scooterboi - got any rough dimensions for those pieces and cuts? I could really use a kit like that.
Check this out:
http://modernvespa.com/forum/post1183960#1183960
I could probably use this. It sure seems it would be easier to ramp up on than to use the narrow ramp I have. I will just have to rig a lock for both the up and the down position. However, I am still a little worried the recommended weight limit (450) with the BV weighing in at near 400. I also was worried that I couldn't lift that weight to level. That is until I realized that where you park the bike makes a huge difference on the required effort and that I could always get some mechanical advantage on the top end to help if I really need it. A wheel chock would help to make sure the bike did not tip or wobble in transition. :shock: Luckily I have one. Good to have options. Thanks Eric!

That Kendon Lift is nice <drool> but I don't need the mechanical advantage and won't be spending enough wrench time to justify the increased cost. I already have the ramp and chock to truck transport so the cost is another $30 vs. $700 + shipping for the Kendon Lift. Sweet lift, but clearly a want instead of a need for me. :cry:
User avatar
Scooterboi
Member
Posts: 157
Joined: Thu Sep 08, 2011 7:06 pm
Location: Lakewood, CO

Post by Scooterboi »

I really like the idea of having the ramp in the table but I also like that the straight knock-down table only needs plywood for the structural materials.

So now I am working on a hybrid of the two knock-down designs. I have the materials list and I am putting together the cutting layout and I have a question.

If you had to choose only one height for a lift table where you will be working on all kinds of bikes and your choice must be 24" or less, what would be the best compromise height?

:nerd:
User avatar
Lostmycage
FAQ Moderator
Posts: 4062
Joined: Tue Jun 17, 2008 3:36 am
Location: The Interwebz!

Post by Lostmycage »

24" or less? 24". Assuming that you're constraints are 4'x8' plywood sheets, then plan your framing/upright measurements for 23 7/8" to 23 15/16" (ideally) since you have to take into account the thickness of a saw blade.

If having a store do your rip cut, plan on 23 3/4" since their equipment isn't super accurate and their employees aren't super trained.

In all honesty, 23 3/4" is a good height to plan for since it allows for several layers of "oopsies".
Check out :arrow: Scoot Richmond's new site: My awesome local shop.
User avatar
Scooterboi
Member
Posts: 157
Joined: Thu Sep 08, 2011 7:06 pm
Location: Lakewood, CO

Post by Scooterboi »

I was speaking generally but if you want to talk details you forgot the thickness of the plywood. :P I have tried to talk math on this forum in the past and it seems to be a "four letter word" to some folks.

However (since you brought it up :lol: ) at 23-7/8" (I have a table saw, 1/8' kerf) plus the 3/4" thickness of the ply equals 24-5/8" as the tallest finished height I can design for without going to 3 sheets of ply.

Another thing that concerns me about the ramp end of the table is the lack of support. I was thinking that there is enough material to cut a 48" x 4" piece and notch the ramp and the center crosspiece so that it will hold it and support the table center lengthwise on that end. This also helps ensure the ramp won't kick out unexpectedly.

Because changing the height also changes the ramp angle, I had to lengthen the entire support box and table to 7' rather than the original 6'. Otherwise the ramp would not be 23-7/8" like the rest of the cross pieces, still reach the ground, and/or still be the same angle as the rest of the ramp/table. When I first looked at this ramp/table combo, I thought 6' was just a little short for the BV350. At a length of 7' 3" and wheelbase 5' 2" it means that it would "hang off" both ends of a at 6' table and I would not be able to use a chock as I originally planned. :nerd: :nerd:

All that said, thanks for the 24" vote. I was leaning there myself but was looking for confirmation. My guess is that 2' is a good height for both sitting on a stool and standing. Much taller and I wonder if using a tool stool would work at all.
Post Reply