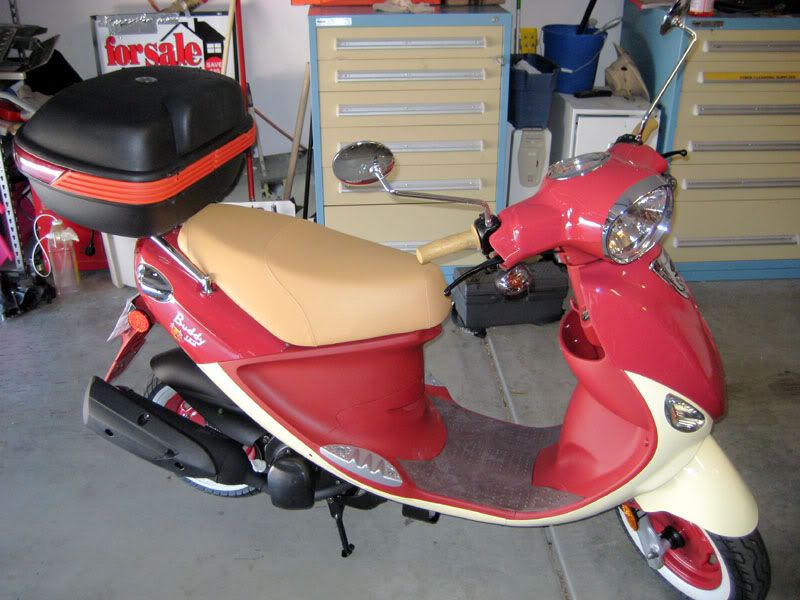
Ok as I know some of you are biting at the bits to know what other $775 scooter I got to complement my new Buddy 150 Pamplona so that guest can ride along. READY!
OK-OK, Here is my recent April 28th birthday buy, Buddy 150 Pamplona right!
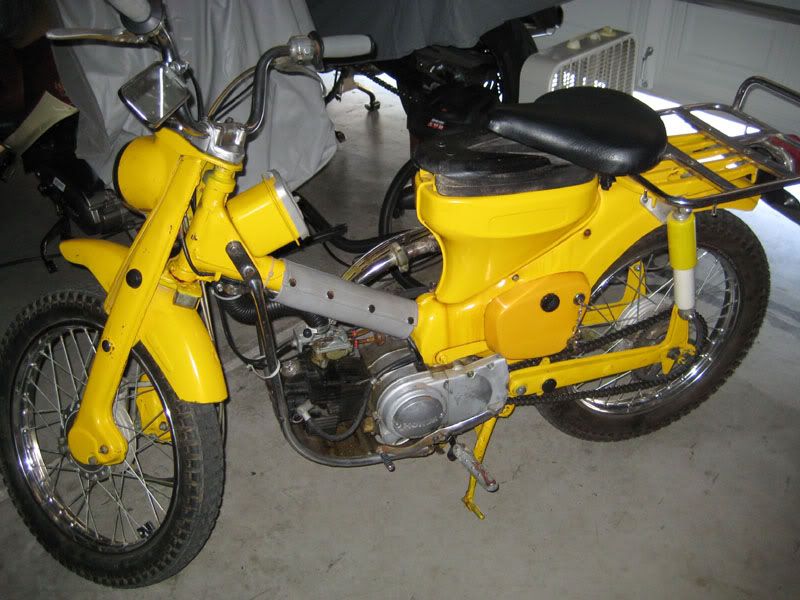
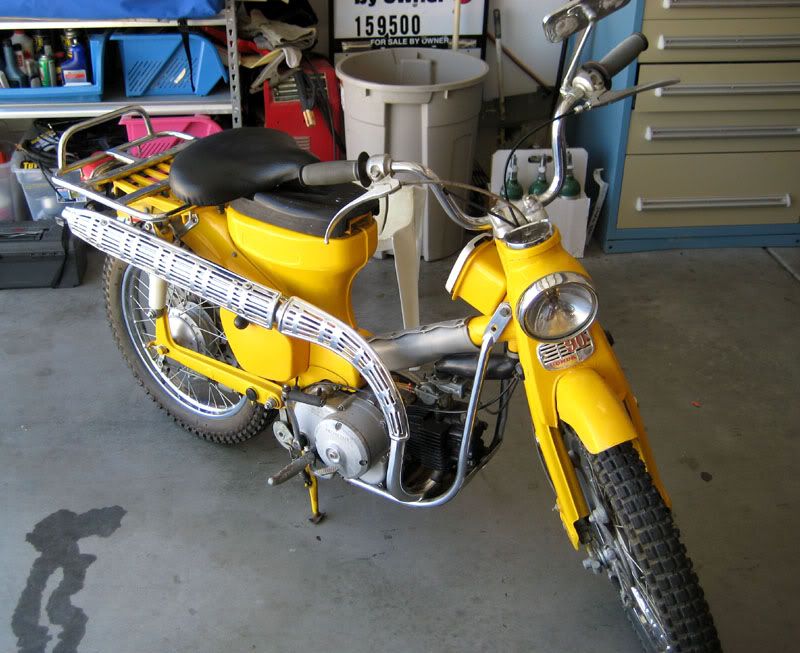
Ready! Close your eyes! OPEN! Can you believe I picked up this restored 1967 Honda CT90 for that price. It starts on the 1st kick and really goes on those 8 gears. Only needs some minor maintenance cause the original owner just drove it off and on 3200 miles. So even though it hauls and the compression on the kick feels good, Ill be going through the entire maintenance check. How cool is that! I know your silence speaks volumes.. [/img] [/img]
What an awesome find! That Honda is beautiful, I am a Honda fanboy for sure, so extreme amounts of jealously on my part. Love the style, love the color, you win
"Only the curious have, if they live, a tale worth telling at all" Alastair Reid
Well I was wrong about 1 thing, its not a 1967 but a 1965. The owner has two and the second he wasn't selling, I got them mixed up in my head. When I got home I noticed the title, VIN and frame number all matched up as 1965. That means its the 2nd year production model Honda CT90.
Below the CL advertisement posted last night at 9:40PM, I was there at 8am the next day. http://mohave.craigslist.org/for/2378178664.html
I just downloaded the original shop manual from japan which is 167 pages of the most detailed information of not just repair but dimensional, electrical, tolerances, schematics even dyno performance chart for HP and torque curves. The displacement is actually 89.6CC with 8.2:1 compression producing 8HP and 5.3 foot Lbs of torque @ 6000 RPM for a max speed of 60 MPH in high 4 gears. When you switch to the 4 low gears for off-road the HP and Torque or what they call driving force just about doubles but speed is cut in half. The free manual from ct90-ct110.com is amazingly detailed for being made 50 years ago, actually the last reprint of 1977 but still the 40 years ago there manuals for USA were impeccably detailed (no copy rights, expired). http://www.vintagehonda.net/docs/honda90sm.pdf
My very first bike was a 1969 Honda ct70 with a very similar exhaust set up. I was 11 years old and rode that thing like crazy on the farm. They are fantastic machines. I rode mine constantly at full throttle and don't recall ever changing the oil. These pics sure remind me of my first. Thanks for sharing.
Standard boat cushions fit nicely on there as well, but it looks like this one came out before Honda added the passenger footpeg brackets that my 1970 had.
Actually my best friend in CA restores them from rusted scratch (CT70's, CT90"s CT110's) so he put the small bug in my head but I don't like restoring vehicles from scratch, Id rather pay twice as much and get something that already runs. I have avoided what I have seen so far these years on craiglist cause they were none working projects and ebay wants fortune and have bidding wars. So when I saw this before going to bed pop-up on craiglist I just had to call the guy and show up next morning with cash. I tried to haggle him down to $700 but he only came down $25 so I said to myself I did not drive 65 miles to not do this deal.
At $775 Im consider myself blessed with a great deal
Thanks and everyone for the kind comments I have not responded too. I decided to change oil which was pretty black with Klotz MX4 racing oil (all I use in cycles) and the engine really quieted down allot. Before you could hear the cam chain and cam roller ringing away, a common sound I was told. I can stiil hear it and the tappets (need adjustment) but no longer complaining. That oil was old. Tires (brand new) only had 15PSI so I filled them to 25 PSI and the bike ran so much better and was able to roar around the neighborhood up hills & down hills with no problems as longs as I hit the shift sequence correctly and on time, opposite of my other motorcycles being "neutral" all the way up (top) and gears 1 through 4 in succession down, allot of fun and amazed that for being 46 years old it rides so well and starts on just 1 kick. Next I plan to adjust the valves and true the front spokes wheel which is slightly off. I also need to order a new drive chain with 2 master links and an extension to drive the optional large off-road sprocket, as the gap measurement between links indicates it overdue for replacement.
Little by little Ill perfect those little mechanical things that are near "run-out" to like new tolerance, the mechanical things things that most would not notice visually but are on the mind of a wrencher.
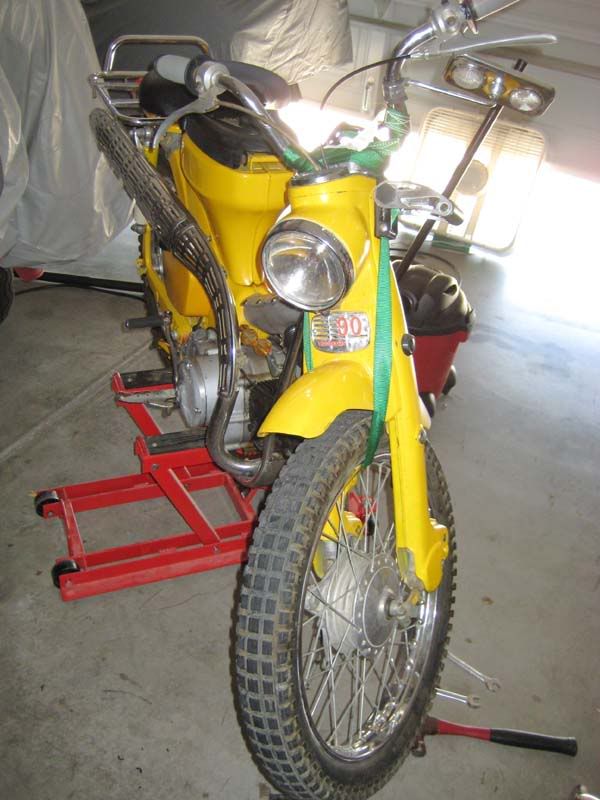
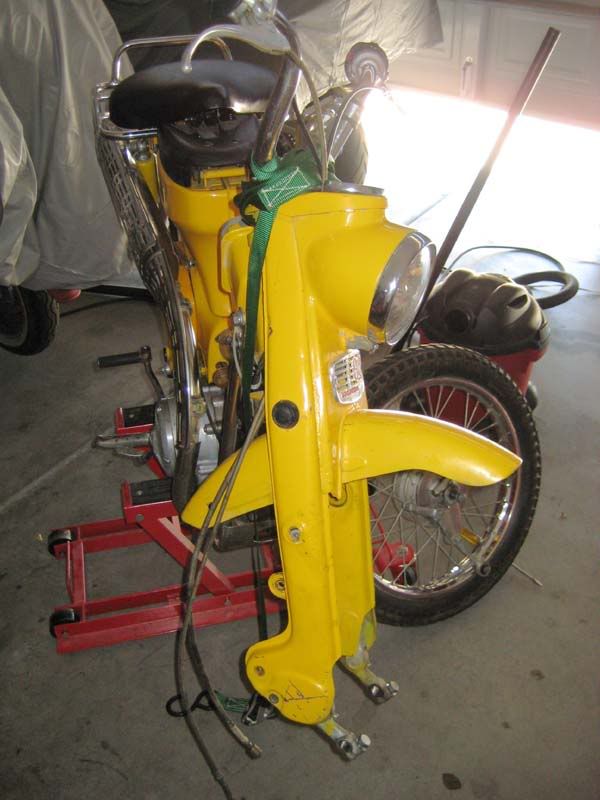
Been a little while since I posted on my 46 year old vintage scoot. Even though it was somewhat restored by privious owners, in reality it spent more time just sitting in storage for decades with only a few things fixed here & there. So even though it been rideable the process continues. I found out that becasue in 1964 when bike were titled by year sold that its a year older model a Honda 90 trail CT200 and why the VIN number only 6 numbers long much smaller then later models. Cutting to the chase things I have replaced.
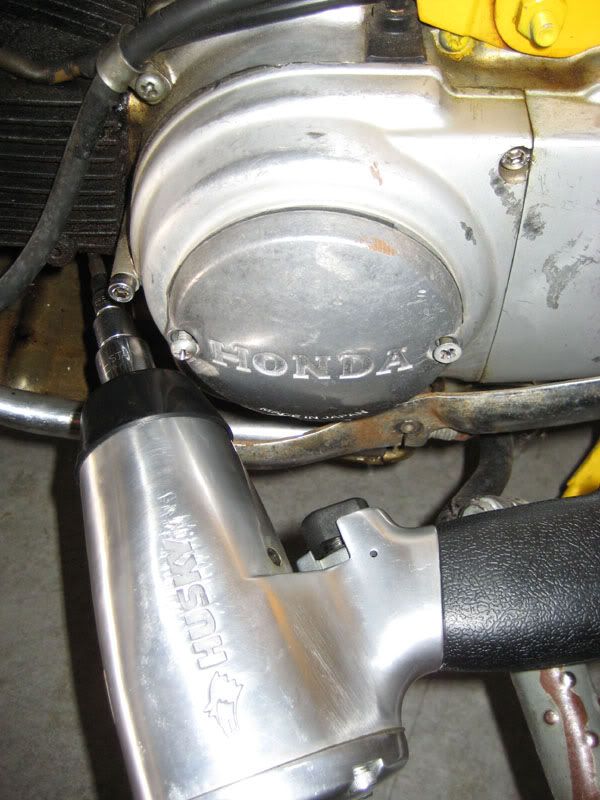
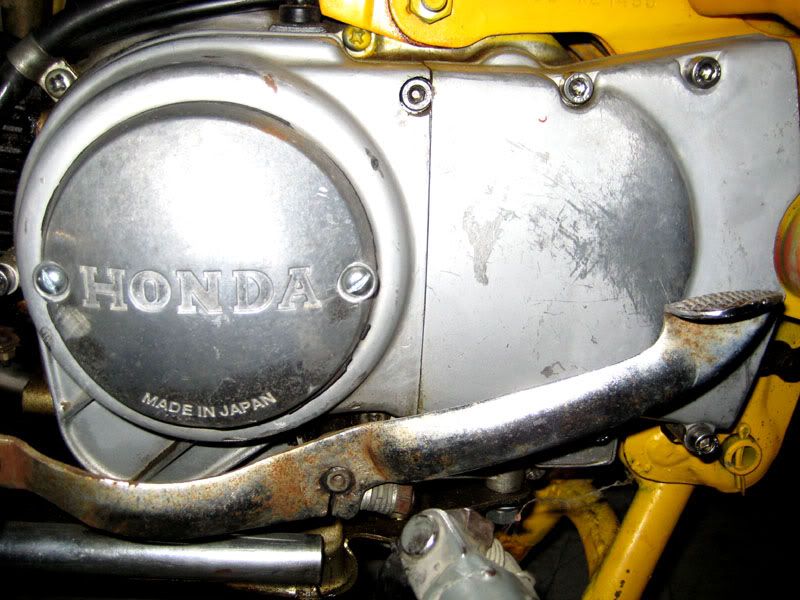
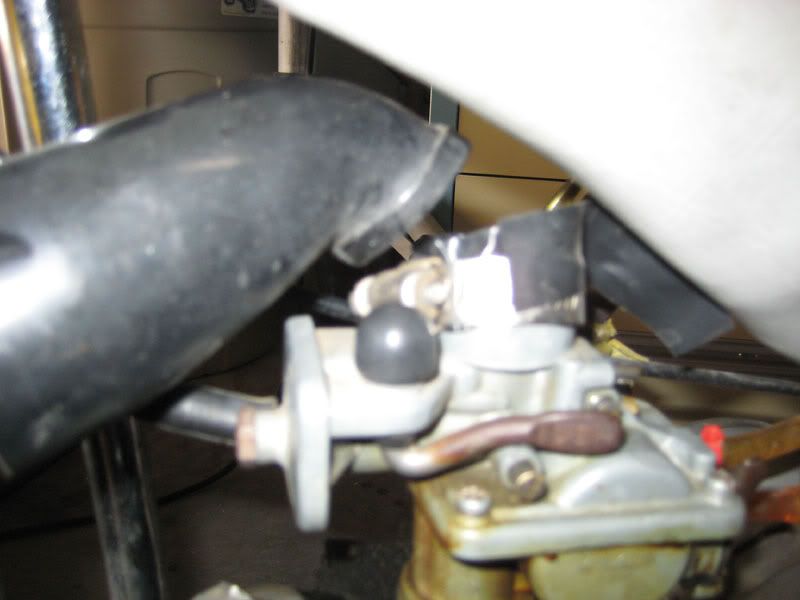
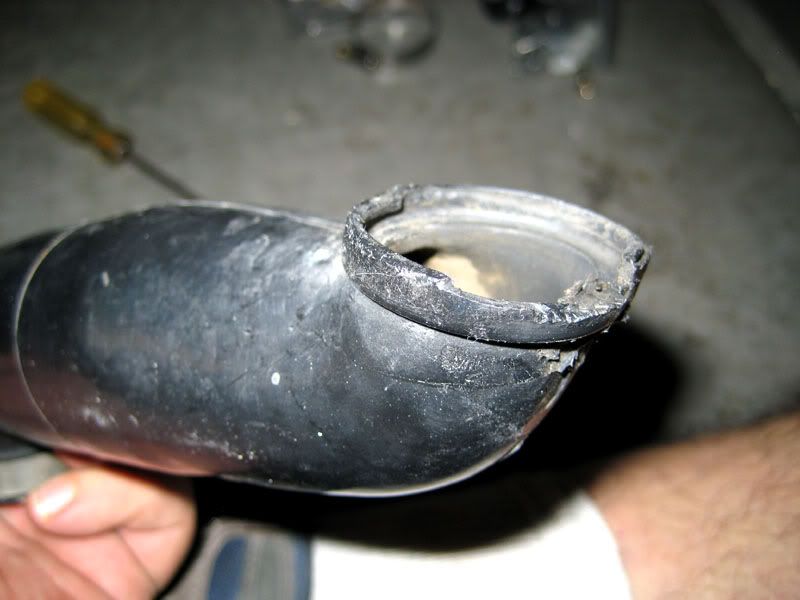
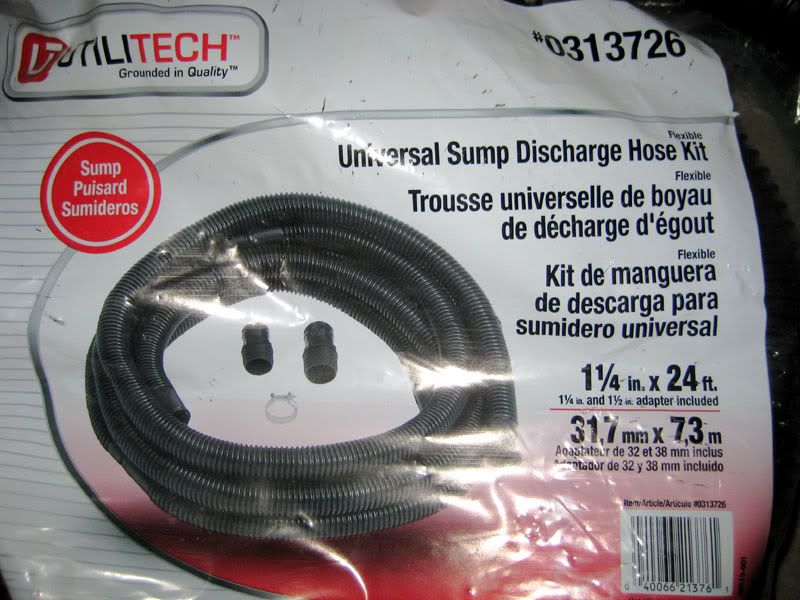
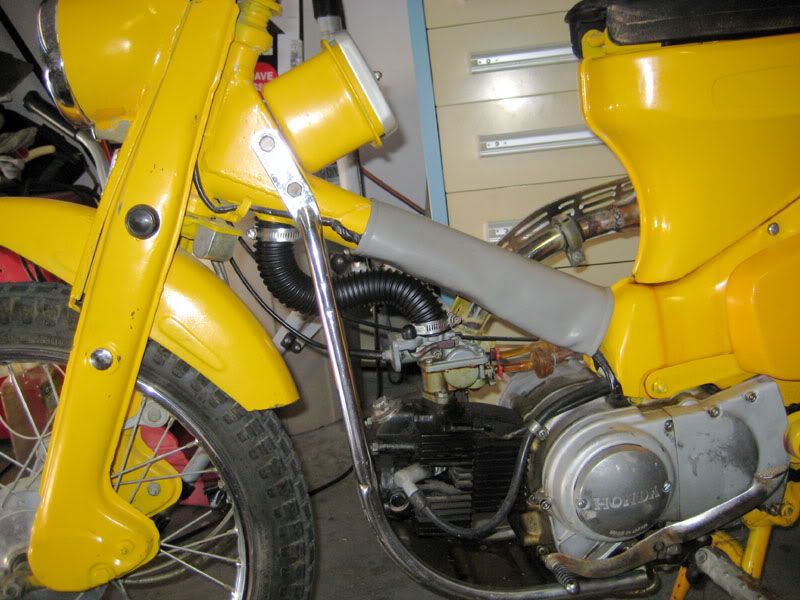
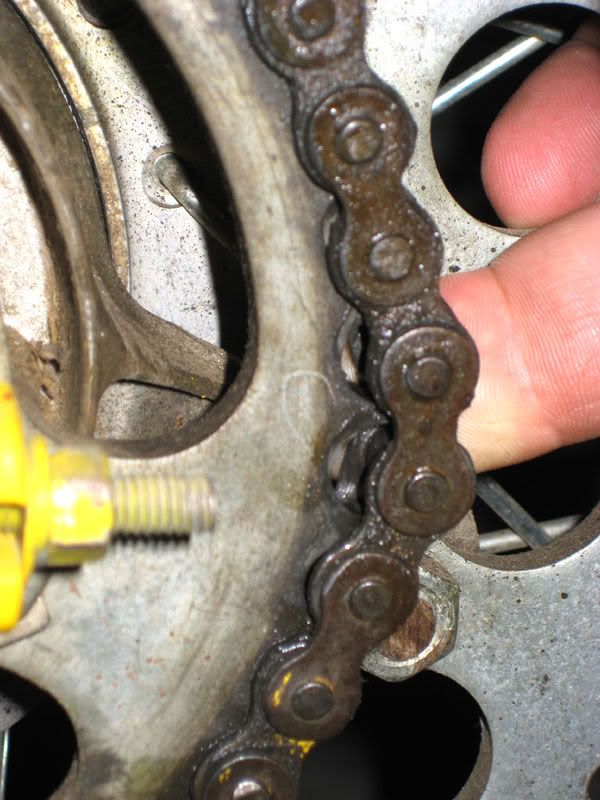
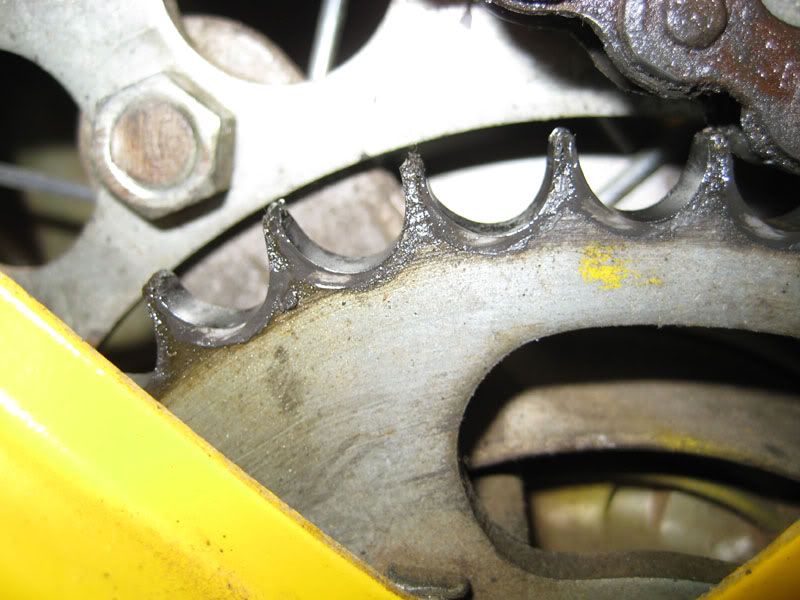
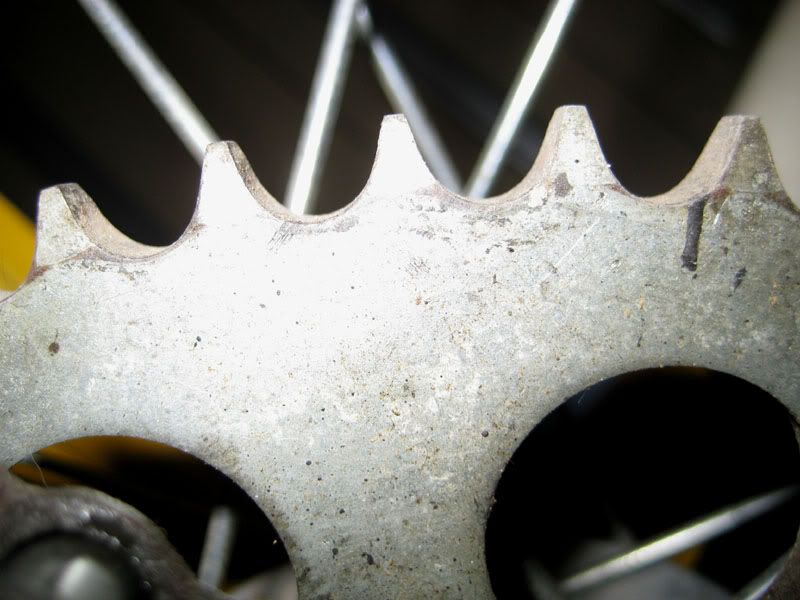
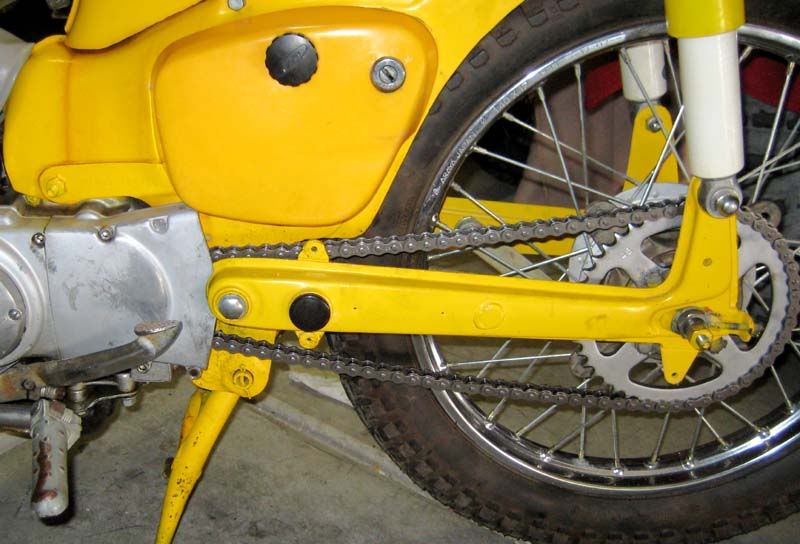
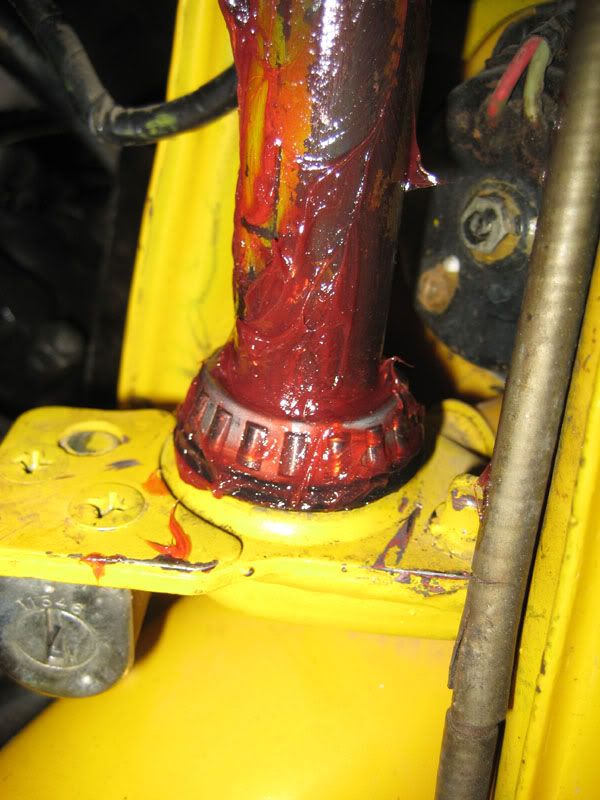
All of the old side case Phillip-screws which were head-striped so that you couldn't hardly remove or replaced them properly have been replaced with either stainless-steel Allen head bolts or new screws out of my old nut & bolt box, I knew all those years of collecting good discarded screws would come in handy. The last two suborn screws covering the dynamo/points only gave up using my pneumatic impact wrench, they gave up without a fight even though the threads themselves were partially stripped. Why the privious owner would use wrong thread screws Ill never know, but after using the correct size thread bold the new bolts worked fine. Another problem was the carburetor filter air plastic duct that had cracked ends so that the privious owner was using electricians tape to keep a seal which does not work. Until I can find a replacement or repair the old duct, I found that using a piece of 1.5" PVC corrugated sump hose that comes in 23 feet sections for $10 from Lowe's (I keep on hand for all my 100+ gallon aquarium sump filters) worked like it was made to be used for this purpose lol. Lastly for this entry I ordered and have received a new chain but noticed today as I was about to replaced the old that the rear sprocket teeth are also worn. As shown in the photo any time you can easily lift links off a tight chain at the rear of the sprocket at the 3'Oclock position it means the chain is badly worn but also in the photo you can see the narrowing of the Hwy 45 tooth sprocket teeth when compared to hardly use dirt 73 tooth off-road sprocket teeth. This means that both front and rear sprockets will have to be replaced otherwise the new chain would ware out very fast. That's all for this entry of the Yellow Banana CT200.
bluebuddygirl wrote:NICE! I like the new hose! And, you won't ever be tempted to wear shorts on that thing with that exhaust.
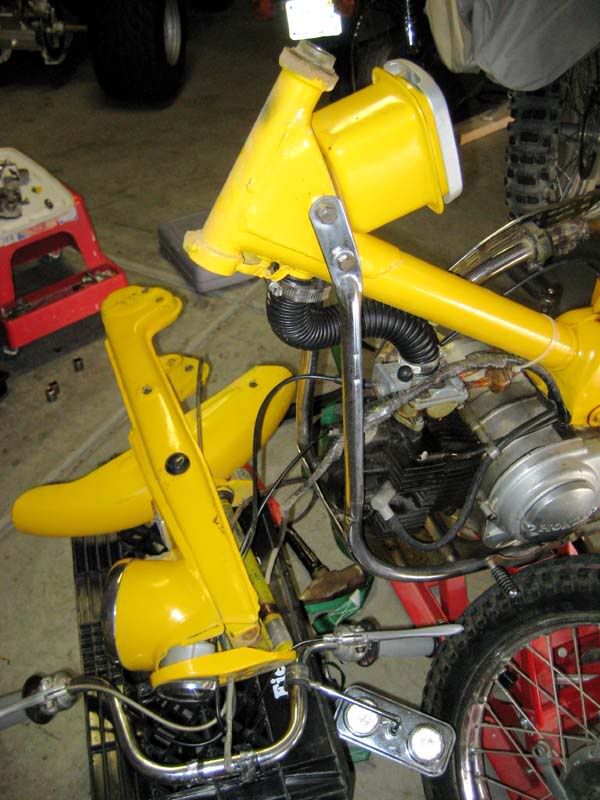
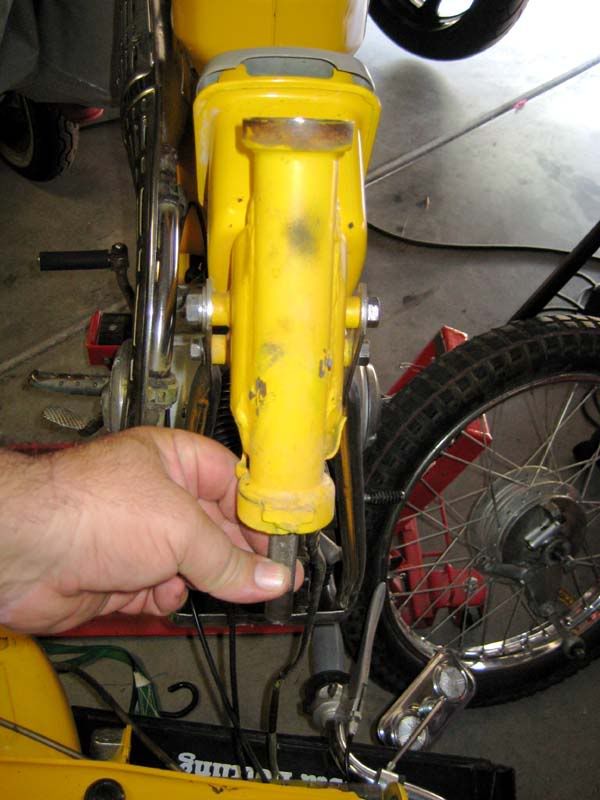
I think your mistaking this CT200 (89cc) with my other blue CT110 (110cc) that has no heat shield. Remember this was the 1st duel purpose scooter for on and off road so the high riding exhaust was and still is necessary. What your being fooled by is the chrome heat shield normally black plastic on most scooters today and only because plastic is cheaper but not durable. Even though made of metal works great never gets warm because it only has 3 attachment points to the hot exhaust and is slotted so heat is shed too fast to be stored. You have to remember even though at the time Japan was recovering from a WWII their technology and engineers were very advanced even back then they knew how to build machines as good as the USA and Britain.
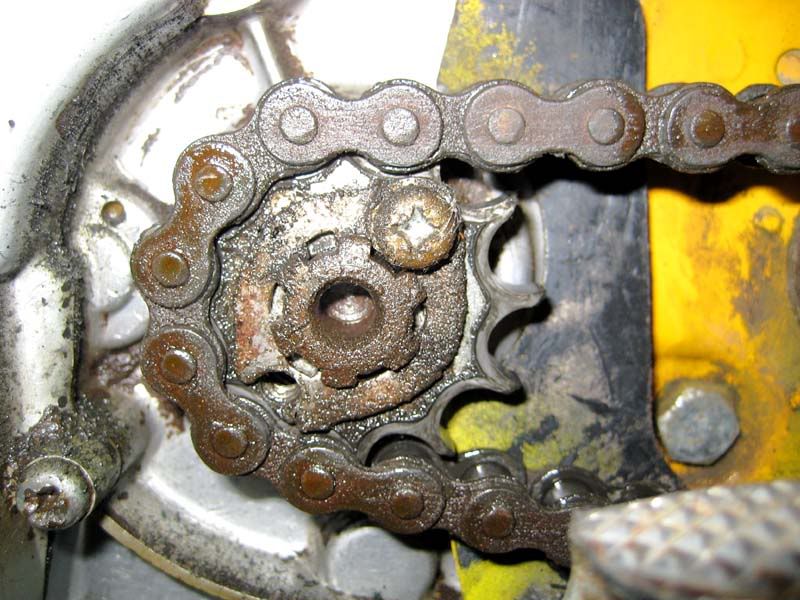
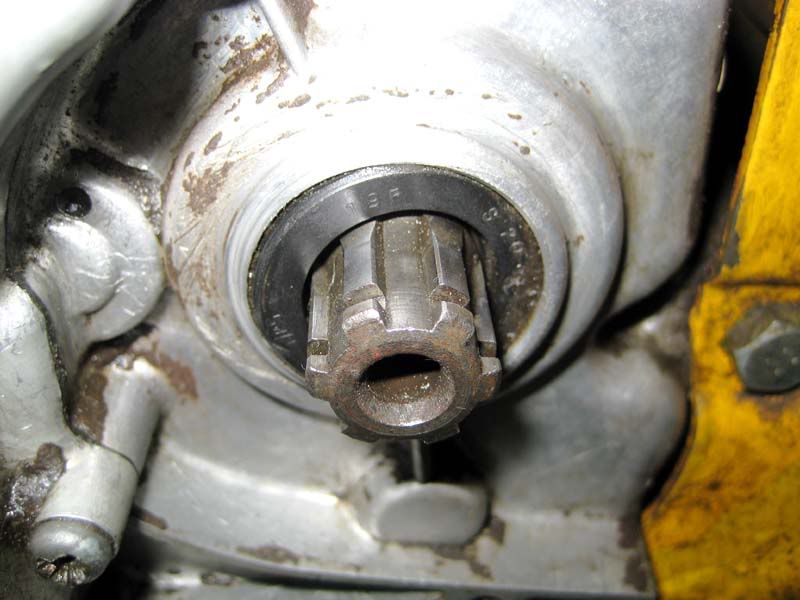
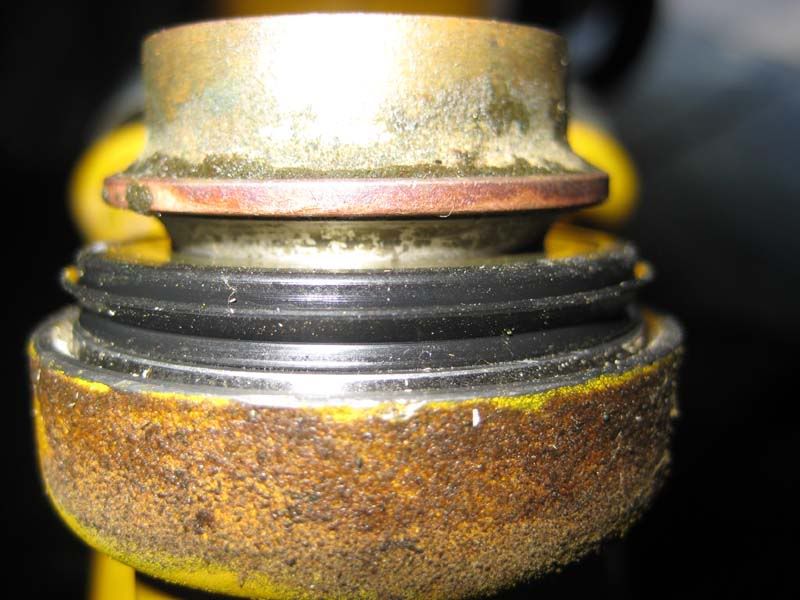
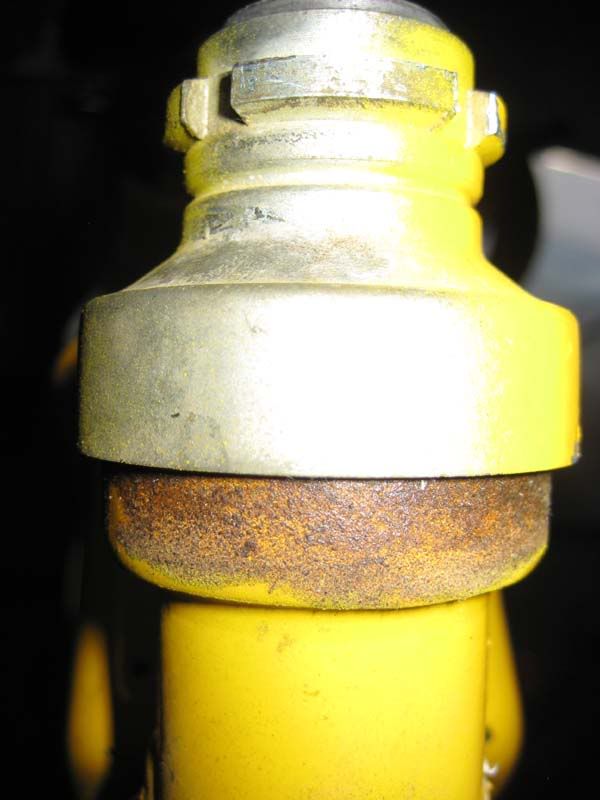
Having discovering that my recently purchased CT200 among other things has a very worn out chain and rear 40T (stock) sprocket. I decided to start shopping for what I needed. Purchased a new chain in the correct size and long enough with 2 links to drive both the rear 40T & 72T overlay off-road sprockets. Now to find a new 40T which I discover are almost impossible to find so I settle on an almost new 43 tooth rear becasue I think the bike will do well with a little lower gearing in my hilly neighborhood. Then I find a great deal on a stock 14T counter-shaft sprocket thinking surly there is no need to verify the size and condition of my counter-shaft sprocket, it must be worn and it must be stock. So just for the heck of it while I had my CT200 up on the bike jack to check the steering head bearing play, I decide to take the counter-shaft cover off. Well-well I do like surprises ...Not only is the counter-shaft sprocket severely worn with only 1 "screw" securing it in place, but after counting the teeth 3 times it is most definitely "A 12 TOOTH" sprocket!! Im telling you acquiring these 50 year old bikes is like buying a pickle-barrel, you never know whats inside till you get the lid off. Anyway my CT200 has a 12/40T (3.3 to 1 ratio) setup that needs replacing so I guess if I want a little lower gearing Ill go with the only new rear sprocket available sold at Beatrice in stock for the CT200 a 45 tooth rear sprocket and couple that with a 13 tooth which should give me 13/45 (3.46 to1 ratio). So I wont be able to use the off-road sprocket (no need), but at least I will have all new chain and sprockets that will give my just a little lower gearing I was looking for so I can go faster.
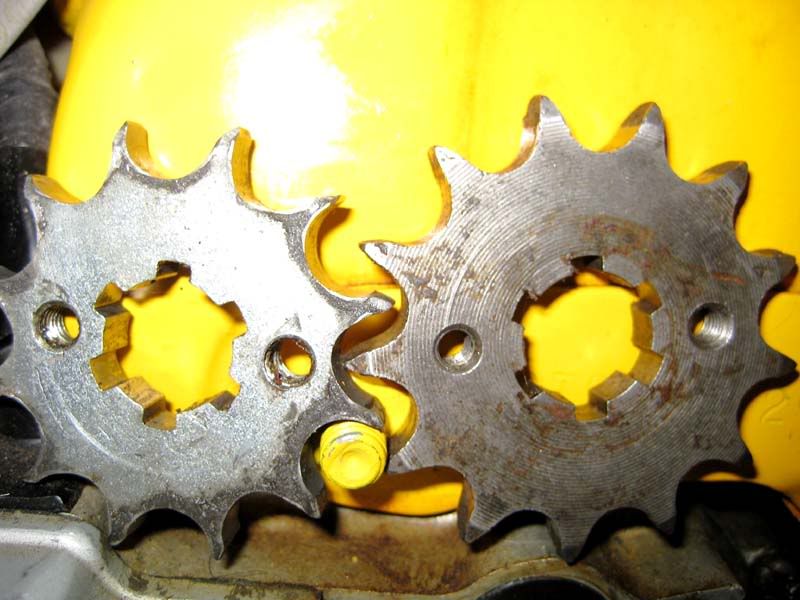
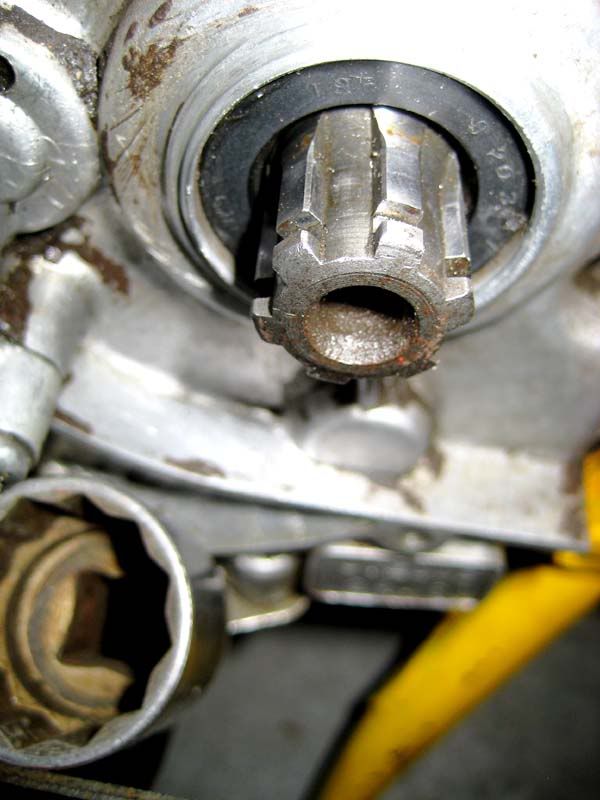
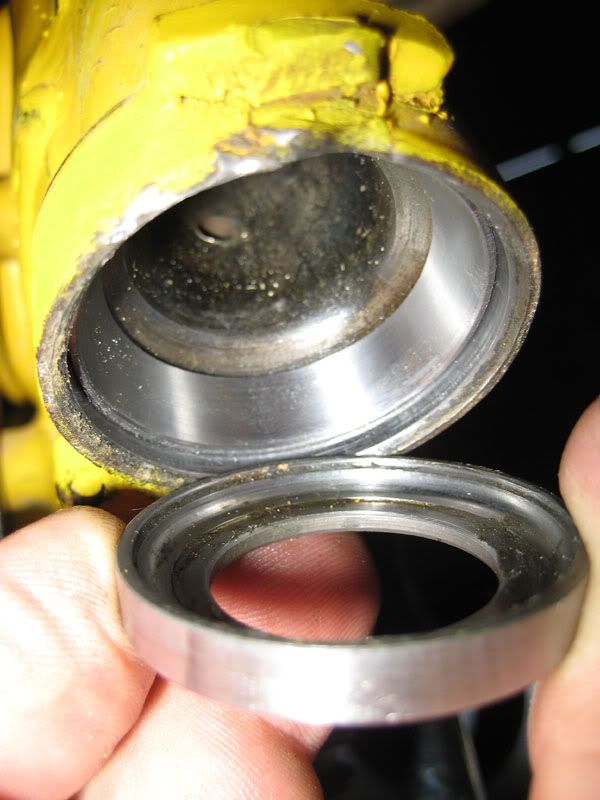
Now that my replacement used/good countershaft & new rear sprockets, and new drive chain have all arrived I decided to get started and install them. Removing the old countershaft sprocket I discover a poorly installed shaft seal. Note the difference between the totally worn out 12 tooth sprocket on the left and the used/good sprocket on the right. There was only one small Phillips screw holding the sprocket retaining washer on. Also note the surprise of the shaft seal not leaking but installed unevenly with one side pushed in deep and the other end sticking out. I cant imagine this is the normal seal seat position and wondering if the end sticking out can merely be tapped in even using a socket. Whoever worked on this bike before me was obviously well skilled in 3rd world handy-man skills lol.
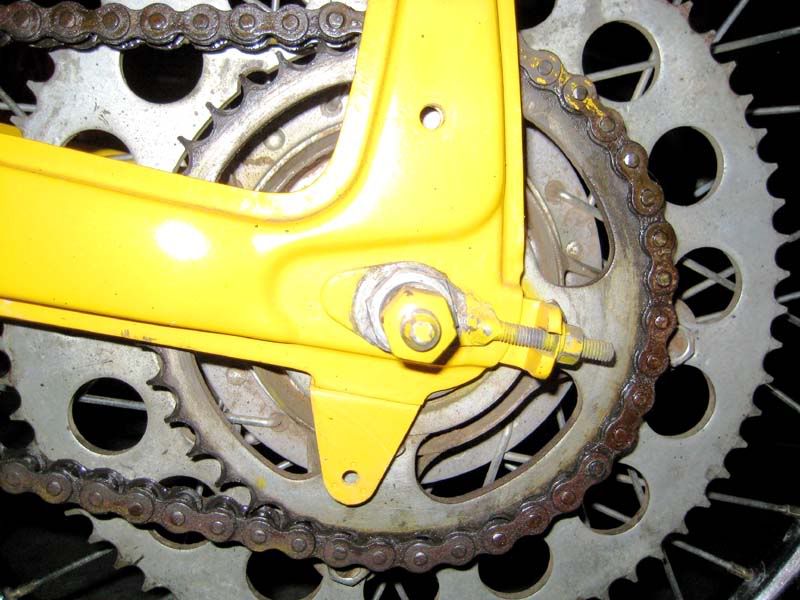
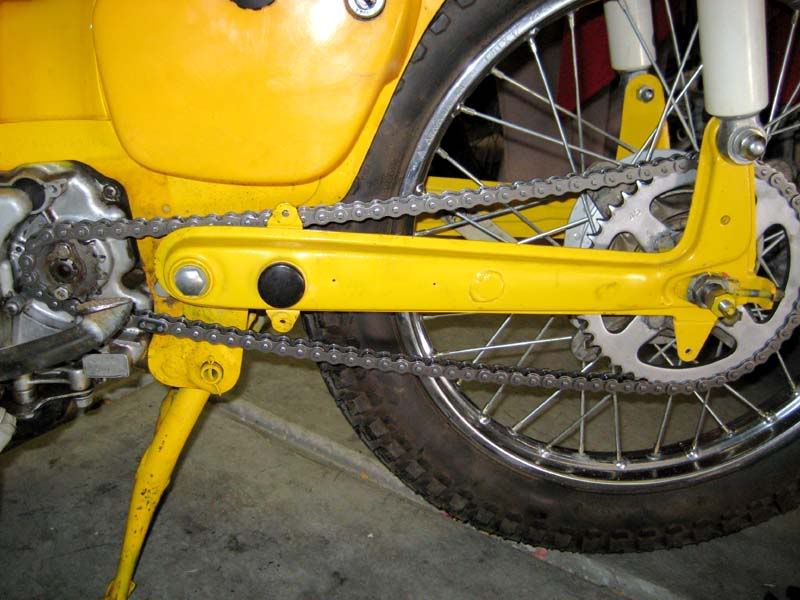
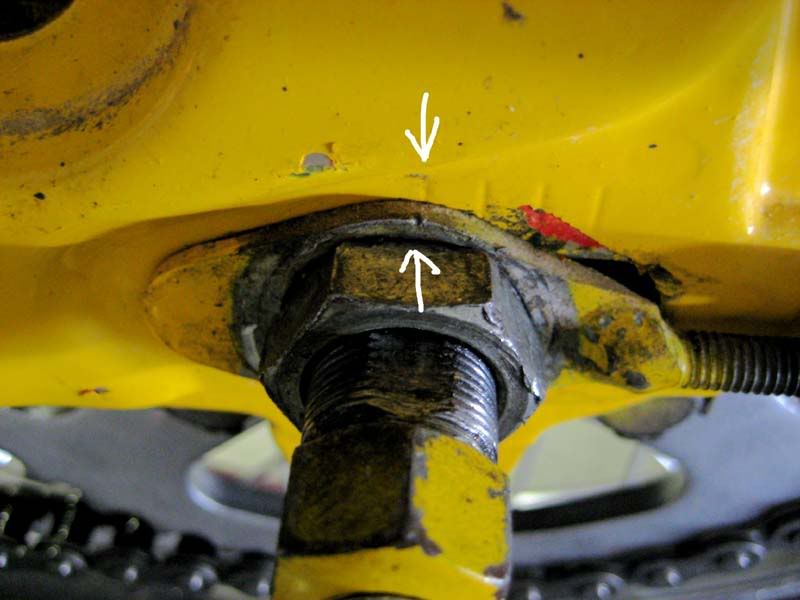
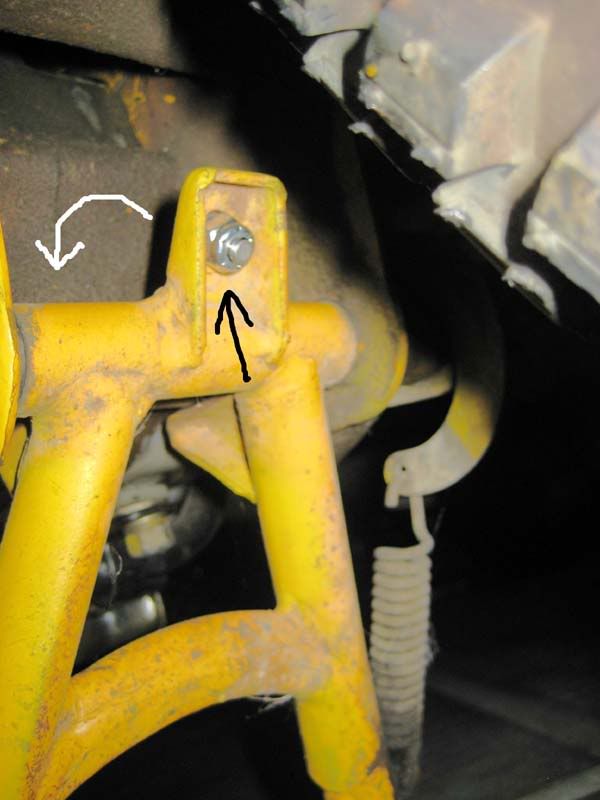
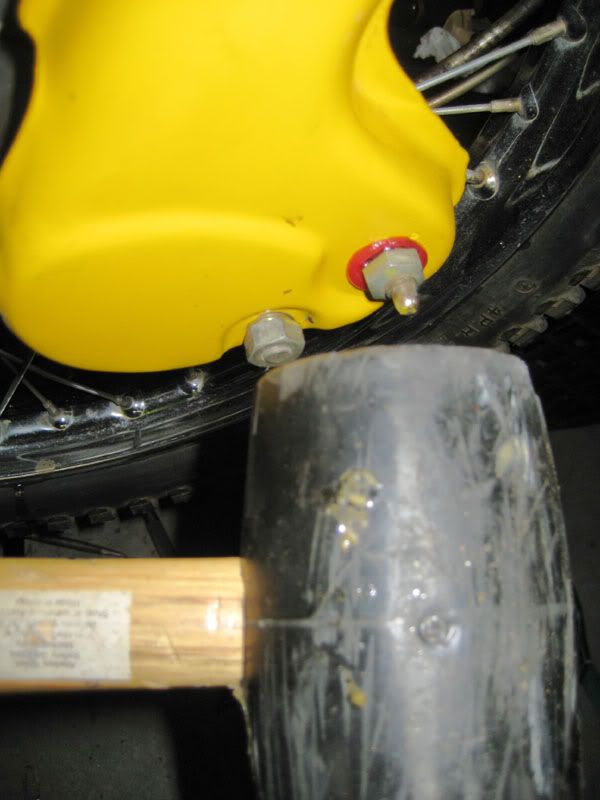
Well since I had nothing to lose I used the socket shown in the photo below and a 1 pound hammer to tap straiten the crooked shaft seal tapping it into place and it appears to have worked since its not leaking and is in all the way. I was now able to install both new front and rear sprockets with a new chain that I had to be broken to the correct length so that the new chain adjustment setting could be at the 1st adjustment marks on the swing-arm. Only problem is I broke the chain 1 link too short and had to place the new adjustment marks just forward of the 1st line so that it would fit and also have the required minimum chain slack. In addition becasue I had set the swing-arm adjustment marks to minimum rim/tire clearance, even though the tire had good clearance at the pivot of the swing-arm frame, the stand when retracted rubbed the tire slightly. To alleviate this I had to install a nut & bolt on the stand where a bump-stop once had been installed to limit slamming and provide clearance for this exact cause. Note the arrows in the photo below show the bolt and locking nut installed near the stand pivot point and how when the stand is retracted the nut and bolt provide the clearance needed for tire movement. Below the CT90 scoot new chain/sprockets and ratio are ready to test out. I plan to make my own full length chain guards out of plywood or aluminum sheeting, later. For now time to get ready for the 4th festivities and Fireworks on the Colorado River
procket006.jpg[/IMG]
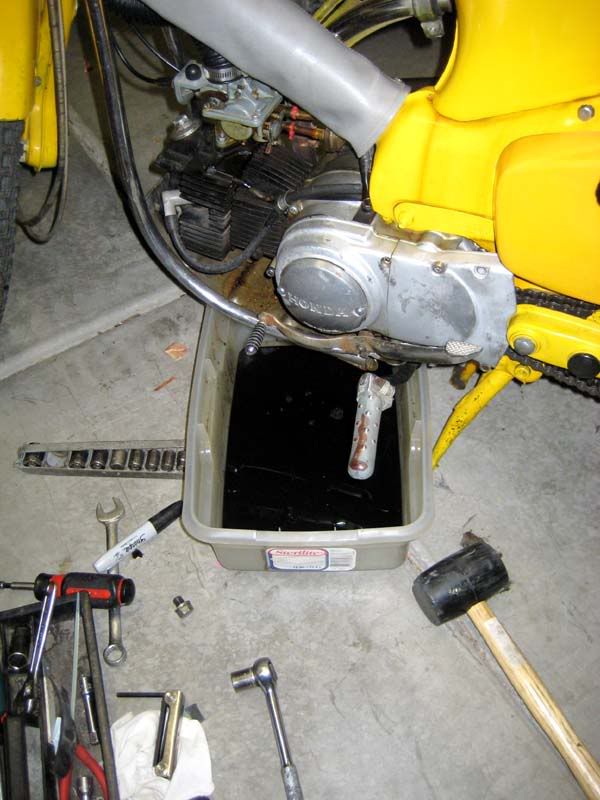
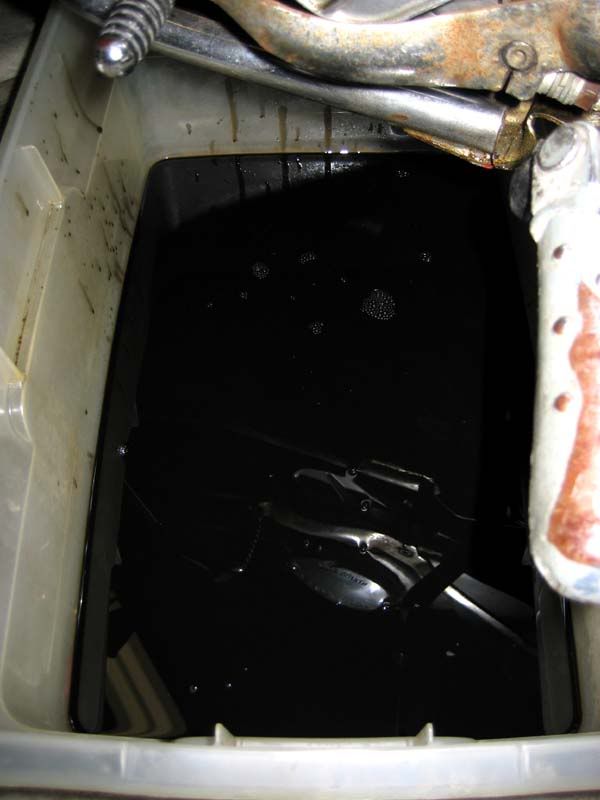
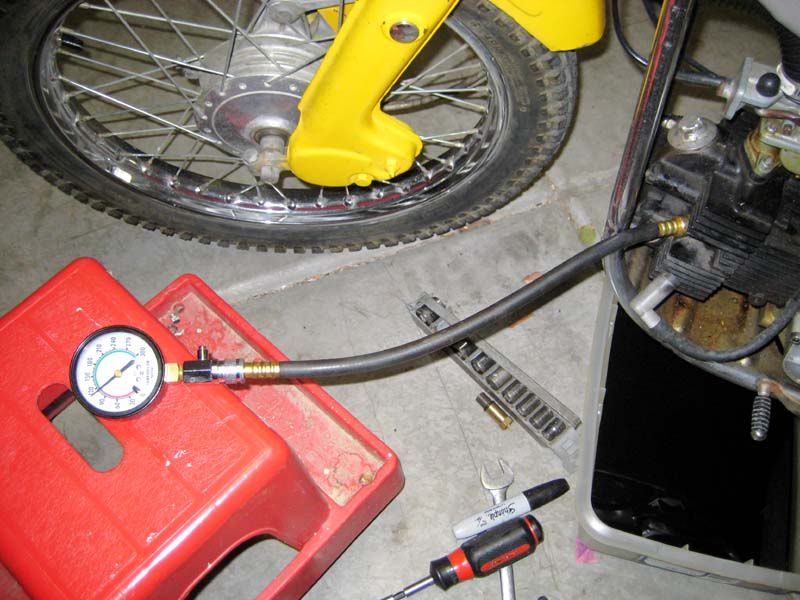
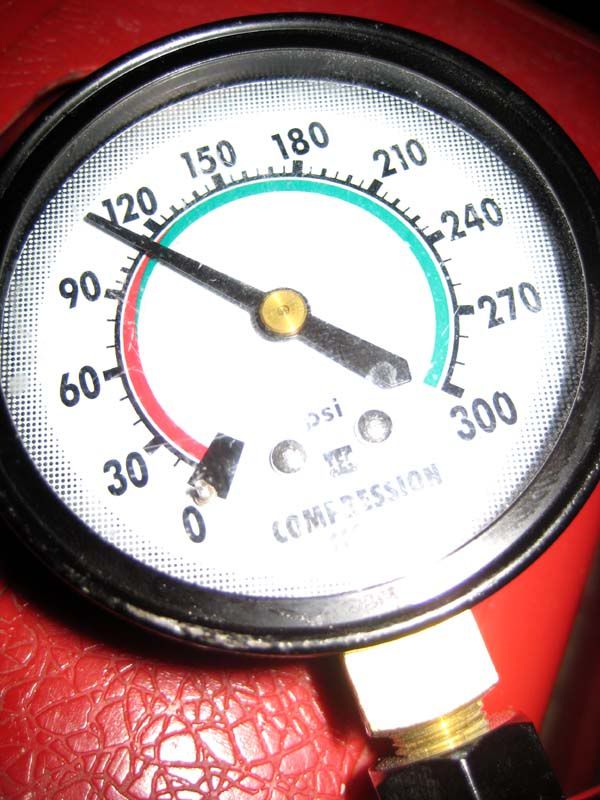
After managing to get it running right again decided before I start on the steering bearings and fork springs, might as well change the oil that I believe has never been drained only added. I have seen dark oil before but never jet black oil and never thick as paint come out of any engine. It seemed strange that the engine when kick started felt to offer good piston resistance on the compression stroke from such dirty oil, so I decided to do a compression check. I really did not expect to get to 80 PSI by the looks of the oil but to my surprise it tested constantly 3 times at 110 PSI. Not exactly great but definitely good enough. I think the evidence of all the case screws needing replacing was an indicator that someone had gone in and rebuilt this engine but probubly never changed oil for even brake in period. This was a hot oil change and I let it drip overnight. If you have ever used large triangular drain containers as oil collectors then set them up on one corner to drain into a large funnel, its amazing how much gravity will pull out dirty oil given some time. Between hot drain, and overnight drip-dry, I think Ill be good to fill it up with MX4 the only oil I use in all my bikes as it really protects engines from failure and holds up against very extreme conditions (cold start/high temp/stress brakedown) and worth every bit of $8 per qt IMO. I realize unless Im willing to be perfect (Im not at the moment) by removing the engine supports to take off that dirty oil strainer which is probably chocked full of stuff, this is as close to perfect as Im going to get.
UPDATE: The following morning after adding new oil to my dripped drained crankcase, specifically Klotz MX4 race oil I took it out for a drive to fill up on gas. Man what a difference in the shifting and down shifting, so much smoother now and predictable. I diden't hit a false neutral even once and the bike shifted so much easier and in the right sequence each time. Of course I don't think its was so much the use of the brand oil I use as much as the removal of the many years old dirty oil that came out of there probubly helped allot with the clutch plates.
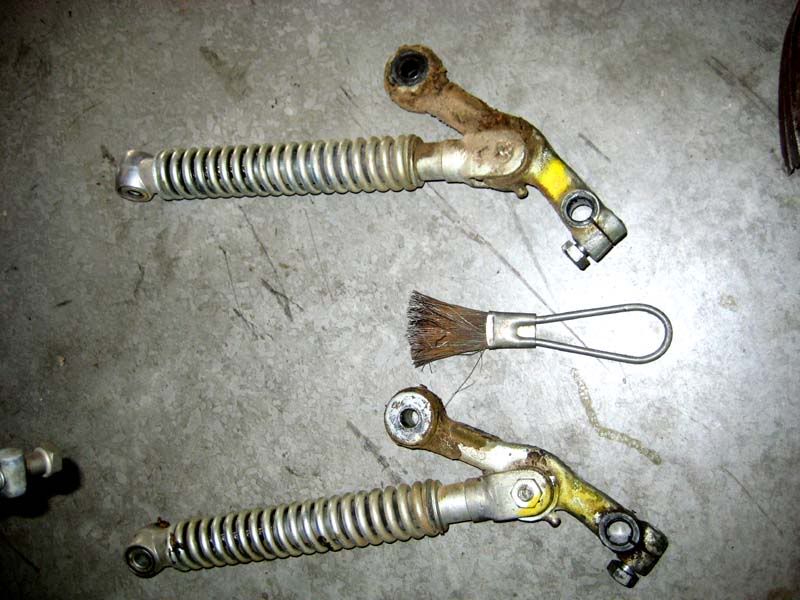
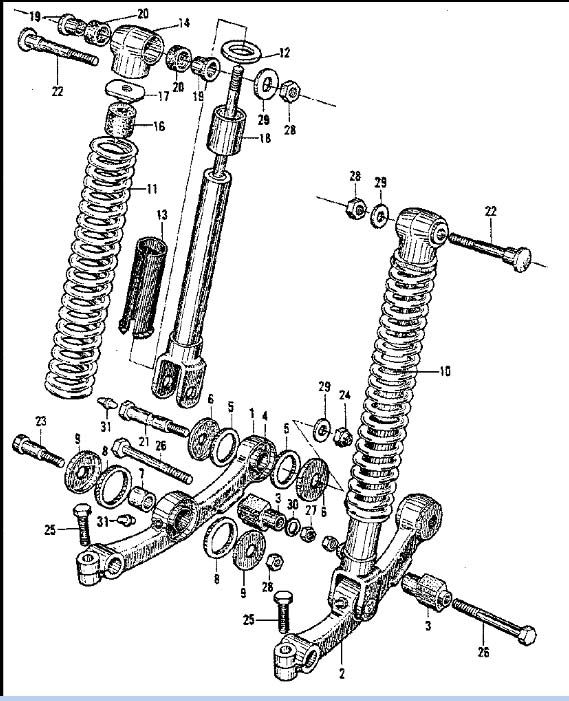
Since I Used procedures from a privious thread as a guideline I will only go into detail where I did things different. I decided to start out disassembling the leading-link by first compressing the suspension a ratchet-strap to take load off the pivot bolts for removal followed by removal of the front wheel and then the upper shock mounts, as seen below.
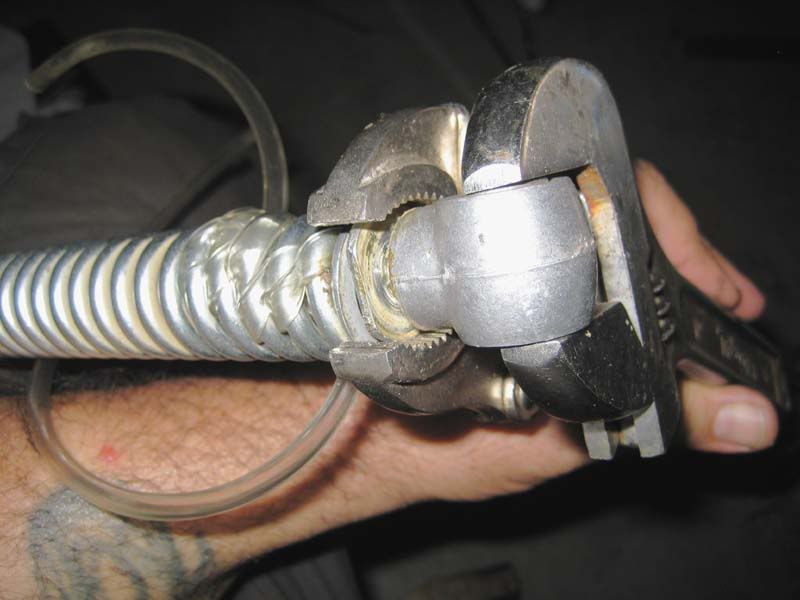
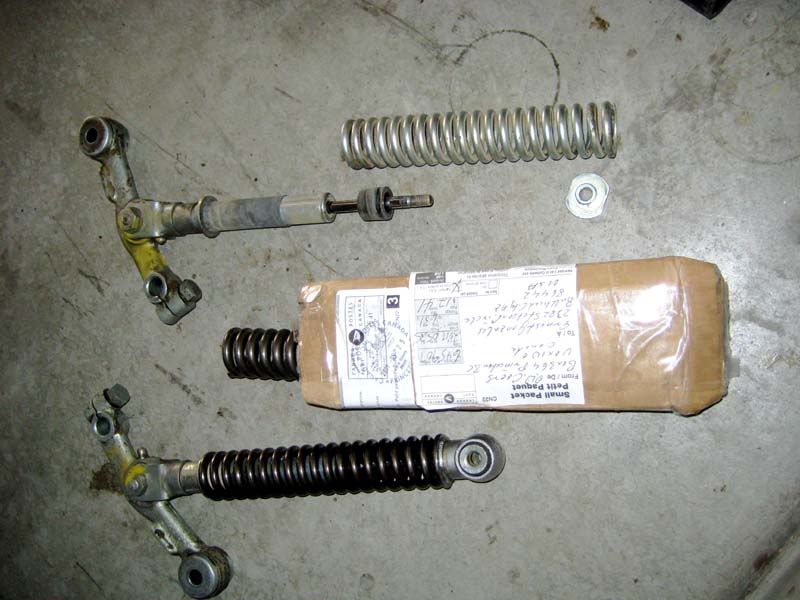
With the shock removed I used a hand-brush, rag and degreaser to clean them up for further disassembly. Then using aquarium hose to secure the shock plunger, pipe pliers to secure the threaded bushing, and adjustable wrench to unthread the mounting eye, the leading link was a breeze to disassemble. Then it was just a matter of installing Gizmo’s heavy duty springs and reassembly of the leading link as seen below.
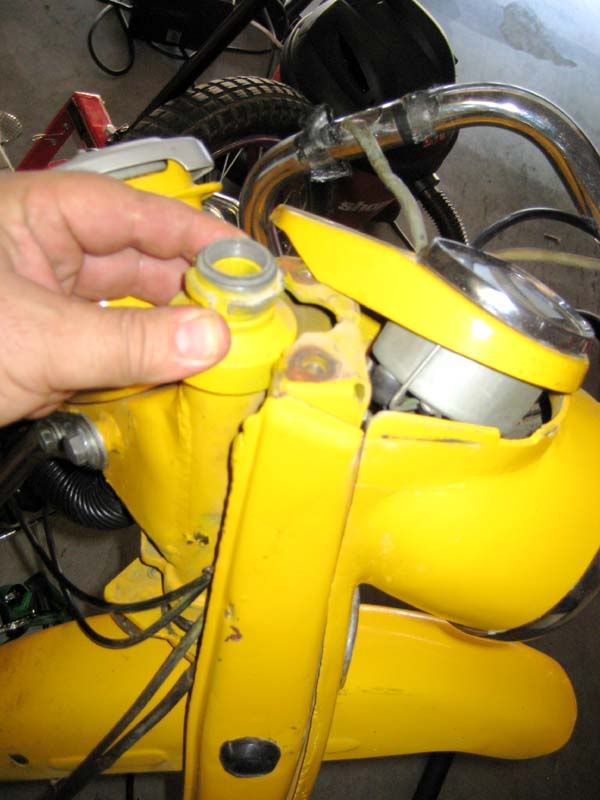
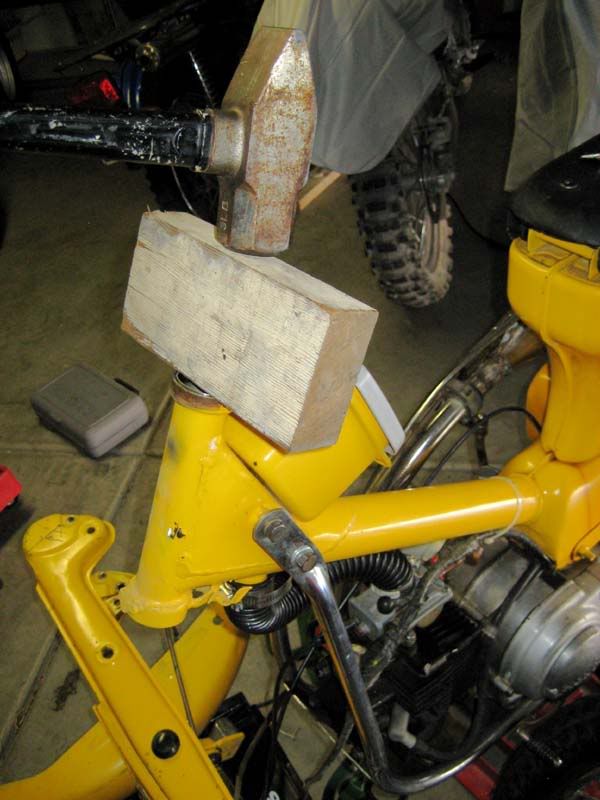
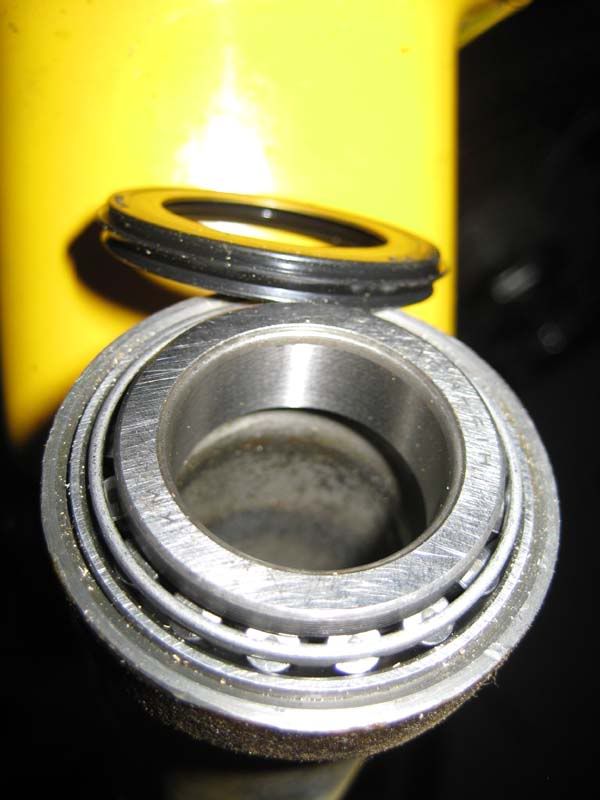
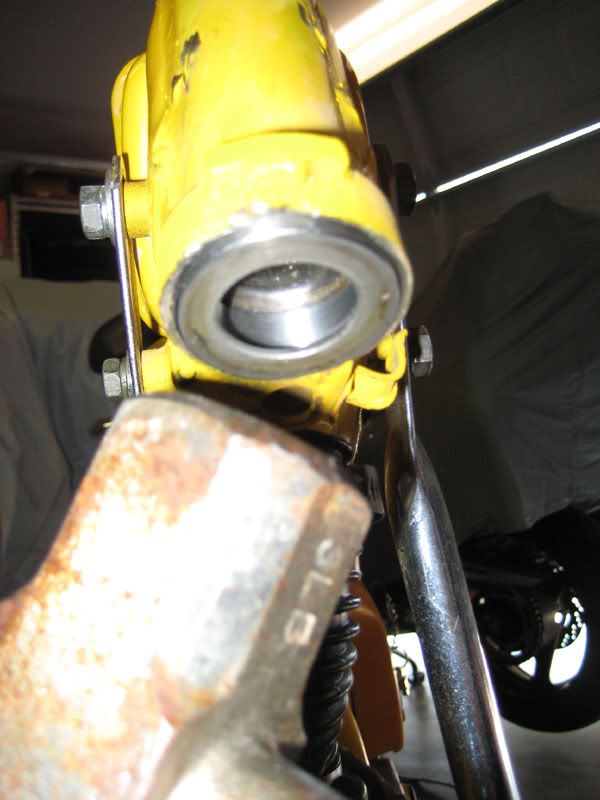
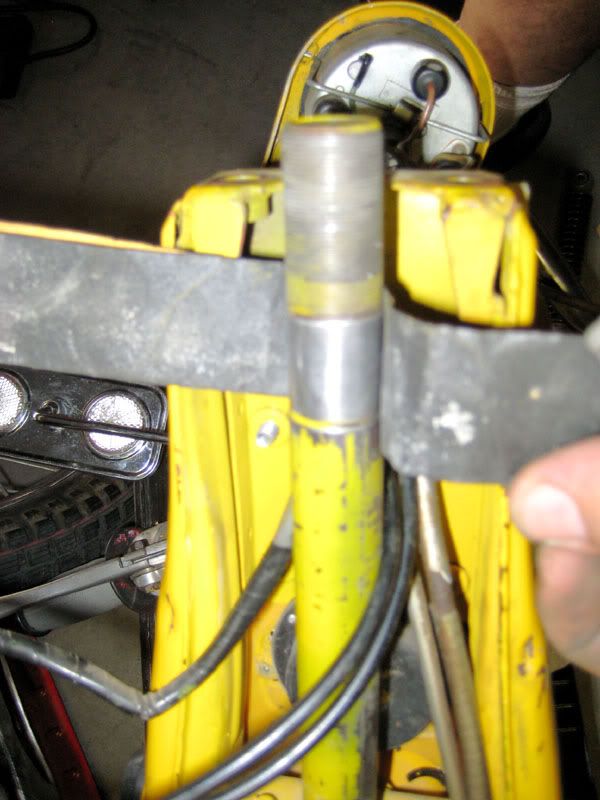
At this point it was time to pause the leading-link work and shift gears to install new steering stem bearings, hoping they would install as easily as the new springs and I will be discussing replacement of the top steering-stem bearing only as the bottom is identical. I made my first mistake by not properly testing the stock un-caged roller bearings for flat spots (none) and lateral slack which would indicate runout-wear and justified replacement (none). Caught up in the work I broke my number 1 rule “if not broke why fix it”. After I had already dropped out several ball bearings I realized the bearings and races were in good condition and that the lower castle nut only needed adjust-tightening “Doh!” Not wanting to try and put the cat (spilled bearings) back in the bag I decided to move forward through the arduous work of removing the handlebars, upper and lower castle nuts, and all fork cables and control wires which would have to be un-routed. All unnecessary extra work with the added risk of the new roller cage bearing not fitting properly resulting is more wasted time. Below to save work and time I found a secret way to drop out the steering stem without having to disconnect or un-rout any cable or wires and just lay the fork-stem on a box next to the steering head ready for quick reinstallation once the new bearings are installed.
Below I managed to knock-out the old bearing-races using a punch & hammer on the inside stem-shaft evenly, and the new roller-bearing races and seals seemed to fit inside easily using a 2X4 & hammer to drive them in (not the seals). However the old brass top race-bushing which also served as a spacer for the lower castle nut base, does not fit with the new bearings causing a 1 inch extended space preventing the top bearing hood from protecting the bearing from weather.
So before I can proceed with the work or this post I need to collaborate with another CT200 owner who has already installed these steer-stem bearings.
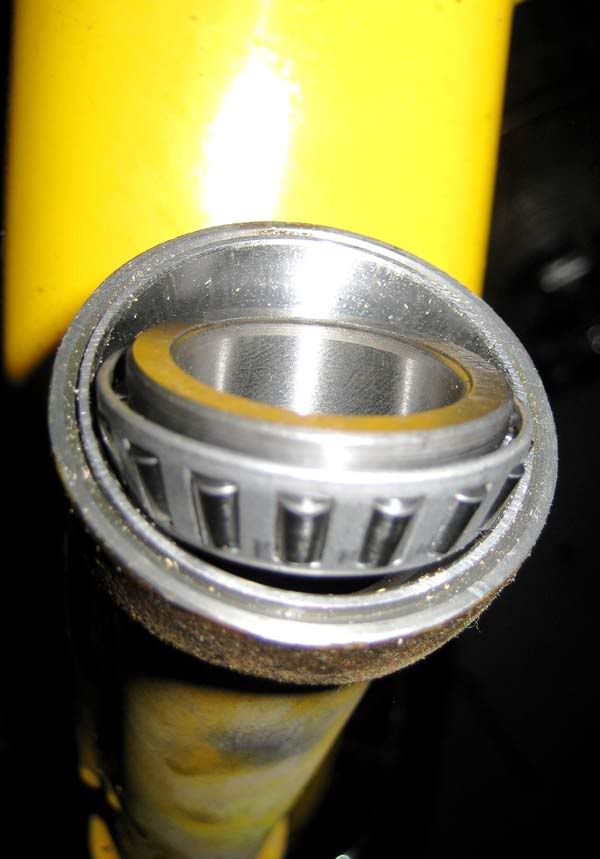
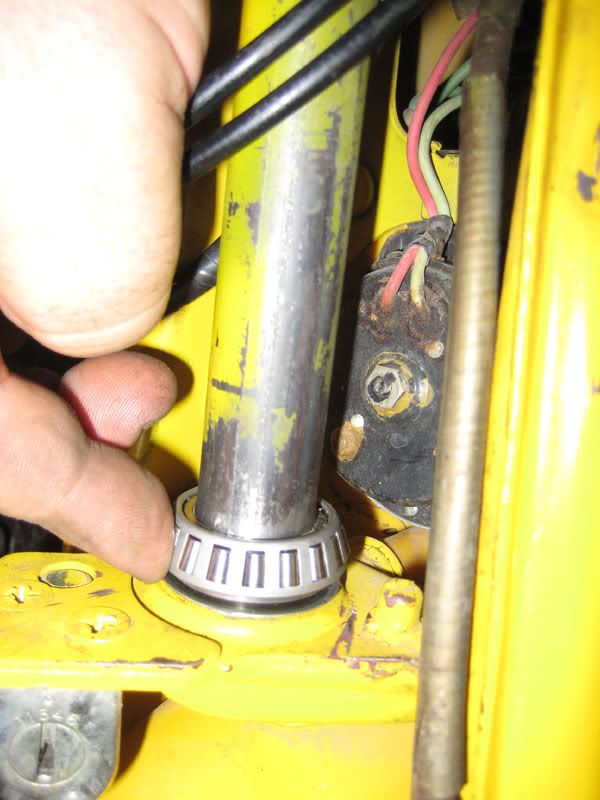
After a night sleep in contemplation I came up with the answer, what I do whenever Im stuck on a decision. Of-course my concern wasn't that I just thought that old brass "bushing/bearing race/spacer" had to be included for no apparent reason. That old brass bushing fits very snug in tolerance supporting the steering stem 1 inch in length while the new inner roller bearing races allow allot more orbital slack and is only 1/4 inch long, that slack I was concerned would translate into rattle or vibration requiring yet another dismantling procedure. Also the top of the new bearing doesn't quite fit the top hood castle-nut base and will probubly bend the hood cover a little when tightened into place, hopefully without consequence. But I realized that since the bottom stem bearing (not shown) does not use a similar brass bushing only the old bearing race, perhaps the new inner bearing races will do the job of bushing just fine albeit not as snug. As usual the good Lord has given me the guidance on this one as well and I believe I have it figured out.
I'm cautiously optimistic that the combination of replacing both springs and bearing will yield a notable difference in handling, we will see and I will reveal the results in my next anticipated post.
Well then you have probubly never ridden a Dual-sport, Enduro, or MX motorcycle becasue that is exactly how close to your leg ALL off-road motorcycles/scooter exhaust systems have been designed from the late 1950's to the present, an industry standard for off-road use. The simplest way to explain it is the heat shield insulates the body from burns the same way plastic insulation on your extension cords keep your hands from receiving a fatal electrical shock, its the simple law of universal physics by the creator.
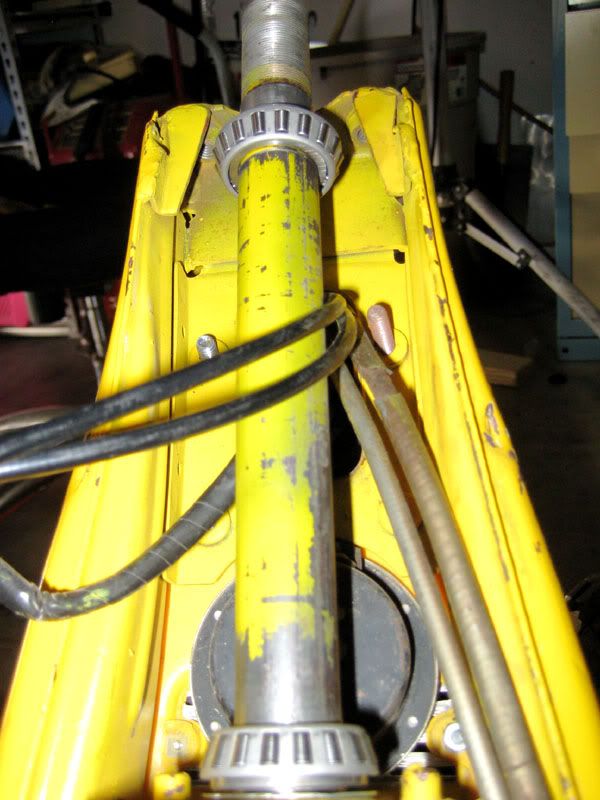
When I last posted I was concerned about the need to use some of the old bearing parts on the steering stem with respect to spacing and sizing. What I didn’t realize was that the new upper/lower “INNER” bearing inner races are actually different in size to fit snuggly on the upper and lower steering-stem which is larger at the bottom then the top. This to keep the top bearing race from slipping down, note in the photo below the difference in wall thickness of the “INNER” race of the bearing. This is the only difference as the bearing themselves and “OUTER” races are identical. Imagine my confusion when I had them switches and the top bearing was loose and the bottom would not fit lol. Noted here those new like me don’t have to rediscover this difference on their own. In my last post I had hammered in to top outer bearing race into the steer-stem receiver with no additional room for depth it fit flush. Below the lower steer-stem receiver is almost twice a deep and besides the use of a wood block and hammer requires the use of the old outer bearing race to plant it all the way inside to the base, not doing this would mean non-fit when reassembled so is required. The large 3 pound hammer is used because when “tapped” lightly has the inertia due to weight to move the race in without having to swing.
Next we move on to “INNER” race/bearings/seals and their respective placement on the steering stem itself. Below I first clean the area when the bearing INNER races will seat so that they go on smoothly. Then I set in place the lower and upper INNER races/bearing/seals respectively to make sure they fit properly and I don’t have to struggle later when trying to place the front forks over the stem. Note that the lower race/bearing/seal will remain and wait for the forks to be placed over. I grease both bearings and stem confident that the new seals will prevent leaking and they do.
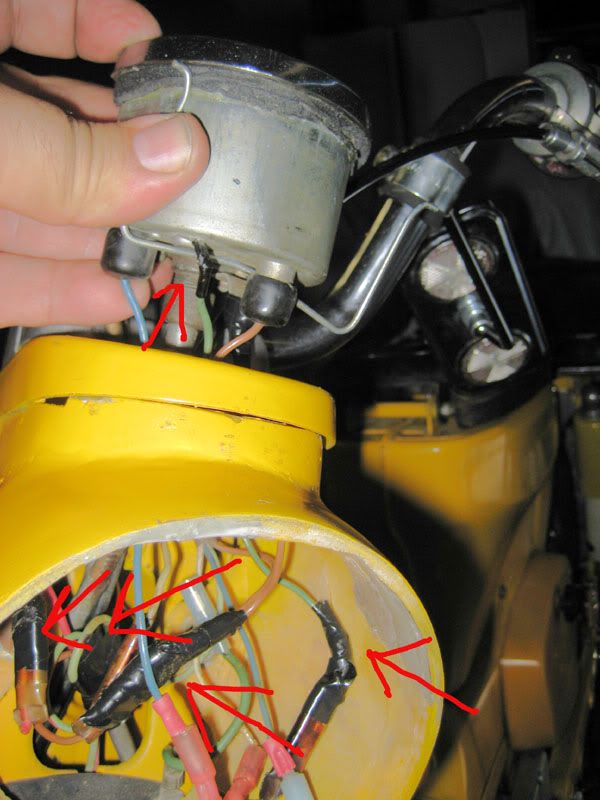
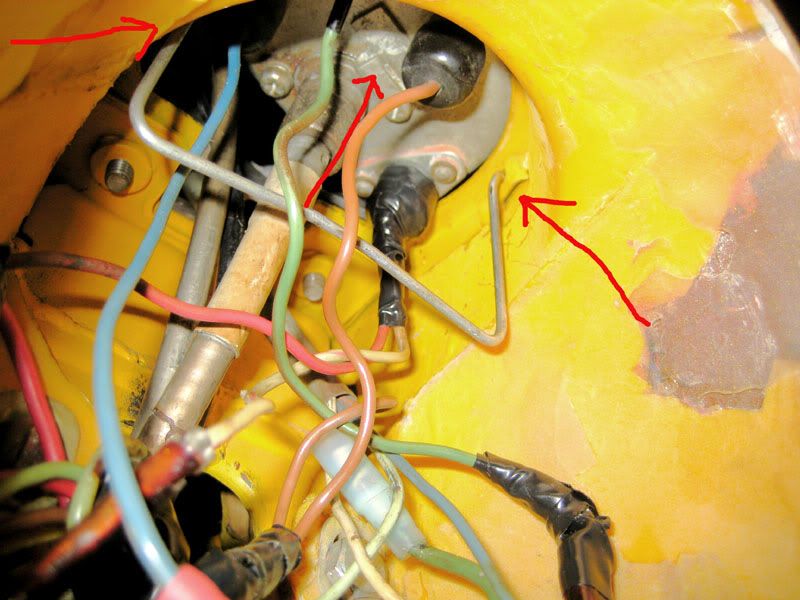
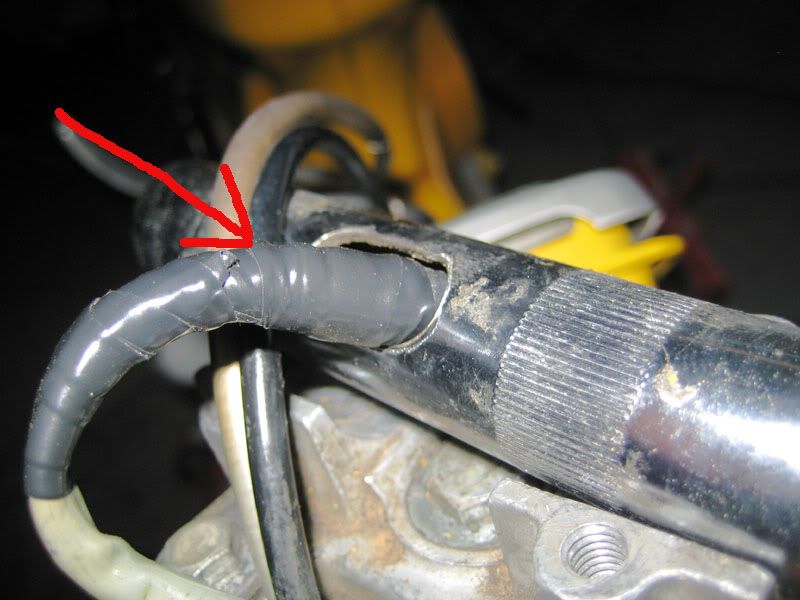
At this point the next step of replacing the forks over the top of the steering stem and tightening down the castle bolts, speedo-housing and handlebar plate assembly is the same as when disassembled and elementary, just don’t forget ant parts. When I would like to cover below are things I found frustrating. Removing the headlamp to figure out how the speedo is held in was a puzzle. Below you see there is a wire clip that hangs in 2 holes and suspends the speedo via a clip at just the right height. Also being these bikes are 50 years old I could not help but notice all the bare wire connections from connectors that had lost their plastic. So I temporarily tapped them up to ID them for future replacement and insured good connections in the mean time. Also the handlebar bottom hole used as a conduit for many circuits has the inherent flaw of eventually fraying into wires, I tapped up to give added strength and insulation against a short.
With the steering stem bearings, castle bolts, speedo-housing and handlebar plate fully assembled, its time to reinstall the leading link suspension that has been rebuilt with new springs. First let me say that I discovered its very important to use a good schematic for reassembly as the bike being 50 years old has probably gone through many previous attempts at rebuilt and as a results many parts incorrectly reassembled and substituted with parts from different models years. Again with assembly being the same as disassembly I will cover only those things which I feel are important to mention and only 1 side of 1 leading link.
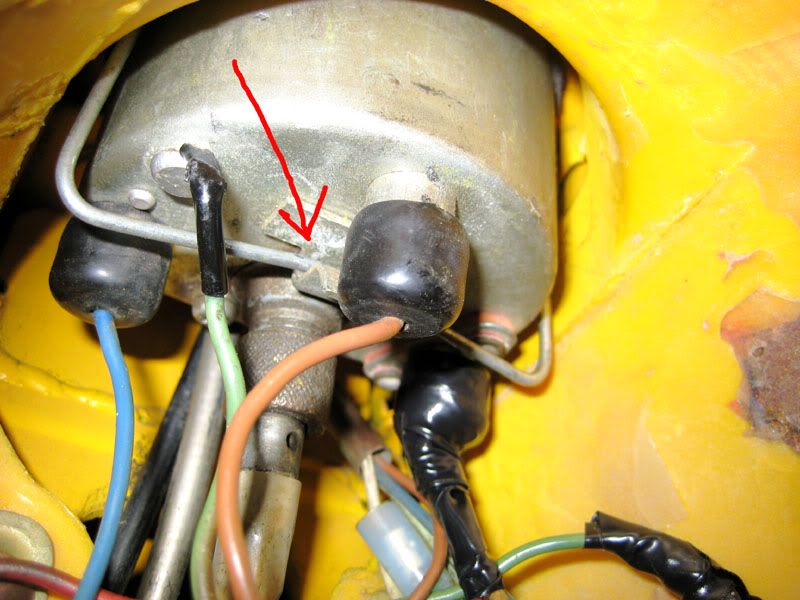
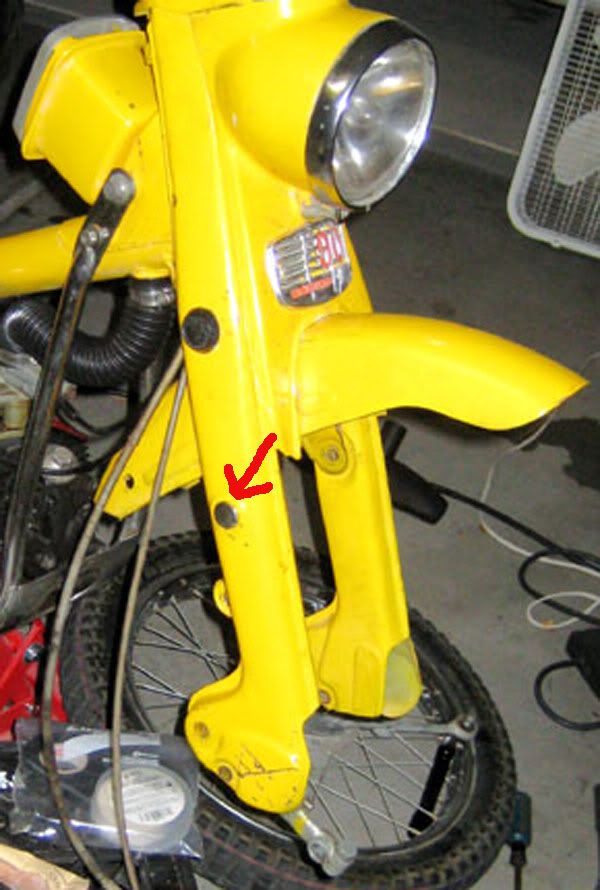
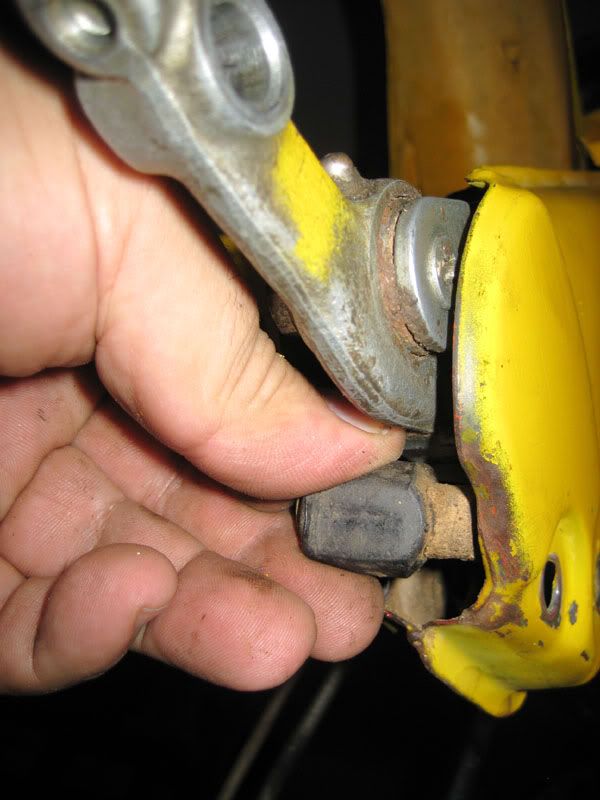
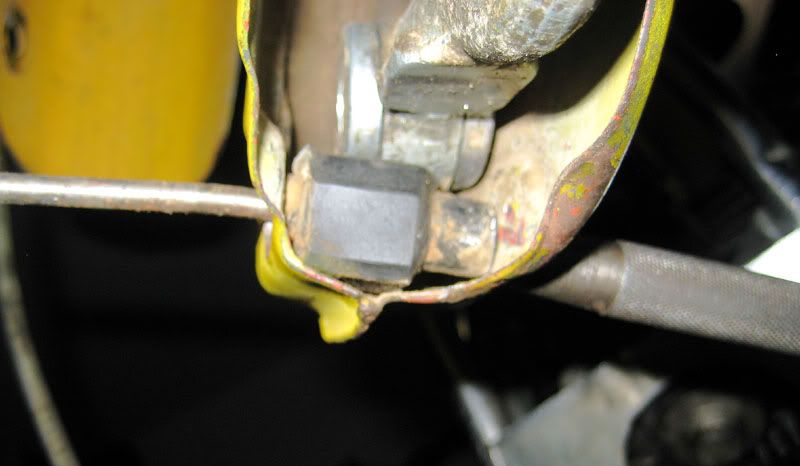
Reinserting the right leading link you first attach the top shock mount which is simple only needed to remember that that the outside facing bold (red arrow below) has only a keyway that locks into the fork housing so that the nut on the opposite side (not shown) can be tightened. Next is the link bump-stop bolt which I later discovered is actually always engage and presses against the link so it can pivot properly. So its important that the rubber stop makes the widest amount of contact with the link, placing them in backwards only uses 1.2 of the rubber stop deforming it. Below I set it in place tapping each side into to position using a long punch then use the punch to bring the holes of the bump stop and housing into alignment, then place the bolt through and tighten making sure the contact previous rubber contact point is in line with the link contact point.
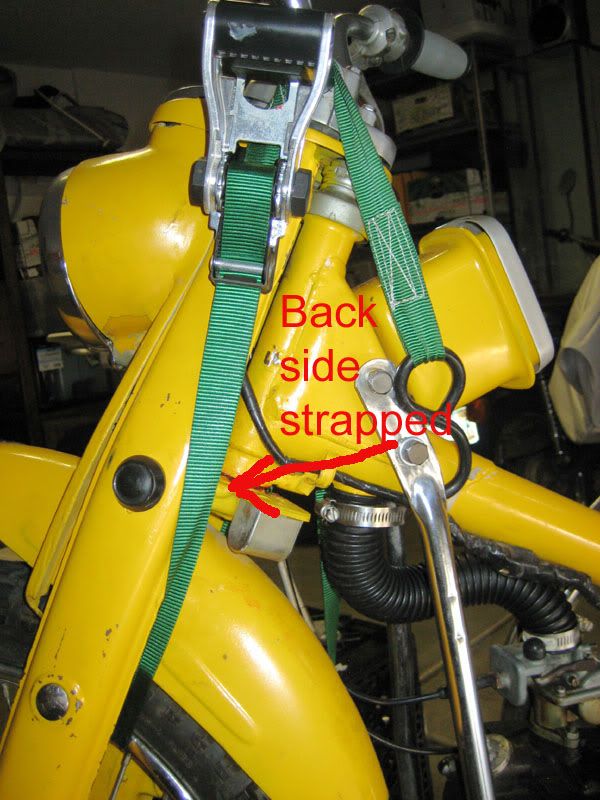
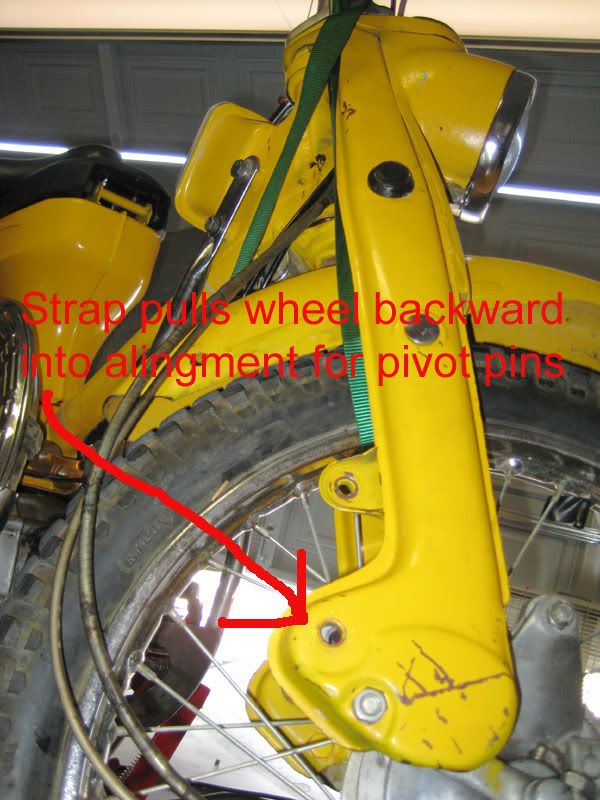
At this point the most difficult part will be reinstalling the pivot bolts which are under new spring pressure and will require a ratchet strap to compress the wheel against the fork link new springs. With the wheel reinstalled I found that placing the ratchet strap on the back side of the fork housing from the handlebars to the rim works fat better then having the strap in front. Having the strap on front not only compresses the springs but pulls the leading link back toward the frame which is needed to more easily align the holes and also protects the fragile fiberglass speedo housing from getting cracked from strap squeeze pressure.
Note below how under backside strap pressure the holes almost come into alignment without help, a punch from one side will then aligned the holes which you drive home using a mallet a pre-greased pivot pin.
Well that about covers the job of doing both the link springs and steer-stem bearings. The results were a very good improvement. The only problem I realized after I finished the job is that CT with leading link systems are so old that its sort of silly to replace the springs and bearings without replacing all the ling bushings as well which are pretty worn. After the job the steering felt so much better that I could actually feel the worn bushing giving flex and the spokes that needed tightening. The problem is where do you get replacement bushings unless you mold your own out of silicone sealant. That aside my CT200 is running better then ever and will be working on adjusting the tappets, timing chain, points, and carburetor.
Its been a while since I have posted and I suppose that happens on forums. Anyway got tired of the old Honda 90's after realizing that no matter how much I restored them, they are an old tech rides and at peek performance sluggish, heavy, handle like two wheel farm tractors and the reason why they were discontinued and technology moved on to far better machines. Sort of like using a sun dial as a time piece, cool looking but not very functional compared to a modern time piece. After restoring two of those boat anchor (300Lbs), I ended up selling them for $200 less then I paid for them lol. Lesson learned I don't quite look a old tech as fondly anymore no matter how attractive it looks. Far better to get a modern replica with all new tech IMO. I still have my 2012 Buddy 150 and the only thing that has failed is the speedo which melted because they put such a powerful hot lamp inside I guess.
Just for general interest, Honda CT90's around these parts sell for around $700-$3900. Even incomplete "project" bikes can sell for up to $800. The CT110 (what I want to get) goes for $1800-$3400. Yes, these bikes are funky and don't have much power nor do they handle very well, and the brakes are so-so, but that's just part of their charm.
The seller of this particular CT110 is asking $2600. A fair price considering it only has 1600 miles, is clean, and has a few factory options.
If you have the room to store it, it's always a good idea to keep an old tech vehicle around. Especially one that gets good gas mileage.
If we ever get hit with an EMP or massive solar flare, you'll be the only one in your neighborhood with an operating vehicle.
Think it can't happen? Our ubiquitous susceptible modern tech is only about 50 years old. That's a blink of an eye in terms of geological history.
If we get hit with another flare similar to the Carrington Event of 1859, it would take us back to the dark ages and it would take decades to recover.
Imagine, no telecommunications, no cars/trucks, no food, no gas, no power, no water, no police, no services whatsoever. How long do you think you could last if that happened?
But you'd have an immune scooter that ran like a champ and could get 120 mpg.
I was going to say our Buddies should run after a super solar flair but we have cdi ignitions, not points. I have a friend selling a Honda Trail 110 (I think 110, he rides it VERY FAR!) but I like the look of the CT70. I just cant get around the buy in price for a used CT, and considering I never picked up my free one till it was to late (other thread with those details) I guess I really dont want one. That yellow Trail is sharp looking. Plus, its getting the proper upgrades. My friends Trail has the optional fuel can with holder. Im sure someone has re-popped them by now.
k1dude wrote:If you have the room to store it, it's always a good idea to keep an old tech vehicle around. Especially one that gets good gas mileage.
If we ever get hit with an EMP or massive solar flare, you'll be the only one in your neighborhood with an operating vehicle.
Think it can't happen? Our ubiquitous susceptible modern tech is only about 50 years old. That's a blink of an eye in terms of geological history.
If we get hit with another flare similar to the Carrington Event of 1859, it would take us back to the dark ages and it would take decades to recover.
Imagine, no telecommunications, no cars/trucks, no food, no gas, no power, no water, no police, no services whatsoever. How long do you think you could last if that happened?
But you'd have an immune scooter that ran like a champ and could get 120 mpg.
So, the OP should keep a bike around a bike in storage that he doesn't want, doesn't seem as if he is going to use, but will still have to maintain while waiting for an event that may not happen for decades (or more, or even in his lifetime) to come so that he can get a tank or two's worth of riding on it? And then after he runs out of the probably limited fuel he has stored for this event, he will be just as immobilized as the rest of us. Or, during this coming apocalypse, someone else will probably immediately steal his bike after the collapse of society.
Keeping the bike forever the reason you mentioned seems a bit of an overreach in logic, at least to me.
cummingsjc wrote:So, the OP should keep a bike around a bike in storage that he doesn't want, doesn't seem as if he is going to use, but will still have to maintain while waiting for an event that may not happen for decades (or more, or even in his lifetime) to come so that he can get a tank or two's worth of riding on it? And then after he runs out of the probably limited fuel he has stored for this event, he will be just as immobilized as the rest of us. Or, during this coming apocalypse, someone else will probably immediately steal his bike after the collapse of society.
Keeping the bike forever the reason you mentioned seems a bit of an overreach in logic, at least to me.
So you should just surrender to the inevitable without a fight? Not try at all to survive or flee to safety? Eliminate options because it'll be hopeless? Some survivor you'd be.
I suggest you read up on first hand accounts of economic/societal collapse. Options are a good thing. Survival is a good thing. The boy scout motto of "Be Prepared" rings true and rewards those that are.
I keep an extra vehicle around just in case. Do I particularly like it? No. Have I needed to use it in the course of everyday life? Absolutely! It's saved my butt several times when things went wrong. Is it any skin off my teeth to keep it around? No!
CWO4GUNNER wrote:Its been a while since I have posted and I suppose that happens on forums. Anyway got tired of the old Honda 90's after realizing that no matter how much I restored them, they are an old tech rides and at peek performance sluggish, heavy, handle like two wheel farm tractors and the reason why they were discontinued and technology moved on to far better machines. Sort of like using a sun dial as a time piece, cool looking but not very functional compared to a modern time piece. After restoring two of those boat anchor (300Lbs), I ended up selling them for $200 less then I paid for them lol. Lesson learned I don't quite look a old tech as fondly anymore no matter how attractive it looks. Far better to get a modern replica with all new tech IMO. I still have my 2012 Buddy 150 and the only thing that has failed is the speedo which melted because they put such a powerful hot lamp inside I guess.
Thank you for resurfacing this post. I have an '81 C70 Passport that has similar forks. I bought the Dr. ATV tapered bearings for the steering stem, sealed bearing conversion set for the leading links and the oil filled damper set to replace the bent and binding original springs. Been needing to get back to work on it for a while now...guess I should get the frame sorted and re-sprayed so I can make it a roller again.
I wonder if those tapered roller kits would work on a CB/CL125 frame? I bought a semi-trashed CL125S last week to repair for my brother and this rabbit hole runs pretty deep. I figure that if I'm stripping it to the bones, I might as well improve a few items while I'm in there.
At what point does a hobby become an addiction? I'm uncertain, but after the twelfth scooter, it sorta feels like the latter...
All balls makes a set of tapered bearings for the cb/cl frame they pop right in after you drive out the old races. http://www.dotheton.com/forum/index.php?topic=66379.0 You can find the process on this link hope this helps Rick
cummingsjc wrote:So, the OP should keep a bike around a bike in storage that he doesn't want, doesn't seem as if he is going to use, but will still have to maintain while waiting for an event that may not happen for decades (or more, or even in his lifetime) to come so that he can get a tank or two's worth of riding on it? And then after he runs out of the probably limited fuel he has stored for this event, he will be just as immobilized as the rest of us. Or, during this coming apocalypse, someone else will probably immediately steal his bike after the collapse of society.
Keeping the bike forever the reason you mentioned seems a bit of an overreach in logic, at least to me.
So you should just surrender to the inevitable without a fight? Not try at all to survive or flee to safety? Eliminate options because it'll be hopeless? Some survivor you'd be.
I suggest you read up on first hand accounts of economic/societal collapse. Options are a good thing. Survival is a good thing. The boy scout motto of "Be Prepared" rings true and rewards those that are.
I keep an extra vehicle around just in case. Do I particularly like it? No. Have I needed to use it in the course of everyday life? Absolutely! It's saved my butt several times when things went wrong. Is it any skin off my teeth to keep it around? No!
 [/img]
 [/img]