LONG POST
This is how I replaced my OEM Buddy mirrors with Universal motorcycle mirrors.
Materials needed:
Metric 10x1.25 Tap
21/64 metal drill bit (cordless drill preferable)
14mm wrench
Air compressor w/air gun attachment or canned air
WD-40 or 3 in 1 oil
A couple of rags
Safety glasses and mechanics glove are a good idea
Procedure:
Remove OEM mirrors, use 14mm wrench to loosen the locking nuts at the base of the mirrors and twist the mirrors off. (Remember the right hand mirror is reversed thread).
Next slowly and carefully, Drill (21/64) out the original hole, being careful to stay straight and true to the original angle and depth. Drill a little at a time and check your progress. The material being drilled into is aluminum; you don’t want to make any mistakes.
After successfully drilling, clean-up with compressed air to remove any shavings. (Remember those glasses).
Now you want to tap the new holes with the 10x1.25 tap bit. Spray the bit with the WD or a drop or two of oil. Line up the tap with the top of the hole and start to screw it in like a bolt using even downward pressure and being careful to keep your angle even with the hole’s angle. You should be able to feel the tap shave away the material and start to catch. After it catches and starts to tap new thread, you want to back it our about a quarter turn to a half a turn to clear the shaved material and lube the threads. Then forward again until you feel resistance, turn another quarter to half turn shaving more material into threads and back off again. Every couple of full turns of progress, completely remove the tap and hit the hole with compressed air to remove the shavings. Do the same with the tap and apply new oil. Repeat this tedious process until threaded deep enough for the new 10mm. mirrors.
If you do end up screwing up the holes really bad, there’s always JB Weld….
How I Re-mirrored
Moderator: Modern Buddy Staff
-
ka24desc

- Member
- Posts: 31
- Joined: Sun Aug 27, 2006 4:02 am
- Location: Tucson
How I Re-mirrored
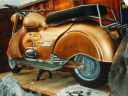
- Attachments
-
- CIMG1867.JPG (117.83 KiB) Viewed 2098 times
Last edited by ka24desc on Tue Oct 10, 2006 11:50 pm, edited 1 time in total.
Have fun in life, doing whatever you do whenever you do it.
-
soundofsingles

- Member
- Posts: 47
- Joined: Sun Aug 27, 2006 3:00 pm
- Location: Gilbert, AZ
-
ka24desc
- Member
- Posts: 31
- Joined: Sun Aug 27, 2006 4:02 am
- Location: Tucson
-
Sailn
- Member
- Posts: 50
- Joined: Wed Jun 21, 2006 2:16 am
- Location: Philly
Just something to consider. Aluminum can be a real bitch to tap. It has a tendency to grab the tap, which can result in the tap breaking. ALWAYS use a cutting fluid, I use tapmagic of aluminum. With hand tapping, heat isn't the issue, extremly high pressure is; you need a lubricant that will hold up to it.
-
Keys
- Member
- Posts: 2037
- Joined: Mon Jul 24, 2006 9:57 pm
- Location: Next to a big dirt lot.
- Contact:
This procedure could also conceivably be used to tap out a larger hole, thread it, and use slightly larger STAINLESS bolts to secure the windshield. I've noticed a number of members have broken off the head to one of the windshield mounting bolts. So, my thought is; drill and tap it BEFORE you mount the windshield and tap it with right-hand threads instead of left-hand and use any ol' bolt of any ol' grade and of the proper length and behold! No more problem.
--Keys
--Keys
"Life without music would Bb"
-
ssybesma
Re: How I Re-mirrored
This is crazy. The company should recall the mirrors and replace them with something useful and safe. I'm thinking about starting a petition.ka24desc wrote:LONG POST
This is how I replaced my OEM Buddy mirrors with Universal motorcycle mirrors.
Materials needed:
Metric 10x1.25 Tap
21/64 metal drill bit (cordless drill preferable)
14mm wrench
Air compressor w/air gun attachment or canned air
WD-40 or 3 in 1 oil
A couple of rags
Safety glasses and mechanics glove are a good idea
Procedure:
Remove OEM mirrors, use 14mm wrench to loosen the locking nuts at the base of the mirrors and twist the mirrors off. (Remember the right hand mirror is reversed thread).
Next slowly and carefully, Drill (21/64) out the original hole, being careful to stay straight and true to the original angle and depth. Drill a little at a time and check your progress. The material being drilled into is aluminum; you don’t want to make any mistakes.
After successfully drilling, clean-up with compressed air to remove any shavings. (Remember those glasses).
Now you want to tap the new holes with the 10x1.25 tap bit. Spray the bit with the WD or a drop or two of oil. Line up the tap with the top of the hole and start to screw it in like a bolt using even downward pressure and being careful to keep your angle even with the hole’s angle. You should be able to feel the tap shave away the material and start to catch. After it catches and starts to tap new thread, you want to back it our about a quarter turn to a half a turn to clear the shaved material and lube the threads. Then forward again until you feel resistance, turn another quarter to half turn shaving more material into threads and back off again. Every couple of full turns of progress, completely remove the tap and hit the hole with compressed air to remove the shavings. Do the same with the tap and apply new oil. Repeat this tedious process until threaded deep enough for the new 10mm. mirrors.
If you do end up screwing up the holes really bad, there’s always JB Weld….
-
Drumwoulf
- Member
- Posts: 810
- Joined: Mon Jan 01, 2007 6:49 pm
Re: How I Re-mirrored
Hey, there's an easier way to do this... The link below is to a Brit Co that sells chrome Yamaha mirror mount convertors that allow 10mm mirrors to be mounted on 8mm mounts...ka24desc wrote:LONG POST
This is how I replaced my OEM Buddy mirrors with Universal motorcycle mirrors.
Materials needed:
Metric 10x1.25 Tap
21/64 metal drill bit (cordless drill preferable)
14mm wrench
Air compressor w/air gun attachment or canned air
WD-40 or 3 in 1 oil
A couple of rags
Safety glasses and mechanics glove are a good idea
Procedure:
Remove OEM mirrors, use 14mm wrench to loosen the locking nuts at the base of the mirrors and twist the mirrors off. (Remember the right hand mirror is reversed thread).
Next slowly and carefully..........SNIP €¦.
http://www.getgeared.co.uk/acatalog/Mot ... rrors.html
drummer
-
Drumwoulf
- Member
- Posts: 810
- Joined: Mon Jan 01, 2007 6:49 pm
Re: How I Re-mirrored
Opps, my mistake... Will not work ...Drumwoulf wrote:Hey, there's an easier way to do this... The link below is to a Brit Co that sells chrome Yamaha mirror mount convertors that allow 10mm mirrors to be mounted on 8mm mounts...ka24desc wrote:LONG POST
This is how I replaced my OEM Buddy mirrors with Universal motorcycle mirrors.
Materials needed:
Metric 10x1.25 Tap
21/64 metal drill bit (cordless drill preferable)
14mm wrench
Air compressor w/air gun attachment or canned air
WD-40 or 3 in 1 oil
A couple of rags
Safety glasses and mechanics glove are a good idea
Procedure:
Remove OEM mirrors, use 14mm wrench to loosen the locking nuts at the base of the mirrors and twist the mirrors off. (Remember the right hand mirror is reversed thread).
Next slowly and carefully..........SNIP €¦.
http://www.getgeared.co.uk/acatalog/Mot ... rrors.html
drummer
NEVER MIND!
drummer
-
Corsair
- Member
- Posts: 931
- Joined: Tue Nov 14, 2006 9:09 pm
- Location: Rockin The Longhorns
- Contact:
-
Keys
- Member
- Posts: 2037
- Joined: Mon Jul 24, 2006 9:57 pm
- Location: Next to a big dirt lot.
- Contact:
I fixed mine the easy way. I removed both, threaded on three nuts at the bottom, stuck them in the vise at work with the bend that is closest to the handlebars at the edge of the vise and simply bent them down a little more. Worked the same as adding about 1/2" to the length. They don't interfere with my hands or anything. Don't go too far, though...you won't be able to screw them back in because as you rotate the mirror, it will hit the headlight. A little bit at a time. Made a big difference.
--Keys
--Keys
"Life without music would Bb"