Page 1 of 1
Stebel Compact Nautilus
Posted: Thu Oct 03, 2013 6:29 pm
by slotrod65
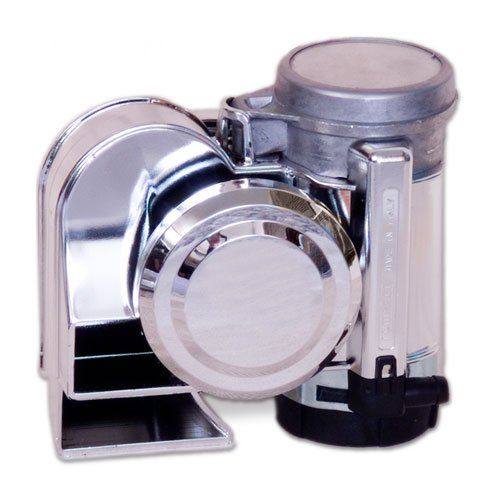
Weeeellllllll.... after another embarrassing use of my stock horn, I have decided to cough up for a Stebel Compact Nautilus. I am very weary of the near useless "stepped on a strangled duck" sound of the stock horn. After installation of my stainless steel floor rails, I have a few extra and unused holes in the legshield, so I plan on mounting it there. I am not sure yet if I will be splitting the horn, or mounting it whole. I plan on documenting the whole process, so hopefully that will help someone after me.
Posted: Fri Oct 04, 2013 4:32 am
by viney266
If you can make it fit, they are a monster, but so loud.
Posted: Fri Oct 04, 2013 11:17 am
by slotrod65
I am pretty sure even just the horn section will not fit under the horn cowl, but I have no problem mounting it outside the legshield. Once I get my mitts on it I can better judge how to play the mounting game.
Posted: Sun Oct 06, 2013 5:43 pm
by jimmbomb
I have seen pictures of people mounting them under the floorboards across from the brake pedal ....
good luck
Posted: Mon Oct 07, 2013 1:18 am
by PeteH
Also I think under the left cowl.
Posted: Mon Oct 07, 2013 1:34 am
by jimmbomb
PeteH wrote:Also I think under the left cowl.
It could be a challenge,, Pete..as Slotrod runs his spare there taking up up a lot of real estate under there already.
Posted: Mon Oct 07, 2013 1:51 am
by slotrod65
Actually, I moved the spare to the 3-in-1 rack behind the seat. So there is plenty of room.
I am however toying with mounting on the front of the legshield, or on my Cuppini front crash bars which I have yet to mount...
Also, as I have seen the compressor and the horn portions successfully split, I am not sure exactly where I will mount it... It should be here Wednesday, and I can start playing round.
Posted: Tue Oct 08, 2013 7:06 pm
by slotrod65
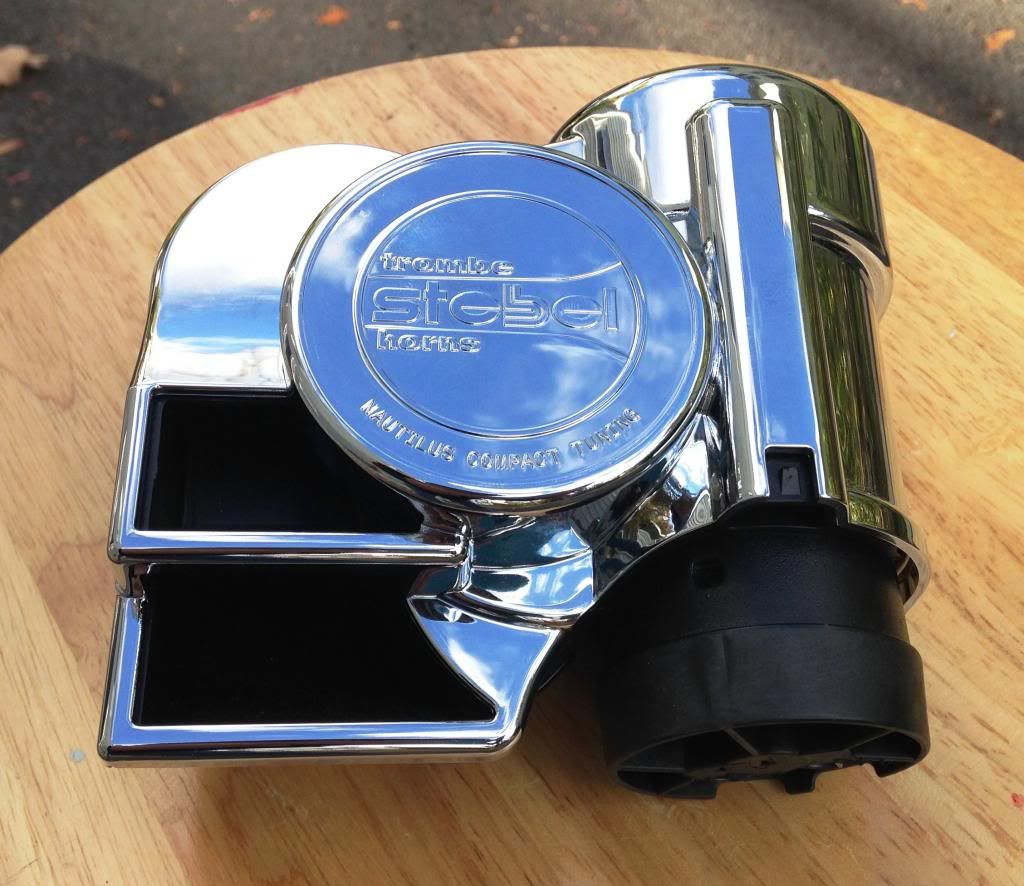
OK, So I received the Stebel today. The chrome version is the regular horn, with a one piece plastic chromed cover... so no separating. Since I have moved the spare to the rack, I have room under the left cowl. It looks like that will be the place.
Posted: Tue Oct 08, 2013 8:26 pm
by jimmbomb
Well cool..Slotrod....if you decide to run a wire from the horncast thru the tunnel to the back....please tell us how you do that???
Thanks...
Posted: Tue Oct 08, 2013 8:35 pm
by slotrod65
I have been pondering that myself... I may need to buy a fish, but will try with a coat hanger first. Right now I am still working on the bracket for mounting the horn.
Posted: Tue Oct 08, 2013 10:03 pm
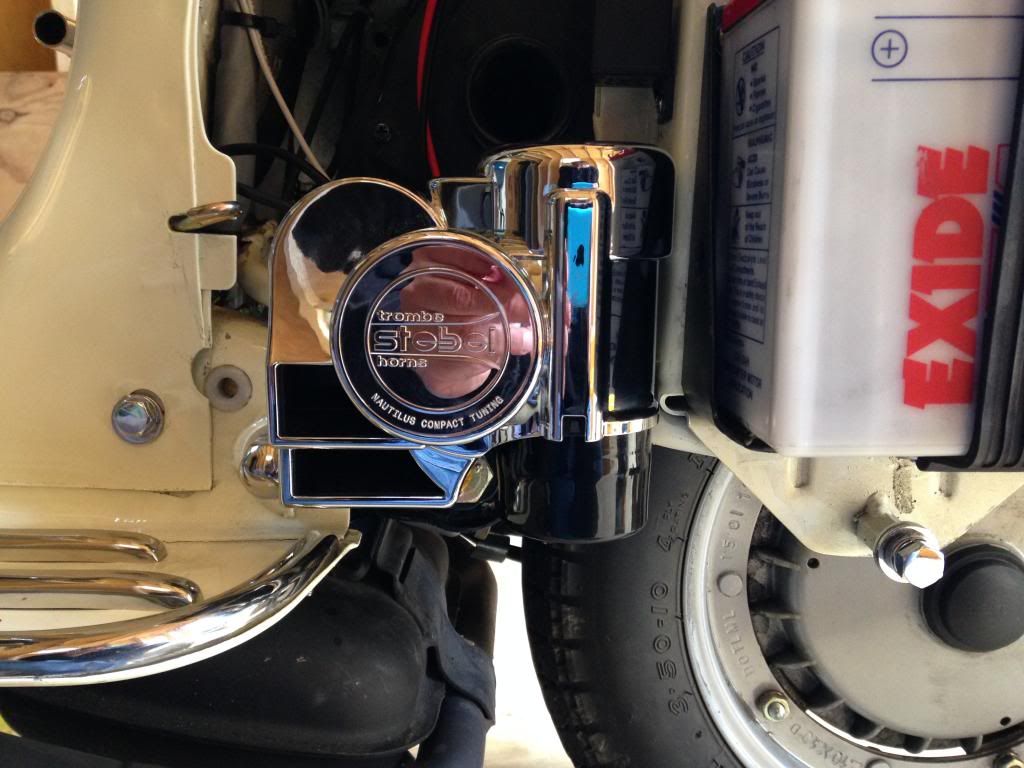
by slotrod65
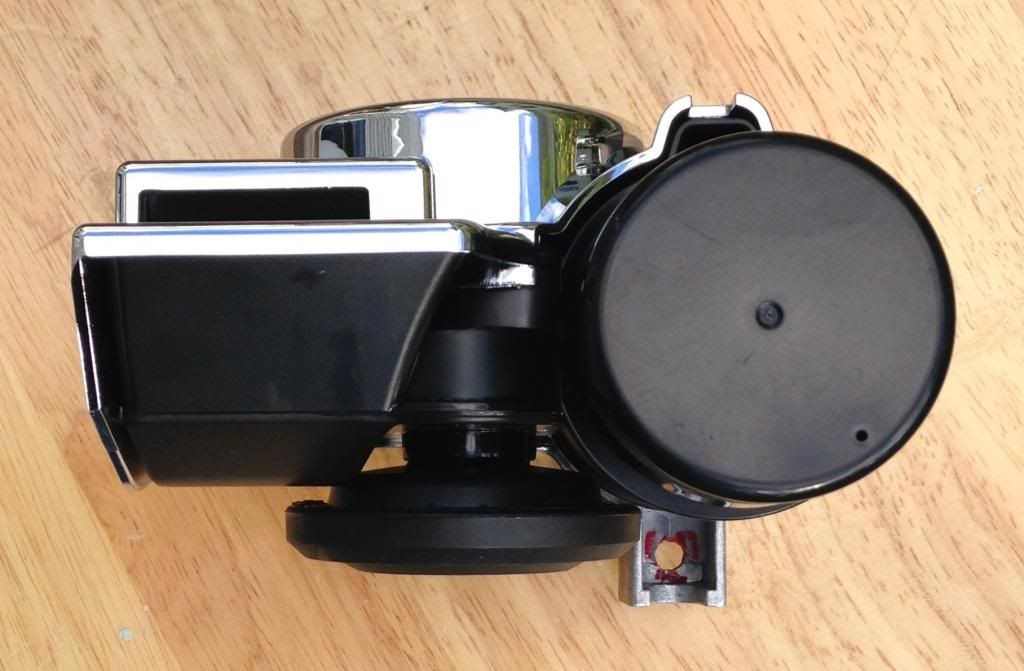
I had about 1/2 hour after work today. Just enough time to get an idea for a bracket.
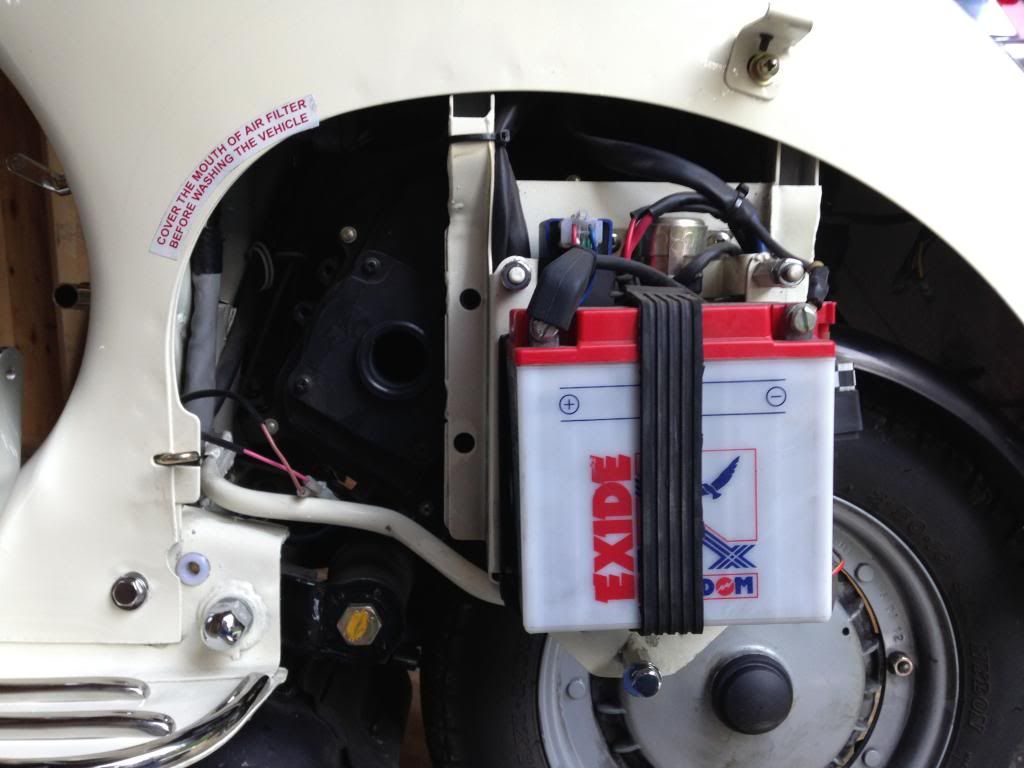
First photo shows the area under the cowl, without the tire. There is lots of room. I did some measuring and found a very nice hole already in the frame, just to the left of the battery.
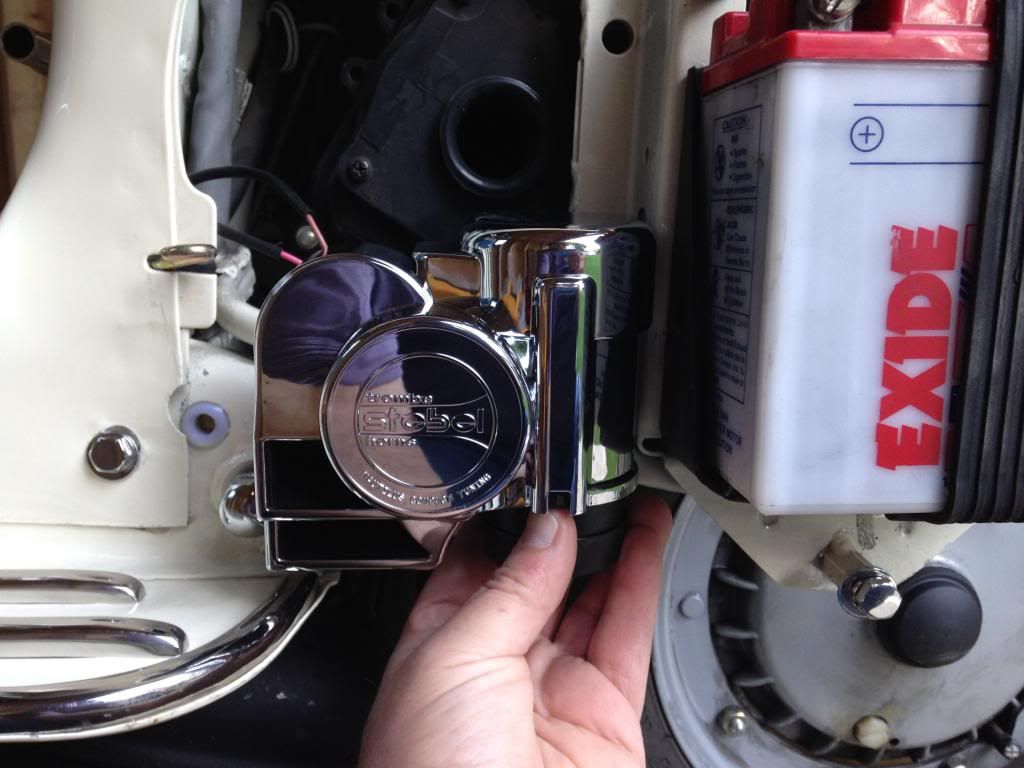
Next we have the Stebel floating in place where I will be attempting to attach it. I believe a nice 2-3" piece of angle that is 3/4" x 3/4" should to the trick.
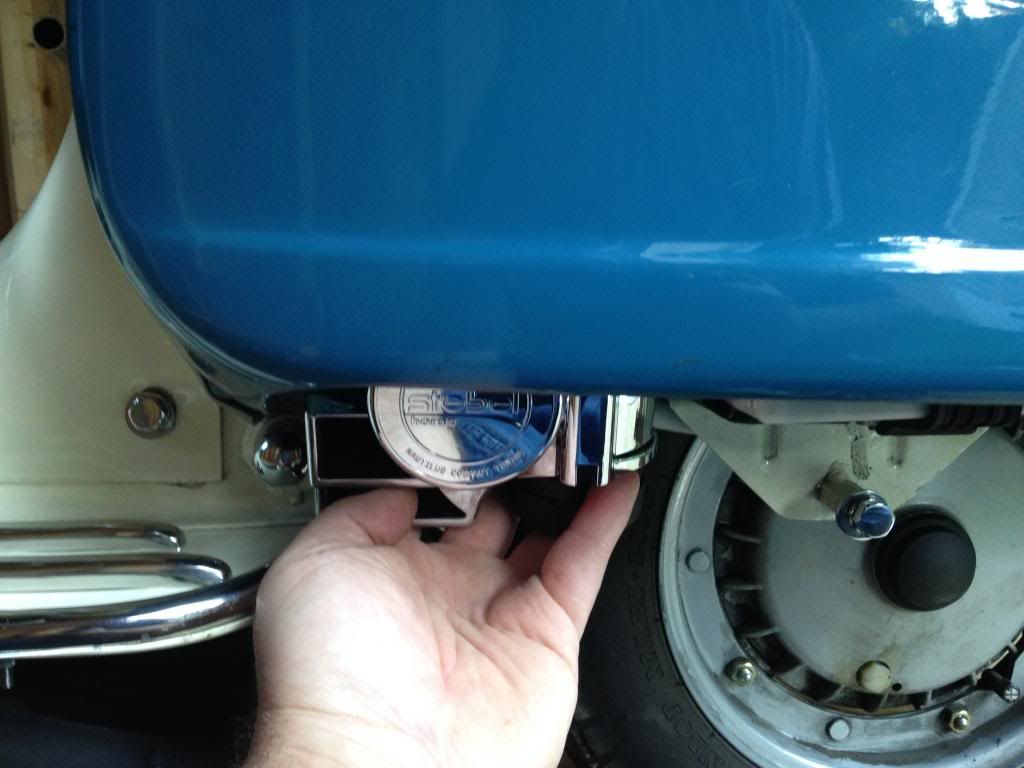
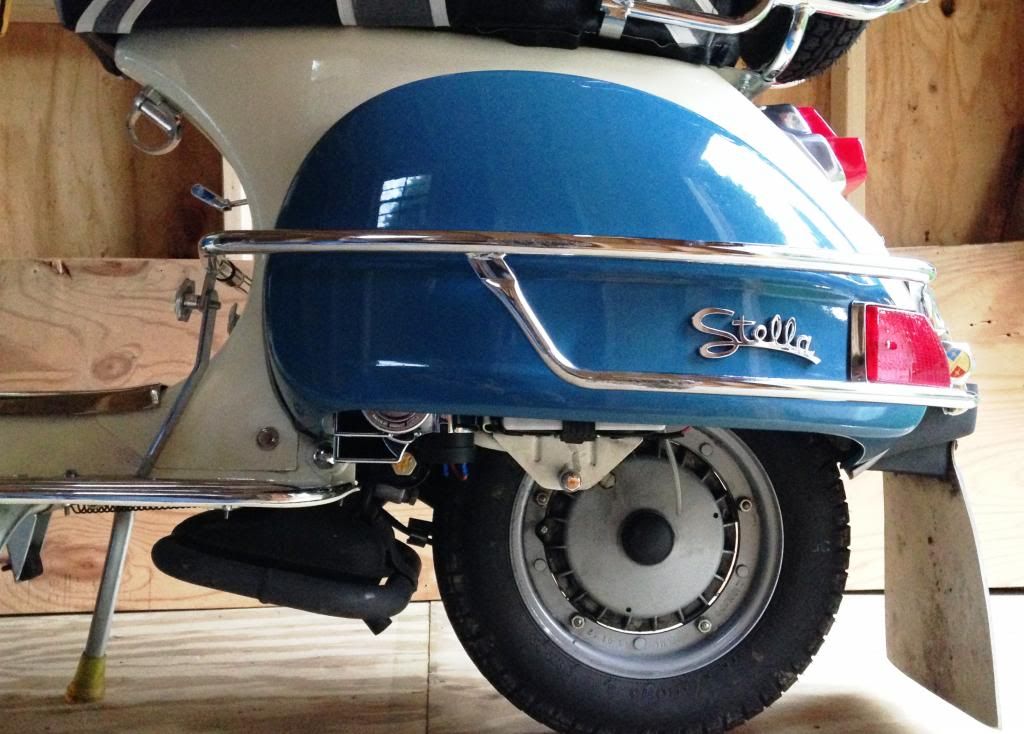
Finally, here is how it should look after the cowl is back on: The twin horn mouths just peeking out of the cowl.
Posted: Wed Oct 09, 2013 11:40 pm
by ericalm
I've yet to install mine because I was thinking of putting the smaller Stebel Magnum from my Vespa in the Stella and the Nautilus un the Vespa because it'd be easier.
The left cowl mount looks pretty good, though! Would love to know how you wire it if you put it there.
Posted: Fri Oct 11, 2013 7:37 pm
by slotrod65
Posted: Sat Oct 12, 2013 11:37 pm
by slotrod65
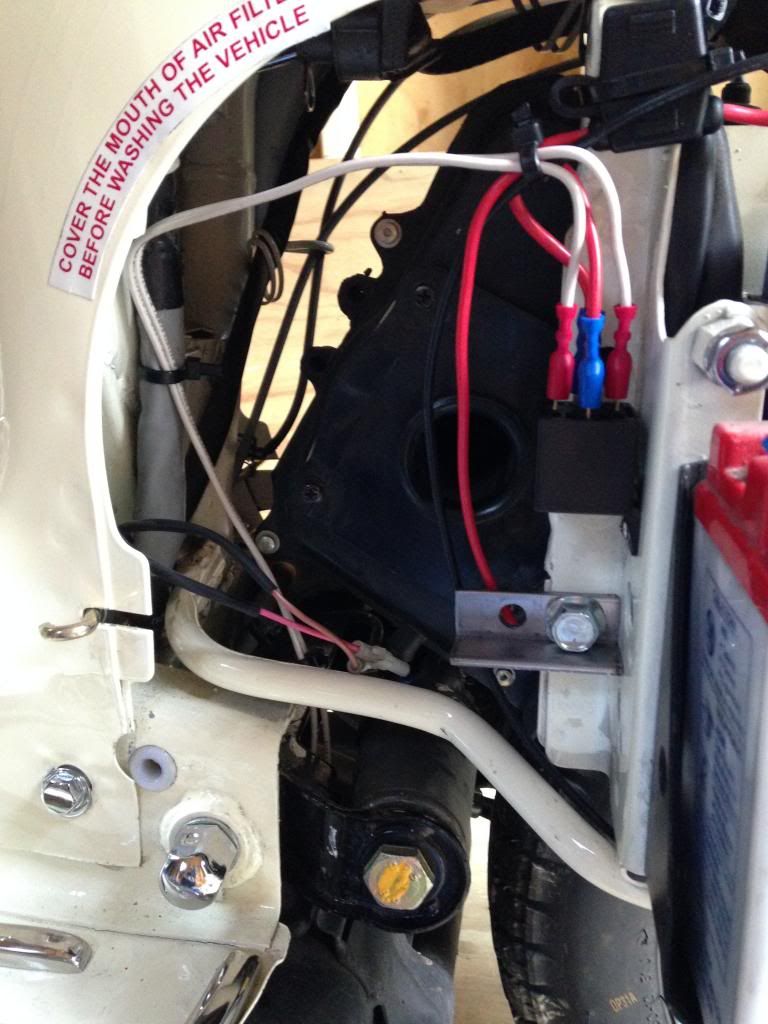
I had more time to work on the horn today. First I mounted the relay using an existing hole. I had to remove the battery box to get to the rear of it.

Then I started the actual wiring. First came the 14 gauge wire from the Stebel to the relay and on to the battery
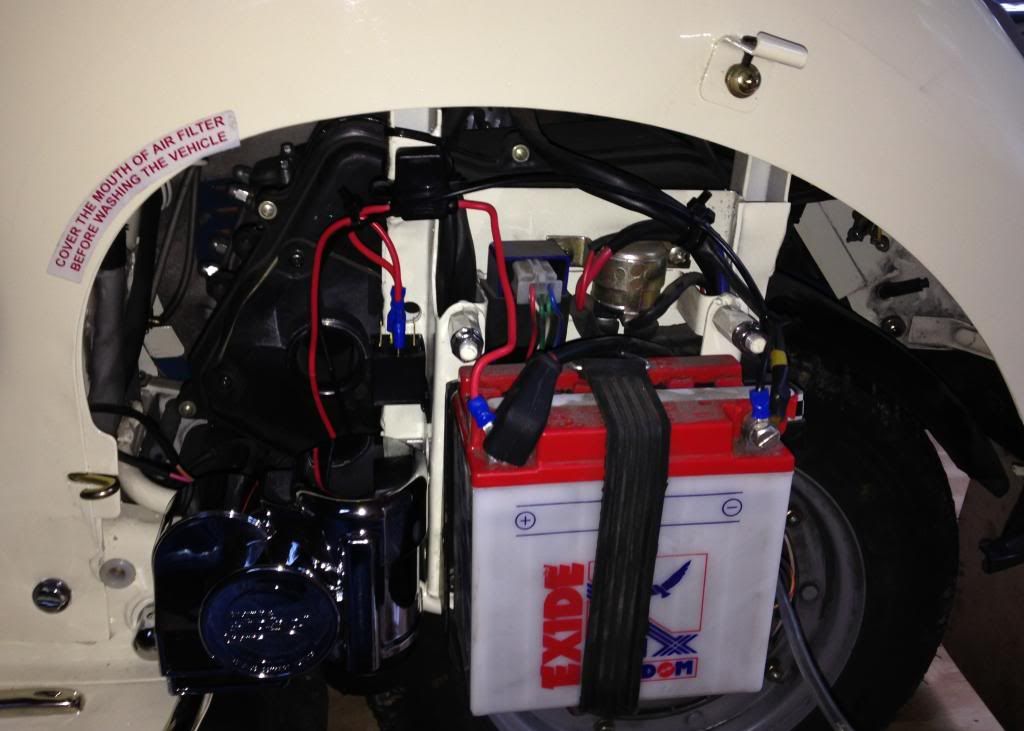
I know this was the easy wiring... I did remove the horncast to work out where the wiring harness enters the frame tunnel. The next job will be fishing wire down through. I expect to be doing lots if swearing.
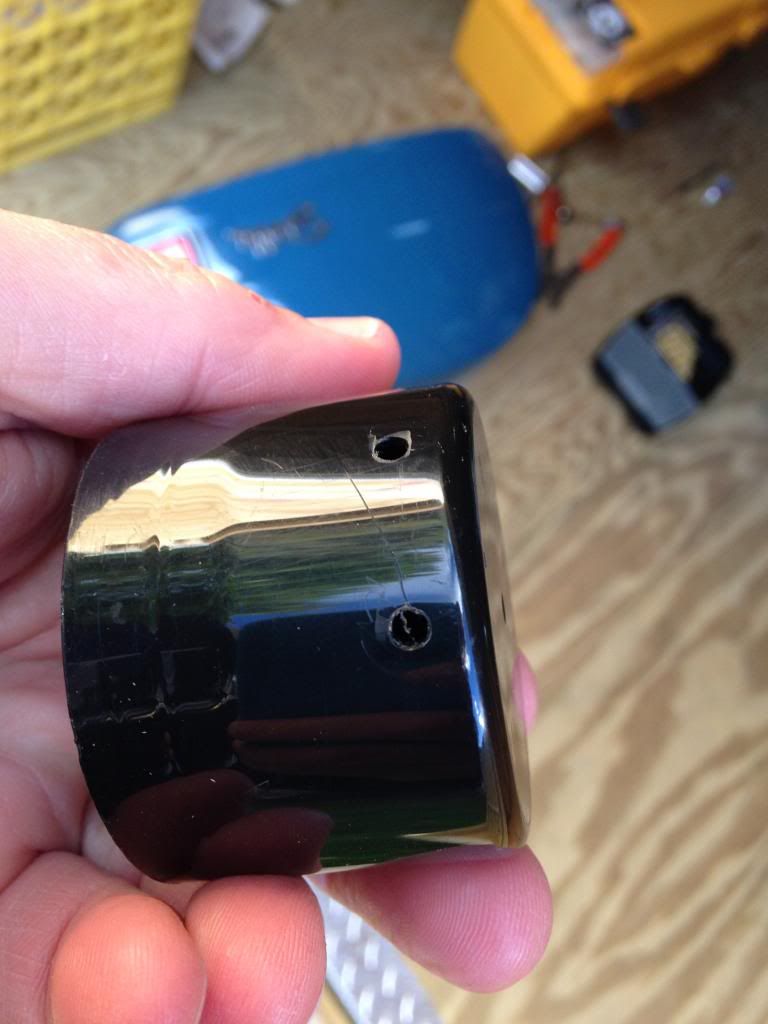
Also, the leads on the Stebel are on the bottom, so I will be searching around for a cap to cover the bottom part of the compressor. It is just shy of 2" in diameter, or 50mm. Times to keep my eyes peeled whenever I am out at various stores, looking for something I can cap it with.
Posted: Sun Oct 13, 2013 4:49 am
by ericalm
This is looking great!
I shoved wiring from back to front through the body using a coat hanger. Well, actually I had string attached to the coat hanger, then used that to pull the wiring through. At night!
So, could be done in reverse.
You just going to run new 14ga. from the button through to the new horn or try to use the existing wires?
Posted: Sun Oct 13, 2013 11:54 am
by slotrod65
The instructions say I can just jump wires from the horn contacts to the relay, so I am going to try that. My idea was similar to yours: Coat hangar with the wires attached with electrical tape, or crimped on the end. How tight did you find the clearance in the tunnel?
Posted: Sun Oct 13, 2013 11:11 pm
by ericalm
It's not tight, it's just not a straight feed. There are some obstructions up there. I think it'll be easier coming from the front. Aiming for the steering column and getting the wire up there was a pain. Also, for whatever reason, when feeding from back to front, the hole on the right side was easier.
Posted: Mon Oct 14, 2013 1:00 am
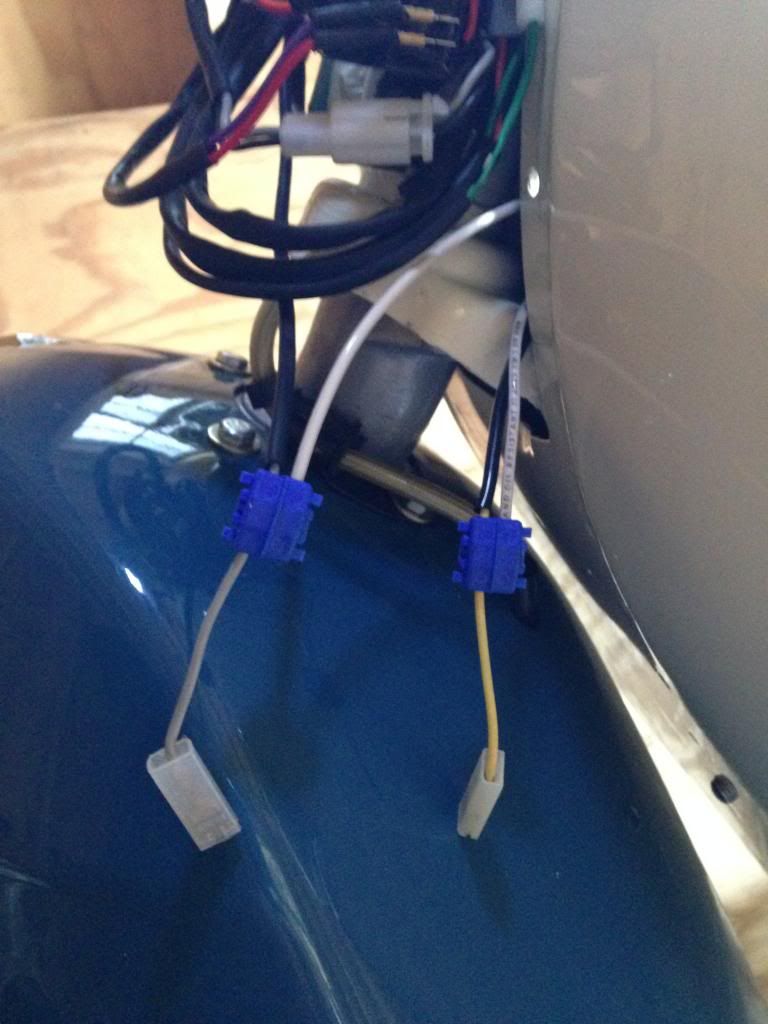
by slotrod65
Today I was able to complete the install of the horn. The first thing I did was to grab a coat hanger, and sensing that I would need all of it, I unwound the twisted ends, and straightened them with a set of large linesman pliers. It is a good thing I simply did not clip off the ends, because it turned out that I needed every inch. I removed the horncast and tried feeding from the front end, where the various wiring harness enter the tunnel. I was however, unable to get the wire to come out any of the small holes in the back end. I then swicted to the rear and started by feeding from a frame hole in the rear. It took a few tried and a bit of fiddling, but I was able to work the coat hanger wire up to under the lower steering collar, where I could grab it with needle nosed pliers. Then I directed it above the collar and out into the open. I have marked the ends of the coat hanger with blue masking tape in the below photos:
In the back and...

Up and out the front.
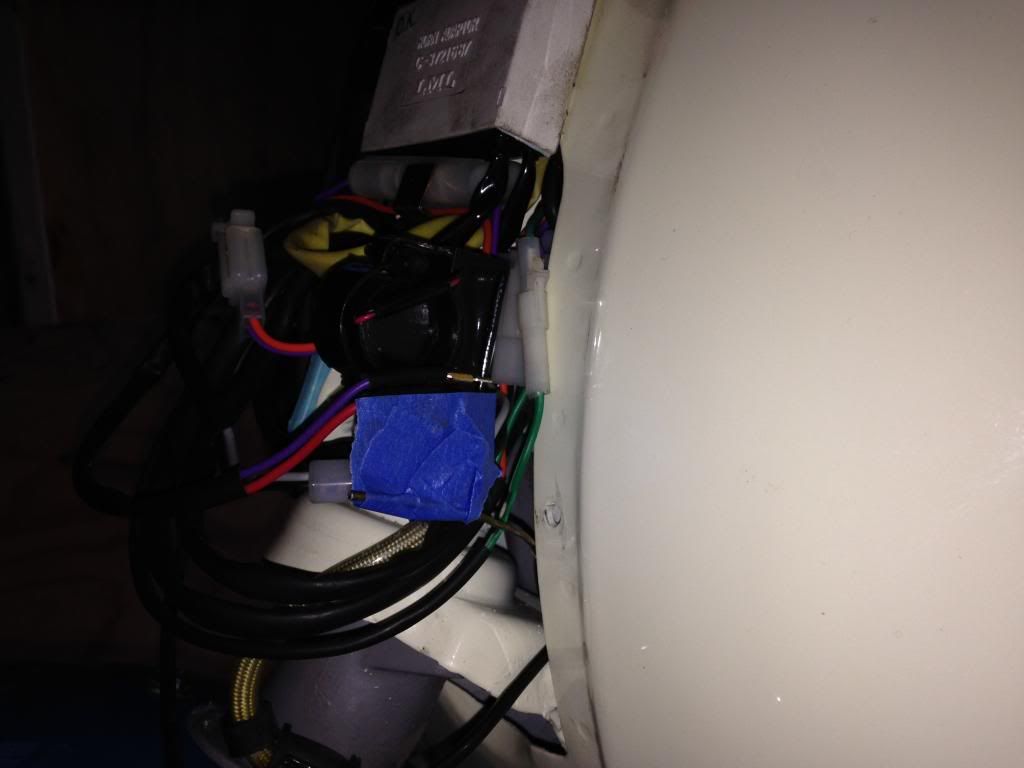
As you can see, I only had a few inches to spare on each end.
Posted: Mon Oct 14, 2013 1:23 am
by slotrod65
Posted: Mon Oct 14, 2013 1:30 am
by slotrod65
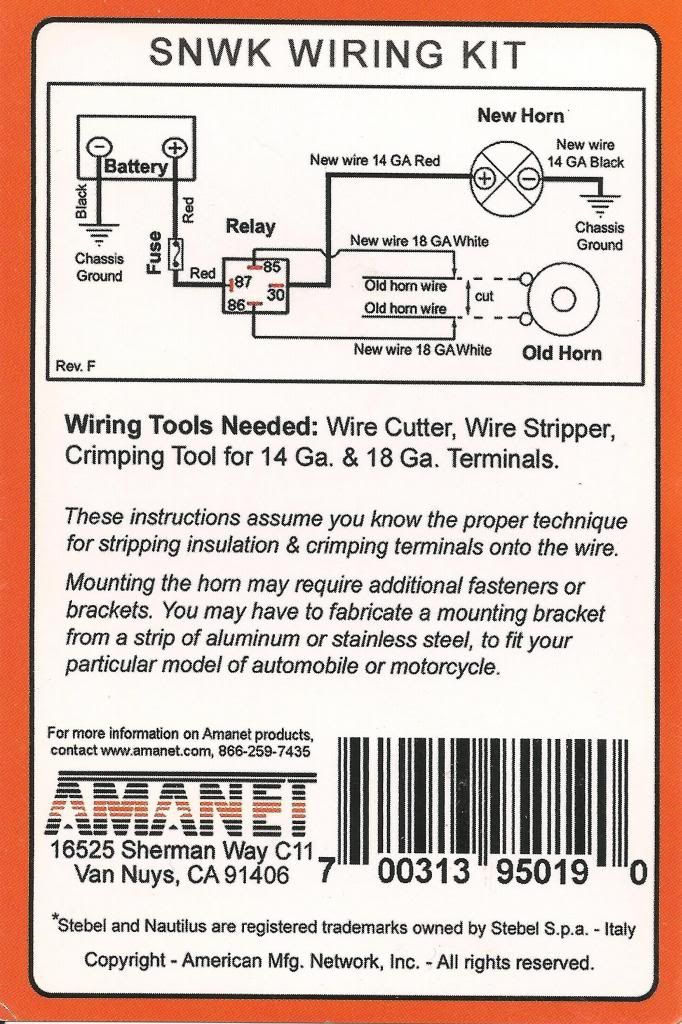
I guess I should back up a bit. For wiring, I purchased the "deluxe" all included Stebel install kit on Amazon. Of course, I needed to but 10 feet of wire and some additional jumper connectors since I was not removing the stock horn.

Here is the wiring diagram I used. I did not follow their written instructions, except what goes to where in the relay.
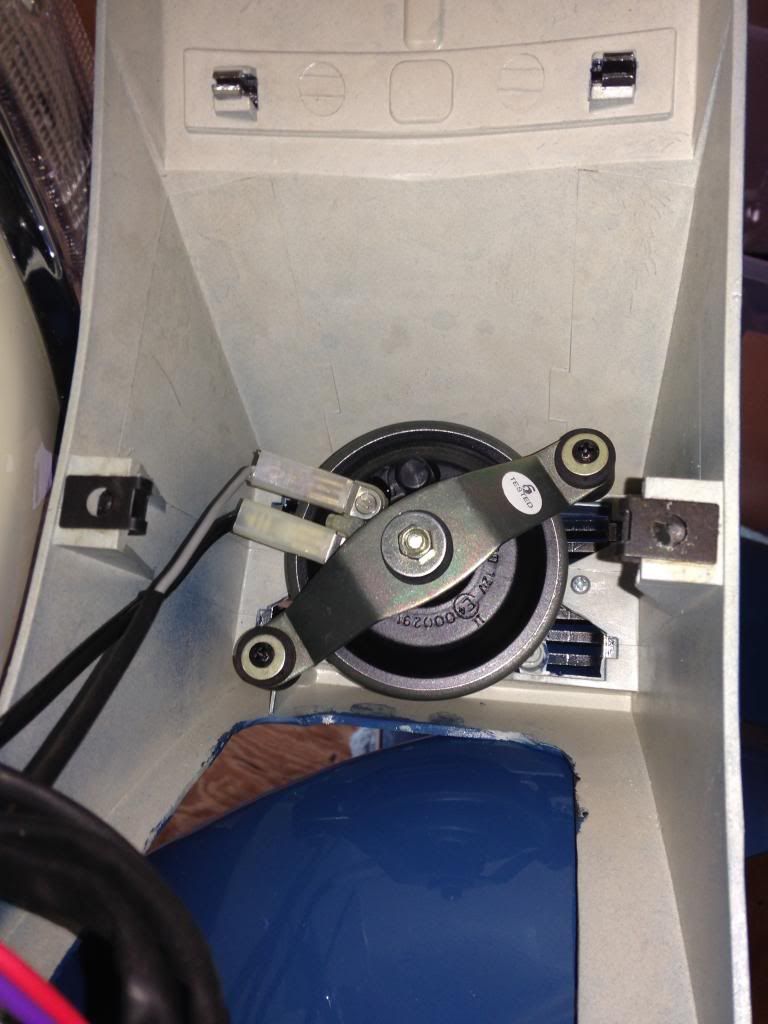
Before total dis assembly, I took this pic of the horn to be sure I put the correct wires in the right place when re attaching them.
Posted: Mon Oct 14, 2013 1:38 am
by slotrod65
Here is the jumper connectors I used on the front end to connect the horn, while still keeping the stock horn in place. This parallel wiring setup allows current to flow to both.
The back end was a simple matter of connectors and zip ties. I love those zip ties! I made sure I did not pull the wires too tight to allow for flex and road motion:
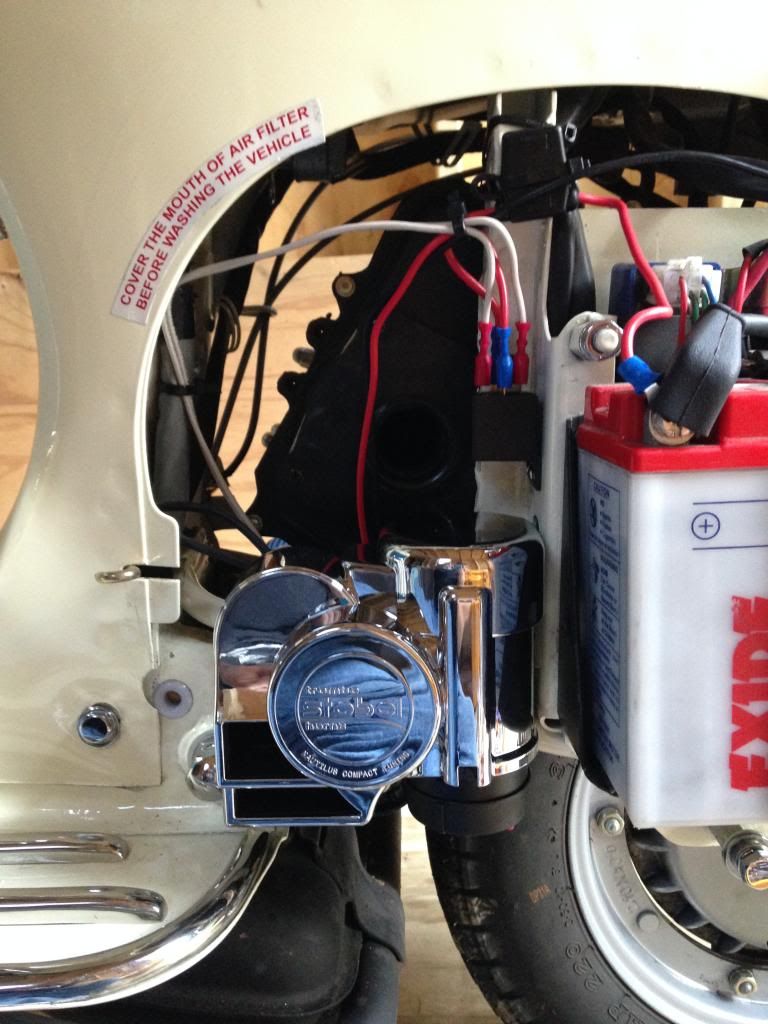
Next the Stebel went back on:
Then, I took the scooter out of the shed to test the horn, and it works!!
Man, it is LOUD!
Posted: Mon Oct 14, 2013 1:42 am
by slotrod65
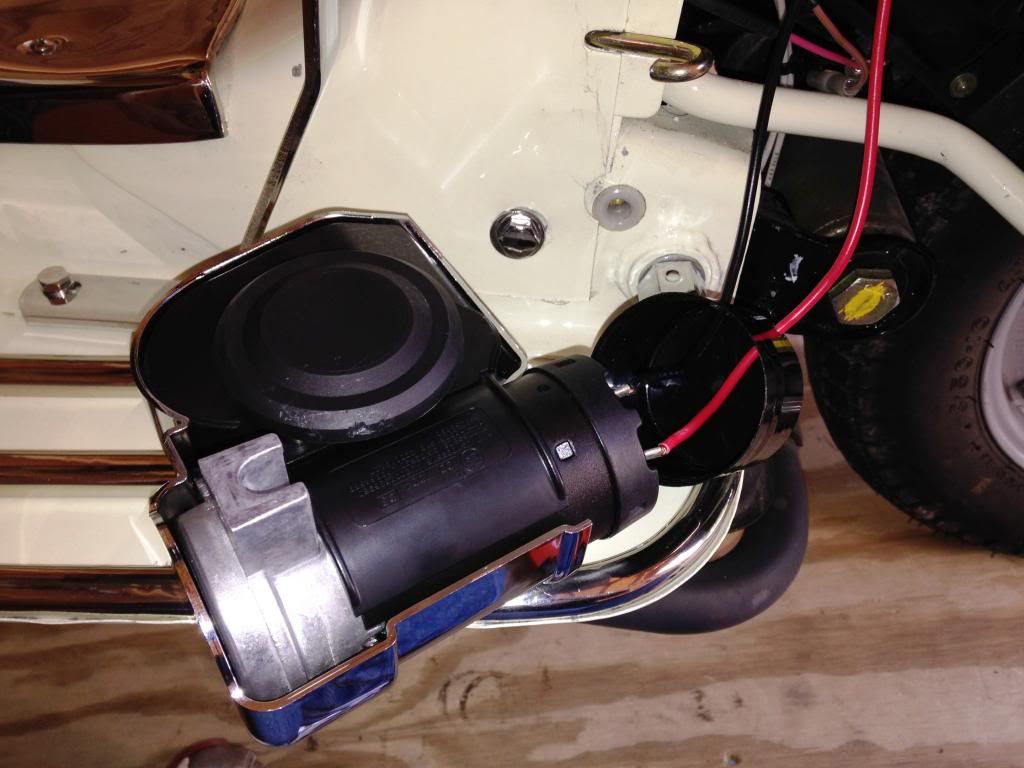
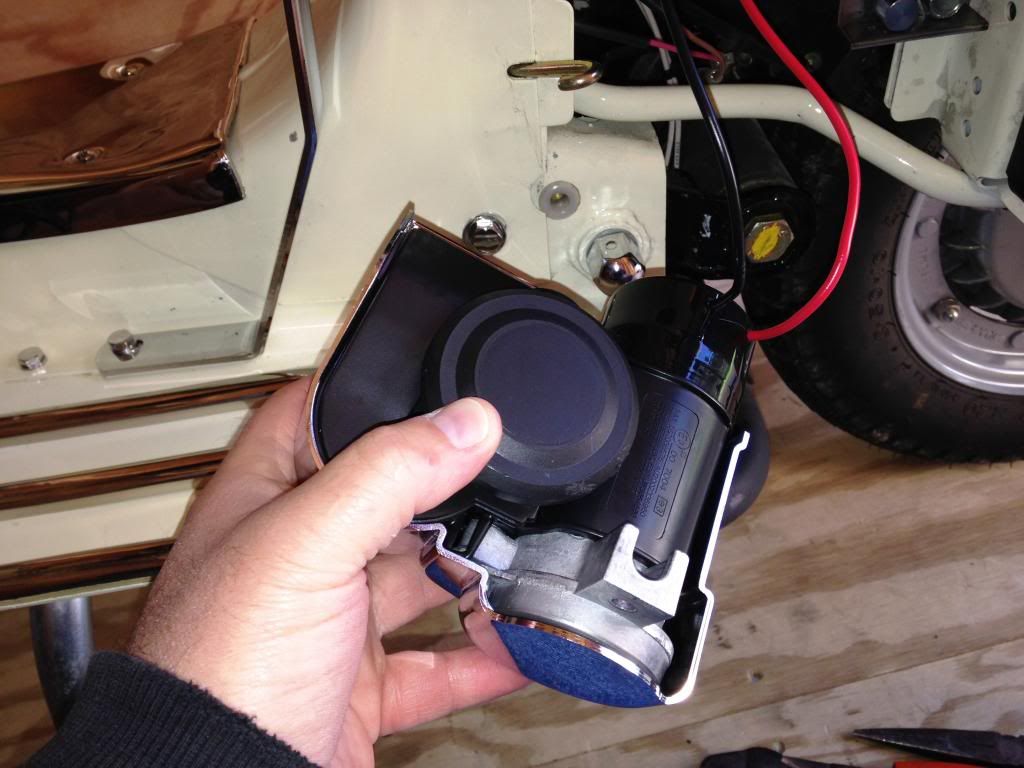
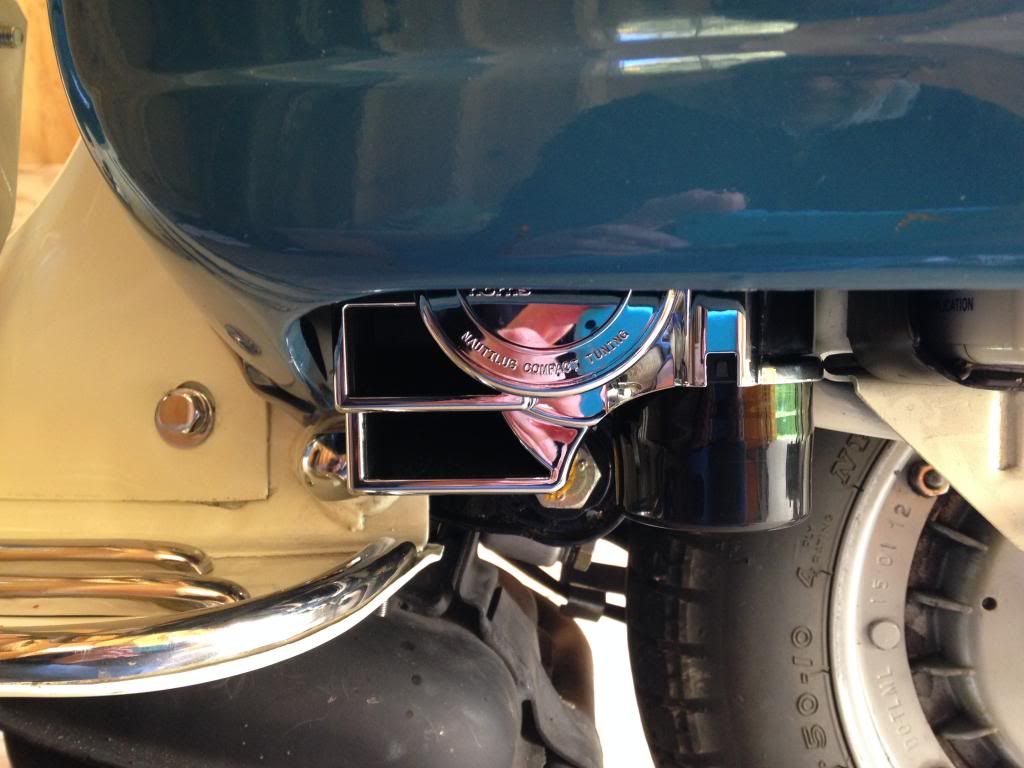
Once I was sure everything worked, I remounted the Stebel using threadlocker, and buttoned her back up. Here are some final views:
From underneath:
And the side:
Posted: Mon Oct 14, 2013 1:51 am
by slotrod65
Overall, I am very pleased with the horn, and the install went far smoother than I envisioned. I was afraid I would be poking that coat hangar around for an hour...
I did use threadlocker on all bolts and nuts, red permanent for the bracket and the relay mount, and blue removable for the Stebel itself.
I also may add some foam in between the horn and the frame, since I am afraid it will vibrate during riding.
Finally, I am not happy with the connection underneath being so exposed to the elements. The horn is a 2" circle down there, so i am on the lookout for a plastic something I can cut up and use as a cover.
As soon as I can I will take her out somewhere I can blast it and make a video.
Posted: Mon Oct 14, 2013 4:11 pm
by berleyprt
Thanks for sharing. This is very helpful. I was looking at the screaming banshee horn system to put on my Stella.
Plastic something
Posted: Mon Oct 14, 2013 4:41 pm
by mer10
Would your old or a new stock spar tire cover work for a temp solution?
Posted: Mon Oct 14, 2013 5:41 pm
by jimmbomb
Very nice write up! Thanks for this..
Posted: Thu Oct 17, 2013 3:47 pm
by slotrod65
And.... We have video!
http://www.youtube.com/watch?v=3WhFSgC- ... e=youtu.be
Today was the first ride with the Stebel, and i had to use it. An old lady started to pull out in front of me from a Dr Office parking lot...
Posted: Thu Oct 17, 2013 4:46 pm
by jimmbomb
Very nice camera work!! How did you get such steady pans and zooms?? I like the work!!!
Whats your secret?
Posted: Thu Oct 17, 2013 4:46 pm
by jimmbomb
Very nice camera work!! How did you get such steady pans and zooms?? I like the work!!!
Whats your secret?
Posted: Thu Oct 17, 2013 5:12 pm
by slotrod65
Thanks. The video was taken using my iPhone 5c. Zooms are all me moving the camera about. I did use Youtube's stabilize function after upload and that steadied the still parts.
Posted: Fri Oct 18, 2013 12:51 am
by jimmbomb
Very nice....hey slotrod....what was that square thing that was on the side of your glove box. The horn sounds great.
Posted: Fri Oct 18, 2013 1:37 am
by slotrod65
That's the NY state motor vehicle inspection sticker. Ugly, but it has to be there.
Posted: Fri Oct 18, 2013 5:06 pm
by KABarash
slotrod65 wrote:That's the NY state motor vehicle inspection sticker. Ugly, but it has to be there.
At least here in Pennsylvania they place those in some more unobtrusive spot either on the fork or in case of mine on the fender where its not there like a sore thumb.
Love the Stebel horn, the Buddys came with it, really lets people know you're there.
Great job with your instal....
Posted: Fri Oct 18, 2013 5:33 pm
by slotrod65
I should have more say where it goes next spring. This one was put on by the dealer before I took delivery. As the dealer is 2 hours away, I will be getting my inspection from a local MC shop, and I will ask them to place it somewhere else. Not sure where yet.
Posted: Wed Oct 23, 2013 5:20 pm
by stASH
My shop placed the inspection sticker on the back left of the front fender, facing the leg shield. I believe that meets Virginia's requirements and is reasonably inconspicuous.
Posted: Wed Oct 23, 2013 5:23 pm
by slotrod65
I like that!!
Posted: Thu Oct 24, 2013 3:59 pm
by slotrod65
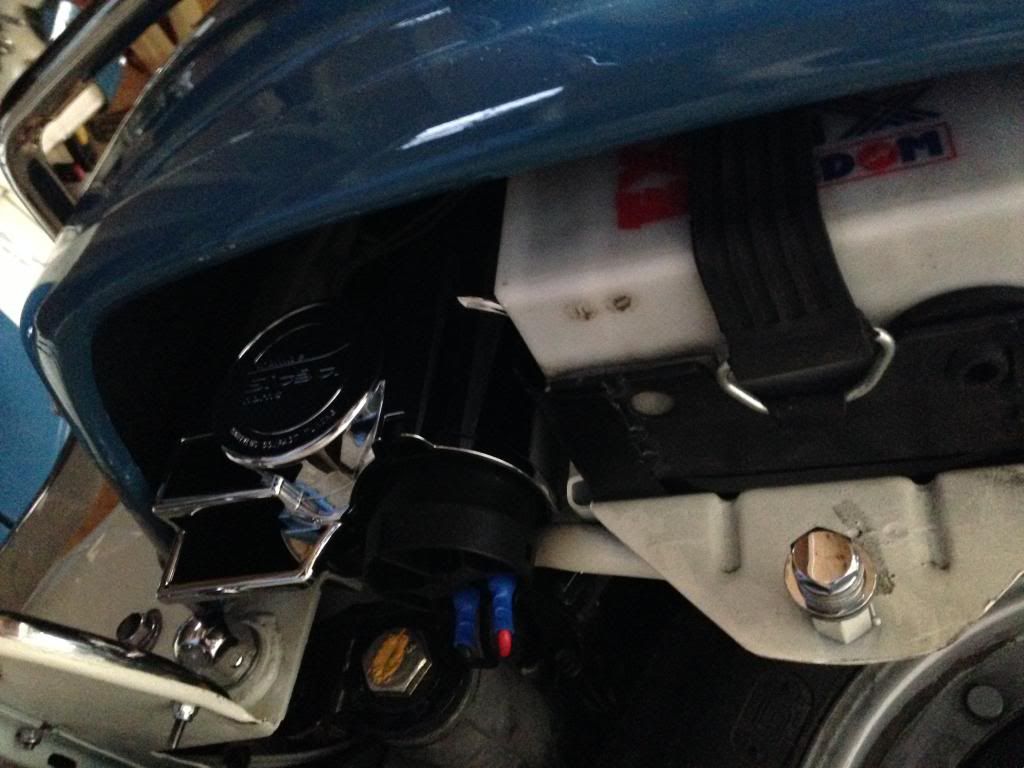
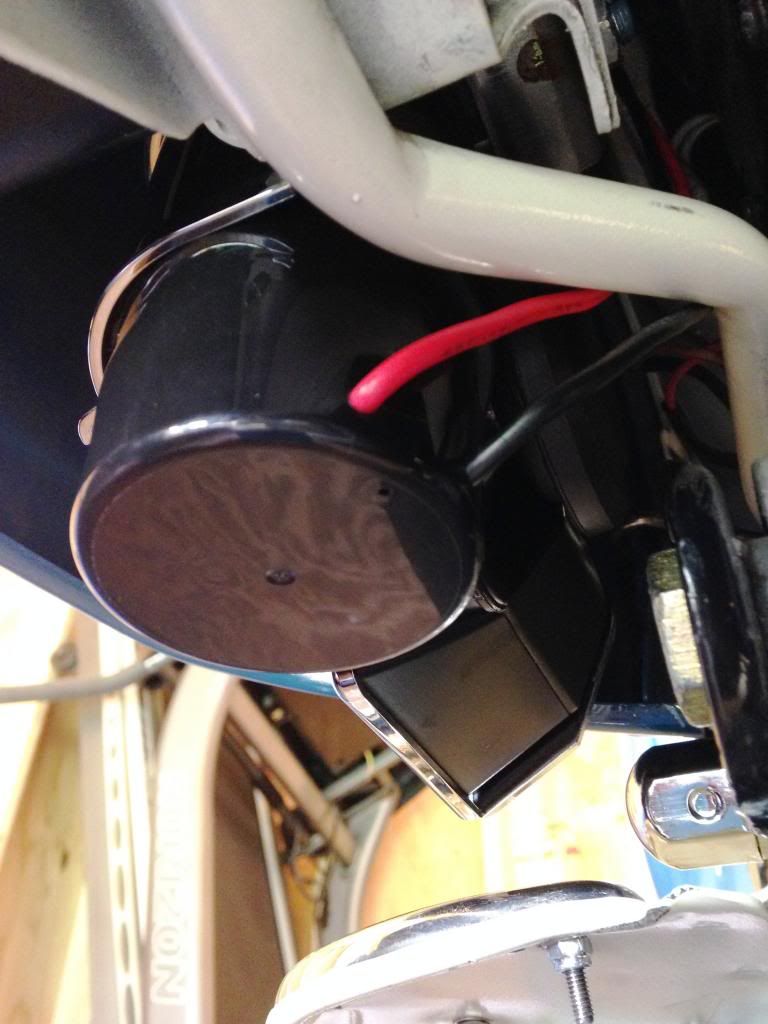
OK, so as I said, I was not happy with the open wiring down the bottom of the horn.

I searched hardware stores, crafts shops, all sorts of places, and all sorts of caps, to no avail. Then I was down in my own basement, and spotted it: The cap from Testor's model paint. A quick and dirty measurement showed the interior to be two inches, so I dismounted the horn and tried it out:
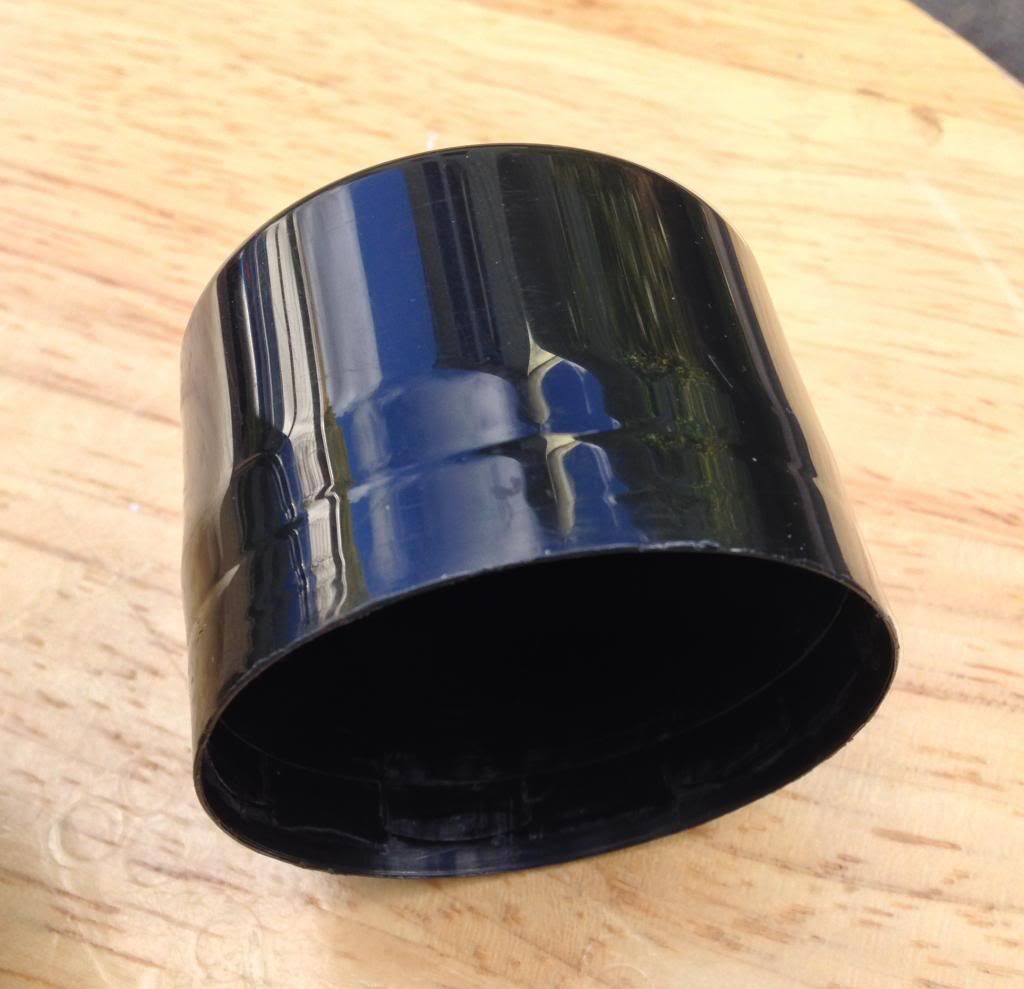
It almost fit... so I carefully removed the few small bits of plastic from the inside of the cap that held in on the paint can, and: Wow! It fit... the soft plastic cap actually stretched just enough to completely cover the bottom of the horn.
It was now time to head out to the shed...
Posted: Thu Oct 24, 2013 4:01 pm
by slotrod65
I drilled two holes in the cap, and threaded the wire through. It was a very tight fit, which will help keep the weather out:
I re-attached some connectors and worked the cap on, slowly pulling the wires as I went.
Posted: Thu Oct 24, 2013 4:03 pm
by slotrod65
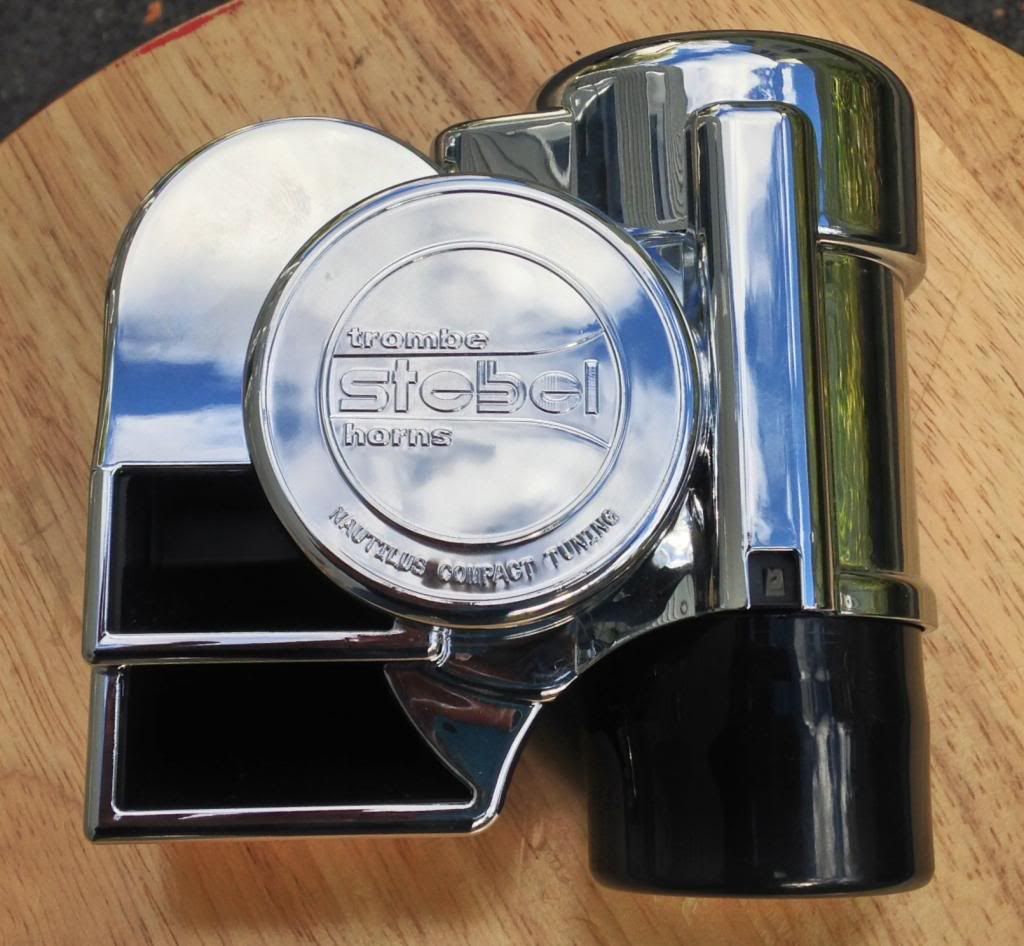
Then it was as simple as remounting the horn, and putting the side panels and bars back on:
Here is an under view: This should keep the mud and water out of the horn connections:
Posted: Thu Oct 24, 2013 6:11 pm
by PeteH
MacGyver Award!
Horn cowl removal?
Posted: Sun Aug 21, 2016 5:51 pm
by junebugphoto
So I've been inspired to add this horn to my Stella. Thanks for the awesome instructions and photos. Wondering how to go about removing that from plastic horn cowl. Is it as simple as the 2 bolts in the glovebox or does the chrome trim and heAdbadge need to be removed. The manuals and photos I've found don't provide much in the lines of info. Thanks in advance for any help.
Re: Horn cowl removal?
Posted: Sun Aug 21, 2016 10:21 pm
by phunksoulbrotha
junebugphoto wrote:Is it as simple as the 2 bolts in the glovebox or does the chrome trim and heAdbadge need to be removed.
3rd bolt is behind the hexagonal Genuine emblem on the front. Beginning of this thread
topic15977.html details the removal.
broke the Emblem...
Posted: Mon Aug 22, 2016 7:05 pm
by junebugphoto
I was as careful as I could be.. Even bought a small screwdriver for the job and still ended up snapping the tab off...
So where do you get new Emblems?
Re: broke the Emblem...
Posted: Tue Aug 23, 2016 8:32 pm
by Stilts
junebugphoto wrote:I was as careful as I could be.. Even bought a small screwdriver for the job and still ended up snapping the tab off...
So where do you get new Emblems?
Don't feel bad, they snap for jsut about everyone.
Sadly, can't seem to find a replacement. Both of my Stellas go without.
Posted: Wed Aug 24, 2016 12:16 pm
by RoaringTodd
C-3727202
Genuine"G: Badge for Horn Cover
http://www.scooterloungeonline.com/genuinestickers
OR Have you tried contacting your dealer and see if he has any or knows where to get them?
a little dab of silicone
Posted: Wed Aug 24, 2016 8:07 pm
by junebugphoto
went to the hardware store in search of stuff to stick it back on with that would not be permanent in case I needed to access that screw again and honestly a little dab of regular old silicone sealant seems to do the trick.
snaking the wire through on a 2T
Posted: Tue Sep 06, 2016 1:05 pm
by junebugphoto
So I spent the better part of an afternoon unsuccessfully attempting to snake a feed wire through the front to the back... Has anyone done this on a 2t?
I feel like I am missing something.
Any advice would be appreciated. Thanks!
Posted: Tue Sep 06, 2016 1:45 pm
by phunksoulbrotha
If you re-read the thread you'll see that Slotrod tried that as well and didn't have much luck. Easier if you come at it from back to front. The post is towards the top and has photos.


