Got my RH 50 yesterday and am real happy with it. I've put on 175 miles already and have some questions.
I've filled the gas tank twice and both times the fuel gauge didn't budge off "empty" til I'd ridden about 10 miles. Then it slowly inched up to "Full". How come it doesn't register "Full" immediately?
I suspected something amiss in the speedometer/odometer when I drove a measured mile and odometer said I'd gone 1.1 miles. I think I found the answer to that from another thread about speedometers being off 10 or 15 percent. Not a big deal but I'm not really getting 100 mpg and not really going 50 mph I guess. Anyway, tomorrow I'll take my GPS along to see what it's really doing. Other than that I'm having a lot of fun with it.
New Roughhouse owner
Moderator: Modern Buddy Staff
-
oldscoot
- Member
- Posts: 22
- Joined: Thu Jul 15, 2010 9:32 pm
- Location: Wisconsin
-
JoshuaTree

- Member
- Posts: 12
- Joined: Sun Apr 25, 2010 6:19 pm
Congrats on the new rough house! I've had mine about 3 months now and it has 1300 miles on it. When I fill up the gas gauge doesn't go right to full either. Sometimes it takes some riding before it moves up there. Also, you're gonna want to use that gps to get a true MPH. I had the restrictions taken out off my rough house and I have a prime pipe and michelin bopper tires and I go about 50 mph according to GPS. My next upgrade is going to be a 70cc kit soon.
Have fun riding!
Have fun riding!
-
ScootLemont

- Member
- Posts: 2526
- Joined: Fri Apr 11, 2008 6:20 pm
- Location: Lemont IL
- Contact:
yeah... two scoots & both gas gauges are more like "vague approximations of if there might be some fuel in the tank or then again maybe not" gauges
Digital on Rattler & analog on Stella
Not a huge problem... I just pop the gas cap every 100ish miles & take a look
- its less of a concern on the Stella because of the reserve switch on the tank.
-----------------------------------------------
OldScoot - how many miles are you up to?
Still having fun?
Any problems?
-
oldscoot
- Member
- Posts: 22
- Joined: Thu Jul 15, 2010 9:32 pm
- Location: Wisconsin
Up to 670 miles and still having fun. The dealer showed me how to fix the gauge and it works fine now.ScootLemont wrote:yeah... two scoots & both gas gauges are more like "vague approximations of if there might be some fuel in the tank or then again maybe not" gauges
Digital on Rattler & analog on Stella
Not a huge problem... I just pop the gas cap every 100ish miles & take a look
- its less of a concern on the Stella because of the reserve switch on the tank.
-----------------------------------------------
OldScoot - how many miles are you up to?
Still having fun?
Any problems?
-
oldscoot
- Member
- Posts: 22
- Joined: Thu Jul 15, 2010 9:32 pm
- Location: Wisconsin
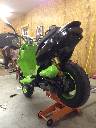
It was a 50 mile trip to see my dealer so I didn't take my scooter to him. I just drove there in my cage. I told him it seemed as though the float was sticking as I could push the float down and it wouldn't rise to the top. He diagnosed the problem immediately and said, (if I remember correctly) that this happens in about 1 in 10 new scooters. There is a linkage wire from the float to the fuel gauge. Where that wire passes through a linkage arm on the gauge, it is held in place by a tiny lock washer type of fastener. What happened is that fastener was too tight against the linkage arm. So, you remove the whatever is over the rear cover, i.e. rear rack, then remove gas tank cap, then remove rear cover. If you have the RH_Rat_service manual look on page 106. You don't need the manual, but it helps me describe this.agrogod wrote:Maybe you could clue us other folk in on what your dealer showed you.
Anyway, now your gas tank is exposed and you will see the fuel gauge on top of it. It is held on to the gas tank with 4 screws. Remove them and carefully lift the whole assembly out, including the float with wire linkage.
See page 104 of the manual to see the fuel gauge on top of the tank.
Move the float up and down. If it seems stiff then look where the linkage wire passes through the linkage arm of the gauge. With a thin flat screw driver pry the tiny fastener away from the linkage arm. Don't pry it all the way off. When the linkage arm and float moves freely up and down put it all back together. Dealer told me it was a 10 minute job and that's about what it took me. You need some metric sockets (10-12 mm), Phillips screwdriver and thin blade screwdriver.
-
Lotrat

- Member
- Posts: 440
- Joined: Fri Apr 29, 2011 5:35 am
- Location: Vista, CA
Awesome! Thanks for posting this. I just bought a new 2009 Rattler and 55 miles in I noticed my gas gauge was screwy. I pulled the gas cap and discovered that the float wasn't moving freely.oldscoot wrote:It was a 50 mile trip to see my dealer so I didn't take my scooter to him. I just drove there in my cage. I told him it seemed as though the float was sticking as I could push the float down and it wouldn't rise to the top. He diagnosed the problem immediately and said, (if I remember correctly) that this happens in about 1 in 10 new scooters. There is a linkage wire from the float to the fuel gauge. Where that wire passes through a linkage arm on the gauge, it is held in place by a tiny lock washer type of fastener. What happened is that fastener was too tight against the linkage arm. So, you remove the whatever is over the rear cover, i.e. rear rack, then remove gas tank cap, then remove rear cover. If you have the RH_Rat_service manual look on page 106. You don't need the manual, but it helps me describe this.agrogod wrote:Maybe you could clue us other folk in on what your dealer showed you.
Anyway, now your gas tank is exposed and you will see the fuel gauge on top of it. It is held on to the gas tank with 4 screws. Remove them and carefully lift the whole assembly out, including the float with wire linkage.
See page 104 of the manual to see the fuel gauge on top of the tank.
Move the float up and down. If it seems stiff then look where the linkage wire passes through the linkage arm of the gauge. With a thin flat screw driver pry the tiny fastener away from the linkage arm. Don't pry it all the way off. When the linkage arm and float moves freely up and down put it all back together. Dealer told me it was a 10 minute job and that's about what it took me. You need some metric sockets (10-12 mm), Phillips screwdriver and thin blade screwdriver.
It took me longer to type this post that it did to fix it.
I used a box cutter and worked around the retaining clip just until the arm moves freely. Thanks again.
- Attachments
-
- fuel tank (Small).jpg (40.61 KiB) Viewed 1691 times
-
- IMG00764 (Small).jpg (27.12 KiB) Viewed 1691 times
-
- IMG00765 (Small).jpg (24.89 KiB) Viewed 1691 times
-
SuperCyclone.81
- Member
- Posts: 282
- Joined: Sat Jan 21, 2012 10:53 pm
- Location: Fayetteville Arkansas

-
SuperCyclone.81
- Member
- Posts: 282
- Joined: Sat Jan 21, 2012 10:53 pm
- Location: Fayetteville Arkansas
-
agrogod
- Member
- Posts: 1156
- Joined: Mon Jul 19, 2010 9:29 pm
- Location: Rancho Cordova, CA
-
SuperCyclone.81
- Member
- Posts: 282
- Joined: Sat Jan 21, 2012 10:53 pm
- Location: Fayetteville Arkansas
-
SuperCyclone.81
- Member
- Posts: 282
- Joined: Sat Jan 21, 2012 10:53 pm
- Location: Fayetteville Arkansas
-
brianwheelies
- Member
- Posts: 260
- Joined: Tue Jun 28, 2011 8:15 pm
If you are satisfied with the performance, none.
You can modify the airbox for more flow and go up a main jet size depending on how extreme you go.
There are some parts you can get to make it faster like Prima pipe from scooterworks and big bore kits, carbs. It depends on how much you want to spend, really.
You can modify the airbox for more flow and go up a main jet size depending on how extreme you go.
There are some parts you can get to make it faster like Prima pipe from scooterworks and big bore kits, carbs. It depends on how much you want to spend, really.