OScoot! wrote:Oh wow....I LOVE this. Hmmmm.....maybe this should be a winter project for me and my pinkster!
How hard was this to do? How long did it take? I already have the black seat and handle covers, so all I'd need would be the black panels.
Edit: Searched Scooterworks for the panels but can't find them. Do you have part numbers? Or did you just call them?
Hi Carol-
I think the total cost was around $200 to $250 for the black panels from scooterworks.com. I had to order various parts at different times so I'm not sure how much it cost total. When I called scooterworks I explained over the phone what I needed and that was not an ideal way to order the parts because I didn't get everything I needed on the first or even second attempt.
Someone here said to have your dealer order the parts from Genuine instead of from scooterworks, but scooterworks IS Genuine Scooter Company's retail operation, so you'll be getting them from the same source. As you discovered, these parts are not listed on the scooterworks website, so if a dealer would have a microfiche of the parts, that would be a big help in identifying what you need. I don't know if dealers have a microfiche parts diagram of the Buddy, however.
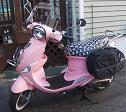
The inside of the legshield is made of two parts that are screwed together. The top part that contains the ignition switch, and the bottom part that creates the storage bin, plus the package hook if you want to change that. We kept ours pink. You'll need to remove the front of the legshield to get to some of the screws that hold these pieces together and to the scooter.
You remove the plastic surround from the ignition switch by twisting it counterclockwise an eighth of a turn and pulling it off (sort of like a bayonette mount). Then there is a little rectangular part on the lower piece that is called the VIN cover that snaps out by carefully using a small flat screwdriver on the top edge. Then there is the bottom piece under the rubber floor mat that holds the battery, plus the batter cover (which is already black - but scooterworks send me another one), and there are three other pieces to the rear of the rubber mat that come together under the seat.
If you want to get really fancy, you can also replace the pink parts under the headset and the rear part of the front fender, and the rear mudflap/license plate holder with black parts.
It took us a couple of hours to disassemble and reassemble all the parts, but it is not all that difficult if you are handy with tools. It just requires you to remove the seat and the pet carrier (as the interior liner/engine cover is called), the rear rack, and all of the fasteners holding together the fairing sections. You also have to remove the passenger footrests and the battery. I drilled out the VIN plate and reattached it to the new black piece with a pop rivet gun, so it looks factory original.
There is nothing really complicated in this project but it is time consuming and I'd recommend making notes about what types of fasterners were removed from what holes, etc. You could take photos as you go along to remember what things look like.
There are a few plastic automotive-type pin fasteners to deal with too. They require you to unscrew the center section, then remove it before pulling out the outer section. To reattach, you insert the outer section first, then push the inner section back in - no screw driver needed to reinsert it.
You also have to transfer over a number of automotive style clipnuts that hold various screws when attaching a plastic part to another plastic part. Be sure to identify each of them and transfer them over to the new black parts.
Good luck and let me know if I can be of any further help.
Ned