New Cowl Protectors!
Moderator: Modern Buddy Staff
-
SonnyD
- Member
- Posts: 348
- Joined: Sun May 26, 2013 3:21 am
- Location: Overland Park, Ks
New Cowl Protectors!
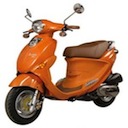
Decided to go the Cowl protector route.... My local Awesome shop had them in stock so i didn't even have to order them... I would have actually preferred black, but I already had the Chrome rack....so I went the chrome way.... Sure looks different then it did when I bought it in May...Still as Happy now as I was then.......
- Attachments
-
- IMG_0760.JPG (162.18 KiB) Viewed 1768 times
-
- IMG_0758.JPG (147.04 KiB) Viewed 1768 times
-
- IMG_0755.JPG (159.5 KiB) Viewed 1768 times
2006 Buddy 125 in ORANGE!..Sold
2007 Harley FLHX in Black Cherry!
1999 Saturn SC1...."Marvin"...Still runnin' strong
2007 Harley FLHX in Black Cherry!
1999 Saturn SC1...."Marvin"...Still runnin' strong
-
cyclewhitman
- Member
- Posts: 31
- Joined: Fri Aug 30, 2013 2:51 am
- Location: Kansas City, MO
Scooter looks great! I put some cowls on mine a week or so ago and am less worried about getting knocked by a car. I originally installed them with the foot pegs but took the pegs off after one day of finding myself constantly having to work my feet around them. How are they working for you?
I have a question about those mirrors from your handlebar ends. Where did you get them? How good are they? Are they easy to install? I'm constantly having to tighten my mirrors (not bar end mirrors) because of the windscreen that I have installed. The vibration just loosens the mirrors, so I carry a wrench with me to tighten them at stop lights. I'd love something that can either keep the mirrors more firmly in place or moved some place else.
I have a question about those mirrors from your handlebar ends. Where did you get them? How good are they? Are they easy to install? I'm constantly having to tighten my mirrors (not bar end mirrors) because of the windscreen that I have installed. The vibration just loosens the mirrors, so I carry a wrench with me to tighten them at stop lights. I'd love something that can either keep the mirrors more firmly in place or moved some place else.
-
PeteH

- Member
- Posts: 2281
- Joined: Mon Jan 17, 2011 4:32 pm
- Location: 3603mi SE of Dutch Harbor
Good looking cowl bars. I have the passenger pegs on mine, and I don't find that they interfere, but that's just me.
This thread will get you started with bar-end mirrors. You can either get expensive folding mirrors or cheapie s on eBay (as I did):
viewtopic.php?t=4495
This thread will get you started with bar-end mirrors. You can either get expensive folding mirrors or cheapie s on eBay (as I did):
viewtopic.php?t=4495
Feel da rhythm! Feel da rhyme! Get on up! It's Buddy Time!
-
cyclewhitman
- Member
- Posts: 31
- Joined: Fri Aug 30, 2013 2:51 am
- Location: Kansas City, MO
-
SonnyD
- Member
- Posts: 348
- Joined: Sun May 26, 2013 3:21 am
- Location: Overland Park, Ks
Yeah, that's one of the best looking scoots I've ever seen...the Grips are just awesome...... I got mine off of Ebay....less then 20.00 to my door. Decent quality. I've spent almost 200 a pair in the past for my regular bikes...but for 20 bucks I have no complaint. They stay in adjustment unless they get bumped, but no biggie. Install is a bit of trial and error. Just have to make sure nothing like the throttle tube or grip contacts it, and turns it, and that the throttle returns quickly to it's stop.
The passenger pegs are kind of in my way. I've got a short inseam, and my legs hit them when I try to back up and stuff. I may take them off, I just haven't decided yet... Thanks for the replies guys.....
The passenger pegs are kind of in my way. I've got a short inseam, and my legs hit them when I try to back up and stuff. I may take them off, I just haven't decided yet... Thanks for the replies guys.....
2006 Buddy 125 in ORANGE!..Sold
2007 Harley FLHX in Black Cherry!
1999 Saturn SC1...."Marvin"...Still runnin' strong
2007 Harley FLHX in Black Cherry!
1999 Saturn SC1...."Marvin"...Still runnin' strong

-
ed85379

- Member
- Posts: 510
- Joined: Thu Apr 15, 2010 10:00 pm
- Location: Boston
If you are using the cowl protectors along with the rear rack, I highly recommend replacing the default bolts with longer ones from the hardware store. Between the two devices, and all the washers, they only can bite into the holes on the frame like, a half a centimeter. At one point, mine just got ripped right out.

-
SonnyD
- Member
- Posts: 348
- Joined: Sun May 26, 2013 3:21 am
- Location: Overland Park, Ks
Hmmm, nice to know.....maybe they made a change, mine probably had a 1/4" or more in length.. I did read about some bolt problems people mentioned, but mine seemed plenty long... Thanks for the heads up, I'll keep watch on them. I will probably remove the passenger pegs, they bump my calves when I'm wheeling it around...more in the way then anything else....ed85379 wrote:If you are using the cowl protectors along with the rear rack, I highly recommend replacing the default bolts with longer ones from the hardware store. Between the two devices, and all the washers, they only can bite into the holes on the frame like, a half a centimeter. At one point, mine just got ripped right out.
2006 Buddy 125 in ORANGE!..Sold
2007 Harley FLHX in Black Cherry!
1999 Saturn SC1...."Marvin"...Still runnin' strong
2007 Harley FLHX in Black Cherry!
1999 Saturn SC1...."Marvin"...Still runnin' strong
-
ed85379
- Member
- Posts: 510
- Joined: Thu Apr 15, 2010 10:00 pm
- Location: Boston
1/4" is about a half a centimeter. That isn't enough to withstand much sideways pressure. They can get popped right out of there if they are even slightly loose, if you go over a big enough bump, and have anything even halfway into the supposed weight allowance for the rear rack.SonnyD wrote:Hmmm, nice to know.....maybe they made a change, mine probably had a 1/4" or more in length.. I did read about some bolt problems people mentioned, but mine seemed plenty long... Thanks for the heads up, I'll keep watch on them. I will probably remove the passenger pegs, they bump my calves when I'm wheeling it around...more in the way then anything else....ed85379 wrote:If you are using the cowl protectors along with the rear rack, I highly recommend replacing the default bolts with longer ones from the hardware store. Between the two devices, and all the washers, they only can bite into the holes on the frame like, a half a centimeter. At one point, mine just got ripped right out.
I went through hell after that. The holes were stripped. So I went and bought a manual bore-thing, to make new threads at a larger size. The stupid thing then broke off, right in the damn hole, and was then impossible to remove.
I ended up having to bring it to a mechanic, who drilled them out and welded in a couple of nuts in place. I then made sure to put in much longer bolts.
Don't go through what I went through. Get longer bolts.
-
SonnyD
- Member
- Posts: 348
- Joined: Sun May 26, 2013 3:21 am
- Location: Overland Park, Ks
Actually what I meant was.....once they threaded into the nuts.....they were still extended about 1/4" above the two brackets. About 6 full turns of my wrench...which should be pretty much to the point of extending all the way through the nuts.... I'll double check them again.......Thanks
2006 Buddy 125 in ORANGE!..Sold
2007 Harley FLHX in Black Cherry!
1999 Saturn SC1...."Marvin"...Still runnin' strong
2007 Harley FLHX in Black Cherry!
1999 Saturn SC1...."Marvin"...Still runnin' strong
-
ed85379
- Member
- Posts: 510
- Joined: Thu Apr 15, 2010 10:00 pm
- Location: Boston
You're missing my point. Simply covering the length of the threads themselves is not enough, when considering how powerful of a lever effect can have on them, and how flexible any metal can be from a sudden impact. You want the end of the bolt to be well beyond the bottom of the short distance of threads.SonnyD wrote:Actually what I meant was.....once they threaded into the nuts.....they were still extended about 1/4" above the two brackets. About 6 full turns of my wrench...which should be pretty much to the point of extending all the way through the nuts.... I'll double check them again.......Thanks
Maybe I'm just being a nag, and what happened to me has never happened to anyone else before.
-
SonnyD
- Member
- Posts: 348
- Joined: Sun May 26, 2013 3:21 am
- Location: Overland Park, Ks
Yeah, I understand about the bolt length if you are not all the way through the nut. I've never had a problem with a bolt that has its threads all the way through the nut. Now in my experience, if a bolt or nut starts stripping, it really didn't matter how long the bolt was, as long as it was all the through, once started it would come all the way out, even ones that protruded 2 inches through the nut. I will never put my feet on those pegs, and I don't carry passengers, so I think I'll be fine. But Thanks
2006 Buddy 125 in ORANGE!..Sold
2007 Harley FLHX in Black Cherry!
1999 Saturn SC1...."Marvin"...Still runnin' strong
2007 Harley FLHX in Black Cherry!
1999 Saturn SC1...."Marvin"...Still runnin' strong
-
cyclewhitman
- Member
- Posts: 31
- Joined: Fri Aug 30, 2013 2:51 am
- Location: Kansas City, MO
On a related note, when I installed my cowl protectors with the rack, I had a heck of a time getting the bolts in and it all lined up. Now I'm thinking maybe if the bolts were longer, they would have grabbed more easily. I'm going to explore this.
However, when installing it all, I noticed that on the right side of the seat, the material was starting to wear away. I bought the scooter over a month ago and had them transfer the rack I had on the old scooter to this new one. I wonder if the install was not done well enough. When I close the seat, I'm careful not to let it rub, but it is closer to the right side of the rack than the left. Do I need to reinstall the rack and cowls (given what I said above about the pain in the neck it was the first time) or do I need to do something else? Scooterworks, where I bought the scoot, is very open to giving me a new seat for free, and I'm going to take them up on it. I am going also to buy a seat cover from Cheeky Seats and want to get this figured out before so the seat cover does not get ruined.
Any help? Are pictures needed to see what I mean or have others experienced this? Thanks!
-
ed85379
- Member
- Posts: 510
- Joined: Thu Apr 15, 2010 10:00 pm
- Location: Boston
It should be exactly the same on both sides. If not, then something was definitely installed wrong.cyclewhitman wrote:On a related note, when I installed my cowl protectors with the rack, I had a heck of a time getting the bolts in and it all lined up. Now I'm thinking maybe if the bolts were longer, they would have grabbed more easily. I'm going to explore this.
However, when installing it all, I noticed that on the right side of the seat, the material was starting to wear away. I bought the scooter over a month ago and had them transfer the rack I had on the old scooter to this new one. I wonder if the install was not done well enough. When I close the seat, I'm careful not to let it rub, but it is closer to the right side of the rack than the left. Do I need to reinstall the rack and cowls (given what I said above about the pain in the neck it was the first time) or do I need to do something else? Scooterworks, where I bought the scoot, is very open to giving me a new seat for free, and I'm going to take them up on it. I am going also to buy a seat cover from Cheeky Seats and want to get this figured out before so the seat cover does not get ruined.
Any help? Are pictures needed to see what I mean or have others experienced this? Thanks!
While I'm here, a couple more things I learned from how my dealer poorly installed mine originally:
Make *SURE* to use the rubber washer on the center bolt that comes with the rear rack. The center support kept breaking on the rear racks. Went through 2 of them before I installed the 3rd one myself, with the rubber washer for shock absorption.
It is also important to use locking washers on the sides. Mine kept shaking loose. I can't really blame the dealership for not putting those on though, because with the original bolts, they weren't really long enough to have another washer in there. (Another reason to get longer bolts)
-
cyclewhitman
- Member
- Posts: 31
- Joined: Fri Aug 30, 2013 2:51 am
- Location: Kansas City, MO
-
cyclewhitman
- Member
- Posts: 31
- Joined: Fri Aug 30, 2013 2:51 am
- Location: Kansas City, MO
-
ed85379
- Member
- Posts: 510
- Joined: Thu Apr 15, 2010 10:00 pm
- Location: Boston
I didn't look for a specific length. I took the original to the hardware store with me, and just looked for one with the same size head, and the same thread, which was at least 1/4" longer. But it all goes into a hollow tube, so you can get as long as you want. It wasn't even that easy finding the right thing. I had to go to 3 different stores before I found one of the right length, that didn't have a big area under the head without any thread.cyclewhitman wrote:Just so I don't make multiple trips to the hardware store, how long a bolt did you use?
-
cyclewhitman
- Member
- Posts: 31
- Joined: Fri Aug 30, 2013 2:51 am
- Location: Kansas City, MO
I went to 5 hardware stores and no luck finding the right size bolt. At the last store they suggested I go to an automotive parts store. I'll give it a go this weekend, but any suggestions? I found them online (the size is M8x1.25x60mm) button socket screw but you have to buy them in bulk.
I found one with a hex head and bought them but they are big and can ruin the seat because they touch. So the trade off is secure rack for a possible torn seat or safe seat and potential wobbly rack. As I said above, I have to reposition the rack and cowl bars anyway but really want to get this right.
I found one with a hex head and bought them but they are big and can ruin the seat because they touch. So the trade off is secure rack for a possible torn seat or safe seat and potential wobbly rack. As I said above, I have to reposition the rack and cowl bars anyway but really want to get this right.
-
ed85379
- Member
- Posts: 510
- Joined: Thu Apr 15, 2010 10:00 pm
- Location: Boston
Wow, really? I ended up finding what I needed at Home Depot. Did you only try dinky little neighborhood hardware stores? I mean, seriously, it should be a standard thread and size. I have hex head bolts myself, standard 0.5", I think. I forgot that the originals used alan-wrenches. They've never hit the seat on mine.cyclewhitman wrote:I went to 5 hardware stores and no luck finding the right size bolt. At the last store they suggested I go to an automotive parts store. I'll give it a go this weekend, but any suggestions? I found them online (the size is M8x1.25x60mm) button socket screw but you have to buy them in bulk.
I found one with a hex head and bought them but they are big and can ruin the seat because they touch. So the trade off is secure rack for a possible torn seat or safe seat and potential wobbly rack. As I said above, I have to reposition the rack and cowl bars anyway but really want to get this right.
-
cyclewhitman
- Member
- Posts: 31
- Joined: Fri Aug 30, 2013 2:51 am
- Location: Kansas City, MO
I went to HD first. Then to some others that are pretty big. All had hex heads, which is why I just decided to get some. Yours don't hit the seat? I think I need to play with the position of this all. Maybe this can work. I'll give it a go.
Yeah, the original ones are not hex head and have a rounded button shape. That way it clears the seat easily.
Yeah, the original ones are not hex head and have a rounded button shape. That way it clears the seat easily.
-
SonnyD
- Member
- Posts: 348
- Joined: Sun May 26, 2013 3:21 am
- Location: Overland Park, Ks
My bolts were plenty long...It's hard if you tighten one down before installing the one on the other side though...I blocked the scoot with my body and had to pull a little to get the hole to line up..I just pulled till the bolt dropped down. It didn't take a lot. None of those pieces are that precise though, if they just get dropped during shipment or where ever it can tweak them a bit....Mine is close to the seat on each side, but they don't touch.....
2006 Buddy 125 in ORANGE!..Sold
2007 Harley FLHX in Black Cherry!
1999 Saturn SC1...."Marvin"...Still runnin' strong
2007 Harley FLHX in Black Cherry!
1999 Saturn SC1...."Marvin"...Still runnin' strong
-
cyclewhitman
- Member
- Posts: 31
- Joined: Fri Aug 30, 2013 2:51 am
- Location: Kansas City, MO
-
SonnyD
- Member
- Posts: 348
- Joined: Sun May 26, 2013 3:21 am
- Location: Overland Park, Ks