Can we start a new discussion on that? I too dislike the 'star' and would like to swap out or get one of those moon hubcaps.slotrod65 wrote:That old style front hub intrigues me. I am not a fan of the way the star hub looks. Does anyone have a clue what would be involved in adding this style front hub to a Stella?
Stella 4T exhaust, lets discuss
Moderator: Modern Buddy Staff
-
clayjo
- Member
- Posts: 33
- Joined: Tue Mar 18, 2014 1:17 pm
- Location: Norwalk, Connecticut
-
slotrod65

- Member
- Posts: 473
- Joined: Wed Dec 05, 2012 9:28 pm
- Location: Albany NY
Agreed and done. For follow up on the front drum hub swap, see the below link.
viewtopic.php?p=333581#333581
For the ongoing exhaust thread, stay tuned to this channel.
viewtopic.php?p=333581#333581
For the ongoing exhaust thread, stay tuned to this channel.
-
djp4059
- Member
- Posts: 112
- Joined: Sun Jun 30, 2013 11:59 pm
- Location: Palos Hills, IL
-
Stilts

- Member
- Posts: 281
- Joined: Thu Jun 23, 2011 7:33 pm
- Location: Baltimore, MD
- Contact:
-
slotrod65
- Member
- Posts: 473
- Joined: Wed Dec 05, 2012 9:28 pm
- Location: Albany NY
I had a good day today, but I am rushed with family business, so no time to really evaluate the results:
https://www.youtube.com/watch?v=G93ZMxN ... e=youtu.be
https://www.youtube.com/watch?v=G93ZMxN ... e=youtu.be
-
Stilts
- Member
- Posts: 281
- Joined: Thu Jun 23, 2011 7:33 pm
- Location: Baltimore, MD
- Contact:
-
jimmbomb

- Member
- Posts: 801
- Joined: Fri May 20, 2011 1:00 am
- Location: St Louis
 [/URL]
 -
slotrod65
- Member
- Posts: 473
- Joined: Wed Dec 05, 2012 9:28 pm
- Location: Albany NY
I managed to take a few pics during the install. I followed the video, and it went smoothly. I was worried that the old exhaust might not want to come off, but the nuts unscrewed very easily from the motor flange.
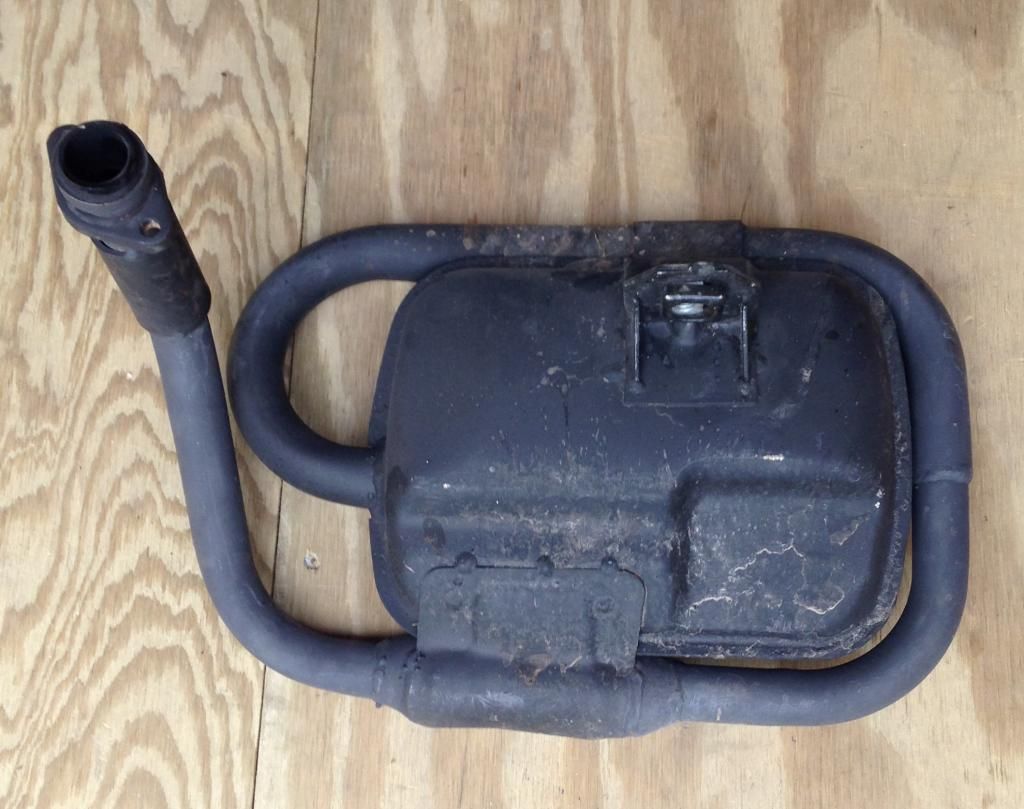
I haven't had time to measure, but I believe that the new exhaust give more room underneath than the stock one. The stock exhaust has that extra trombone tube going around the outside, making it wider than a 2T/PX exhaust. This requires the 4T to have an especially wide stand, and no one makes a reinforced, chrome or stainless version at this point. Hopefully this new exhaust will allow me to use a regular PX stand as I really would like a stainless one.

I haven't had time to measure, but I believe that the new exhaust give more room underneath than the stock one. The stock exhaust has that extra trombone tube going around the outside, making it wider than a 2T/PX exhaust. This requires the 4T to have an especially wide stand, and no one makes a reinforced, chrome or stainless version at this point. Hopefully this new exhaust will allow me to use a regular PX stand as I really would like a stainless one.
Last edited by slotrod65 on Sat May 10, 2014 1:22 am, edited 1 time in total.


-
slotrod65
- Member
- Posts: 473
- Joined: Wed Dec 05, 2012 9:28 pm
- Location: Albany NY
And then the end pipe goes on. There is a removable baffle: the "db killer" they call it. I will dig out my ring pliers next week and see how loud the pipe is without it.
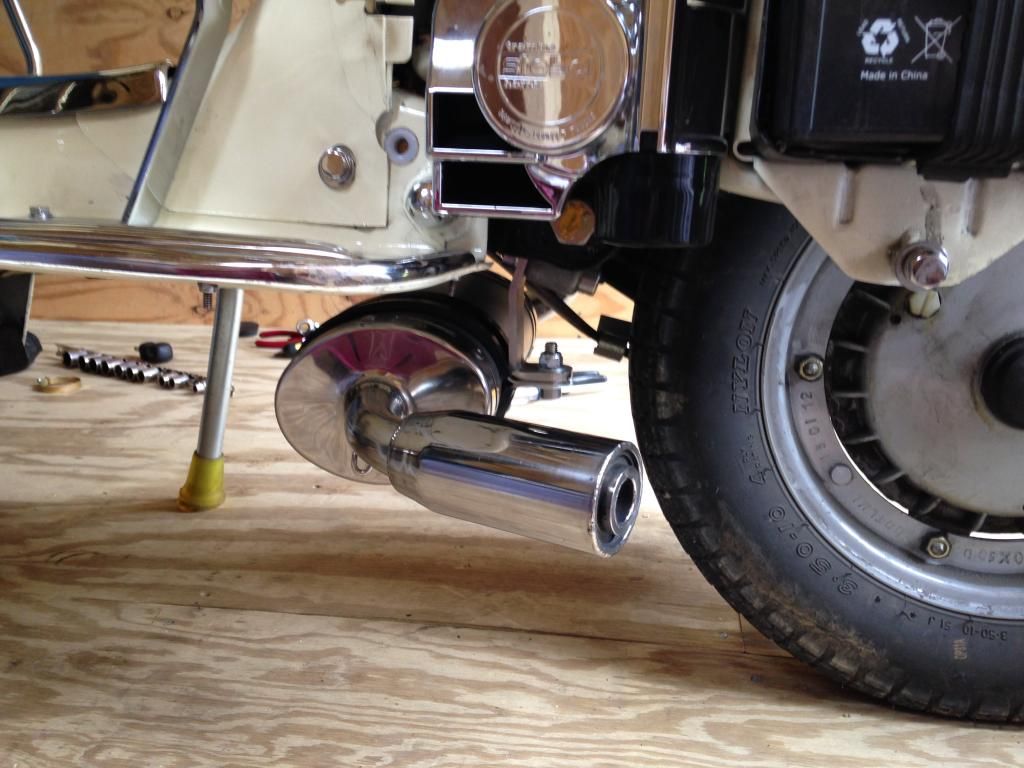
After that, you just makes sure everything is in place, and tighten all of the bolts. I was concerned about breaking the studs on the exhaust manifold, so I did not torque them down as hard as I could. I will check them later. Perhaps some loctite 266 is in order...

After that, you just makes sure everything is in place, and tighten all of the bolts. I was concerned about breaking the studs on the exhaust manifold, so I did not torque them down as hard as I could. I will check them later. Perhaps some loctite 266 is in order...
-
Howscoot
- Member
- Posts: 7
- Joined: Wed May 21, 2014 10:07 am
- Location: Wales, UK
GPR Exhaust
Hi Slotrod
I've been following your posts on this subject with interest over here in the UK. As Tipper has already mentioned in this thread, Tasso has developed an exhaust over here and sells it for £125/ approx $210 but other than some Youtube video on how it sounds there isnt much more info on the Tasso version available as yet.
GPR claim 'noticable' increases in power with their version and because I run a 125cc version of the 4-T I'd really like to have a bit more get-up-and-go for my little scoot.
I'm interested to know if you've noticed any actual difference in the way your scoot runs in the real world with the new GPR. As I said, there's a significant difference in the cost of these exhausts so I'd like to know what I'll be getting for my money.
Howscoot
-
slotrod65
- Member
- Posts: 473
- Joined: Wed Dec 05, 2012 9:28 pm
- Location: Albany NY
I have had the GPR exhaust on for a couple of weeks now, but only received my TASSO coil a few days ago and am still fiddling with the installation. I have only done about 40 miles with the GPR and have yet to check the plug, but I believe I am running a little lean, and am predicting a jet change will be one of my next steps.
So far, I can feel more pull in the mid range, and the machine does not lug as much. I also drive a small hill every day, and I used to have to speed up to 50mph on the downside to make it to the top at 30. Now I can comfortable get up that hill at 40-45mph with WOT, but I no longer need to dive bomb y way down to do so.
I plan on pulling the plug in the next few day as it will be raining, so more to come...
It does look and sound awesome though, so there is that.
-
Howscoot
- Member
- Posts: 7
- Joined: Wed May 21, 2014 10:07 am
- Location: Wales, UK
GPR exhaust
Sounds like there are real life scootering advantages to be had.
Thanks for your speedy reply, I'll watch out for your future posts on this with a lot of interest
Thanks
Thanks for your speedy reply, I'll watch out for your future posts on this with a lot of interest
Thanks
-
SockyTX
- Member
- Posts: 168
- Joined: Sat Jul 14, 2012 5:29 pm
- Location: Grapevine, TX
SlotRod-
So how is Stella running with the new exhaust?
I have a little crack developing in the mounting plate of my stock exhaust. I plan on getting it welded this week in hopes of extending its life for just a bit longer. I already had one replaced under my warranty when it cracked. My 2 year warranty is up on July 6th. I am thinking about buying the same exhaust. The install looks pretty straight forward. Did you change the jets or plug? If so which ones did you purchase, do you have a link to those you could share?
No pressure but i figured since you've gone down this path you might have the info.
SockyTX
Hispanic Panic
Hispanic Panic
-
slotrod65
- Member
- Posts: 473
- Joined: Wed Dec 05, 2012 9:28 pm
- Location: Albany NY
OK, So I have been riding every day with the GPR pipe. I was getting a lot of backfire and so I up-jetted to a 93 main and a 42 idle jet, and adjusted the idle. I feel much more pull in low and mid ranged. I can do as low as 15mph in 4th gear and pull right up to full speed. I am still getting some backfire, so when I get the time and the whim to deal with all that gasoline everywhere, I will be up-jetting again, 95 and 45 respectively.
That being said, I am very pleased with the GPR exhaust. I have been running it with the baffle installed as I feel it sounds deeper than without. I tend to run higher rpms in a lower gear in traffic just to use the louder pipe as an "I am here, don't run me over" attention getter. I am quite pleased with the results, and the extra pull in the low and mid ranges is pleasing. I do not believe I am getting any extra top end, as I run out of gear at 55-60 on flat ground.
That being said, I am very pleased with the GPR exhaust. I have been running it with the baffle installed as I feel it sounds deeper than without. I tend to run higher rpms in a lower gear in traffic just to use the louder pipe as an "I am here, don't run me over" attention getter. I am quite pleased with the results, and the extra pull in the low and mid ranges is pleasing. I do not believe I am getting any extra top end, as I run out of gear at 55-60 on flat ground.
-
Neurotic-Hapi-Snak

- Member
- Posts: 335
- Joined: Thu Jun 05, 2014 2:56 am
Here's where I've bought jets for the Keihin PB carb before:
Main:http://www.power-barn.com/servlet/the-1 ... Jet/Detail
Idle:http://www.power-barn.com/servlet/the-1 ... Jet/Detail
Keihin PBs are also used on a lot of Honda, Yamaha, and Suzuki ATVs, so the jets aren't too hard to find.
Main:http://www.power-barn.com/servlet/the-1 ... Jet/Detail
Idle:http://www.power-barn.com/servlet/the-1 ... Jet/Detail
Keihin PBs are also used on a lot of Honda, Yamaha, and Suzuki ATVs, so the jets aren't too hard to find.
-
SockyTX
- Member
- Posts: 168
- Joined: Sat Jul 14, 2012 5:29 pm
- Location: Grapevine, TX
Ok Ok Ok so I just had my second exhaust/muffler replaced under warranty for cracking and the mounting plate failing-tearing off. Just in time too cause had had it replaced 2 days before my warranty went ran out. So now I am thinking about ordering that GPR system and some new jets.
Just a little concerned about swapping the jets, I have only a slight appreciation understanding for the mechanics under the cowl. I feel confident that I can install the exhaust but am hesitant to tackle the jets.
Soooo I think I will see if my dealer can help with that.
Just a little concerned about swapping the jets, I have only a slight appreciation understanding for the mechanics under the cowl. I feel confident that I can install the exhaust but am hesitant to tackle the jets.
Soooo I think I will see if my dealer can help with that.
SockyTX
Hispanic Panic
Hispanic Panic
-
Stilts
- Member
- Posts: 281
- Joined: Thu Jun 23, 2011 7:33 pm
- Location: Baltimore, MD
- Contact:
How long did it take for the second one to crack? I noticed mine developing a new crack less than two months after replacing the original. Gotta love that quality.SockyTX wrote:Ok Ok Ok so I just had my second exhaust/muffler replaced under warranty for cracking and the mounting plate failing-tearing off. Just in time too cause had had it replaced 2 days before my warranty went ran out. So now I am thinking about ordering that GPR system and some new jets.
Just a little concerned about swapping the jets, I have only a slight appreciation understanding for the mechanics under the cowl. I feel confident that I can install the exhaust but am hesitant to tackle the jets.
Soooo I think I will see if my dealer can help with that.

-
slotrod65
- Member
- Posts: 473
- Joined: Wed Dec 05, 2012 9:28 pm
- Location: Albany NY
SockyTX: The jets are really easier to change than to clean. The below video shows carb servicing starting at the 2 minute mark. Instead of cleaning the jets, just put the new ones in. Be sure to use the correct tools, and a screwdriver with a nice fat blade to remove the jets. It can take some wiggling to get the intake bolts back in, but it is more an annoyance than anything else. Just go by hand until you are sure you have the threads started.
http://vimeo.com/20618680
The real pain is the changing/testing/changing. If someone else dials it in, and all you have to do is change the jets once, you are way ahead of the game.
I will let you guys know when I get the 95/45 jets installed.
http://vimeo.com/20618680
The real pain is the changing/testing/changing. If someone else dials it in, and all you have to do is change the jets once, you are way ahead of the game.
I will let you guys know when I get the 95/45 jets installed.
-
Neurotic-Hapi-Snak
- Member
- Posts: 335
- Joined: Thu Jun 05, 2014 2:56 am
Slotrod, you sure you need a 45 idle? That seems pretty rich. One way to tell is to set the idle in the normal manner. This should be down while the engine is at temp, so after a decent ride. Turn the idle mix screw in till it lightly seats, turn it out 1 1/2 turns. Start the scooter. Turn the idle (throttle stop) screw to speed up the idle a bit, this makes it easier to tell the difference in RPM. Turn the mix screw out 1/4 turn, wait 10 sec.
*If the RPM went down, turn in 1/4 wait 10 secs, turn in 1/4 turn, wait 10 secs. If they went up, keep turning in 1/4, waiting 10, till they decrease. If they go down, go back 1/4 turn.
*If the RPM went up, turn out another 1/4 turn and wait 10 secs. If they go up again, keep turning 1/4, waiting 10 till they decrease. If they decrease go back 1/4 turn.
*You are trying to find the idle mix with the highest RPM.
*If the mix screw is turned out more than 2-2 1/2 turns, go up a jet size and start over, less than 1 turn, go down 1 size.
*Once done, turn the idle speed back down.
There also are ways of reading a spark plug that can tell you the air/fuel ratio at idle, mid, and WOT.
http://www.4secondsflat.com/Spark_plug_reading.html
-
Neurotic-Hapi-Snak
- Member
- Posts: 335
- Joined: Thu Jun 05, 2014 2:56 am
I ordered the GPR, too. So I guess I should play it safe and purchase both a 42 and 45 idle. Maybe a 48, since I plan on installing the 165cc cylinder at some point. I'm already running a 92 main with the stock exhaust and it's running well, the plug is a nice tan to medium brown when I pull it. So I'll get a 95 and 98, and 100, possibly 105, for the 165 when I get it.slotrod65 wrote:I followed these instructions and I am out 2 and 1/2 turns, yet I am still not satisfied with the idle mix. As per the instructions, I am going one size higher which is 45.
-
misterbrackets
- Member
- Posts: 162
- Joined: Thu Apr 18, 2013 5:19 am
- Location: Vista CA (San Diego)
- Contact: