Finally! I tried to do it all in a weekend, that was 4 weeks ago. It was worth it, I'm really happy with the turn out. I used Rescue Green Automotive Paint from Jeep. (Click "All Sizes" For the large view)
It's a bit dusty from all the dried up paint particles; im going to wait a week for the paint to cure, then give 'er a wash.
I'm going to install 10gr Dr. Pulley weights over the weekend.
Check them out!
http://www.flickr.com/photos/24216818@N ... 990026495/
Thanks
Jason
New Paint Job!
Moderator: Modern Buddy Staff
-
jasonkoscho

- Member
- Posts: 78
- Joined: Tue Jan 16, 2007 7:28 pm
- Location: Philly
- Contact:
New Paint Job!
Last edited by jasonkoscho on Tue Feb 26, 2008 1:54 pm, edited 1 time in total.
-
Corsair
- Member
- Posts: 931
- Joined: Tue Nov 14, 2006 9:09 pm
- Location: Rockin The Longhorns
- Contact:

-
jasonkoscho
- Member
- Posts: 78
- Joined: Tue Jan 16, 2007 7:28 pm
- Location: Philly
- Contact:
paint
I did clear coat. I decided to go with a Clear Coat Enamel. It seemed to be the thickest and provided the most protection to UV, heat, dirt, etc.. and the epoxy-polyurethane was $30 for a 9oz can...
But the enamal went on nice and smooth and really gave a clean, smooth finish.
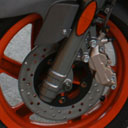
I painted the forks with a bronze metalic paint -- I originally wanted to annodize them, but couldnt find the right color.
But the enamal went on nice and smooth and really gave a clean, smooth finish.
I painted the forks with a bronze metalic paint -- I originally wanted to annodize them, but couldnt find the right color.
-
EP_scoot

- Member
- Posts: 760
- Joined: Mon Dec 10, 2007 3:42 pm
- Location: Eden Prairie, MN
Jason,
very nice job. It has a HALO3 look to it.
I noticed you had the garlic out to keep the vampire's paws out of your paint job, but I am curious about what you did to keep the dust out of the paint while it was drying. It looks like you did it on your garage? How were the fumes, how did you deal with them?
Very nice indeed.
Beer is the answer . . . what was the question?
D.
D.
-
jasonkoscho
- Member
- Posts: 78
- Joined: Tue Jan 16, 2007 7:28 pm
- Location: Philly
- Contact:
Vampires
Yeah - the garlic worked great -- had no issues with any vampires and such, which was my biggest concern; especially this time of the year.
The dust was pretty bad -- everything was coated and you can see it in the pictures. I was painting with the garage door open and a fan venting out, but iI later found that it didnt work too well; although it didnt seem to settle too much on the panels.
The fumes were TERRIBLE! You mos def need to invest in respirator where you can change filters. The automotive paint was the wost. It's in a whole other level of paint fumes.
-
illnoise

- Moderator Emeritus
- Posts: 3245
- Joined: Wed Sep 06, 2006 9:23 pm
- Location: Chicago, IL
Nice! I think you shoulda left the wheels orange, though >: )
Bb.
Bb.
2strokebuzz: When news breaks, we put it under a tarp in the garage.
-
jasonkoscho
- Member
- Posts: 78
- Joined: Tue Jan 16, 2007 7:28 pm
- Location: Philly
- Contact:
Orange.
ya know - I was going to. Keep some of the original Blur; but you cant go wrong with black rims. 
-
beelzebubbles
- Member
- Posts: 149
- Joined: Mon May 14, 2007 8:27 pm
- Location: SF, CA
-
justscooten
-
Christy

- Member
- Posts: 689
- Joined: Sun Feb 03, 2008 2:02 am
- Location: Plano TX
- Contact:
-
blurblaine
- Member
- Posts: 191
- Joined: Wed Sep 13, 2006 11:37 pm
- Location: Cincinnati, OH
I like it! I like it a lot!!
Hmmmm ... life after orange isn't so bad after all?!
Hmmmm ... life after orange isn't so bad after all?!
Blaine
The 'Nati
Blur 150
Sym RV250
http://www.blainekelley.com/scooters.html
orange is good ... except in the NFL!
The 'Nati
Blur 150
Sym RV250
http://www.blainekelley.com/scooters.html
orange is good ... except in the NFL!
-
Rippinyarn

- Member
- Posts: 652
- Joined: Tue Aug 08, 2006 9:35 pm
- Location: Royal Oak, Michigan
- Contact:
-
weaseltamer
- Member
- Posts: 424
- Joined: Wed Apr 04, 2007 5:20 am
-
lojical1
- Member
- Posts: 177
- Joined: Sat Jan 27, 2007 3:11 am
- Location: The Lone Star State!
-
360
- Member
- Posts: 72
- Joined: Mon Sep 11, 2006 1:16 am
- Location: Chicago, IL
-
jasonkoscho
- Member
- Posts: 78
- Joined: Tue Jan 16, 2007 7:28 pm
- Location: Philly
- Contact:
Paint
I went through about 6-7 spray cans total for the green, then a few for the wheels. My carbon-footprint jumped up a bit the past month...
I was originaly going to paint it with the dark green and do the whole Jeep Willy 1942 style, but wasnt sure how that would look with the "euro" style of the Blur compaired to the Classic style.
But I def have "The bug" now and one thing leads to the next.
and thanks!
I was originaly going to paint it with the dark green and do the whole Jeep Willy 1942 style, but wasnt sure how that would look with the "euro" style of the Blur compaired to the Classic style.
But I def have "The bug" now and one thing leads to the next.
and thanks!
-
zuman
- Member
- Posts: 77
- Joined: Sat May 31, 2008 1:44 pm
- Location: Midwest
Plastic parts?
That's a GREAT job, Jason, both in concept and in execution.
How hard was it to remove the plastic parts for painting? Did any tabs/connectors break?
Thanks.
How hard was it to remove the plastic parts for painting? Did any tabs/connectors break?
Thanks.
-
Racenut
- Member
- Posts: 467
- Joined: Thu May 22, 2008 5:36 am
- Location: Santa Cruz, Ca
- Contact:
Re: Plastic parts?
I'd be curious on this too. I tried to get the orange sides off mine and this thing is like a mind bender puzzle, you have to take it apart in the correct order or it just doesn't come apart without breaking something.zuman wrote:That's a GREAT job, Jason, both in concept and in execution.
How hard was it to remove the plastic parts for painting? Did any tabs/connectors break?
Thanks.
-
jasonkoscho
- Member
- Posts: 78
- Joined: Tue Jan 16, 2007 7:28 pm
- Location: Philly
- Contact:
Tabs
Thanks guys.
I was a little intimidated at first. And it def is like putting together a puzzle. Each piece requires the prior to be removed first. I didn’t break any tabs luckily; Just took my time and used a flashlight and bent the pieces to their max to see how they were put together. There were also a bunch of hidden screws that had to be removed before you could pop off the panels. The gas cap was tricky. You have to twist it to remove it. But it feels like its about to break, but it wont, it just pops off.
The ebst advise I could give is try to seperate them into sections (left side, right side, front fender, headlight etc...) and lable zip-lock baggies and place the screws in the baggies to keep everything in order. If i didnt do this, i think it would still be in pieces.
Jason.
-
Racenut
- Member
- Posts: 467
- Joined: Thu May 22, 2008 5:36 am
- Location: Santa Cruz, Ca
- Contact:
-
jasonkoscho
- Member
- Posts: 78
- Joined: Tue Jan 16, 2007 7:28 pm
- Location: Philly
- Contact:
gas cap
I forget... I didnt remove that until i removed the orange side panels and was able to see up where the cap locks in. I want to say to the right.
-
Racenut
- Member
- Posts: 467
- Joined: Thu May 22, 2008 5:36 am
- Location: Santa Cruz, Ca
- Contact:
-
charlie55
- Member
- Posts: 1924
- Joined: Tue Apr 08, 2008 6:47 pm
- Location: New Jersey
All:
Just finished tearing the Blur down, and in so far as the removal of the trim ring around the gas cap goes, twist it about 15 to 20 degrees counterclockwise (or until it just won't go anymore), then lift it straight up. It also helps to maintain downward pressure on the black panel underneath it as doing so gives you more clearance for a better grip on the ring.
Regards,
Charlie
