I've made two attempts to install this rack and been hoisted both times. I give up. I'm assuming anything on the bike will be metric, correct? My socket set is in horrible disarray and I've decided tomorrow to just pick up a new set, they're out of order and some are missing and I don't have the patience with a $3.99 Harbor Freight set.
Can someone tell me exactly what sockets and anything else I'll need to get this rack installed so I don't throw it against the wall and give up?
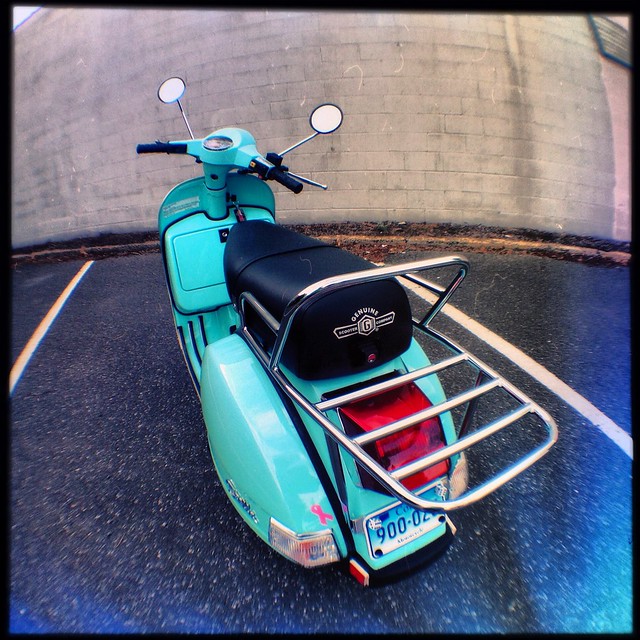
It's this rack, going on a 2T.
I'm outdoorsy in that I like getting drunk on patios.
It mounts using the two bolts under the seat, to the rear of the gas and oil. I was 99% sure they're 11mm, which of course is one socket that's missing.
I'm outdoorsy in that I like getting drunk on patios.
Kitty,
I have installed the same rack on my 09 as well.
Initially, I installed the front loop but decided to remove it.
Although I was able to space the seat hinge higher to keep the seat from binding on the bar when raised, it still interfered a bit.
So, I was able to find some chrome plugs at the hardware store to cap the holes on the rack.
For whatever it's worth, removing and re-installing the helmet/grocery bag hook in the front to install that bar is a real character builder and I've been spinning wrenches for over.....uh.....gonna be 50 years.
So, you might want to give that some thought.....the bar has no purpose other than decoration and the cowls come off a bit easier without getting bonked by the bar on removal.
OK, the bolts you will be removing for the seat are 13mm heads as well as the tank bolts that the rack will be secured with.
If you are going to install the loop, then remove the seat using the three bolts holding the hinge to the body.
I STRONGLY recommend you take one of the seat rubbers from under the seat out and go to a hardware store with a good hardware selection.
Using the seat rubber as your guide, look for fender washers that are the same outer diameter as the rubber and the same hole diameter as the the seat rubber stub.
I think I purchassed 18......don't freak out, they're cheap. Also buy four regular flat washers.....regular means normal outer diameter.
And, you will need two, longer bolts for the upper license plate mount because the rack supports share that position.....Again, take a sample and add at least a quarter inch to the length.
If you are not going to use the bar you will need two longer metric bolts.
Take one of the tank bolts out and have it along when you are getting the fender washers.
Find the metric bolts and duplicate your bolt thread size and pitch but buy two about a quarter inch longer......they can be up to a half inch longer and not cause any interference once installed.
And, if you aren't going to use the bar you can get a pair of decorative plugs for the rack (yep, carry that in too).....ACE hardware works best for this type of event.....Hint, my plugs were in the plumbing supply area.
Sounds like you'll spend a fortune but it'll be under ten bucks.
Back home, with your new tools, the process is reasonably straightforward.......you will have to take the plastic cover off the fuel sender.....caution, tiny flat washers and tiny lock washers are under the brass thumb nuts.....you can use a screwdriver on these as well.
Then slide the wires off the fuel sender.....they will have to run above the rack cross bars once the rack is installed.
Use your new, longer bolts in place of the two tank bolts and I installed two of the normal flat washers between the rack cross bar and the tank....this to prevent crushing the tank to body gasket and to prevent future corrosion.
NOTE: Put masking tape on the rear fender to prevent the rack verticle supports from bashing the fender and knocking the paint off......remove the tape only when everything is finally bolted down.
Once the rack is on and all the secondary parts (fuel gauge wires/cover, etcetera) you will find the seat will not latch.
This, because the seat is hitting on the rack.
Hopefully, you purchassed the longer seat stud but you may get away with the original.....process is the same for either stud.
Using a plain old adjustable wrench, loosen the stud and unscrew it several turns......now, gently close the seat on it......at some point of loosening, the seat will latch without pressing down on it.....that is the spot you are looking for.
Take a few fender washers and determine how many will be needed to fill the gap between the seat stud and body.
Remove the stud, install the washers on the body side and re-install the stud.....hand tighten only and try it.
If it latched, with the slightest amount of up and down play, tighten the seat stud with the crescent wrench.....CAUTION: The seat stud is NOT a hardened bolt.....it will actually stretch before it breaks.
You cannot feel this happening, so, just tighten it till resistance is felt and then stop there.
I hope that was detailed enouph,
Good luck,
Rob
PS......The remaining flat washers go between the center seat rubbers and seat frame, spacing the rubbers down to make up for the slightly higher latched seat position.....up to four per seat rubber.
Rob: I'm still trying to process all this, lol, thank you!
I stopped by Home Depot tonight and grabbed a new socket set, it's black and the guy told me that's good, I don't know, it was $20 and Husky and hopefully should stay together and last me a while. There was no way in hell I was getting it in my glovebox though, went back in and asked for scissors to cut the package off and I was in business. Wanted to come home and attempt the install, but I got close to my house and kept going. Twice.
Maybe tomorrow I'll be able to stay off her long enough to attempt it! I really need a rack!
I'm outdoorsy in that I like getting drunk on patios.
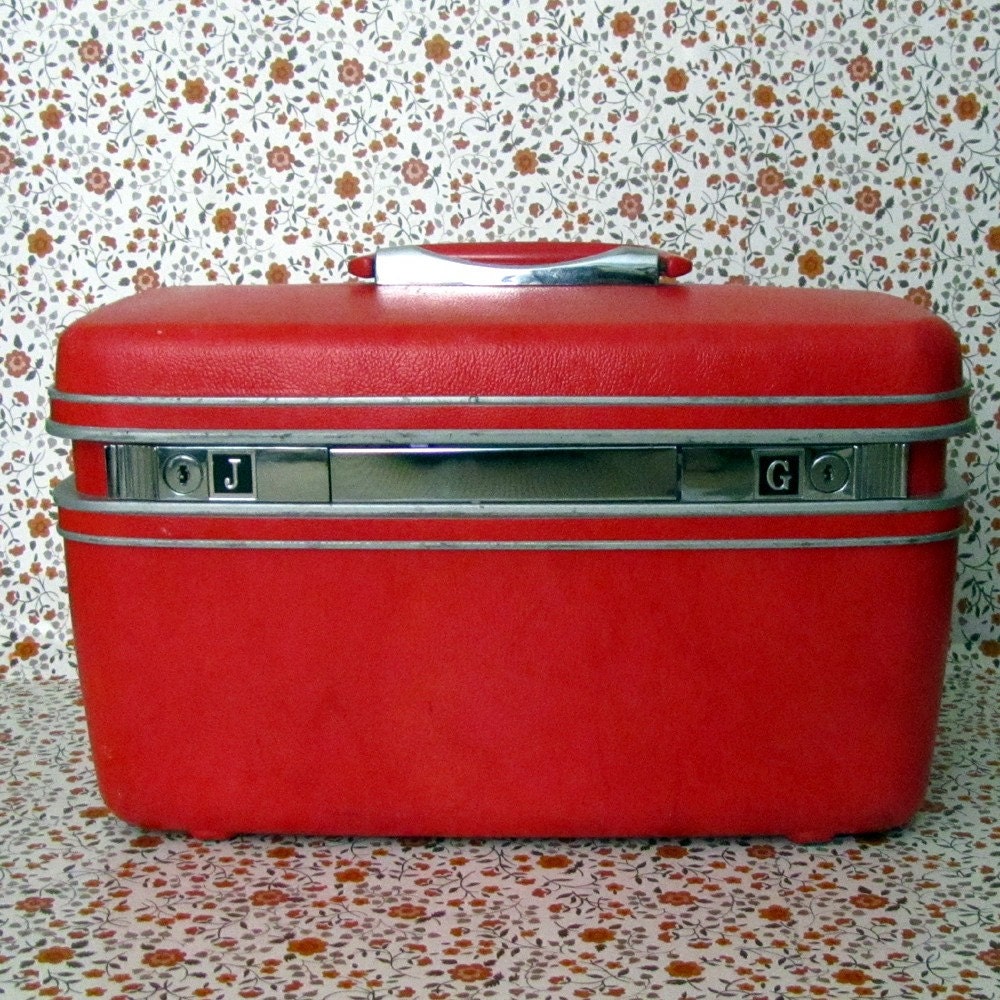
Oh by the way, my plan (at least when needed) is to use a vintage Samsonite train case on the rack, basically as a makeshift topcase with some flair. Mine are up in the attic, no picture at the moment, but the one I have in mine looks just like this one.
I'm outdoorsy in that I like getting drunk on patios.
ScootLemont wrote:topic15745.html
I have this rack
Scroll down to my july 2nd post about the shopping bag hook for an important tip
Got magnets or gum?
^^^ Yes, I used a magnet to hold it in place, too. Its a 3 handed job otherwise. Still a little tricky.
Speed is only a matter of money...How fast do you want to go?
I installed the rear half today after work, I could no longer stand the sweat dripping in my eyes and gave up on the front for now.
Please tell me it's my imagination and gas is not leaking out somehow. I swear my gas gauge shot down way quicker than it should have after the install, but maybe it's my imagination. Not like it's all that accurate anyway (the gas gauge, not my imagination)
I'm outdoorsy in that I like getting drunk on patios.
I fear that the bolts aren't as snug as they were before. I investigated a few times and noticed some gas (I assume gas) "rings" where the seat hits in the middle. The wire isn't my concern, I'm sure it's fine, the actual gas is! I haven't quite figured out a reasonable method to track my mileage yet so sadly I can't really tell if something is awry or if it really is just in my head. I'll top it off tomorrow and see how much she takes. Shouldn't be more than a gallon.
I'm outdoorsy in that I like getting drunk on patios.
The bolts just go through the tank flange.....they cannot cause any tank damage.....the flange is about 3/4" wide around the perimeter of the tank itself.
1st, good rack! I have the same on my 4t. Rob was right about the bag hook. My shop fabbed up a different mount to make it still work with the front part of the rack...
2nd- I really like your "topcase" idea. Personally, i'm on the lookout for the right vintage bowling bag for mine.
3rd- for mileage tracking, if you are a smartphone user, check out fuelly.com You can just plug all the numbers in when you fill up. Or you can jot everything down and enter the numbers later.
-tom