(NBR) 64 Vespa GD, Project CBR 2014

Discussion of Genuine Scooters and Anything Scooter Related

Moderator: Modern Buddy Staff

User avatar
BuddyRaton
Scooter Dork
Posts: 3887
Joined: Sat Sep 09, 2006 10:08 pm
Location: Boca Raton, Florida
Contact:

Post by BuddyRaton »

ericalm wrote:EXCELLENT thread! I'm hoping to learn a lot from following along.
Thanks Eric. I know it's not Buddy related but I thought some might be interested and enjoy. It also takes some of the mysteries out of motors.

I will say that documenting like this has made me pay closer attention to what I'm doing!

Don't worry...there is still a long way to go to finish!
"Things fall apart - it's scientific" - David Byrne
www.teamscootertrash.com

'06 Cream Buddy 125, 11 Blur 220, 13 BMW C 650 GT, 68 Vespa SS180, 64 Vespa GS MK II, 65 Lambretta TV 175, 67 Vespa GT, 64 Vespa 150 VBB 64 Vespa GL
User avatar
BuddyRaton
Scooter Dork
Posts: 3887
Joined: Sat Sep 09, 2006 10:08 pm
Location: Boca Raton, Florida
Contact:

Post by BuddyRaton »

After the cases were back together I put the rear hub on without making it up turned it and made sure it would shift through the gears. everything shifted smoothly. SWEET!!
Image

Once everything seemed good it was time to pull off the hub and put in the rear hub oil seal

Remember that the part with the metal goes towards the inside.

Image

Image

I have a few large size sockets that I picked up at garage sales for like a buck each to use as drifts. A little grease around the seal and I used one (23mm?) and tapped it in with a light dead blow hammer
Image

You don't want to wail on it but just tap in until it's seated.
Image
"Things fall apart - it's scientific" - David Byrne
www.teamscootertrash.com

'06 Cream Buddy 125, 11 Blur 220, 13 BMW C 650 GT, 68 Vespa SS180, 64 Vespa GS MK II, 65 Lambretta TV 175, 67 Vespa GT, 64 Vespa 150 VBB 64 Vespa GL
User avatar
BuddyRaton
Scooter Dork
Posts: 3887
Joined: Sat Sep 09, 2006 10:08 pm
Location: Boca Raton, Florida
Contact:

Post by BuddyRaton »

Two top end studs needed to be reinstalled so I used the two bolt trick. Put two bolts on the top stud threads, snug them up against each other and use the top one to turn the stud into the case. Of course a little blue locktite on the case threads. Once in use two wrenches to "unsnug" the bolts and just spin them off.

Image
Image

Image

then just clean up the excess blue.
"Things fall apart - it's scientific" - David Byrne
www.teamscootertrash.com

'06 Cream Buddy 125, 11 Blur 220, 13 BMW C 650 GT, 68 Vespa SS180, 64 Vespa GS MK II, 65 Lambretta TV 175, 67 Vespa GT, 64 Vespa 150 VBB 64 Vespa GL
User avatar
BuddyRaton
Scooter Dork
Posts: 3887
Joined: Sat Sep 09, 2006 10:08 pm
Location: Boca Raton, Florida
Contact:

Post by BuddyRaton »

The shop was starting to get a little out of hand. It was time to reorganize, put all the tools where they belong and straighten up a bit.


Could someone pleases tell me how this happens...I never knew that scooter tires were like rabbits! oh yeah...I have two more!

Image
"Things fall apart - it's scientific" - David Byrne
www.teamscootertrash.com

'06 Cream Buddy 125, 11 Blur 220, 13 BMW C 650 GT, 68 Vespa SS180, 64 Vespa GS MK II, 65 Lambretta TV 175, 67 Vespa GT, 64 Vespa 150 VBB 64 Vespa GL
User avatar
BuddyRaton
Scooter Dork
Posts: 3887
Joined: Sat Sep 09, 2006 10:08 pm
Location: Boca Raton, Florida
Contact:

Post by BuddyRaton »

Well it seems like I've finished the drive to Disney World and now we're ready to have some fun!

Yes...it's top end time!
Image

Here is the Pinasco piston and the stock before sending to Al.
Image

Here it is before installation.

Image

Image

Image

Image
"Things fall apart - it's scientific" - David Byrne
www.teamscootertrash.com

'06 Cream Buddy 125, 11 Blur 220, 13 BMW C 650 GT, 68 Vespa SS180, 64 Vespa GS MK II, 65 Lambretta TV 175, 67 Vespa GT, 64 Vespa 150 VBB 64 Vespa GL
User avatar
BuddyRaton
Scooter Dork
Posts: 3887
Joined: Sat Sep 09, 2006 10:08 pm
Location: Boca Raton, Florida
Contact:

Post by BuddyRaton »

Here you go ....some shots of the cylinder after Al did his porting.
Image

Image

Image
Image


And a shot of the ported cases

Image
"Things fall apart - it's scientific" - David Byrne
www.teamscootertrash.com

'06 Cream Buddy 125, 11 Blur 220, 13 BMW C 650 GT, 68 Vespa SS180, 64 Vespa GS MK II, 65 Lambretta TV 175, 67 Vespa GT, 64 Vespa 150 VBB 64 Vespa GL
User avatar
BuddyRaton
Scooter Dork
Posts: 3887
Joined: Sat Sep 09, 2006 10:08 pm
Location: Boca Raton, Florida
Contact:

Post by BuddyRaton »

First thing was to check the ring gaps. I slicked up the cylinder and the rings with a little two stroke oil.

I placed the ring in the cylinder and then set it in place with the piston to square it in the cylinder.

Image

Here it is set in the cylinder
Image

Then measure the gap with a feeler gauge (forgot to take a photo)

The Haynes specs for a P200 ring gap is 0.25mm to 0.40mm. My gap measured .005 mm...really really really tight!

Each one came out...a little work with a needle file back in...measure...out....file....you get it.

It's tempting to just hit it with a dremel but you can take off way too much really fast. I'd rather go through it a few times.

The top I ring I got to 0.35mm and the lower ring to 0.40mm. I went to the higher spec since the aluminum jug can run at a higher temp than cast iron and figured I would leave a little extra room for expansion.

The thicker I ring goes on top and the thinner ring on the bottom.

Thee is a little pin for each ring to keep it in the proper position. The ring gap goes over the pin.
Image
"Things fall apart - it's scientific" - David Byrne
www.teamscootertrash.com

'06 Cream Buddy 125, 11 Blur 220, 13 BMW C 650 GT, 68 Vespa SS180, 64 Vespa GS MK II, 65 Lambretta TV 175, 67 Vespa GT, 64 Vespa 150 VBB 64 Vespa GL
User avatar
BuddyRaton
Scooter Dork
Posts: 3887
Joined: Sat Sep 09, 2006 10:08 pm
Location: Boca Raton, Florida
Contact:

Post by BuddyRaton »

So reading through others experiences I decided to first slide the piston into the cylinder before making ir up to the crank.

First I inserted one circlip with the rounded stamped side inborad as suggested by others. It took me a little while to figure which was the stamped side but once you "see" it it's pretty obvious. Just stare at it for awhile as you turn it back and forth.

The top of the piston has an arrow on it that points to the exhaust when installed
Image

I also made a little mark with a sharpie on the bottom of the piston skirt in the same direction the arrow pointed. Probably not necessary but working from the bottom it was nice to know which way was which.

People always ask what I use as a ring compressor...they are pretty surprised when I tell them my fingers.

I slicked up the cylinder with some 2T oil, squeezed the top ring making sure the gap was at the pin and slid it in.
Image

Then just did the same thing with the bottom ring. Once it was in I slicked up the wrist pin and placed it through the side of the piston without the circlip making sure it didn't extend out to interfere with the little end of the crank.
"Things fall apart - it's scientific" - David Byrne
www.teamscootertrash.com

'06 Cream Buddy 125, 11 Blur 220, 13 BMW C 650 GT, 68 Vespa SS180, 64 Vespa GS MK II, 65 Lambretta TV 175, 67 Vespa GT, 64 Vespa 150 VBB 64 Vespa GL
User avatar
BuddyRaton
Scooter Dork
Posts: 3887
Joined: Sat Sep 09, 2006 10:08 pm
Location: Boca Raton, Florida
Contact:

Post by BuddyRaton »

Next was to fit the metal base gasket. When I was trying to fit it on it was really tight on the studs. I checked and discovered that one of the studs was bent. Luckily, smartly...what ever...I had ordered a set of studs so I had a replacement. I pulled the stud out and placed the gasket with three studs.
Image

As you can see it covers up a lot of the porting that has been done. Well that's not good! I took an exacto knife and cut slits in the gasket corresponding with the radial edges of the porting (from the outside in) then folded the cut piece down to mark the radial edge. I didn't want to cut it there and risk scaring up surfaces or loosing a piece of gasket so I pulled it off and trimmed the excess off, then placed it back into position.

Image

The it was installing the new stud as described before, sliding the piston and jug down the studs, sliding the wrist pin through the little end of the crank and the opposite side of the piston to the circlip, installing the second circlip and then letting the cylinder slide down to the gasket. Sorry for the lack of photos but both hands were busy!

Finally it's starting to look like a motor!
Image

I stuck on the flywheel and rotated it through a couple of cycles
Top dead center (TDC)
Image

Bottom Dead Center (BDC)
Image
"Things fall apart - it's scientific" - David Byrne
www.teamscootertrash.com

'06 Cream Buddy 125, 11 Blur 220, 13 BMW C 650 GT, 68 Vespa SS180, 64 Vespa GS MK II, 65 Lambretta TV 175, 67 Vespa GT, 64 Vespa 150 VBB 64 Vespa GL
User avatar
BuddyRaton
Scooter Dork
Posts: 3887
Joined: Sat Sep 09, 2006 10:08 pm
Location: Boca Raton, Florida
Contact:

Post by BuddyRaton »

Well time to see what's going on.

So I used a little grease to hold 4 pieces of solder.

Image

I placed the head on and just snugged the bolts a bit. Everything seemed a bit sloppy. It was easy to move the head around on top of the cylinder. I torqued the head down to 15 ft/lbs stuck in a woodruff key and slid the flywheel on (you can see it has been lightened).

Image

I cycled the piston four or five times then pulled the head back off.

We were shooting for a squish of about 1.5 mm and was surprised with what I got.

Image

Image

For the heck of it I made everything back up and put a compression tester on. I could hear an air leak somewhere and was only getting about 30 psi.

So that's enough for today. I'll give Al a call tomorrow and see where to go from here.

It looks like I may need to dowel at least the head like Chuck did. There is just way too much slop for my comfort.

On the good side...I'm making progress! I expected a few hick ups along the way, you just never know what they are going to be or when they are going to happen!
"Things fall apart - it's scientific" - David Byrne
www.teamscootertrash.com

'06 Cream Buddy 125, 11 Blur 220, 13 BMW C 650 GT, 68 Vespa SS180, 64 Vespa GS MK II, 65 Lambretta TV 175, 67 Vespa GT, 64 Vespa 150 VBB 64 Vespa GL
Robbie
Member
Posts: 536
Joined: Wed Apr 25, 2012 2:46 am
Location: Desplaines Il.

Post by Robbie »

BuddyRaton?

I've been following your build with great interest/enjoyment.
Couple of thoughts regarding this last post regarding piston to head clearance.

Isn't there a gasket between cylinder and head......or, how the heck does this seal?
Without fully torqueing the head the cylinder to case gasket is not fully compressed, nor is the cylinder 'squared' on the cases.....this may be your variation......just a thought.
Are you performing a cylinder leakage test or a compression test?
I don't understand how either could be conclusive without fully tightening the top end.

In my defense, I've built many engines, all returned to stock as designed by the manufacturer......you are performing a precision build with several part upgrades, so I understand the need for additional steps and measurements.......this is why I'm enjoying your thread so much.

Thanks for the effort.
Rob
User avatar
BuddyRaton
Scooter Dork
Posts: 3887
Joined: Sat Sep 09, 2006 10:08 pm
Location: Boca Raton, Florida
Contact:

Post by BuddyRaton »

Thanks for the comments.

I thought the same thing at first which is why I torqued to spec, 15 ft/lbs.

It is always hard to believe but most Vespa 2T motors do not use a head gasket, just machined surface to machined surface. I am going to talk to Al tomorrow about the possibility of milling for an O ring, profiling the head, decking the cylinder, going to a MMW head etc.

As long as I had it together I figured I would put a compression gauge on just to see what was going on. On cycling I could hear an air leak somewhere.

I have already ordered dowel pins to keep the head square.

Thanks again for the comments! I don't know everything so they are always appreciated!
"Things fall apart - it's scientific" - David Byrne
www.teamscootertrash.com

'06 Cream Buddy 125, 11 Blur 220, 13 BMW C 650 GT, 68 Vespa SS180, 64 Vespa GS MK II, 65 Lambretta TV 175, 67 Vespa GT, 64 Vespa 150 VBB 64 Vespa GL
User avatar
BuddyRaton
Scooter Dork
Posts: 3887
Joined: Sat Sep 09, 2006 10:08 pm
Location: Boca Raton, Florida
Contact:

Post by BuddyRaton »

OK...so here is what I decided to do.

I ordered a Pinasco VRH head specifically manufactured with bushings for the 115 kit with a long stroke crank . This head wasn't available when I ordered the kit
Image

I trust Al...but I am not comfortable drilling into an aluminum jug that has already had a lot of porting work invested in it. This should result in 225 ccc

I ordered from SIP in Germany and they are generally pretty quick with shipping.
"Things fall apart - it's scientific" - David Byrne
www.teamscootertrash.com

'06 Cream Buddy 125, 11 Blur 220, 13 BMW C 650 GT, 68 Vespa SS180, 64 Vespa GS MK II, 65 Lambretta TV 175, 67 Vespa GT, 64 Vespa 150 VBB 64 Vespa GL
User avatar
az_slynch
Member
Posts: 1934
Joined: Wed Sep 12, 2012 4:56 pm
Location: Tucson, AZ

Post by az_slynch »

Did you get that particular head? I dig the center-fire plug, but I believe you'll want a Cosa 200 cooling shroud to go with it.

Keen on this bit...you might knock me off the want for one of the MMW heads. :D
At what point does a hobby become an addiction? I'm uncertain, but after the twelfth scooter, it sorta feels like the latter...

Seriously...I've lost count...

Seven mopeds ...that's still manageable...
User avatar
jrsjr
Moderator Emeritus
Posts: 3746
Joined: Fri Jun 09, 2006 11:26 pm

Post by jrsjr »

BuddyRaton wrote:OK...so here is what I decided to do.

I ordered a Pinasco VRH head specifically manufactured with bushings for the 115 kit with a long stroke crank . This head wasn't available when I ordered the kit
Image
Sooooo beautiful! :shock: Poetry in aluminum.
User avatar
viney266
Member
Posts: 2270
Joined: Thu May 19, 2011 8:49 pm
Location: westminster md
Contact:

Post by viney266 »

I didn't know about that head either. Looks nice. Keep us up to date. The SIP catalogue is a wonderful place; dangerous for my bank account, but such nice stuff.

The pic of the head looks like it has no spark plug threads? blank or maybe just a pre production piece? Very interested how the head works out.

I have worked on 2 strokes a good part of my life. Just wanted to say you are doing a nice job.
Speed is only a matter of money...How fast do you want to go?
User avatar
BuddyRaton
Scooter Dork
Posts: 3887
Joined: Sat Sep 09, 2006 10:08 pm
Location: Boca Raton, Florida
Contact:

Post by BuddyRaton »

az_slynch wrote:Did you get that particular head? I dig the center-fire plug, but I believe you'll want a Cosa 200 cooling shroud to go with it.

Keen on this bit...you might knock me off the want for one of the MMW heads. :D
You know I was close on pulling the trigger on the MMW. Anything I have gotten of theirs has been top notch...but expensive..like $125 for a clutch basket.


I liked the pinasco head mainly because of the center fire, designed for this kit, comes with the dowls so hopefully I don't have to drill the cylinder and was a reasonable price.

I hear ya on the shroud but I figure first I can go with some metal tape and a hole saw.
"Things fall apart - it's scientific" - David Byrne
www.teamscootertrash.com

'06 Cream Buddy 125, 11 Blur 220, 13 BMW C 650 GT, 68 Vespa SS180, 64 Vespa GS MK II, 65 Lambretta TV 175, 67 Vespa GT, 64 Vespa 150 VBB 64 Vespa GL
User avatar
BuddyRaton
Scooter Dork
Posts: 3887
Joined: Sat Sep 09, 2006 10:08 pm
Location: Boca Raton, Florida
Contact:

Post by BuddyRaton »

viney266 wrote: The pic of the head looks like it has no spark plug threads? blank or maybe just a pre production piece? Very interested how the head works out.

I have worked on 2 strokes a good part of my life. Just wanted to say you are doing a nice job.
Actually it comes threaded with spacers to keep the spark plug at the correct depth in the head. Since I'm going to be running a CHT gauge it might take some washer and plug ring trial and error to get it right but really I consider that a pretty minor thing
viney266 wrote:The SIP catalogue is a wonderful place; dangerous for my bank account, but such nice stuff.
Opening the SIP catalog or visiting their website is worse thatn walking into a "Gentleman's Club"...just pull out your wallet and throw it at them!

viney266 wrote:I have worked on 2 strokes a good part of my life. Just wanted to say you are doing a nice job.
Thanks! And all comments and suggestions are appreciated! I would say that probably 1/3 of the project is figuring out what I want to accomplish, researching...researching, deciding what parts I want to use and why, how they should be modified, who can do the work that I don't have the skill or tools for etc. for me it's also a good part of the fun and challenge! Deciding to change heads at this point...well it doesn't surprise me too much.
"Things fall apart - it's scientific" - David Byrne
www.teamscootertrash.com

'06 Cream Buddy 125, 11 Blur 220, 13 BMW C 650 GT, 68 Vespa SS180, 64 Vespa GS MK II, 65 Lambretta TV 175, 67 Vespa GT, 64 Vespa 150 VBB 64 Vespa GL
User avatar
BuddyRaton
Scooter Dork
Posts: 3887
Joined: Sat Sep 09, 2006 10:08 pm
Location: Boca Raton, Florida
Contact:

Post by BuddyRaton »

Well I'm waiting on parts from Germany, Georgia...and I think Taht's it for now.

So I decided to clean the selector box. Sprayed it down with some CRC electrical cleaner to get the big garf off. Then I put it in the ultrasonic cleaner with a little simple green for an hour. Then a spray with water and it's squeaky clean. I wouldn't suggest getting an ultrasonic for leaning scooter parts but I have one for cleaning antique clock parts and find some other uses.

Image

Image

While I was waiting I decided to try the head again. I put it on and started tightening down in star pattern. Torqued to 6 ft/lbs around, 10 ft/lbs around and went to 15 ft/lbs around.

Torquing two of them up to 15 for the second time I felt it...that sick feeling that if you have worked on enough motors you know something is bad...how bad...don't know...but bad. All of a sudden it got easier to turn the nut...on two studs...crap!

Yep...something stripped. On two studs the nuts come out, on two studs the studs started to rotate out. The studs felt like they were still threaded into the case as they backed out.

The bad news...two stripped studs...the good news...two stripped studs. The case threads were fine.

Image

So I have learned something. If you have one bad stud, (remember that bent one a while back?) and maybe even if they look fine, change them all. I had three new one's left and knew which one I had changed before so I removed the other three and put new ones in.
"Things fall apart - it's scientific" - David Byrne
www.teamscootertrash.com

'06 Cream Buddy 125, 11 Blur 220, 13 BMW C 650 GT, 68 Vespa SS180, 64 Vespa GS MK II, 65 Lambretta TV 175, 67 Vespa GT, 64 Vespa 150 VBB 64 Vespa GL
User avatar
ericalm
Site Admin
Posts: 16842
Joined: Sat Jun 10, 2006 3:01 am
Location: Los Angeles, CA
Contact:

Post by ericalm »

Are you still thinking of this as a scoot for Cannonball 2014? Curious if your setup may change to deal with altitudes.
Eric // LA Scooter Meetup Group // Stella 4T // Vespa LX // Vespa LXS // Honda Helix // some, uh, projects…
User avatar
BuddyRaton
Scooter Dork
Posts: 3887
Joined: Sat Sep 09, 2006 10:08 pm
Location: Boca Raton, Florida
Contact:

Post by BuddyRaton »

ericalm wrote:Are you still thinking of this as a scoot for Cannonball 2014? Curious if your setup may change to deal with altitudes.

I think it will do well. I went with the Pinasco for higher torque at lower rpms. The Malossi kits like the high revs, not as much torque and are cast iron. More weight and lower running heat range. I'll have plenty of torque to climb.

The vortex carb has an adjustable air mix so I should be able to lean it out at higher elevations. Unless I was running FI I would rather run 2T. The worse that can happen at altitude is running rich which will cause a drop in power but the worse damage would be a fouled plug.

Much easier to rejet a dellorto 24/24 than a Buddy carb

One good...(bad?) thing is it looks like temps will be much cooler in the morning...OK....it could be freaking cold! Bad for the rider....good for the motor! When the weather gets warmer we will be running more on the flats...easier to jet for temp and should be able to run 70+.
"Things fall apart - it's scientific" - David Byrne
www.teamscootertrash.com

'06 Cream Buddy 125, 11 Blur 220, 13 BMW C 650 GT, 68 Vespa SS180, 64 Vespa GS MK II, 65 Lambretta TV 175, 67 Vespa GT, 64 Vespa 150 VBB 64 Vespa GL
User avatar
BuddyRaton
Scooter Dork
Posts: 3887
Joined: Sat Sep 09, 2006 10:08 pm
Location: Boca Raton, Florida
Contact:

Post by BuddyRaton »

I can't believe that I haven't updated in a month. Sorry about that. I have been busy, and have had some unfortunate work related news. (Anyone need an international wellsite geologist?)

Anyway let's get back to what counts.

Finished cleaning up the selector box, that thing was nasty! I put on a new gasket then manually pulled the selector rod all the way out to fourth gear. Then it was turn the "bat wing" on the box and slide it into place.

I will say that although this is pretty easy for me now the first few times I installed a selector box it was a bit tricky to figure out how it all fit back together.

Selector rod in 4th and gasket in place
Image

Selector "bat wing" past 4th gear
Image

Top view (a little past 4th gear setting)
Image

Slide the actuator arm onto the rod
Image

Twist the back wing into fourth and let it make up to the case and torque down the nuts.
Image

Then I made sure it shifted through the gears. here it is set in first gear.
Image

This is how it will look with the box cover on. Need to wait until the flywheel cover is on to bolt it in place
Image
Last edited by BuddyRaton on Mon Sep 09, 2013 2:52 pm, edited 3 times in total.
"Things fall apart - it's scientific" - David Byrne
www.teamscootertrash.com

'06 Cream Buddy 125, 11 Blur 220, 13 BMW C 650 GT, 68 Vespa SS180, 64 Vespa GS MK II, 65 Lambretta TV 175, 67 Vespa GT, 64 Vespa 150 VBB 64 Vespa GL
User avatar
BuddyRaton
Scooter Dork
Posts: 3887
Joined: Sat Sep 09, 2006 10:08 pm
Location: Boca Raton, Florida
Contact:

Post by BuddyRaton »

oops...double post...nuthin to see here!
Last edited by BuddyRaton on Mon Sep 09, 2013 4:14 pm, edited 1 time in total.
"Things fall apart - it's scientific" - David Byrne
www.teamscootertrash.com

'06 Cream Buddy 125, 11 Blur 220, 13 BMW C 650 GT, 68 Vespa SS180, 64 Vespa GS MK II, 65 Lambretta TV 175, 67 Vespa GT, 64 Vespa 150 VBB 64 Vespa GL
User avatar
BuddyRaton
Scooter Dork
Posts: 3887
Joined: Sat Sep 09, 2006 10:08 pm
Location: Boca Raton, Florida
Contact:

Post by BuddyRaton »

Hardened steel studs came in from SIP. I ordered the first thread sized over since the motor is a 79 and a couple of the studs felt a little loose...maybe just too easy to turn into the cases by hand.

The studs came in and it was time to install them.

Image

The studs are notched to fit a 7mm open end wrench.
Image

They are tight going in, I brushed on a little never seize. SIP suggests using the two wrench method but I just put a pair of vice grips on the end of the 7mm wrench to install.

As long as I had it all apart again I double checked the ring gap. put some copper bases permatex on each side of the base gasket

Image

reinstalled the cylinder
Image

and brushed on a thin layer of permatex head shellac

Image
Image
"Things fall apart - it's scientific" - David Byrne
www.teamscootertrash.com

'06 Cream Buddy 125, 11 Blur 220, 13 BMW C 650 GT, 68 Vespa SS180, 64 Vespa GS MK II, 65 Lambretta TV 175, 67 Vespa GT, 64 Vespa 150 VBB 64 Vespa GL
User avatar
BuddyRaton
Scooter Dork
Posts: 3887
Joined: Sat Sep 09, 2006 10:08 pm
Location: Boca Raton, Florida
Contact:

Post by BuddyRaton »

The Pinasco head also came in. I think the previous photo was for a 125/150 as the 200 head plug is not centered.

Image

The head comes with centering dowels
Here is the head with the dowel and the plug installed. The plug looks way too deep into the head
Image


The head also comes with a spacer for the spark plug.
Image

I'm also going to be running a CHT at the plug. I happen to have an old broken thermocouple (another reason not to throw anything away!) so I measured that also.
Image

Usually I remove the plug crush washer when using the CHT but I left it on to see how the plug would sit with the washer, spacer and CHT.

I thought the depth looked good but if someone has another opinion please let me know!

Image

It was a pleasure torquing down the head with the new studs. It all felt just the way it should. Nice clicks on the torque wrench at 6, 10, and 15 ft/lbs.
"Things fall apart - it's scientific" - David Byrne
www.teamscootertrash.com

'06 Cream Buddy 125, 11 Blur 220, 13 BMW C 650 GT, 68 Vespa SS180, 64 Vespa GS MK II, 65 Lambretta TV 175, 67 Vespa GT, 64 Vespa 150 VBB 64 Vespa GL
User avatar
Syd
Member
Posts: 4686
Joined: Wed Jul 18, 2007 6:41 am
Location: Tempe

Post by Syd »

Sorry to hear about the work related news ScooterRaton. Best of luck on that end.

That last picture is art. Very nice.
The majority is always sane - Nessus
User avatar
BuddyRaton
Scooter Dork
Posts: 3887
Joined: Sat Sep 09, 2006 10:08 pm
Location: Boca Raton, Florida
Contact:

Post by BuddyRaton »

Thanks Syd. I kind of needed a kick in the butt anyway. I may have had enough of consulting and may look into going back offshore or back overseas...or back offshore overseas.

You know I've been taking a lot of photos to document. Once in a while I need to take a "real" look at them. That is a pretty cool shot.
"Things fall apart - it's scientific" - David Byrne
www.teamscootertrash.com

'06 Cream Buddy 125, 11 Blur 220, 13 BMW C 650 GT, 68 Vespa SS180, 64 Vespa GS MK II, 65 Lambretta TV 175, 67 Vespa GT, 64 Vespa 150 VBB 64 Vespa GL
User avatar
BuddyRaton
Scooter Dork
Posts: 3887
Joined: Sat Sep 09, 2006 10:08 pm
Location: Boca Raton, Florida
Contact:

Post by BuddyRaton »

So next was to finish up around the rear hub.

First thing was to install the O rings including the figure 8.

Image

Then the back plate or "dust cover". I have the original but this is one I have had sitting on the shelf for about 5 years. I had ordered a "dust cover" from Scooters O thinking of a hub cover. This came with the order and I was kind of "that's not what I ordered". Well...when you look at diagrams and Scooter O's description...that's a dust cover...I got what I ordered!

I know scooters O would have taken it as a return but I didn't want to pay shipping (it was an inexpensive part) and figured I would use it "someday".

Someday arrived!
Image

Brakes were next.

I cut some slots in the shoes with a hacksaw being careful not to go all the way through the compound.
Image

Image

Next a little high temp grease on the posts and the actuator. Make sure the external actuator arm is in the right position as it may have moved with all the flopping around of the motor

Put on the spring and place the shoes on the posts. I don't set them all the way down yet.

Image

Then with a screwdriver open up the shoes and get one side on to the actuator...then the second side.
Image

I tap everything down into position with a light plastic dead blow hammer..remember tap...no need to hammer them on!

Image

Get the retaining clips in position...I always use new clips.
Image

Cover it up with your hand in case it trys to fly away and push into place with your fingers.

Image

After that work the actuator a few times to see everything is working right.

I had a new rear hub so I cleaned with brake cleaner, lightly sanded ine inside with a 120 grit sanding sponge and hit with cleaner again. Then I placed the hub on and made sure it turns free. I put the washer and castelated nut on finger tight to keep everything clean. That will be torqued down when the motor is installed.

Image
Last edited by BuddyRaton on Mon Sep 09, 2013 8:35 pm, edited 1 time in total.
"Things fall apart - it's scientific" - David Byrne
www.teamscootertrash.com

'06 Cream Buddy 125, 11 Blur 220, 13 BMW C 650 GT, 68 Vespa SS180, 64 Vespa GS MK II, 65 Lambretta TV 175, 67 Vespa GT, 64 Vespa 150 VBB 64 Vespa GL
User avatar
BuddyRaton
Scooter Dork
Posts: 3887
Joined: Sat Sep 09, 2006 10:08 pm
Location: Boca Raton, Florida
Contact:

Post by BuddyRaton »

Next up was mounting the carb air box. This motor will start out going into my 67 GT rat. No oil reservoir for the injector system so I left the shaft out and plugged the hole with some grease. This way when it is time all I have to do is reinsert the injector shaft and change some gaskets.

Image


Then the air box gasket
Image

and mount the air box with one screw and a drop of blue
Image

I'm going to leave it at that for now and mount the carb once the motor is in the frame
"Things fall apart - it's scientific" - David Byrne
www.teamscootertrash.com

'06 Cream Buddy 125, 11 Blur 220, 13 BMW C 650 GT, 68 Vespa SS180, 64 Vespa GS MK II, 65 Lambretta TV 175, 67 Vespa GT, 64 Vespa 150 VBB 64 Vespa GL
User avatar
BuddyRaton
Scooter Dork
Posts: 3887
Joined: Sat Sep 09, 2006 10:08 pm
Location: Boca Raton, Florida
Contact:

Post by BuddyRaton »

That's pretty much all I can do before dropping the motor out of the GT.

But what about the clutch? Well...during CBR 2012 my newfeld reinforced cosa clutch asploded after about 1,00 miles. Some of the parts I used to build a clutch in the parking lot I wanted to use in this motor.

OK...I wanted to use the MMW clutch basket.

First thing was to get the parts ready.

Image

Soak the fiber ("cork") plates in 30W non detergent oil overnight. Actually they soaked for about a week.
Image
Image


The steel plates are fairly smooth
Image

To give them a little more "tooth I roughed up the steels a little with a dremel grinding stone.

Image

Clutch rebuilds have been covered many places...and probably better that I can do.

Dave at Scooter Mercato has a great writeup http://www.scootermercato.com/Garage/Te ... ch-Rebuild

and so does scooter help
http://www.scooterhelp.com/tips/engine/ ... vespa.html

I pulled the clutch out of my GT motor and disassembled as shown in the above.

The 23 tooth back plate gear was a little loose so I peaned the rivets back tight. That will be replaced at a later time.

Peaning the rivets only took a couple of taps on each one. I went in a criss cross manner and marked each one after tapping to keep track
Image

I also replaced the brass bushing and washers. Be careful with the bushing and keep it warm but not too hot. I have cracked them installing in the past.

Heat it up
Image

Tap it on
Image

Keep it warm and press it on
Image

Then clean up the MMW basket and spring cups and put them back in place with new springs

Image

Then fit the back plate, fiber plate, steel plate etc. After assembled use the clutch tool to compress and fit in the retaining ring. Make sure the opening of the retaining ring is located at a solid part of the basket, not at one of the openings for the cork plate tabs.
Image
"Things fall apart - it's scientific" - David Byrne
www.teamscootertrash.com

'06 Cream Buddy 125, 11 Blur 220, 13 BMW C 650 GT, 68 Vespa SS180, 64 Vespa GS MK II, 65 Lambretta TV 175, 67 Vespa GT, 64 Vespa 150 VBB 64 Vespa GL
User avatar
BuddyRaton
Scooter Dork
Posts: 3887
Joined: Sat Sep 09, 2006 10:08 pm
Location: Boca Raton, Florida
Contact:

Post by BuddyRaton »

Next was the clutch install. A new woodruff key (paper towel in place in case I drop it!) and the oil injector gear in place.

Image

I lined up the keyway slid the clutch onto the crank. Secured with a drop of blue, a wavy washer and a cosa clutch nut torqued to 35 ft/lbs.
Image

This was also a good time to double check the input shaft nut torque and make sure it was positioned so that the clutch cover will go into place.

You can also see the clutch holding tool in place.
Image

Then the pressure plate
Image

Replace the cover O ring..the old one was really dried out
Image

A little grease to hold the plunger in place and then install the cover
Image

Image

Check to make sure it fells right...and it feels sweet!
Image
"Things fall apart - it's scientific" - David Byrne
www.teamscootertrash.com

'06 Cream Buddy 125, 11 Blur 220, 13 BMW C 650 GT, 68 Vespa SS180, 64 Vespa GS MK II, 65 Lambretta TV 175, 67 Vespa GT, 64 Vespa 150 VBB 64 Vespa GL
User avatar
BuddyRaton
Scooter Dork
Posts: 3887
Joined: Sat Sep 09, 2006 10:08 pm
Location: Boca Raton, Florida
Contact:

Post by BuddyRaton »

As long as I still had it on the bench I thought it would be a good time to make the timing marks.

I think the best description of how to make the marks has been written up by scooter help.

The points timing has a good description on how to locate top dead center (TDC) http://www.scooterhelp.com/tips/timing/ ... iming.html

The electronic ignition has a good walk through on how to set the stator
http://www.scooterhelp.com/tips/timing/ ... iming.html

I'm going for 18 deg before top dead center (BTDC).

I have a degree wheel that I have some magnets glued to the back so it will stick to the flywheel.
Image

In addition to the degree wheel I use a piston stop and a piece of wire as a degree wheel pointer.

The piston stop gets screwed into the spark plug threads

Piston stop
Image

Piston stop screwed into the head
Image


So first is to find TDC. Rotate the flywheel clockwise until it contacts the piston stop. Then set the degree wheel and wire pointer to 0

Image


Then...being careful not to move the pointer and the degree wheel on the flywheel rotate the fly wheel counter clockwise until the piston stop is encountered. I just rotate it by grabbing a flywheel fin.
Image

If you accidentally move the pointer or wheel don't panic...just start over!

Image

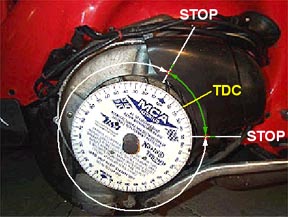
In my case it was 120 degrees from stop to stop. As shown by scooter help TDC is midway between the two stop points so divide 120 by 2 and TDC is 60 degrees past the first stop. Remove the piston stop and reposition the flywheel back to 0. Next turn the flywheel until the pointer, (in my case) points to 60 degrees.

The flywheel is now at TDC. I put a mark on the case and the flywheel and mark it TDC on the flywheel
Image

We also need a second mark on the flywheel for 18 degrees before the TDC mark. I just leave everything in place and use the wheel to measure, then mark the flywheel and label it 18 deg. When I make my marks I use a straight edge to get the marks as close as possible. In reality I figure the marks are actually about 1 degree wide.

Here you can see the 18 degree mark lined up with the case mark and the TDC mark further back.
Image

I also made a mark at the flywheel window at the pickup. Forgot to take a photo but we will see it later!
"Things fall apart - it's scientific" - David Byrne
www.teamscootertrash.com

'06 Cream Buddy 125, 11 Blur 220, 13 BMW C 650 GT, 68 Vespa SS180, 64 Vespa GS MK II, 65 Lambretta TV 175, 67 Vespa GT, 64 Vespa 150 VBB 64 Vespa GL
User avatar
BuddyRaton
Scooter Dork
Posts: 3887
Joined: Sat Sep 09, 2006 10:08 pm
Location: Boca Raton, Florida
Contact:

Post by BuddyRaton »

I decided to take a shortcut. My 67 GT has what started life as an 83 P125 motor. Instead of mounting the double yellow P200 stator and trying to figure out the wiring into my 12V 67 GT. I pulled the stator off the GT motor and mounted it into the P2 motor.

This way all I needed to do was re connect the wiring as it was before.
Timing is adjusted by rotating the stator, the black box it the pickup that is triggered by the flywheel when it passes.

First was to pull the wires through the case.
Image

The stator has 2 marks on it; "A" and "IT" There is also a mark on the case.
The "A" mark on the stator lined up with the case mark is for 23 degrees BTDC and the "IT" is for 18 degrees.

Image

I set the stator and lined it up with the IT mark. Am I going to trust that?
Heck no! That's why I went through marking the case and flywheel. I am hoping that it gets me close to start!

Then it was the basic mounting of the Ducati CDI, the black junction box, and making sure all the contacts were clean and secure.

Image

The last thing was to install a new woodruff key

Image

And mount the flywheel. I make a mark on the end of the crank lined up with the woodruff key to make it easier to line up the flywheel key way.
Image
"Things fall apart - it's scientific" - David Byrne
www.teamscootertrash.com

'06 Cream Buddy 125, 11 Blur 220, 13 BMW C 650 GT, 68 Vespa SS180, 64 Vespa GS MK II, 65 Lambretta TV 175, 67 Vespa GT, 64 Vespa 150 VBB 64 Vespa GL
User avatar
BuddyRaton
Scooter Dork
Posts: 3887
Joined: Sat Sep 09, 2006 10:08 pm
Location: Boca Raton, Florida
Contact:

Post by BuddyRaton »

Finally! I've done all I can on the bench, time to stick it into the GT!

Frame up on cycle jack, motor on a separate jack...and tire, make up the rear shock mount.

Image

Get the clutch side lined up and shove a large screw driver in there to hold it in place.

Image

Back to the fly side, get everything lined up, grease up the long bolt and slide it through and make it up.

Image

In!
Image

Rear wheel back on, up on the lift and finish the wiring.
Image
"Things fall apart - it's scientific" - David Byrne
www.teamscootertrash.com

'06 Cream Buddy 125, 11 Blur 220, 13 BMW C 650 GT, 68 Vespa SS180, 64 Vespa GS MK II, 65 Lambretta TV 175, 67 Vespa GT, 64 Vespa 150 VBB 64 Vespa GL
User avatar
BuddyRaton
Scooter Dork
Posts: 3887
Joined: Sat Sep 09, 2006 10:08 pm
Location: Boca Raton, Florida
Contact:

Post by BuddyRaton »

Next was the carb install. I'm using a DellOrto 24/24 modified to a vortex by Al at HRS.

Image
Image
Image

Remember...this is a carb with an injector pump so it has the oil channel on the bottom
Image

The main jet is an adjustable 175. I have the rest of the jetting info written down...in the shop...and will post it later.
Image

First I removed the banjo from the carb and made it up to the fuel line. For me it's just easier to do now when there is plenty of room!
Image

Since I am using an injected carb as a pre mix I had to be sure to use the correct gasket. Most...OK all...carb base gaskets have a hole in them for the oil to make it into the carb. This hole had to be covered so I took an air box gasket and cut it to fit the carb base and cover the injector hole

Image

The rest was pretty standard. Drop in carb, torque to 10 ft/lbs working up slowly so as not to warp the base and stick the slide

Image

Then reattach the choke, throttle cables and make up the banjo.

I also made sure to block off the oil injector intake with a piece of tubing and a bolt.
Image
"Things fall apart - it's scientific" - David Byrne
www.teamscootertrash.com

'06 Cream Buddy 125, 11 Blur 220, 13 BMW C 650 GT, 68 Vespa SS180, 64 Vespa GS MK II, 65 Lambretta TV 175, 67 Vespa GT, 64 Vespa 150 VBB 64 Vespa GL
User avatar
BuddyRaton
Scooter Dork
Posts: 3887
Joined: Sat Sep 09, 2006 10:08 pm
Location: Boca Raton, Florida
Contact:

Post by BuddyRaton »

TravisNJ wrote:What exhaust are you going to be using?
Here you go Travis.

Image

Got it yet?

Image

Image

Now?

Nope...that ain't no stinking Sito+!

SERIE PRO PEP Plus 3.0
http://www.sip-scootershop.com/en/produ ... p_23015000

The ultimate stealth high performance exhaust!
"Things fall apart - it's scientific" - David Byrne
www.teamscootertrash.com

'06 Cream Buddy 125, 11 Blur 220, 13 BMW C 650 GT, 68 Vespa SS180, 64 Vespa GS MK II, 65 Lambretta TV 175, 67 Vespa GT, 64 Vespa 150 VBB 64 Vespa GL
User avatar
BuddyRaton
Scooter Dork
Posts: 3887
Joined: Sat Sep 09, 2006 10:08 pm
Location: Boca Raton, Florida
Contact:

Post by BuddyRaton »

Of course as with many aftermarket parts...the fit wasn't quite right with my set up. With the standard mounting slots I was a few mm short of the exhaust stub.
Image

After mounting and removing and trimming a few times...fighting with that stupid exhaust bolt I just extended the mounting holes to slots.

Image This let me not only adjust the position but remove it without pulling the bolt.

Using the BFCLs to squeeze the deflated rear tire to remove the exhaust mounting bolt
Image

Then drill the hole for the EGT probe
Image

Of course it took longer (a good part of the day) to get everything set but it was finally mounted! with the EGT probe in place
Image

That's it!...well...no. The fancy center stand did not clear the box
Image

A little dremel work and problem solved
Image
"Things fall apart - it's scientific" - David Byrne
www.teamscootertrash.com

'06 Cream Buddy 125, 11 Blur 220, 13 BMW C 650 GT, 68 Vespa SS180, 64 Vespa GS MK II, 65 Lambretta TV 175, 67 Vespa GT, 64 Vespa 150 VBB 64 Vespa GL
User avatar
BuddyRaton
Scooter Dork
Posts: 3887
Joined: Sat Sep 09, 2006 10:08 pm
Location: Boca Raton, Florida
Contact:

Post by BuddyRaton »

A few things left to do.

Torque down the flywheel to 45 ft/lbs

Image

Torque the rear hub bolt to 65 ft/lbs and insert a new cotter pin. Remember ALWAYS use a new pin!
Image

Reattach brake and shifter cables and fill the crank case with 30W ND oil.
Image
"Things fall apart - it's scientific" - David Byrne
www.teamscootertrash.com

'06 Cream Buddy 125, 11 Blur 220, 13 BMW C 650 GT, 68 Vespa SS180, 64 Vespa GS MK II, 65 Lambretta TV 175, 67 Vespa GT, 64 Vespa 150 VBB 64 Vespa GL
User avatar
BuddyRaton
Scooter Dork
Posts: 3887
Joined: Sat Sep 09, 2006 10:08 pm
Location: Boca Raton, Florida
Contact:

Post by BuddyRaton »

A gallon of premium fuel with 3% elcheepo 2T oil as recommended by Al for break in. I 'd like to say that it was a one kick and it fired up...but it wasn't. It took some messing with plugs, longer ignition wire, a buttload of kicking, carb adjustments, a buttload of kicking, carb adjustments, a buttload of kicking.

I was ready to call it for a bit when I got that first fire and turn over! Some more adjustments and...

IT"S ALIVE!


http://www.youtube.com/watch?v=1TMTDfFpL8A

<iframe width="640" height="360" src="http://www.youtube.com/embed/1TMTDfFpL8 ... detailpage" frameborder="0" allowfullscreen></iframe>
Last edited by BuddyRaton on Wed Sep 11, 2013 7:20 pm, edited 4 times in total.
"Things fall apart - it's scientific" - David Byrne
www.teamscootertrash.com

'06 Cream Buddy 125, 11 Blur 220, 13 BMW C 650 GT, 68 Vespa SS180, 64 Vespa GS MK II, 65 Lambretta TV 175, 67 Vespa GT, 64 Vespa 150 VBB 64 Vespa GL
User avatar
BuddyRaton
Scooter Dork
Posts: 3887
Joined: Sat Sep 09, 2006 10:08 pm
Location: Boca Raton, Florida
Contact:

Post by BuddyRaton »

OK...now remember those marks I made earlier for timing? Time for timing check!

I used a timing light and a portable 12v dc battery.

The video isn't great..it seems that it's once in awhile that the shutter speed and timing light coincide but you can see where the marks don't quite line up. It was a bit awkward to hold the camera and the timing light so I shot it at idle about 1200 rpm. Later it looked the same using the strobe at 3,000 rpm

http://www.youtube.com/watch?v=P-wKyWOyRuI

<iframe width="640" height="360" src="http://www.youtube.com/embed/P-wKyWOyRu ... detailpage" frameborder="0" allowfullscreen></iframe>

The ignition is firing a few degrees before 18 degrees. Actually it's closer than I thought it would be so it will be a small adjustment of the stator.
"Things fall apart - it's scientific" - David Byrne
www.teamscootertrash.com

'06 Cream Buddy 125, 11 Blur 220, 13 BMW C 650 GT, 68 Vespa SS180, 64 Vespa GS MK II, 65 Lambretta TV 175, 67 Vespa GT, 64 Vespa 150 VBB 64 Vespa GL
User avatar
BuddyRaton
Scooter Dork
Posts: 3887
Joined: Sat Sep 09, 2006 10:08 pm
Location: Boca Raton, Florida
Contact:

Post by BuddyRaton »

Another delay due to medical issues...but this will get finished sometime in the next year or two!

One of the things that I did not want to do was rewire my GT to put the P200 motor in. That would mean pulling a new harness, rectifier, etc. Everything was working fine with the old system so I decided not to mess with it...too much!

What I did was use the stator that was used with my kitted 166 motor and swapped it to the P225. Timing for a 12v electronic ignition system is done by turning the stator. That repositions the pickup; the black box on the stator. As above the timing needed to be adjusted. when I turned the stator as far as the slots would allow I was still a few degrees shy of 18.

I used a dremel cut off wheel to extend the slots a bit so I could turn the stator plate more.
Image


After a few resets and checks the timing sat at 18 degrees BTDC. Then it was time to tighten up the stator screws with a bit of loctite, put the flywheel on with a new woodruff key and torque to 47 ft lbs. Then recheck the timing.

Here you can see the flywheel holder in the observation window and hooked onto the kickstart. You can also see how Al lightened the flywheel...it's a beautiful thing!
Image

It fires up first kick but I need to get the vortex carb dialed in. Also when shifting I could feel some motor "wiggle" so I will be checking out the shock mounts.

One great thing...it shifts like buttah!
"Things fall apart - it's scientific" - David Byrne
www.teamscootertrash.com

'06 Cream Buddy 125, 11 Blur 220, 13 BMW C 650 GT, 68 Vespa SS180, 64 Vespa GS MK II, 65 Lambretta TV 175, 67 Vespa GT, 64 Vespa 150 VBB 64 Vespa GL
User avatar
Syd
Member
Posts: 4686
Joined: Wed Jul 18, 2007 6:41 am
Location: Tempe

Post by Syd »

Hope the Medical problems are now far behind. And for good. Love this thread. It's like nab's garage except with a professional carpenter!
The majority is always sane - Nessus
User avatar
BuddyRaton
Scooter Dork
Posts: 3887
Joined: Sat Sep 09, 2006 10:08 pm
Location: Boca Raton, Florida
Contact:

Post by BuddyRaton »

Thanks Syd. Not completely behind me but doing much better...thanks. I've been told that some of the damage may be permanent...but life is good!

Back to the fun stuff!

I pulled the tank to check the upper shock mount. You can see the two bolts that are tucked away pretty well! This is a Clause Studio reinforced top mount. The bolts were snug but they took a few turns to reseat all the way. I also retorqued the swingarm bolt and the lower mount.

Image

Image

Next was getting the vortex dialed in. I changed the idle jet to a 55/160. After that it was adjusting the mixture screw and the main jet air flow...about a dozen times :shock:

I'm close now so I took it out for a little ride.

http://www.youtube.com/watch?v=EjxtAIgV ... e=youtu.be
"Things fall apart - it's scientific" - David Byrne
www.teamscootertrash.com

'06 Cream Buddy 125, 11 Blur 220, 13 BMW C 650 GT, 68 Vespa SS180, 64 Vespa GS MK II, 65 Lambretta TV 175, 67 Vespa GT, 64 Vespa 150 VBB 64 Vespa GL
User avatar
az_slynch
Member
Posts: 1934
Joined: Wed Sep 12, 2012 4:56 pm
Location: Tucson, AZ

Post by az_slynch »

That PEP sure has the poppy sound of a Sito. It's probably hard to quantify an such a modified motor, but how does the pipe seem to "hit"?

When I put the SIP Road on my P, it would rev-on up top like a Sito, but it had a nice midrange boost in torque and more "thrust" at the top of the rev range. I'd expect the PEP to flow even better on top, just wondering if it brings any more midrange power to the party than a SIP would.
At what point does a hobby become an addiction? I'm uncertain, but after the twelfth scooter, it sorta feels like the latter...

Seriously...I've lost count...

Seven mopeds ...that's still manageable...
User avatar
BuddyRaton
Scooter Dork
Posts: 3887
Joined: Sat Sep 09, 2006 10:08 pm
Location: Boca Raton, Florida
Contact:

Post by BuddyRaton »

still a little boggy at midrange. I think a few more tweeks with jetting will improve things. It was it's first time out so I took it pretty easy on it and kept it pretty much below 4K rpm.

It does have a freaking ton of torque!
"Things fall apart - it's scientific" - David Byrne
www.teamscootertrash.com

'06 Cream Buddy 125, 11 Blur 220, 13 BMW C 650 GT, 68 Vespa SS180, 64 Vespa GS MK II, 65 Lambretta TV 175, 67 Vespa GT, 64 Vespa 150 VBB 64 Vespa GL
User avatar
az_slynch
Member
Posts: 1934
Joined: Wed Sep 12, 2012 4:56 pm
Location: Tucson, AZ

Post by az_slynch »

Does your slide have a cutout in the bottom of it?

Not quite the same carb, but I had a problem with an SI-20/20D on a stroker Stella. I kept fiddling with the jetting, with little effect. Finally, I tried a Dell'Orto #3 slide (fitted to the Rally 180s) with a cutout in the bottom. That made all the difference in getting the midrange sorted out.
At what point does a hobby become an addiction? I'm uncertain, but after the twelfth scooter, it sorta feels like the latter...

Seriously...I've lost count...

Seven mopeds ...that's still manageable...
User avatar
BuddyRaton
Scooter Dork
Posts: 3887
Joined: Sat Sep 09, 2006 10:08 pm
Location: Boca Raton, Florida
Contact:

Post by BuddyRaton »

It's an HRS 24/24 vortex (more like a 26) so the main really kicks in early. Very small adjustments to the airflow screw on the main stack make big changes even at 1/4 throttle.

I also have to say that it is hard to give a seat of the pants assessment of individual components. As you know I've done a lot to this motor,With the high hp, torque and lightened flywheel I really don't have a good comparison.

This is the most powerful motor I've put in a vintage frame so I'm not even used to the handling. I can't even compare it to a stock P2...except it blows one away. The nisil cylinder takes about 800 miles to break in so it's still uber tight. So lots going on and more fun to be had!
"Things fall apart - it's scientific" - David Byrne
www.teamscootertrash.com

'06 Cream Buddy 125, 11 Blur 220, 13 BMW C 650 GT, 68 Vespa SS180, 64 Vespa GS MK II, 65 Lambretta TV 175, 67 Vespa GT, 64 Vespa 150 VBB 64 Vespa GL
Post Reply