So I've got a new 2013 Stella + hack with 75 miles. I want to add a rear brake light to the sidecar fender and a headlight or white running light to the nose cap. Has anyone done this before? Or can someone point me to a good location to ask?
Thanks!
Need suggestions for lights on a cozy sidecar
Moderator: Modern Buddy Staff
-
ArgonV
- Member
- Posts: 127
- Joined: Sat Dec 27, 2014 7:12 am
- Location: TX, USA
- Contact:
-
avescoots1134
- Member
- Posts: 275
- Joined: Mon Oct 06, 2014 8:40 pm
-
Dooglas
- Moderator
- Posts: 4373
- Joined: Sun Jul 08, 2007 2:17 am
- Location: Oregon City, OR
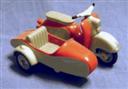
We are talking about the Cozy Rocket? It already has a tail/brake light on the fender, though you could replace it with something more to your liking. It also has a cutout at the nose which is used to mount a headlight in deluxe versions of the sidecar. I don't believe it would be difficult to remove the metal disc at the nose and fabricate a holder and ring for a small headlight.
- Attachments
-
- GTS sidecar.jpg (47.49 KiB) Viewed 4862 times
-
ArgonV
- Member
- Posts: 127
- Joined: Sat Dec 27, 2014 7:12 am
- Location: TX, USA
- Contact:
-
Dooglas
- Moderator
- Posts: 4373
- Joined: Sun Jul 08, 2007 2:17 am
- Location: Oregon City, OR
The Cozy is intended to have a brake light. My guess is that the installer incorrectly wired the tail light to the wiring harness of the bike. In other words, the wiring harness from the sidecar lights includes a turn signal connection. The tail light is normally a two filament bulb that also functions as a brake light.ArgonV wrote:Yes, the Cozy rocket. There is a turn indicator light that sits on top of the fender, but it is not a brake light on my model. Thanks for the pic though!
-
viney266
- Member
- Posts: 2270
- Joined: Thu May 19, 2011 8:49 pm
- Location: westminster md
- Contact:
-
ArgonV
- Member
- Posts: 127
- Joined: Sat Dec 27, 2014 7:12 am
- Location: TX, USA
- Contact:
Not the cozy built for the scooters. Only the larger cozy for actual motorcycles.Dooglas wrote:The Cozy is intended to have a brake light. My guess is that the installer incorrectly wired the tail light to the wiring harness of the bike. In other words, the wiring harness from the sidecar lights includes a turn signal connection. The tail light is normally a two filament bulb that also functions as a brake light.
I do like that light idea. I'll try and see what I can come up with. As I understand the electrical power requirements, I should be fine as the engine uses a magneto and doesn't require a battery for anything but the electric start?viney266 wrote:LED is the key, you don't have much juice to work with...
Mine is as yours is. Do you also have the dampener? I did not, but bought a hydraulic one anyhow. I just need mounting clamps now...azbrewer wrote:I uncrated our Cozy and there was only one light it is orange and it sits on top of the fender.
-
azbrewer
- Member
- Posts: 8
- Joined: Fri May 04, 2012 5:12 am
- Location: Northwest Az
Don't have a dampener installed yet. My complaint is that trying to adjust the mount was a total pain, finally ended up moving the sidecar axel to get it running straight. I want to find a small light to use as a brake light but I want one that is shaped somewhat like a bullet. Been looking for a year so far.
-
Wild Handyman

- Member
- Posts: 70
- Joined: Tue Feb 05, 2013 2:11 pm
- Location: South Boston, VA
There are dozens of different bullet shaped lights on the following website, and the prices do not seem bad at all to me:azbrewer wrote:I want to find a small light to use as a brake light but I want one that is shaped somewhat like a bullet. Been looking for a year so far.
http://www.thefind.com/cars/info-motorc ... let-lights
-
min2max
- Member
- Posts: 23
- Joined: Sat Aug 23, 2014 3:33 pm
- Location: Indianapolis
Lights
Welcome ArgonV! I have the same setup and swapped to PIAA bulb, added a VW stabilizer, and some decals. Also picked up some LED lights from the bicycle section at the local Waltucky. Works great for me because I don't take very long rides at night.
I got these because they didn't have the ones in the second link. Lights are both LED and BRIGHT!
http://www.walmart.com/ip/Zefal-Deluxe- ... t/21679204
http://www.walmart.com/ip/Allen-5-Watt- ... r/39805797
I got these because they didn't have the ones in the second link. Lights are both LED and BRIGHT!
http://www.walmart.com/ip/Zefal-Deluxe- ... t/21679204
http://www.walmart.com/ip/Allen-5-Watt- ... r/39805797
- Attachments
-
- You can almost see the tail light...
- 10928127_10152872393794504_1959639227_n.jpg (191.41 KiB) Viewed 4798 times
-
- IMG_20150115_121430.jpg (154.63 KiB) Viewed 4798 times
-
ArgonV
- Member
- Posts: 127
- Joined: Sat Dec 27, 2014 7:12 am
- Location: TX, USA
- Contact:
So I opted to add the friction dampener supplied by Cozy. I couldn't find any good hardware here to mount the hydraulic dampener that I thought included the mounting hardware. I think I'm going to return it.
I don't have the scooter back from the shop. I'll let ya know how it handles when I do! I think I also found an Aussie place that sells the Inder front light for their sidecar... I'm going to order that next month.
I don't have the scooter back from the shop. I'll let ya know how it handles when I do! I think I also found an Aussie place that sells the Inder front light for their sidecar... I'm going to order that next month.
-
ArgonV
- Member
- Posts: 127
- Joined: Sat Dec 27, 2014 7:12 am
- Location: TX, USA
- Contact:
Well I got the Stella back from the shop today! She handles MUCH better with the Cozy supplied friction dampener. I would never have been able to install it myself however... I did not have the drillset or skills to tackle such a project. The headset wires proved to be a PITA for the mechanics, as they had to be moved out of the way so the drilling and bolting could be done. They appear to have done a great job tho.
-
gburbank
- Member
- Posts: 53
- Joined: Sat Aug 17, 2013 11:09 am
- Location: lake geneva, wisconsin
https://www.facebook.com/photo.php?fbid ... =716%2C960
I went with fog lamps and 13w LED bulbs with underglow lighting.
Another option is the spotlights sold by Florida sidecar company.
I went with fog lamps and 13w LED bulbs with underglow lighting.
Another option is the spotlights sold by Florida sidecar company.
-
ArgonV
- Member
- Posts: 127
- Joined: Sat Dec 27, 2014 7:12 am
- Location: TX, USA
- Contact:


-
gburbank
- Member
- Posts: 53
- Joined: Sat Aug 17, 2013 11:09 am
- Location: lake geneva, wisconsin
new brakelight
ohhh, I'm gonna need one of those bad boys! care to share your source?
stella 4t 200 cc engine, tasso pipe and timing slider, ram-air filter and sidecar
stella auto, bone stock
stella 4t 200cc with readspeed CDI, unmodified stock engine
stella auto, bone stock
stella 4t 200cc with readspeed CDI, unmodified stock engine
-
ArgonV
- Member
- Posts: 127
- Joined: Sat Dec 27, 2014 7:12 am
- Location: TX, USA
- Contact:
I do rather like the look! You can't see it, but I ran the wire out from under the light to the left with some extra 18 gauge black wire I bought. The wire goes along the sidecar frame held by black tie-straps, under the sidecar body along the mount, up under the kickstand mount of the Stella, and through the cowl opening where it abuts to the body into the rear chassis. I then spliced it to the blue wire running from the rear brake light on the Stella with a simple crimp splice connector after routing it along the existing wire hangers.
I picked this beehive style light up on eBay here:
http://www.ebay.com/itm/111577838857
It comes with a license plate attachment which I did not use, the rubber gasket you see, 2 nuts and 2 lock washers. I had to buy extra 18 gauge wire and the snap-splice connectors, and I had to drill 2 new holes into the fender. Use some grease after drilling to protect the exposed metal from moisture before you mount it. I think the nuts are 10mm if I remember correctly.
-
gburbank
- Member
- Posts: 53
- Joined: Sat Aug 17, 2013 11:09 am
- Location: lake geneva, wisconsin
tombstone light
Great! thanks. I'll be changing the bulbs to LED's so... do you know the bulb numbers? I went with this http://floridasidecarproducts.com/yahoo ... 191714.jpg
for the top marker light. Lots of nice options for other lighting too from florida sidecar products. Plus an awesome bumper sticker came packed with the order. Stuff showed up in two days.
for the top marker light. Lots of nice options for other lighting too from florida sidecar products. Plus an awesome bumper sticker came packed with the order. Stuff showed up in two days.
stella 4t 200 cc engine, tasso pipe and timing slider, ram-air filter and sidecar
stella auto, bone stock
stella 4t 200cc with readspeed CDI, unmodified stock engine
stella auto, bone stock
stella 4t 200cc with readspeed CDI, unmodified stock engine
-
ArgonV
- Member
- Posts: 127
- Joined: Sat Dec 27, 2014 7:12 am
- Location: TX, USA
- Contact:
I just ordered this headlight for the Cozy sidecar. I'll let y'all know how the install goes!
http://www.nfieldgear.com/sidecar-light/
http://www.nfieldgear.com/sidecar-light/
-
viney266
- Member
- Posts: 2270
- Joined: Thu May 19, 2011 8:49 pm
- Location: westminster md
- Contact:
-
ArgonV
- Member
- Posts: 127
- Joined: Sat Dec 27, 2014 7:12 am
- Location: TX, USA
- Contact:
well I finally got around to installing the headlight to the Cozy!
I had to improvise the seal and wiring. I used a weather seal with a sticky back and adhered that to the light fixture at an angle, and it's pressured up via two bolts to the nose cap back plate against the nose rim creating a water tight seal. Had to drill two holes in the nose cap back plate, and routed the wires out the existing center hole. On the inside, I ran the wires out through the drain hole under the Cozy - and I did have to run the ground wire to get a good circuit. I'm still not done with tucking the wiring away properly inside the hack... Also, I'm changing to LED bulbs as the draw from the Cozy headlight to the running lights of the Stella is quite a bit! Pics:


I had to improvise the seal and wiring. I used a weather seal with a sticky back and adhered that to the light fixture at an angle, and it's pressured up via two bolts to the nose cap back plate against the nose rim creating a water tight seal. Had to drill two holes in the nose cap back plate, and routed the wires out the existing center hole. On the inside, I ran the wires out through the drain hole under the Cozy - and I did have to run the ground wire to get a good circuit. I'm still not done with tucking the wiring away properly inside the hack... Also, I'm changing to LED bulbs as the draw from the Cozy headlight to the running lights of the Stella is quite a bit! Pics:
Last edited by ArgonV on Sun Jun 07, 2015 8:09 pm, edited 1 time in total.
-
ArgonV
- Member
- Posts: 127
- Joined: Sat Dec 27, 2014 7:12 am
- Location: TX, USA
- Contact:
-
jimmbomb

- Member
- Posts: 801
- Joined: Fri May 20, 2011 1:00 am
- Location: St Louis
Hey now.. good job!!! Can you please post up pictures too of this gray wire and its location that you tapped onto? And did you run the other wire to -ground? And did you put in an on/off switch?ArgonV wrote:Oh, I forgot to mention... I had to run the nose light 35W halogen bulb wire off of the gray wire from the AC/DC regulator behind the battery holder. The junction where the tail light all plugs in didn't have enough juice on the circuit.
thanks alot for the pics and write up
 [/URL]
 -
ArgonV
- Member
- Posts: 127
- Joined: Sat Dec 27, 2014 7:12 am
- Location: TX, USA
- Contact:
Thank you! Sadly everything is all back together and I can't really take it apart at the moment... But if you have off the spare tire cowl, spare tire, battery and battery tray, you can get to the AC/DC regulator box. On the top of that ac/dc regulator box (which is silver and slotted), there are a bunch of wires coming out from the top. Just splice it into the only gray one there. I ran the wire through all of the wire holders on the inside of the engine frame and then down by the battery/spare tire mount part of the rear frame. I believe my battery is still charging up just nicely with all of the lights on, and the sidecar light will come on without a battery.
I did run the other wire to ground off of a ground wire on the scooter itself. No on and off switch, the light only comes on when the scooter is running (AC power).
I did run the other wire to ground off of a ground wire on the scooter itself. No on and off switch, the light only comes on when the scooter is running (AC power).
-
ArgonV
- Member
- Posts: 127
- Joined: Sat Dec 27, 2014 7:12 am
- Location: TX, USA
- Contact:
Well of course I hated that boxy looking turn signal supplied by Cozy... Not very retro or vintage looking at all! So I had to go and do something about it. Found this bullet blinker indicator on eBay. Used the existing wiring going to the turn signal.
- Attachments
-
- image3.JPG (97.24 KiB) Viewed 4597 times
-
- image2.JPG (96.38 KiB) Viewed 4597 times
-
jimmbomb
- Member
- Posts: 801
- Joined: Fri May 20, 2011 1:00 am
- Location: St Louis
Looks good.. i dig the beehive tail light.ArgonV wrote:Well of course I hated that boxy looking turn signal supplied by Cozy... Not very retro or vintage looking at all! So I had to go and do something about it. Found this bullet blinker indicator on eBay. Used the existing wiring going to the turn signal.
Now, the challenge is to swap out scooters tailight for the matching beehive.
-
ArgonV
- Member
- Posts: 127
- Joined: Sat Dec 27, 2014 7:12 am
- Location: TX, USA
- Contact:
Thanks! I actually don't mind the scooter's rear light. At least it has a chrome accent trim piece around it. I do need to find a way to make the running light brighter though.jimmbomb wrote:Looks good.. i dig the beehive tail light.
Now, the challenge is to swap out scooters tailight for the matching beehive.
-
jimmbomb
- Member
- Posts: 801
- Joined: Fri May 20, 2011 1:00 am
- Location: St Louis


