When I bought my 2003 2T a few months ago, it had not been well cared for. All three tires were date-stamped from 2001. I couldn't get the spare tire off the wheel because the inside was so full of rust. I had to cut the tire widthwise to break it free of the wheel. So I decided to repaint the spare wheel.
I first cleaned them off with soap, and then sanded. It took me about an hour per half-wheel to sand the rust down by hand. I'm planning to buy a powertool before attempting this again. I did most of the heavy sanding with 80-grit, then finished with 180, 400, and 1500. I was very glad I used a dust mask. After sanding, I wiped everything down with rubbing alcohol.
I decided to cover the entire wheel in primer and paint the outer sides black. Here are the "before" pictures. I'll post the "after" pictures when the paint dries. Due to the sanding, plus all the waiting between coats (3 coats of primer and 3 coats of color), this took about four hours.
Repainting Spare Wheel
Moderator: Modern Buddy Staff
-
johnk

- Member
- Posts: 166
- Joined: Mon Sep 03, 2018 9:42 pm
Repainting Spare Wheel
- Attachments
-
- wheel 3.jpg (170.15 KiB) Viewed 2440 times
-
- wheel 2.jpg (169.04 KiB) Viewed 2440 times
-
- wheel 1.jpg (193.98 KiB) Viewed 2440 times
-
johnk
- Member
- Posts: 166
- Joined: Mon Sep 03, 2018 9:42 pm
The wheel came out looking pretty good. Not perfect, but a thousand times better than it was.
I used Rust-Oleum primer and Dupli-Color Wheel Paint. I think it could have used another few coats, and much more time to dry between coats, as well as more time to dry (more than overnight) before I put the wheel back together. The paint was still very soft this morning, and I made a few scratches in it by bumping it with a wrench.
Also, I would recommend painting every side the same color, and not just leaving primer on one side like I did, because the primer is visible when the wheel is assembled.
I'll make another post after the paint has dried a bit more and I've mounted it on the bike.
- Attachments
-
- wheel 6.jpg (136.06 KiB) Viewed 2432 times
-
- wheel 5.jpg (155.35 KiB) Viewed 2432 times
-
- wheel 4.jpg (131.83 KiB) Viewed 2432 times
-
whereshaldo
- Member
- Posts: 25
- Joined: Sat Aug 17, 2019 11:41 pm
- Location: Seattle
-
modsquad
- Member
- Posts: 27
- Joined: Tue May 14, 2019 1:22 am
- Location: california
painting spare
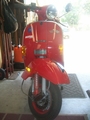
I also painted my spare to match the scooter. But I ended up mounting it on my rear rack because I couldn't get to fit right where it's supposed to go...Bill
- Attachments
-
- 101_9339_Easy-Resize.com (2).jpg (9.48 KiB) Viewed 2398 times
I love the smell of 2 stroke oil in the morning
-
modsquad
- Member
- Posts: 27
- Joined: Tue May 14, 2019 1:22 am
- Location: california
rear rack mounted spare
here's another pic.
- Attachments
-
- r_101_9343.JPG (110.17 KiB) Viewed 2391 times
I love the smell of 2 stroke oil in the morning