Page 1 of 1
horn button
Posted: Thu Oct 21, 2010 2:58 am
by JoshWED
anyone ever moved the button for the horn? i know many have moved the actual horn, but I'm talking about the button you push to sound it.
i find it difficult to be ready to give a quick honk to warn cagers, pedestrians of my presence when i'm also working with the clutch.
(of course i realize the best way to react to emergent situations is to have your escape route planned and be ready to act on it. so i guess what i'm really saying is, "wouldn't it be nice to be able to lay on your horn after you've escaped to a safe lane but are still engaging the clutch to, you know, drive?")
Posted: Thu Oct 21, 2010 11:48 am
by Halloweenie
I know there was one person on stellaspeed that created a foot pedal for a horn. However, I think that was for an air horn they added to their bike.
I will say that I thought the same thing when I first started riding, but after a year I have no problem finding it in a pinch. I just wish it had more umph.
Posted: Fri Oct 22, 2010 3:54 am
by JoshWED
agree that it gets easier to find with time. there are just some situations in the city where there is no chance in hell you're getting on that horn. then i usually end up yelling. i will get shot some day.

Posted: Fri Oct 22, 2010 11:10 am
by Halloweenie
That's the problem with a full faced helmet, no one can hear you scream...at them.
Posted: Fri Oct 22, 2010 2:12 pm
by JoshWED
Posted: Fri Oct 22, 2010 4:20 pm
by loodieboy
This has been a BIG issue for me. I always cover the clutch so the horn button is simply not quickly accessible. I would love to relocate the button and would love to hear from anyone who has done so.
Posted: Mon Oct 25, 2010 4:42 pm
by lilmyk
I removed my starter, which frees up the Start Button.
I am adding an Air Horn and will be using the Starter Button for it.
You can use the starter relay in place of the air horn relay.
And I am actually working on a bracket to mount the air horn compressor where the starter was.
Posted: Mon Oct 25, 2010 8:03 pm
by polianarchy
I wonder if I can use my disabled kill switch for an air horn? Hmm! Anyone done this mod?
Posted: Mon Oct 25, 2010 9:24 pm
by Silver Streak
polianarchy wrote:I wonder if I can use my disabled kill switch for an air horn? Hmm! Anyone done this mod?
It would work, but you'd have to turn it back off to end your "toot."
Horn switches are normally spring-loaded, momentary contact switches, which a kill switch is not (it has an "on and an "off" detent, with no spring return).
Also, any time you "repurpose" a switch for an air horn, you need to take into account the current draw of the horn and the switch's contact rating. For something robust like a Stebel Nautilus, you really need to wire the switch through a relay to take the current load off the switch.
Posted: Mon Oct 25, 2010 11:01 pm
by jmkjr72
Silver Streak wrote:polianarchy wrote:I wonder if I can use my disabled kill switch for an air horn? Hmm! Anyone done this mod?
It would work, but you'd have to turn it back off to end your "toot."
Horn switches are normally spring-loaded, momentary contact switches, which a kill switch is not (it has an "on and an "off" detent, with no spring return).
no she wouldnt the stella does not use a kill switch it uses a kill button
a momentary switch
Posted: Mon Oct 25, 2010 11:03 pm
by jmkjr72
lilmyk wrote:I removed my starter, which frees up the Start Button.
I am adding an Air Horn and will be using the Starter Button for it.
You can use the starter relay in place of the air horn relay.
And I am actually working on a bracket to mount the air horn compressor where the starter was.
as long as disable the part that wont let you engage your starter when the scooter is running
Posted: Tue Oct 26, 2010 11:31 am
by Halloweenie
Hell, if you are going to kill the starter you might as well go full DC and install a HID system.
Posted: Tue Oct 26, 2010 2:48 pm
by lilmyk
Halloweenie wrote:Hell, if you are going to kill the starter you might as well go full DC and install a HID system.
I am full DC on my scoot, upgraded some bulbs to LED and will add HID when I get some more money.
I have another Stella that I can't get spark out of that I need to get running and unload first.
Posted: Tue Oct 26, 2010 3:21 pm
by Silver Streak
jmkjr72 wrote:Silver Streak wrote:polianarchy wrote:I wonder if I can use my disabled kill switch for an air horn? Hmm! Anyone done this mod?
It would work, but you'd have to turn it back off to end your "toot."
Horn switches are normally spring-loaded, momentary contact switches, which a kill switch is not (it has an "on and an "off" detent, with no spring return).
no she wouldnt the stella does not use a kill switch it uses a kill button
a momentary switch
Thanks for the correction. I'm still waiting for my 4T Stella, so I was going by other scoots I've owned. Actually, I think a momentary button is probably superior, as it can't be left in the "off" position inadvertently.
Posted: Tue Oct 26, 2010 3:27 pm
by Halloweenie
polianarchy wrote:I wonder if I can use my disabled kill switch for an air horn? Hmm! Anyone done this mod?
I would not trust the thing, chances are you'd end up with the horn on all the time after a good rainfall. Everyone I know with a Stella has the stupid thing disconnected as is, just for the piece of mind.
Posted: Wed Oct 27, 2010 10:22 pm
by polianarchy
Halloweenie wrote:polianarchy wrote:I wonder if I can use my disabled kill switch for an air horn? Hmm! Anyone done this mod?
I would not trust the thing, chances are you'd end up with the horn on all the time after a good rainfall. Everyone I know with a Stella has the stupid thing disconnected as is, just for the piece of mind.
Yeah, that's why we disabled the starter right when I bought it. Too many '08s had wonky kill switches/buttons/whatevers. Eh, I'll probably just end up leaving the horn alone unless someone else comes up with a better idea.
Posted: Thu Oct 28, 2010 3:12 pm
by JoshWED
I actually really like the idea of switching the kill switch with the horn switch. I haven't had problems with my kill switch and water...and I've often been caught in the rain.
Anyone know a good source for a stella electrics primer?
Posted: Thu Oct 28, 2010 7:02 pm
by PeterC
Halloweenie wrote:I know there was one person on stellaspeed that created a foot pedal for a horn. However, I think that was for an air horn they added to their bike.
Was this the one you referred to?
Posted: Thu Oct 28, 2010 11:44 pm
by Halloweenie
Was this the one you referred to?
Sure is, you are one of the two people that have done it to my knowledge. I really liked the idea, but I just cannot bring myself to go mucking about with the wiring, a wee bit too scary.
Posted: Thu Oct 28, 2010 11:55 pm
by PeterC
Halloweenie wrote:Was this the one you referred to?
Sure is, you are one of the two people that have done it to my knowledge. I really liked the idea, but I just cannot bring myself to go mucking about with the wiring, a wee bit too scary.
The wiring is really extraneous to the existing Stella/P200 wiring. It involves a Stebel Nautilus air horn, which I mounted on the rear rack, a standard auto supply store horn button, an in-line fuse and the relay which is supplied with the Stebel horn. If the electrical diagrams seem confusing, bring the project in to your local auto garage, and any competent mechanic can hook it up for you. The mechanical mounting of the horn and relay is easy, and the only complication with the horn button is insulating it from the scooter floorboard (use a thin piece of rubber, cut to fit), so it doesn't short out.
Posted: Fri Oct 29, 2010 8:46 pm
by ericalm
What odd placement for that Stebel!
The 4T kill switch works fine, though not like other scooters. You really have to hold it for a second.
Unlike an auto scooter, though, there's a good chance your scooter will stall and not be running on its side in a crash. I think.
The horn/kill switch mod is a good idea. I'll have to think about that one. As is, I just don't use my horn like I do on the Vespa.
I'm a bit worried about confusion while riding. Twice I've hit the kill switch on the Vespa because it's where the turn signals are on the Stella! Oops.

Posted: Fri Oct 29, 2010 9:04 pm
by JoshWED
@eric. the kill switch on the 2T's is the same....you have to hold them down to kill the engine. this diagram should help explain why:
http://www.vespamaintenance.com/elec/cdiwork/
Posted: Fri Oct 29, 2010 9:26 pm
by Halloweenie
I wonder if they are as prone to failure on the 4T...
Posted: Fri Oct 29, 2010 9:32 pm
by PeterC
ericalm wrote:What odd placement for that Stebel!:)
Eric, that would indeed be an odd placement for a Stebel, but not here in the Sonora Desert! It rarely rains around here, plus the Stebel is loud enough so it could be mounted anywhere and still be heard.
Posted: Fri Oct 29, 2010 11:04 pm
by ericalm
PeterC wrote:ericalm wrote:What odd placement for that Stebel!:)
Eric, that would indeed be an odd placement for a Stebel, but not here in the Sonora Desert! It rarely rains around here, plus the Stebel is loud enough so it could be mounted anywhere and still be heard.
I've seen an '80s Honda Elite 250 with twin air horns mounted on the body on the bottom of the legshield (sort of). It's like a freakin' truck!
Posted: Sat Oct 30, 2010 5:43 pm
by polianarchy
ericalm wrote:I've seen an '80s Honda Elite 250 with twin air horns mounted on the body on the bottom of the legshield (sort of). It's like a freakin' truck!
AKA, MY DREAM SCOOT. *sigh*
Posted: Sun Oct 31, 2010 4:03 pm
by jmkjr72
ericalm wrote: I've seen an '80s Honda Elite 250 with twin air horns mounted on the body on the bottom of the legshield (sort of). It's like a freakin' truck!
that is kinda simular to the way my xs1100 is set up
on the front fearing below the headlight i have dual air horns and the compressos is in the feraing and yes it is as loud as a truck but i would live to find a way to get a big enough compressor and tank on there to power a train horn
Posted: Sun Oct 31, 2010 4:27 pm
by loodieboy
Okay, here is my plan. I have to disassemble both bars to cure the obnoxious rattle anyway, so while I am at it, I am going to disconnect the kill switch, cap the leads, then reroute the horn button wires to the kill switch. I hope to pull the existing horn button and cap the hole with a plug from Lowes. This will be a couple weekends away (painting the front porch, but I will report back on the results.
EDIT: Nevermind, playing make-believe on my commute, I find that the kill switch location is no more convenient than the existing horn button location. It's too far from the front brake lever.
Posted: Wed Nov 03, 2010 8:59 pm
by JoshWED
Silver Streak wrote:polianarchy wrote:I wonder if I can use my disabled kill switch for an air horn? Hmm! Anyone done this mod?
It would work, but you'd have to turn it back off to end your "toot."
Horn switches are normally spring-loaded, momentary contact switches, which a kill switch is not (it has an "on and an "off" detent, with no spring return).
Also, any time you "repurpose" a switch for an air horn, you need to take into account the current draw of the horn and the switch's contact rating. For something robust like a Stebel Nautilus, you really need to wire the switch through a relay to take the current load off the switch.
So here's what I'm thinking: both the horn switch and the kill switch are both on black here:
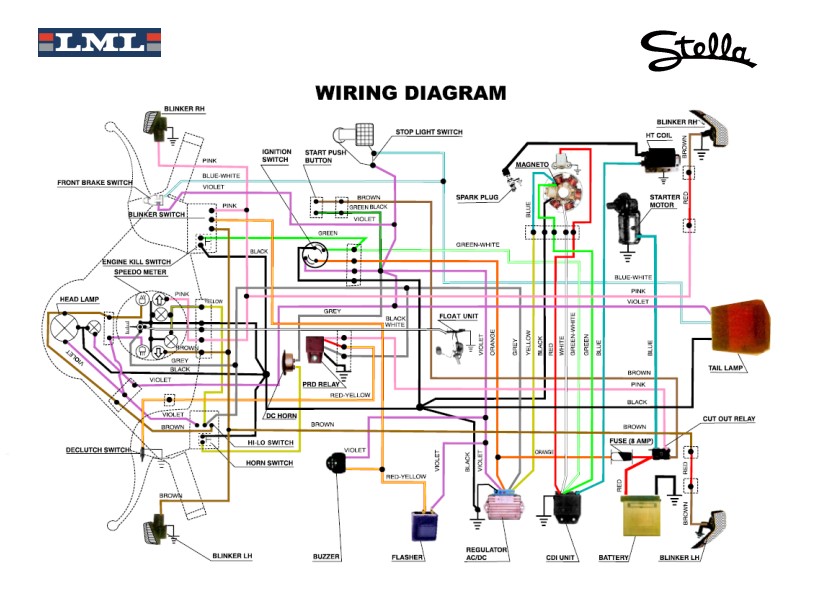
Wouldn't it be simple enough to go to the root splice and switch the two? The kill switch would be the old horn button: useful because we're not fiddling with the clutch when we are switching off.
And of course, the kill switch would be the horn.
Am I missing something?
Finally got around to this
Posted: Tue Jun 10, 2014 6:43 pm
by JoshWED
Finally moved the horn button out of the twist-shift handle. Advantages of this mod: fewer wires coming through the twist-shift mechanism, so less wear on each wire, and; no shorting out of the horn wires (and attendant honk) every time I shift into first gear.
Method:
1. Remove the button plate on the left handle bar. Disconnect the horn wires (yellow and black).
2. Remove the horn plate. Locate the horn (round speaker near bottom). Find the yellow lead, and pull this lead through. It will slide easily out of the headset/handlebar.
3. The black lead is more difficult, as this lead doesn't go directly to the horn. Instead of trying to find where it splits from the gray DC line (that you see connected to the horn unit), you will find it easier to add more lead to the black wire in the headset. I used equally gauged automotive wire to do this...just capped and taped the connection and left the connection in the headset.
4. Snake the yellow and black leads into the glove box. There is a small hole near the top of the glove box where the wires for the turn signals come through. I used the hole for the left turn signal. To make snaking easy, I tied some butcher's twine to a paper clip. Working from inside the glove box, I then poked the paperclip through the turn-signal hole and out towards the front of the scooter. Once the butcher's twine was snaked, I simply wrapped the exposed copper leads into the twine and pulled back in the other direction.
5. Add a little more lead to the the yellow wire, with a junction in the glove box. This gives you a little more wire to work with. It also serves as an easy way to break the circuit in the case of the foot pedal shorting (which I could see happening during a heavy rainfall).
6. Snake the two leads out of the bottom of the glove box. There is a gap between the leg shield and the glove box that easily allows this.
7. Connect to the foot pedal and mount. I used a Sea Dog Marine Surface Mounted Push Button. I mounted below the glove box to afford some protection to the elements.
Posted: Tue Jun 10, 2014 6:59 pm
by RoaringTodd

Could you provide a picture of the connection of the wiring to the horn and relay ?
RT
Re: Finally got around to this
Posted: Tue Jun 10, 2014 11:11 pm
by jimmbomb
JoshWED wrote:Finally moved the horn button out of the twist-shift handle. Advantages of this mod: fewer wires coming through the twist-shift mechanism, so less wear on each wire, and; no shorting out of the horn wires (and attendant honk) every time I shift into first gear.
Method:
1. Remove the button plate on the left handle bar. Disconnect the horn wires (yellow and black).
2. Remove the horn plate. Locate the horn (round speaker near bottom). Find the yellow lead, and pull this lead through. It will slide easily out of the headset/handlebar.
3. The black lead is more difficult, as this lead doesn't go directly to the horn. Instead of trying to find where it splits from the gray DC line (that you see connected to the horn unit), you will find it easier to add more lead to the black wire in the headset. I used equally gauged automotive wire to do this...just capped and taped the connection and left the connection in the headset.
4. Snake the yellow and black leads into the glove box. There is a small hole near the top of the glove box where the wires for the turn signals come through. I used the hole for the left turn signal. To make snaking easy, I tied some butcher's twine to a paper clip. Working from inside the glove box, I then poked the paperclip through the turn-signal hole and out towards the front of the scooter. Once the butcher's twine was snaked, I simply wrapped the exposed copper leads into the twine and pulled back in the other direction.
5. Add a little more lead to the the yellow wire, with a junction in the glove box. This gives you a little more wire to work with. It also serves as an easy way to break the circuit in the case of the foot pedal shorting (which I could see happening during a heavy rainfall).
6. Snake the two leads out of the bottom of the glove box. There is a gap between the leg shield and the glove box that easily allows this.
7. Connect to the foot pedal and mount. I used a Sea Dog Marine Surface Mounted Push Button. I mounted below the glove box to afford some protection to the elements.
Nice!!! and thanks for the instruction!!!
Customize your ride!!!!