I changed exhaust, air cleaner, and jets this weekend, now I need to adjust the mix screw, but...
I went to adjust the mix screw, and was stumped by pentagon plastic bold covering it. The mix screw is turned so far out I can't get a wrench on it from inside the carb box either.
Anyone know the size of the pentagon bold head, and where to get a proper wrench?
Adjusting mix screw
Moderator: Modern Buddy Staff
-
JBenjimin

- Member
- Posts: 52
- Joined: Thu Mar 29, 2012 10:49 pm
- Location: Lewiston, NY
-
fisher1
- Member
- Posts: 188
- Joined: Sat Sep 08, 2012 6:45 pm
- Location: Pa
I assume you're referencing a 2t not a 4T and the horizonal idle mix screw that faces to the rear.
I forget exactly what the plug on the carb box looked like, but I do know that I removed it - which then exposed the hole and the mixture screw behind it which accepts a normal slotted screwdriver.
After adjusting the screw, I now use needle-nosed pliers to insert a small grommet back into the hole to seal it up. I plugged-up the center hole in the grommet with some Permatex silicone gasket stuff. I can remove & reinsert it very easily to expose the screw.
-
az_slynch

- Member
- Posts: 1917
- Joined: Wed Sep 12, 2012 4:56 pm
- Location: Tucson, AZ
The plastic bolt is known as the winter plug. All the ones I've seen have a slot for a flathead screwdriver in them. Should be easy to remove. Not sure what size wrench to use, but I suspect it's either an M8 or M10 (13mm or 15mm socket).
At what point does a hobby become an addiction? I'm uncertain, but after the twelfth scooter, it sorta feels like the latter...
Seriously...I've lost count...
Seven mopeds ...that's still manageable...
Seriously...I've lost count...
Seven mopeds ...that's still manageable...
-
JBenjimin
- Member
- Posts: 52
- Joined: Thu Mar 29, 2012 10:49 pm
- Location: Lewiston, NY
Yes 2T, if I don't find a proper wrench for it then I will end up replacing it with a rubber plug of some kind. But I would like to get it off with the proper tool if I can.fisher1 wrote:I assume you're referencing a 2t not a 4T and the horizonal idle mix screw that faces to the rear.
I was under the impression that the winter plug is the plug on the top of the air filter box by the idle adjust screw, not the one on side by the mix screw.az_slynch wrote:The plastic bolt is known as the winter plug. All the ones I've seen have a slot for a flathead screwdriver in them. Should be easy to remove. Not sure what size wrench to use, but I suspect it's either an M8 or M10 (13mm or 15mm socket).
The one on my air box is a hollow plastic bolt with a five sided head on it. No slots in it, that would make it easy, and nothing about this upgrade has been easy so far.

-
BuddyRaton

- Scooter Dork
- Posts: 3887
- Joined: Sat Sep 09, 2006 10:08 pm
- Location: Boca Raton, Florida
- Contact:
That is right. The one in front of the mix screw is just to keep dirt out.JBenjimin wrote:I was under the impression that the winter plug is the plug on the top of the air filter box by the idle adjust screw, not the one on side by the mix screw.
"Things fall apart - it's scientific" - David Byrne
www.teamscootertrash.com
'06 Cream Buddy 125, 11 Blur 220, 13 BMW C 650 GT, 68 Vespa SS180, 64 Vespa GS MK II, 65 Lambretta TV 175, 67 Vespa GT, 64 Vespa 150 VBB 64 Vespa GL
www.teamscootertrash.com
'06 Cream Buddy 125, 11 Blur 220, 13 BMW C 650 GT, 68 Vespa SS180, 64 Vespa GS MK II, 65 Lambretta TV 175, 67 Vespa GT, 64 Vespa 150 VBB 64 Vespa GL
-
fisher1
- Member
- Posts: 188
- Joined: Sat Sep 08, 2012 6:45 pm
- Location: Pa
I don't know that there is such a thing, everyone I know had to forcefully remove the plug and thus expose the screw. I don't recall, but I don't think they are even attached to each other.Yes 2T, if I don't find a proper wrench for it then I will end up replacing it with a rubber plug of some kind. But I would like to get it off with the proper tool if I can.
I anyone knows otherwise, please comment.
-
Tipper
- Member
- Posts: 214
- Joined: Fri Aug 17, 2012 12:25 pm
-
Robbie
- Member
- Posts: 536
- Joined: Wed Apr 25, 2012 2:46 am
- Location: Desplaines Il.
Yep,
Can't call it a hex with five sides now can we?
Never saw a socket designed to remove a pentagon either.
I am a mechanic (retired) so I have just about every tool ever made it seems.
I found I could remove the plug by using a 9/16" crow foot on a six inch (or longer) extension.
I had to tap the the extension with crow foot attached, to get it to engage the high corners of the pentagon.
I would turn it till the crow foot hit the engine case, pull it off, re-position, tap it back on and unscrew a bit more......finally got it where I could catch the edge with my finger tips and finish unscrewing it.
I then used a hacksaw blade and cut a slot in it so I could use a screwdriver for re-install.
Be patient on re-install, this is a mean/tricky little bugger with barely any manuvering room to screw it back in.
Once I got it to screw in about a turn I was able to use the new slot with a flatblade and screw it back in.
I did, however, order a replacement plug and it IS a normal hex with a screwdriver slot and it is now installed in place of that 'tamperproof' plug.
Hope that helped a bit.
Rob
-
JBenjimin
- Member
- Posts: 52
- Joined: Thu Mar 29, 2012 10:49 pm
- Location: Lewiston, NY
Tipper wrote:The air mix screw cover is not the winter plug. It is designed to be tamper resistant.
I would think the dealer would be set up to get it off, so then the tool should be out there, somewhere. In my searching today I have found sources of 5 point sockets, but I don't know what size the dang thing is to order one, and not sure how to measure it to get the right size.
Thanks that helps a ton! Guess I need a crow foot then. I've never used them before, any tricks to using it? Figure I would ask you since you were a mechanic.Robbie wrote:Yep,
Can't call it a hex with five sides now can we?
Never saw a socket designed to remove a pentagon either.
I am a mechanic (retired) so I have just about every tool ever made it seems.
I found I could remove the plug by using a 9/16" crow foot on a six inch (or longer) extension.
I had to tap the the extension with crow foot attached, to get it to engage the high corners of the pentagon.
I would turn it till the crow foot hit the engine case, pull it off, re-position, tap it back on and unscrew a bit more......finally got it where I could catch the edge with my finger tips and finish unscrewing it.
I then used a hacksaw blade and cut a slot in it so I could use a screwdriver for re-install.
Be patient on re-install, this is a mean/tricky little bugger with barely any manuvering room to screw it back in.
Once I got it to screw in about a turn I was able to use the new slot with a flatblade and screw it back in.
I did, however, order a replacement plug and it IS a normal hex with a screwdriver slot and it is now installed in place of that 'tamperproof' plug.
Hope that helped a bit.
Rob
Where did you get the replacement bolt from?
-
Robbie
- Member
- Posts: 536
- Joined: Wed Apr 25, 2012 2:46 am
- Location: Desplaines Il.
A crowfoot looks like a open end wrench with no handle.JBenjimin wrote:Tipper wrote:The air mix screw cover is not the winter plug. It is designed to be tamper resistant.
I would think the dealer would be set up to get it off, so then the tool should be out there, somewhere. In my searching today I have found sources of 5 point sockets, but I don't know what size the dang thing is to order one, and not sure how to measure it to get the right size.
Thanks that helps a ton! Guess I need a crow foot then. I've never used them before, any tricks to using it? Figure I would ask you since you were a mechanic.Robbie wrote:Yep,
Can't call it a hex with five sides now can we?
Never saw a socket designed to remove a pentagon either.
I am a mechanic (retired) so I have just about every tool ever made it seems.
I found I could remove the plug by using a 9/16" crow foot on a six inch (or longer) extension.
I had to tap the the extension with crow foot attached, to get it to engage the high corners of the pentagon.
I would turn it till the crow foot hit the engine case, pull it off, re-position, tap it back on and unscrew a bit more......finally got it where I could catch the edge with my finger tips and finish unscrewing it.
I then used a hacksaw blade and cut a slot in it so I could use a screwdriver for re-install.
Be patient on re-install, this is a mean/tricky little bugger with barely any manuvering room to screw it back in.
Once I got it to screw in about a turn I was able to use the new slot with a flatblade and screw it back in.
I did, however, order a replacement plug and it IS a normal hex with a screwdriver slot and it is now installed in place of that 'tamperproof' plug.
Hope that helped a bit.
Rob
Where did you get the replacement bolt from?
In place of the handle there is a 3/8" female square for a ratchet or extension to fit into.
The jaws are configured as a 12 point socket would be with a section cut out......as though you were to use it to loosen a hex nut with a compression fitting.
My dealer, Scooterworks (not the parts outlet, the retail sales outlet in Chicago) ordered the replacement plug.
It is P/N C4707995, PLUG......found on the carburetor/air filter page of the parts book.
Rob
-
ryanhennessy
- Member
- Posts: 9
- Joined: Mon Oct 29, 2012 10:26 pm
- Location: Chicago
Just bought a stock 04 Stella 2T that has been sitting idle for years. I am trying to learn how to set the mix screw and being a visual person I decided to graph out my experience adjusting the mix screw.
Here is how I went about this:
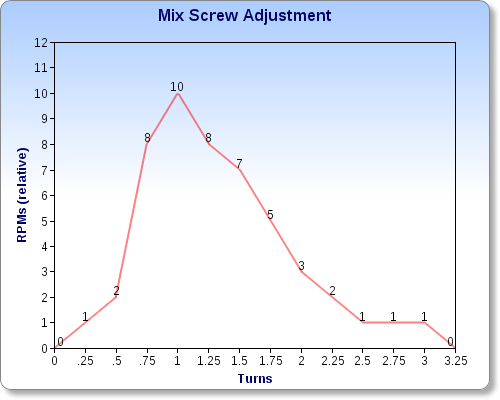
Here is how I went about this:
- Set idle a bit higher than normal (1/4 turn)
Screwed in mix screw until the engine died
Screwed out in 1/4 turn increments until engine would start again
For each reading on the chart I screwed out 1/4 turn then waited 20 seconds to make an RPM reading
RPM reading = my perception of the RPM based on the sound
The scale from 1 to 10 for RPMs is just a relative scale based on how fast it sounded
After going 3 turns out the engine died
I reversed the process from 3 turns out and documented each quarter turn back in and came up with very similar results
-
Robbie
- Member
- Posts: 536
- Joined: Wed Apr 25, 2012 2:46 am
- Location: Desplaines Il.
Adjust the mixture screw to obtain the highest idle speed.......You really should have a tach of some sort......I use a inexpensive lazer tach from good ole Harbor Freight......no wires to mess with.
Readjust the idle back to spec and touch up mixture adjustment, again looking for maximum RPM.
There really is no 'cut and dried' this many turns out/in type spec......for anything with a carb, not just Stella.
The idle mixture adjustment should have little to do with main jetting beyond transition from idle to main circuit.
That occurs as soon as you begin to open the throttle.
The idle screw acts as a valve, controlling flow through the idle jet......the main jet only responds to air passing through the venturi.......to small a jet is lean, too large ,obviously, rich........beyond exchanging jets there is no adjustment for the main circuit.....a trial and error thing.
Good luck,
Rob
-
ryanhennessy
- Member
- Posts: 9
- Joined: Mon Oct 29, 2012 10:26 pm
- Location: Chicago
Thanks Robbie. Max RPM was at 1 turn out -
Here's a quick video I took as I created the graph - in the graph and this vid you can see a massive rpm drop between 1 and 2 turns out https://vimeo.com/52818098
Off mix topic - Does the idle look normal at 25 secs in the video? The headlight flickers and whole bike vibrates (look at mirrors). Not sure if this is normal.
-
fisher1
- Member
- Posts: 188
- Joined: Sat Sep 08, 2012 6:45 pm
- Location: Pa
That graph is cool, and the discussion interesting, but hey we're talking about the idle mix screw.
I paid a lot of attention to get my high and mid range jetting correct via CHT and plug chop readings.
But once I did that, I simply adjusted the idle mix to max rpm (just did it by ear), richened it 1/8 turn to be safe, and then set the idle speed screw fast enough that it ticks over real nice.
Am I not giving it some added attention it deserves?
-
Robbie
- Member
- Posts: 536
- Joined: Wed Apr 25, 2012 2:46 am
- Location: Desplaines Il.
To my ear, still sounds a bit on the fat side.......larger two strokes, meaning larger than 50cc, will tend to four cycle (hit every other turn).....sometimes six and eight cycle, but your looking for that sweet spot that sounds like a Pffft ting ting pffft ting ting......pffft being hitting every stroke, ting ting being every other stroke.ryanhennessy wrote:Thanks Robbie. Max RPM was at 1 turn out -
Here's a quick video I took as I created the graph - in the graph and this vid you can see a massive rpm drop between 1 and 2 turns out https://vimeo.com/52818098
Off mix topic - Does the idle look normal at 25 secs in the video? The headlight flickers and whole bike vibrates (look at mirrors). Not sure if this is normal.
Most of the time you find yourself fiddling around....more idle speed, compensating with leaner adjustments......you will find a setting that seems right to you.
A two stroke engine hates no load idle......the little ones have enouph frictional load to have a rather steady idle.....larger ones, not so much.
Using my lazer tach I can read a three hundred RPM varience at times.
Even too lean settings at idle cause no harm....just runs lousy and dies a lot.
Rob
Readers will find my description funny but accurate at the same time.
-
Robbie
- Member
- Posts: 536
- Joined: Wed Apr 25, 2012 2:46 am
- Location: Desplaines Il.
I think you have it nailed.......I personally am not fond of CHT readings unless EGT is also monitered......CHT is a 'after the fact' reading....EGT is a 'right this instant' measurement.fisher1 wrote:That graph is cool, and the discussion interesting, but hey we're talking about the idle mix screw.
I paid a lot of attention to get my high and mid range jetting correct via CHT and plug chop readings.
But once I did that, I simply adjusted the idle mix to max rpm (just did it by ear), richened it 1/8 turn to be safe, and then set the idle speed screw fast enough that it ticks over real nice.
Am I not giving it some added attention it deserves?
The best situation for those who worry, is both readouts complementing each other........for example, It could have a lean misfire at the top of the rev range.....if it is at the point of misfire, the CHT will be low but the EGT will be excessive...
Just overcooking my thought process there.
Rob
-
Robbie
- Member
- Posts: 536
- Joined: Wed Apr 25, 2012 2:46 am
- Location: Desplaines Il.
Strictly from the standpoint of fuel delivery, the downhill shouldn't matter as there is no combustion event taking place......throttle closed, high rpm, not enouph air available for combustion.fisher1 wrote:Yes that's true, but what if you're going down a prolonged down hill on idle.Even too lean settings at idle cause no harm....just runs lousy and dies a lot.
But, the question then becomes, is there enouph oil still coming through the injection system to adequately lubricate the engine with the throttle closed?
Some have said yes, some have said no......I speculate the designers took into account the existence of hills and have the pump volume/pressure characteristics designed accordingly.
Rob
-
ryanhennessy
- Member
- Posts: 9
- Joined: Mon Oct 29, 2012 10:26 pm
- Location: Chicago
-
az_slynch
- Member
- Posts: 1917
- Joined: Wed Sep 12, 2012 4:56 pm
- Location: Tucson, AZ
The autolube feeds oil into the intake below the throttle slide, so the crank and piston would be getting oil regardless of throttle position. However, the pump volume is regulated by the arm that connects to the carb's throttle slide as well the throttle cable. The pump itself is driven by the crankshaft, so I expect that oil delivery rate is tied to that as well. Going downhill with the throttle closed and the clutch engaged will probably cause it to deliver more oil than it would while just idling, but I'm not sure that it is enough. The other concern is that the piston is still cycling along at speed, without a cooling fuel charge to help regulate temps. It'll get hotter going downhill with the throttle closed than it would while just idling.Robbie wrote:
Strictly from the standpoint of fuel delivery, the downhill shouldn't matter as there is no combustion event taking place......throttle closed, high rpm, not enouph air available for combustion.
But, the question then becomes, is there enouph oil still coming through the injection system to adequately lubricate the engine with the throttle closed?
Some have said yes, some have said no......I speculate the designers took into account the existence of hills and have the pump volume/pressure characteristics designed accordingly.
Rob
I just recommend blipping the throttle at intervals while riding downhill to reduce the risk of a siezure.
At what point does a hobby become an addiction? I'm uncertain, but after the twelfth scooter, it sorta feels like the latter...
Seriously...I've lost count...
Seven mopeds ...that's still manageable...
Seriously...I've lost count...
Seven mopeds ...that's still manageable...