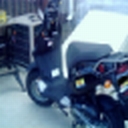
I found a way to install simple, but effective, foot pegs to give my legs some extension while I'm riding.
Recipe:
- Pair of Buddy Footpegs from Motorcycle Superstore: $8.99 for the pair plus $6.99 shipping
- Pair of steel construction corner braces from local hardware store: $3.29 each
- Bolts, washes, lock washers: $1.74
- Total cost after tax: $24.80
- Tools required: Socket wrench with 6 mm and 10 mm sockets.
- Time to install: 5 minutes
- Permanent alterations made to bike: None
They flex a bit if I put too much weight on them, but I don't plan to stand on the pegs. They are great for just resting my weary feet and straightening out my knees some while I'm riding. The pegs fold up and out of the way, too!
Most importantly, it was really easy for a mechanical neophyte like me.
jd
My Buddy's Got Foot Pegs!
Moderator: Modern Buddy Staff
-
jd

- Member
- Posts: 206
- Joined: Sun Aug 07, 2011 8:08 pm
- Location: Cincinnati/Northern Kentucky
My Buddy's Got Foot Pegs!
- Attachments
-
- Footpegs 004.jpg (59.34 KiB) Viewed 1083 times
-
- Footpegs 001.jpg (63.01 KiB) Viewed 1083 times
Some people are like slinkies. They're not very interesting, but they bring a smile to your face when you push them down the stairs.
-
BeefSupreme

- Member
- Posts: 306
- Joined: Tue Oct 25, 2011 6:03 pm
- Location: Mobile, AL
- Contact:

-
jd
- Member
- Posts: 206
- Joined: Sun Aug 07, 2011 8:08 pm
- Location: Cincinnati/Northern Kentucky
I had originally looked into using a single piece of steel, but decided that it would require cutting and bending that I am ill equipped to perform. Anyone with access to the right tools can do a better job, and probably at a cheaper price.
This solution is designed for those of us who don't want to have to fabricate or modify anything. All these parts are bolt-on as is. Call it "Foot Pegs for Dummies," if you like.
The pegs don't stick down very far. For the left one to hit, the kickstand's pretty much going to have to hit, too. I will be doing a lot of testing this weekend. If worse comes to worst, I'll move the pegs to the higher hole and cut off the bottom portion of the brace with a hacksaw. (That much modification I think I can handle.)
Some people are like slinkies. They're not very interesting, but they bring a smile to your face when you push them down the stairs.
-
Tocsik

- Member
- Posts: 1918
- Joined: Mon Jun 02, 2008 8:40 pm
- Location: Denver
This topic has come up a bunch of times in the past with various results in fabrication.
I gotta say, you've done a quick and successful adaptation!
My biggest concern is the possible scraping in turns so please keep us posted. I think the hope in past threads has been to get the pegs positioned more forward but you sure took advantage of existing mounting holes and got the job done! Good work.
.::I know the voices in my head aren't real, but man do they come up with some great ideas::.


-
michelle_7728
- Member
- Posts: 1914
- Joined: Fri Jun 12, 2009 2:16 am
- Location: Renton, WA
Awesome job, JD! 
Many's the time that I have stuff on my floorboard and my feet barely have a couple inches to toe-in to grab purchase.
Do you think it be possible to install them so that they actually flip back, and rest horizontally against the outside of the floorboard when not in use?
I might just have to give this a shot!
I don't suppose you have the part number of the foot pegs you bought?
Past bikes: 08' Genuine Buddy 125, '07 Yamaha Majesty 400, '07 Piaggio MP3 250, '08 Piaggio MP3 500, '08 Aprilia Scarabeo 500
Current bikes: Two '09 Genuine Buddy 125's
Current bikes: Two '09 Genuine Buddy 125's
-
agrogod
- Member
- Posts: 1156
- Joined: Mon Jul 19, 2010 9:29 pm
- Location: Rancho Cordova, CA
I think its these Michelle,
http://www.motorcycle-superstore.com/3/ ... tpegs.aspx
or cheaper still
http://www.motorcycle-superstore.com/3/ ... tpegs.aspx
http://www.motorcycle-superstore.com/3/ ... tpegs.aspx
or cheaper still
http://www.motorcycle-superstore.com/3/ ... tpegs.aspx
"When your mouth is yapping your arms stop flapping, get to work" - a quote from my father R.I.P..
always start with the simple, it may end up costing you little to nothing
always start with the simple, it may end up costing you little to nothing
-
Wolfhound
- Member
- Posts: 958
- Joined: Sat Nov 10, 2012 12:27 pm
- Location: Ball Ground, GA
I have been trying to makes a set for my 170i but did not come up with any
thing that I liked. Congratulations, JD , on a job well done. This will be my
next week end project. Simple, not complex, easily removed if needed, and
even a seriously mechanically challanged person like me can make them.
I will be forever grateful for your sharing this idea.
thing that I liked. Congratulations, JD , on a job well done. This will be my
next week end project. Simple, not complex, easily removed if needed, and
even a seriously mechanically challanged person like me can make them.
I will be forever grateful for your sharing this idea.
-
RoaringTodd
- Member
- Posts: 690
- Joined: Mon Jul 23, 2012 3:45 pm
- Location: Philly, PA
I love the passenger footrests on my Elite 80. They are similar to what has been posted here, but further back, and fold up when not in use. I use them all the time to tuck my feet in below me for a better riding experience.
Question.
Would it be possible to move those footpegs back to under the grey passenger footpeg plastics? That would position your feet like a adventure/sport bike.
Question.
Would it be possible to move those footpegs back to under the grey passenger footpeg plastics? That would position your feet like a adventure/sport bike.
Just because I am Deaf ... does not mean I can't roar.
-
Tocsik
- Member
- Posts: 1918
- Joined: Mon Jun 02, 2008 8:40 pm
- Location: Denver
This was the best attempt for the passenger. They are beautiful.RoaringTodd wrote:
Question.
Would it be possible to move those footpegs back to under the grey passenger footpeg plastics? That would position your feet like a adventure/sport bike.
.::I know the voices in my head aren't real, but man do they come up with some great ideas::.
-
TVB
-
michelle_7728
- Member
- Posts: 1914
- Joined: Fri Jun 12, 2009 2:16 am
- Location: Renton, WA
Thanks Agrogod!agrogod wrote:I think its these Michelle,
http://www.motorcycle-superstore.com/3/ ... tpegs.aspx
or cheaper still
http://www.motorcycle-superstore.com/3/ ... tpegs.aspx
Past bikes: 08' Genuine Buddy 125, '07 Yamaha Majesty 400, '07 Piaggio MP3 250, '08 Piaggio MP3 500, '08 Aprilia Scarabeo 500
Current bikes: Two '09 Genuine Buddy 125's
Current bikes: Two '09 Genuine Buddy 125's
-
jd
- Member
- Posts: 206
- Joined: Sun Aug 07, 2011 8:08 pm
- Location: Cincinnati/Northern Kentucky
Follow-Up Comments and Response:
Thanks for the good word, everyone!
The pegs can be rotated to fold in whatever direction you like before you tighten the nuts. I have them oriented to fold up, but I could easily have them fold back, instead.
agrogod has identified the right footpegs. I ordered the version with the 10mm thread.
Your average corner brace probably will not provide enough stiffness for this installation because they're not designed for this kind of duty. I picked up these heavy duty braces at my local Ace Hardware, but I found them online here. They're cheaper online (although I have not calculated shipping) and they seem to be out of stock at the moment. If I had to go with thinner braces, I might have doubled them up just to prevent too much flexing.
The hardware you need includes the following:
The two existing 6mm bolts in the scooter floorboard are not long enough to reach through the braces, so you'll need to get longer ones (sorry, I didn't measure the ones I actually picked out but you can "eyeball" it pretty easily if you take the existing bolt with you to the store.) Also, the washers will not easily separate from the existing bolts, so pick up two new ones for the two new bolts.
The threads on the pegs are a little tough to get through the holes in the braces but you can finesse them through. I thought I might have to drill out the holes a bit, but that turned out to be unnecessary. You'll want to get a washer and lock washer for each one to ensure the nuts don't loosen up while riding.
I plan to give them a good workout tomorrow and will report back afterwards.
jd
Some people are like slinkies. They're not very interesting, but they bring a smile to your face when you push them down the stairs.
-
Tocsik
- Member
- Posts: 1918
- Joined: Mon Jun 02, 2008 8:40 pm
- Location: Denver
Hey, could you get a couple pics of you (or someone) sitting on the scooter using the foot pegs from a different angles?
I'm curious about the leg position on them.
Again, great job! Would you consider padding the inside of the bracket where it looks close to the side plastics of the scooter? Wondering if the bracket flexes enough to rub against any scooter body parts.
I'm curious about the leg position on them.
Again, great job! Would you consider padding the inside of the bracket where it looks close to the side plastics of the scooter? Wondering if the bracket flexes enough to rub against any scooter body parts.
.::I know the voices in my head aren't real, but man do they come up with some great ideas::.
-
jd
- Member
- Posts: 206
- Joined: Sun Aug 07, 2011 8:08 pm
- Location: Cincinnati/Northern Kentucky
UPDATE FROM WEEKEND TESTING:
1. They work. It's wonderful having a different spot to rest my feet from time-to-time.
2. Clearance is a non-issue. They don't stick down very far, and they didn't even get close to the ground on some sharp curves.
3. They pretty much stay in place, but I'm not 100 percent satisfied with their tendency to rotate forward if I put too much pressure on them. I tried putting in some additional washers, and tightening them down even more. This improved the situation somewhat, but part of the problem is the tendency of the brace to ride up on the plastic ridge at the edge of the floorboard. I've got some ideas about how to fix that, which will involve using nuts strategically placed along the bolts. The purpose of those will be to keep the braces very slightly above the floorboard, so I'm definitely tightening them down against the frame instead of the plastic floorboard.
May not get to this for a couple of weeks, but I'm plenty satisfied with what I've got so far. More to come....
jd
Some people are like slinkies. They're not very interesting, but they bring a smile to your face when you push them down the stairs.
-
jrsjr

- Moderator Emeritus
- Posts: 3746
- Joined: Fri Jun 09, 2006 11:26 pm
A better solution would be a mounting bracket fabricated from one piece with the washers attached to the bottom of the piece to act as spacers. Then it wouldn't try to slide or turn. All you need is a piece of scrap that's long enough. Is there a scrapyard near you? Take your current brackets there to show them the thickness, width, and (measure the) length you need. You don't need elaborate tools to bend it. Clamp it in a vise (maybe the guys at the scrapyard have a bench vise? It can't hurt to ask.), whack it a couple times with a hammer to bend it and then do the same for the other end. If you have rough edges when you're done, ask the folks at the scrapyard if they have a file you can borrow. If not, you can file it by scraping it on concrete. Use your current brackets as templates to mark the new bracket for where to drill the mounting holes. Drill it. Attach the washers on the bottom with some JB Weld. Bolt it up and you're done. If you end up incurring expenses I bet you could sell a couple of these on here to make it worth your while, especially if you painted them and included the footpeg hardware pre-installed so all the end user had to do was bolt it on their scooter.jd wrote:UPDATE FROM WEEKEND TESTING:
... part of the problem is the tendency of the brace to ride up on the plastic ridge at the edge of the floorboard. I've got some ideas about how to fix that, which will involve using nuts strategically placed along the bolts. The purpose of those will be to keep the braces very slightly above the floorboard, so I'm definitely tightening them down against the frame instead of the plastic floorboard.
Signed,
Unrepentent, Unreconstructed, Capitalist Tool