As of right now we removed the contra spring and installed a set of 2000 rpm pill springs. Not the best setup for the street but we are working real hard at getting our rpm's up at the track.jmkjr72 wrote:so just a contra spring and no stiffer clutch springs with this set up
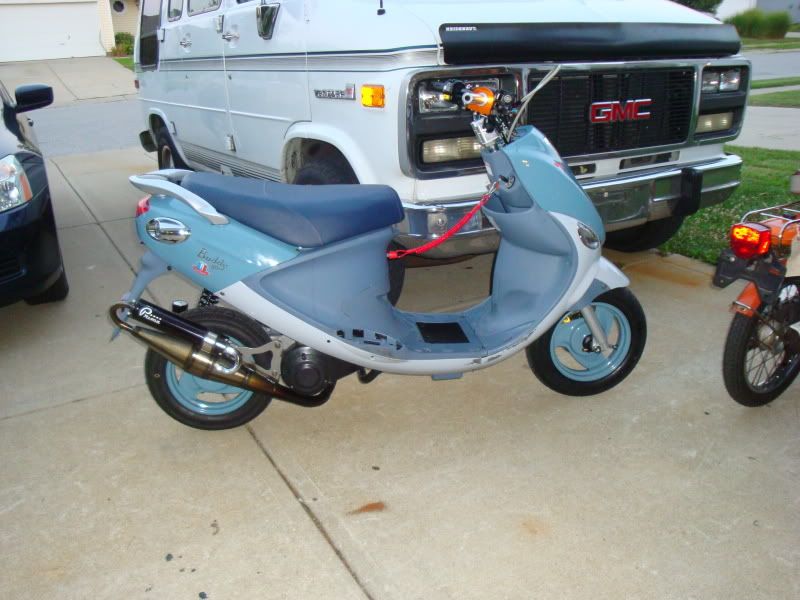
Project "Frenchy" (we love gold!) 56k Beware!
Moderator: Modern Buddy Staff
-
NASRA

- Member
- Posts: 72
- Joined: Fri Jun 25, 2010 7:31 pm
- Location: Indy
- Contact:
Amerivespa Indy 2015.
Scooterists start your engines!
#AVINDY15
Scooterists start your engines!
#AVINDY15
-
jasondavis48108
- Member
- Posts: 2919
- Joined: Fri Apr 24, 2009 12:36 pm
- Location: Ann Arbor
so your back to the stock compression spring? what did replacing the pill springs w/ the 2000rpm do in terms of take off and top end? Just currious as right now I'm running the 1000rpm compression spring from NCY and 7.5g sliders and my top end is fairly good (50-55 mph indicated) but the acceleration is nothing to brag about 
"Only the curious have, if they live, a tale worth telling at all" Alastair Reid
-
NASRA
- Member
- Posts: 72
- Joined: Fri Jun 25, 2010 7:31 pm
- Location: Indy
- Contact:
The pill springs will help your acceleration by letting your engine build higher rpms before engaging. We removed the compression spring on our setup just because we wanted immediate engagement off the line.jasondavis48108 wrote:so your back to the stock compression spring? what did replacing the pill springs w/ the 2000rpm do in terms of take off and top end? Just currious as right now I'm running the 1000rpm compression spring from NCY and 7.5g sliders and my top end is fairly good (50-55 mph indicated) but the acceleration is nothing to brag about
Amerivespa Indy 2015.
Scooterists start your engines!
#AVINDY15
Scooterists start your engines!
#AVINDY15
-
jasondavis48108
- Member
- Posts: 2919
- Joined: Fri Apr 24, 2009 12:36 pm
- Location: Ann Arbor
did you try both the compression spring and pills springs? If so what was your result? thanx for answering all these questions btwNASRA wrote:The pill springs will help your acceleration by letting your engine build higher rpms before engaging. We removed the compression spring on our setup just because we wanted immediate engagement off the line.jasondavis48108 wrote:so your back to the stock compression spring? what did replacing the pill springs w/ the 2000rpm do in terms of take off and top end? Just currious as right now I'm running the 1000rpm compression spring from NCY and 7.5g sliders and my top end is fairly good (50-55 mph indicated) but the acceleration is nothing to brag about
"Only the curious have, if they live, a tale worth telling at all" Alastair Reid
-
NASRA
- Member
- Posts: 72
- Joined: Fri Jun 25, 2010 7:31 pm
- Location: Indy
- Contact:
-
jasondavis48108
- Member
- Posts: 2919
- Joined: Fri Apr 24, 2009 12:36 pm
- Location: Ann Arbor
-
AtlBuddy
- Member
- Posts: 231
- Joined: Wed Jun 09, 2010 3:38 am
- Location: Atlanta
I have been watching this thread for a while now from the shadows. i have a buddy 50 with the stage 1 kit and 5g sliders. I started with 6g sliders and the bike was bogging pretty badly off the line. My mechanic was talking about changing the clutch springs (same as pill springs?) to give me better acceleration now that I have the 5g sliders but I haven't been able to find them. Where did you guys get yours?
-
Scootinbow
- Member
- Posts: 5
- Joined: Mon Jul 12, 2010 4:22 am
- Location: Springfield Mo
-
Scootinbow
- Member
- Posts: 5
- Joined: Mon Jul 12, 2010 4:22 am
- Location: Springfield Mo
What air box with the uni filter i had to remove my airbox. And with the 70 kit I had to move up to 105 mainjet. I just got a good tune on it so time will tell when it cools down if i'm running to lean or not but the plug chops today looked really good. I'm not sure how it will do in the rain yet but if I have a problem with it i will make a sheild for it some how to keep the rain off of it if need be.
-
Scootinbow
- Member
- Posts: 5
- Joined: Mon Jul 12, 2010 4:22 am
- Location: Springfield Mo
-
NASRA
- Member
- Posts: 72
- Joined: Fri Jun 25, 2010 7:31 pm
- Location: Indy
- Contact:
If you take your airbox off you'll see the intake tube on the top near the carb with two small screws holding it in. We simply removed the screws and removed the restriction. This way we were able to keep it reliable and still help it breath.AtlBuddy wrote:The air box mod question was for NASRA.
Currently we are tuning a 28mm carb on this little beasty and once we get it and the front end finished Ill be posting some more interesting tid bits. Bad thing is the shop has been slammed the last couple weeks and finding time to work on this project has been tough.
Amerivespa Indy 2015.
Scooterists start your engines!
#AVINDY15
Scooterists start your engines!
#AVINDY15
-
AtlBuddy
- Member
- Posts: 231
- Joined: Wed Jun 09, 2010 3:38 am
- Location: Atlanta
Thanks. I was wondering if that was all or there was more. i think I will pop that puppy out again and try and see how the bike runs now that I have the 5g sliders installed. Now how about those clutch springs? Where did you guys get those? I did not see them on scooterworks site and am waiting to hear back from them. Will replacing these decrease the life of the clutch?
-
AtlBuddy
- Member
- Posts: 231
- Joined: Wed Jun 09, 2010 3:38 am
- Location: Atlanta
-
NASRA
- Member
- Posts: 72
- Joined: Fri Jun 25, 2010 7:31 pm
- Location: Indy
- Contact:
-
ericalm

- Site Admin
- Posts: 16842
- Joined: Sat Jun 10, 2006 3:01 am
- Location: Los Angeles, CA
- Contact:
You should bring it out to CA in November for the land speed trials.
http://www.motorscooterlandspeedfederation.org/
http://www.motorscooterlandspeedfederation.org/
Eric // LA Scooter Meetup Group // Stella 4T // Vespa LX // Vespa LXS // Honda Helix // some, uh, projects…
-
NASRA
- Member
- Posts: 72
- Joined: Fri Jun 25, 2010 7:31 pm
- Location: Indy
- Contact:
-
Mikie M.
- Member
- Posts: 171
- Joined: Thu Jun 17, 2010 10:15 pm
Well done, Nasra. I hope to hear more as your project progresses.
I have a Buddy 50 that has been kitted to 70cc. I am using the stock exhaust, stock carb with factory jetting, stock air filter, plastic reeds, 1000 contrast spring, and 6 gram sliders. My scoot accelerates very well up to 20/25 mph, then more moderately up to near 50 (indicated). I figure it'll do an honest 45 mph and I weigh 250 lbs. This is a little bit contrary to what most folks do but it runs like a dream and should last forever. What do you think?
I have a Buddy 50 that has been kitted to 70cc. I am using the stock exhaust, stock carb with factory jetting, stock air filter, plastic reeds, 1000 contrast spring, and 6 gram sliders. My scoot accelerates very well up to 20/25 mph, then more moderately up to near 50 (indicated). I figure it'll do an honest 45 mph and I weigh 250 lbs. This is a little bit contrary to what most folks do but it runs like a dream and should last forever. What do you think?
-
jmkjr72

- Member
- Posts: 783
- Joined: Sat Jul 11, 2009 11:07 pm
- Location: green bay wi
- Contact:
well with factory jetting even with a stock pipe i would still worry abotu being lean you are actaly pumpin g more air then you think
also a lot will depend upon what kit you got
single ring al kits need rebuilding more often then cast iron 2 ring kits
then it also depends upon the quailty of the kit get a cheap kit it wont hold up
also a lot will depend upon what kit you got
single ring al kits need rebuilding more often then cast iron 2 ring kits
then it also depends upon the quailty of the kit get a cheap kit it wont hold up
z 2008 zuma 50
olive 2008 setlla
1979 tomos

olive 2008 setlla
1979 tomos
-
AtlBuddy
- Member
- Posts: 231
- Joined: Wed Jun 09, 2010 3:38 am
- Location: Atlanta
Can you guys provide some insight as to where you guys got the replacement clutch springs? I have not been able to find them online so i called scooterworks today and the sales person i spoke to said they only had had the stock replacement springs. My mechanic installed some that were the the same length and a little larger and the bike jumps a little more but not much.NASRA wrote:Yea I would start out with a 95 main.
Also, you guy talked about reinstalling the stock contra spring cause you wanted the bike to launch immediately off the line. Does having the stock contra spring rob the bike of power? My bike seems to stall for a second from a stop before starting to respond. I always thought that was because of the larger expansion pipe and how it performs like a turbo. Are you suggesting that the stock spring will give the bike better launch? Please explain this for me.
-
NASRA
- Member
- Posts: 72
- Joined: Fri Jun 25, 2010 7:31 pm
- Location: Indy
- Contact:
I think you need to upjet your carb. Anytime you increase displacement you will have to increase your fuel supply. Its just simple supply and demand. Start with a 95 main and work your way backwards till your fuel mix is where you want it.Mikie M. wrote:Well done, Nasra. I hope to hear more as your project progresses.
I have a Buddy 50 that has been kitted to 70cc. I am using the stock exhaust, stock carb with factory jetting, stock air filter, plastic reeds, 1000 contrast spring, and 6 gram sliders. My scoot accelerates very well up to 20/25 mph, then more moderately up to near 50 (indicated). I figure it'll do an honest 45 mph and I weigh 250 lbs. This is a little bit contrary to what most folks do but it runs like a dream and should last forever. What do you think?
Plug chop is the easiest way to determine your fuel mixture. You want your spark plug to be a dark coffee and cream color but not wet.
Amerivespa Indy 2015.
Scooterists start your engines!
#AVINDY15
Scooterists start your engines!
#AVINDY15
-
NASRA
- Member
- Posts: 72
- Joined: Fri Jun 25, 2010 7:31 pm
- Location: Indy
- Contact:
The Buddy 50 2t transmission components are the exact same one's the 139QMB GY6 50cc engine uses. If you need any parts pm me and Ill direct you to the right spot.AtlBuddy wrote:Can you guys provide some insight as to where you guys got the replacement clutch springs? I have not been able to find them online so i called scooterworks today and the sales person i spoke to said they only had had the stock replacement springs. My mechanic installed some that were the the same length and a little larger and the bike jumps a little more but not much.NASRA wrote:Yea I would start out with a 95 main.
Also, you guy talked about reinstalling the stock contra spring cause you wanted the bike to launch immediately off the line. Does having the stock contra spring rob the bike of power? My bike seems to stall for a second from a stop before starting to respond. I always thought that was because of the larger expansion pipe and how it performs like a turbo. Are you suggesting that the stock spring will give the bike better launch? Please explain this for me.
You dont want to run contra spring unless you have a big bore kit installed. The engine wont have enough power to pull the spring and you will end up loosing top end. The stall is why you put in a larger spring, it lets you rev higher before takeoff. We have a 1000 rpm spring installed now and it pulls all the way through the powerband.
Amerivespa Indy 2015.
Scooterists start your engines!
#AVINDY15
Scooterists start your engines!
#AVINDY15
-
AtlBuddy
- Member
- Posts: 231
- Joined: Wed Jun 09, 2010 3:38 am
- Location: Atlanta
NASRA wrote:Thanks for answering all my questions. I am still trying to understand all of this. So you say I shouldn't run the after market contra spring; so why does scooterworks sell it in the stage 1 kit?AtlBuddy wrote:The Buddy 50 2t transmission components are the exact same one's the 139QMB GY6 50cc engine uses. If you need any parts pm me and Ill direct you to the right spot.NASRA wrote:Yea I would start out with a 95 main.
You dont want to run contra spring unless you have a big bore kit installed. The engine wont have enough power to pull the spring and you will end up loosing top end. The stall is why you put in a larger spring, it lets you rev higher before takeoff. We have a 1000 rpm spring installed now and it pulls all the way through the powerband.
-
NASRA
- Member
- Posts: 72
- Joined: Fri Jun 25, 2010 7:31 pm
- Location: Indy
- Contact:
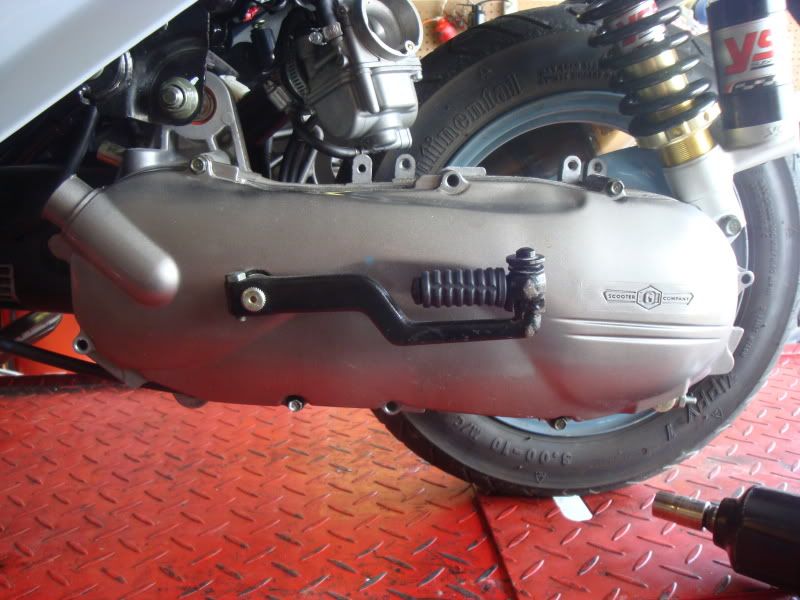
Been awhile since I lasted posted a update, been super swamped here in the shop. However we have a lot of ground to cover so lets dive right in.
How to install a Prima 72cc Iron Big Bore Kit in your Buddy 50 2t.
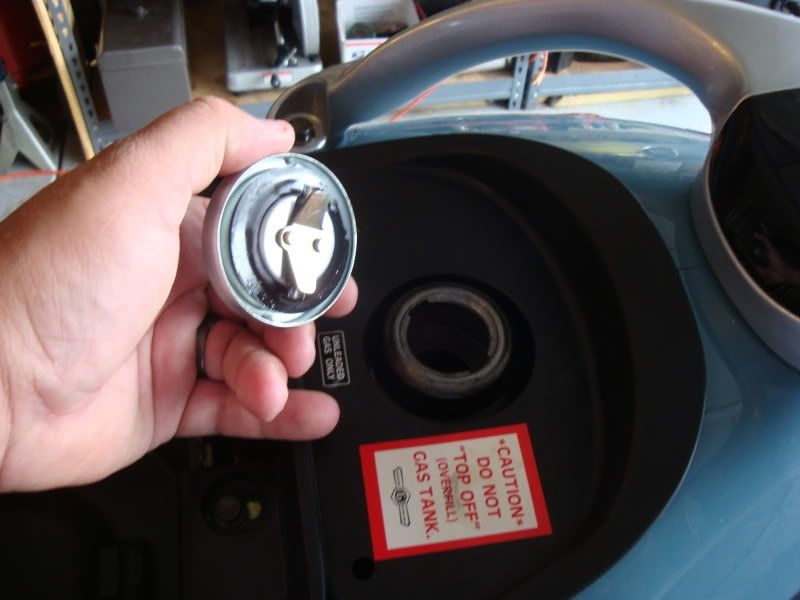
Remove seat bucket.
Remove gas cap.
Remove 4 10mm bolts and bucket slides out.
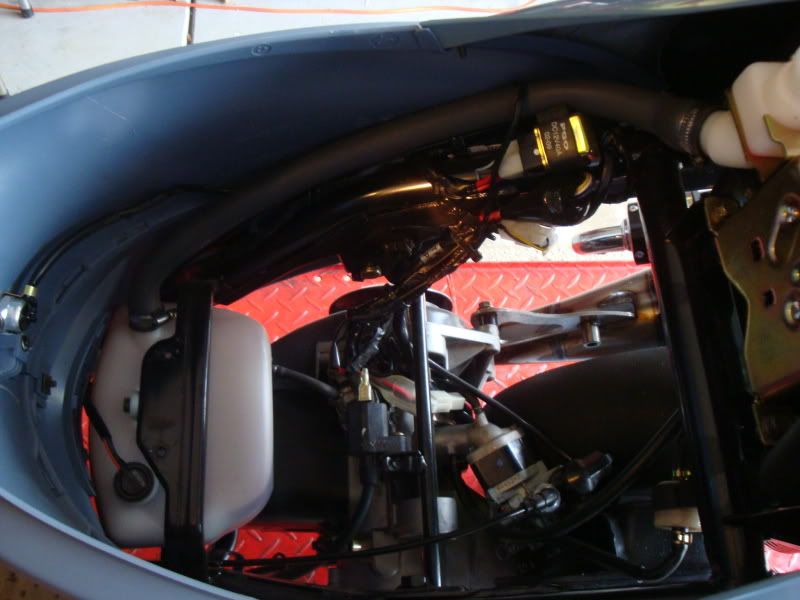
Disconnect the starter wiring.
Disconnect the stator wiring.
Remove the coil from the plug.
Remove rear brake cable.
Remove the fuel line from the carb along with the top of the carburetor so you can remove the engine without having to undo the throttle cable.

Remove cable guide from engine.
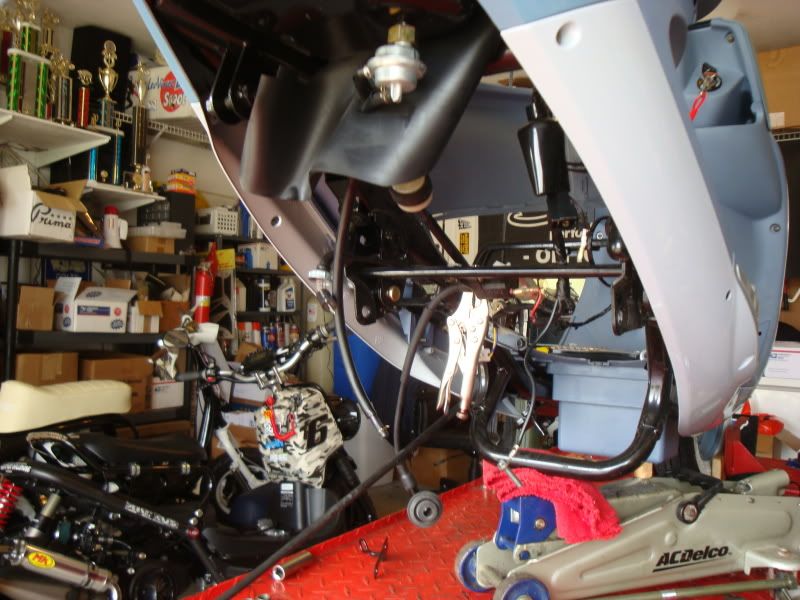
At this point I put a jack under the scooter and strap the scooter to the lift. This way I can lift the front end and remove the motor without having to play twister.
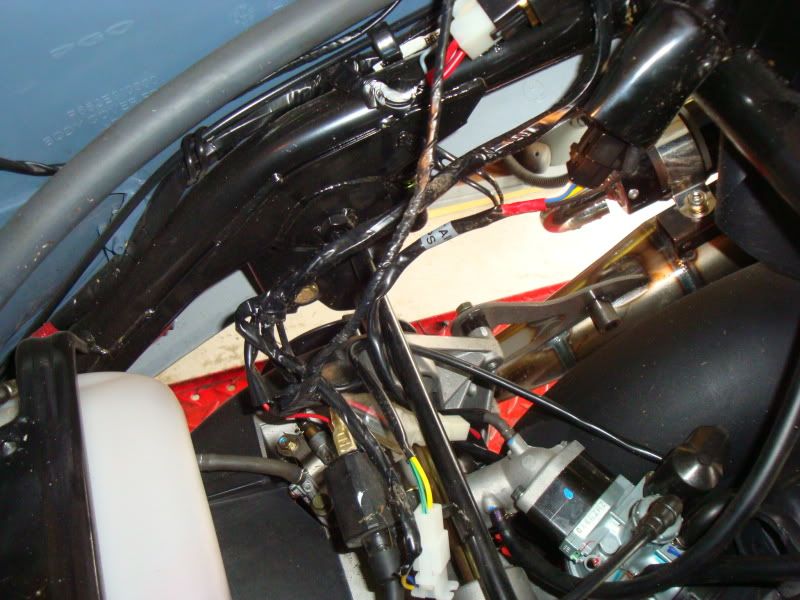
Remove rear shock and let the tire rest on the lift.
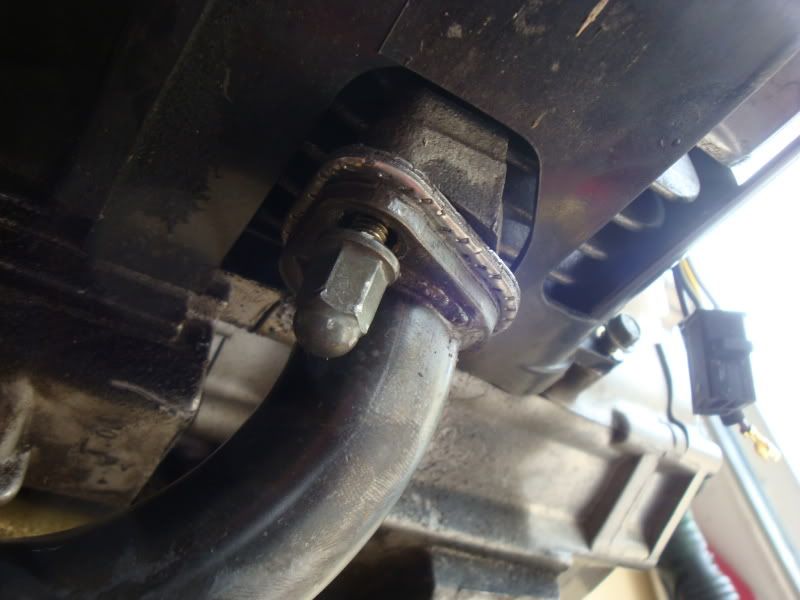
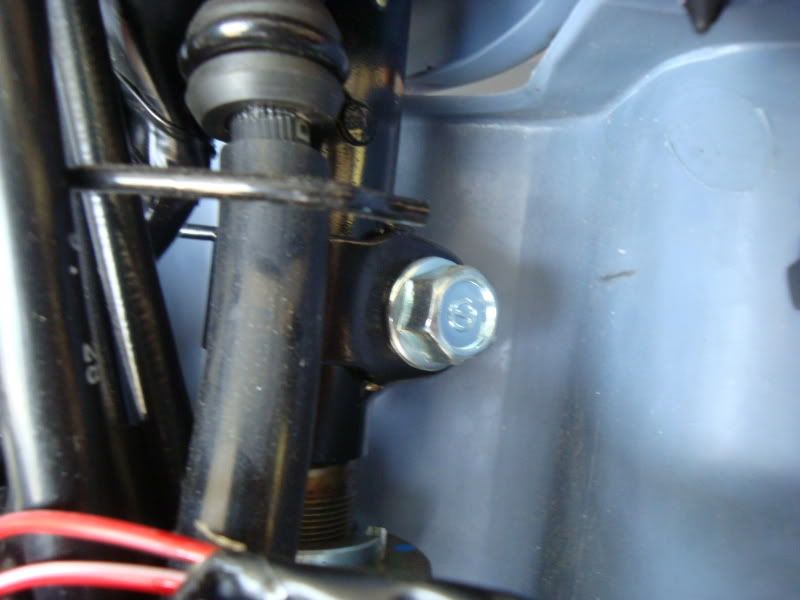
Locate and remove engine mount bolt.
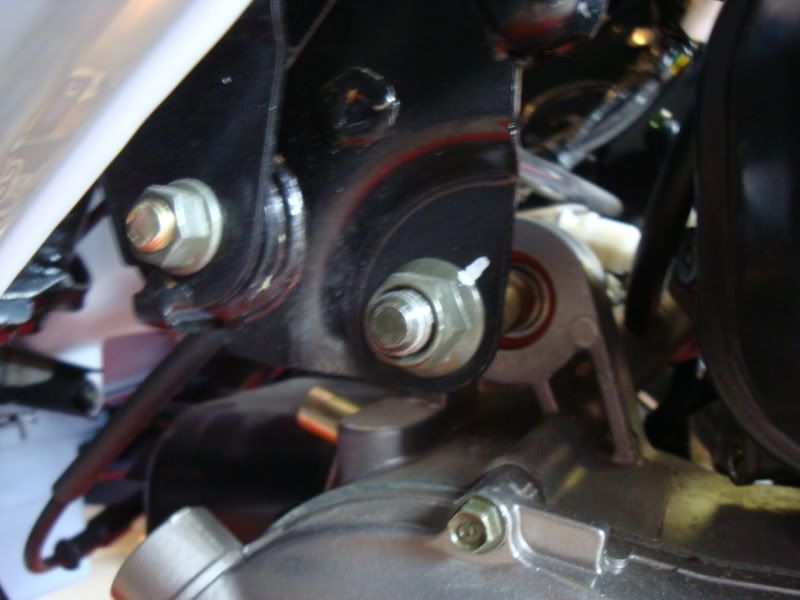
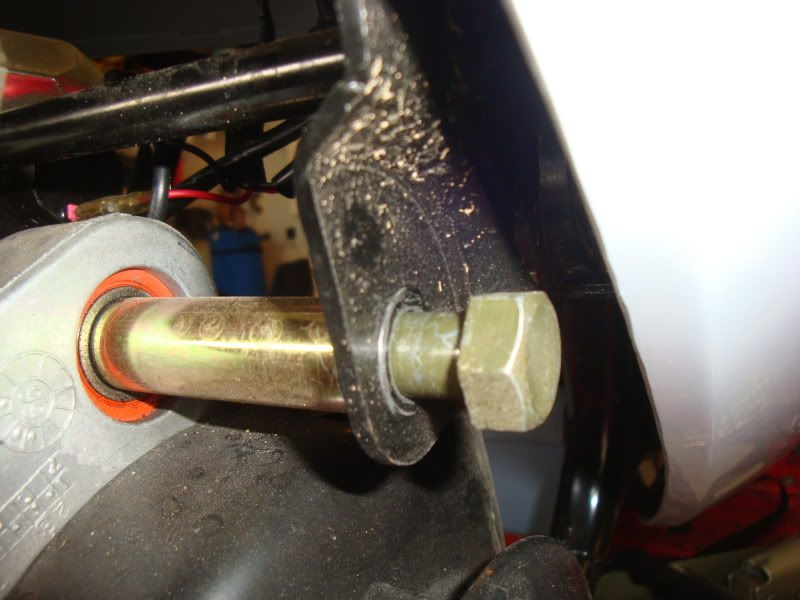
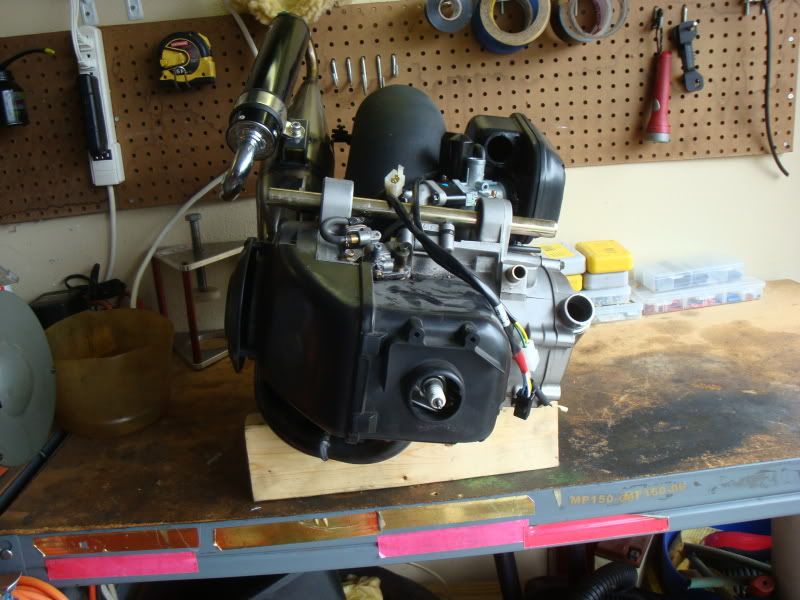
Make sure at this point that all of your wires are removed and and cables unhooked and slide the motor out and place on bench. I use a block of wood to hold the motor in place since this one no longer has a center stand. However your center stand will hold the motor nicely and will provide a excellent working platform.
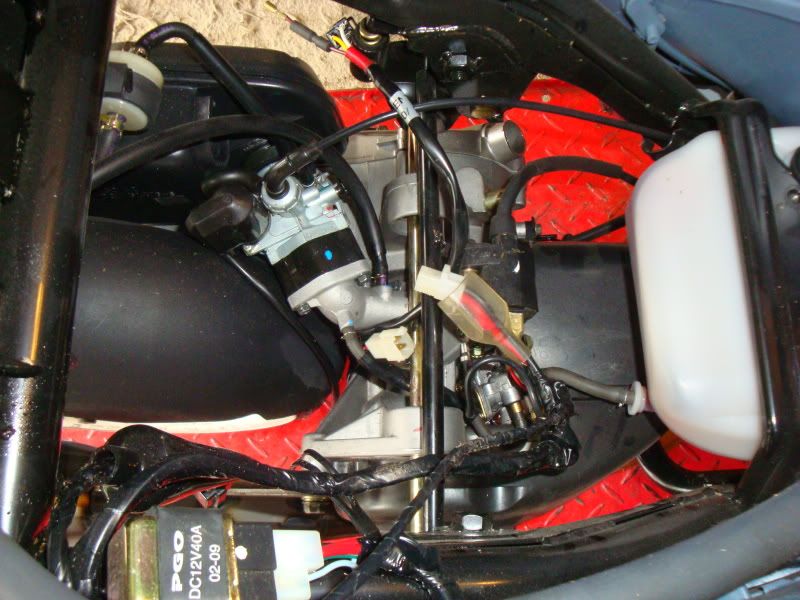
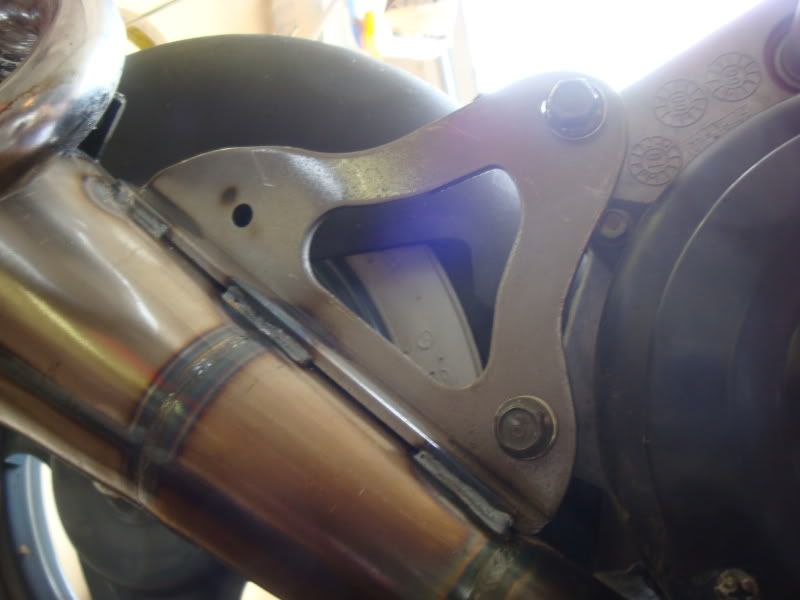
Next remove the exhaust.
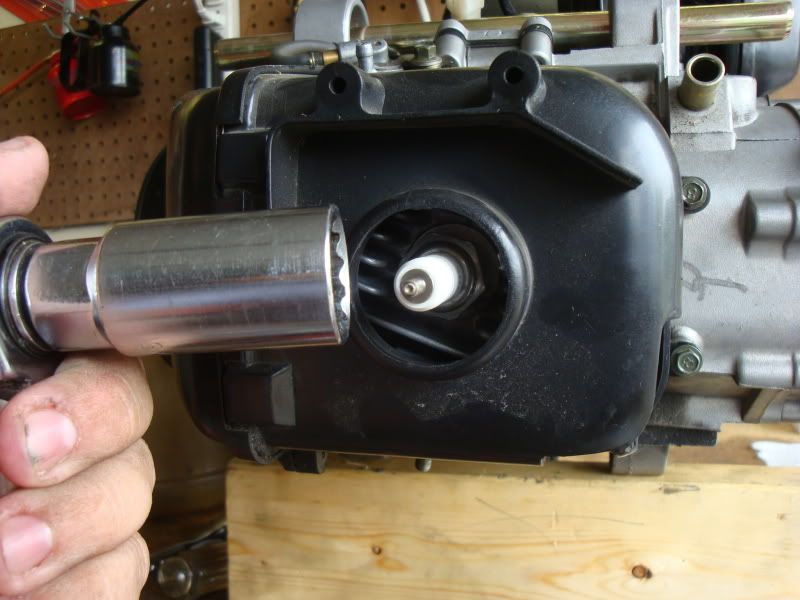
Remove sparkplug and engine shrouding.
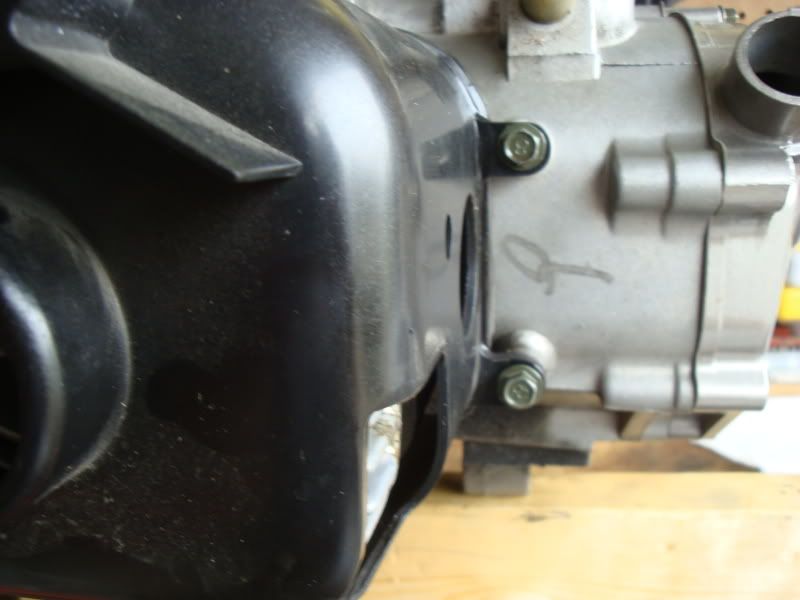
Remove the 4 head nuts.
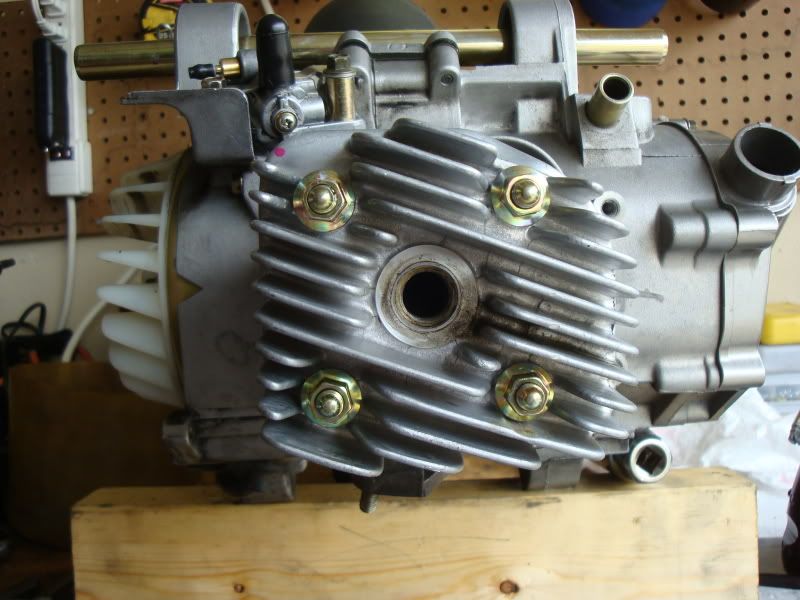
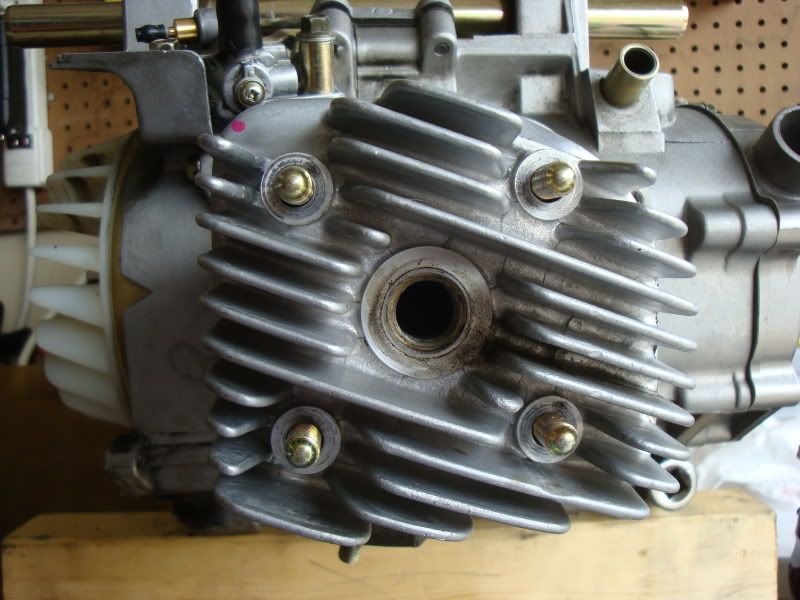
Remove head.
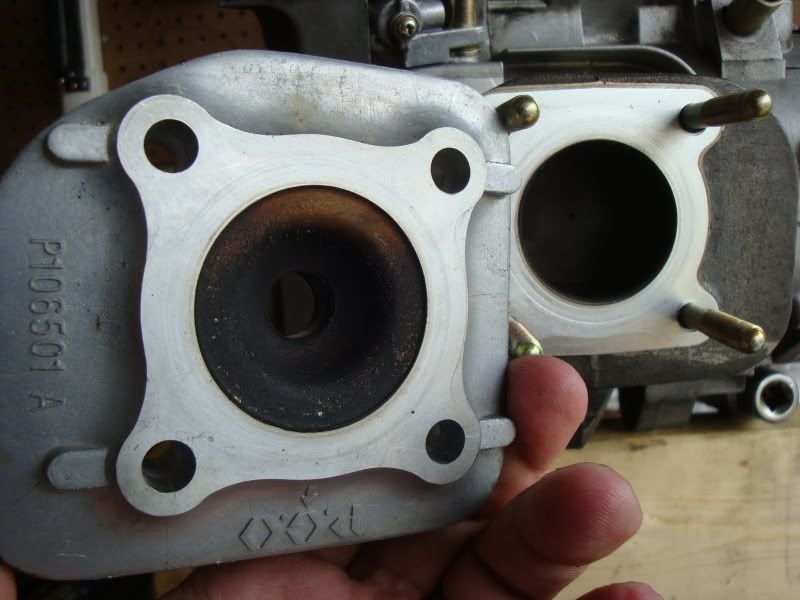
Remove gasket.
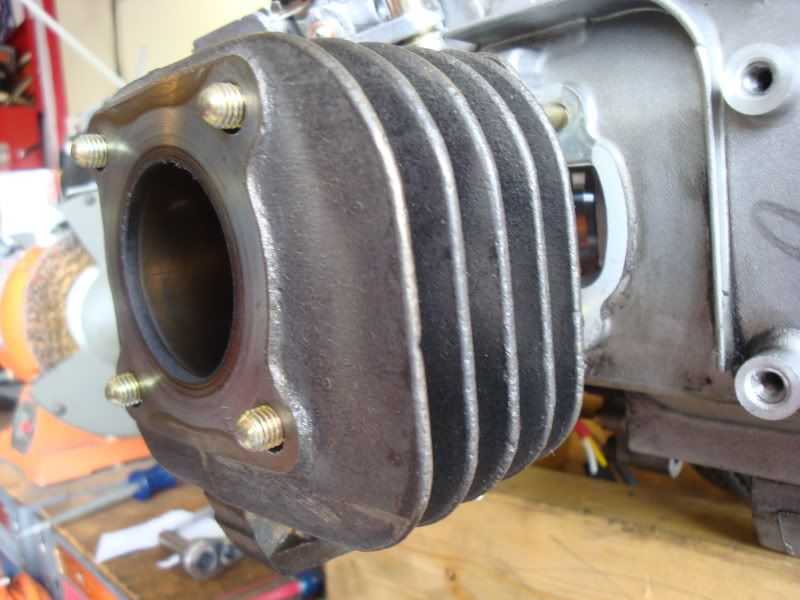
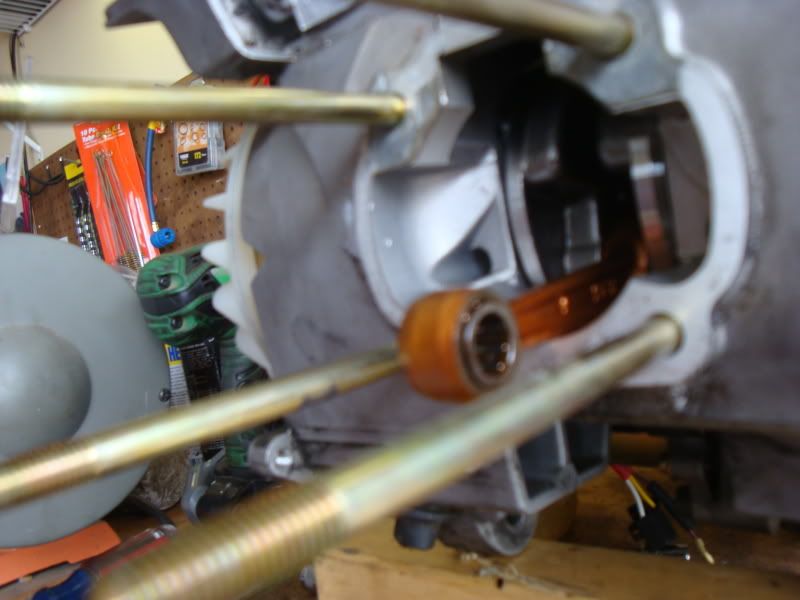
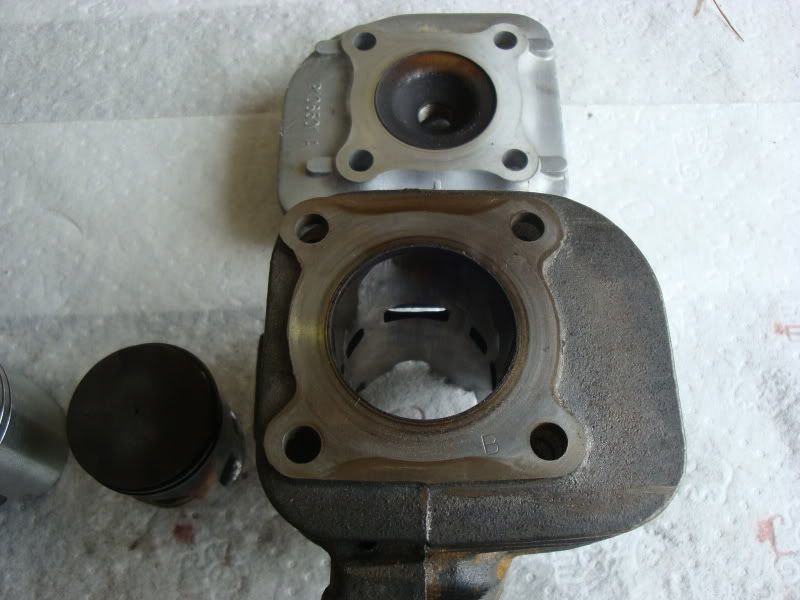
Remove jug.
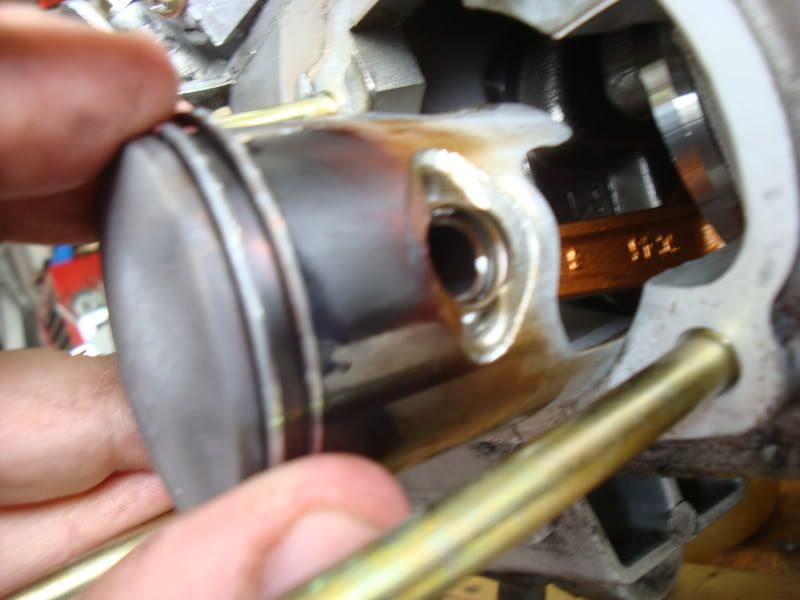
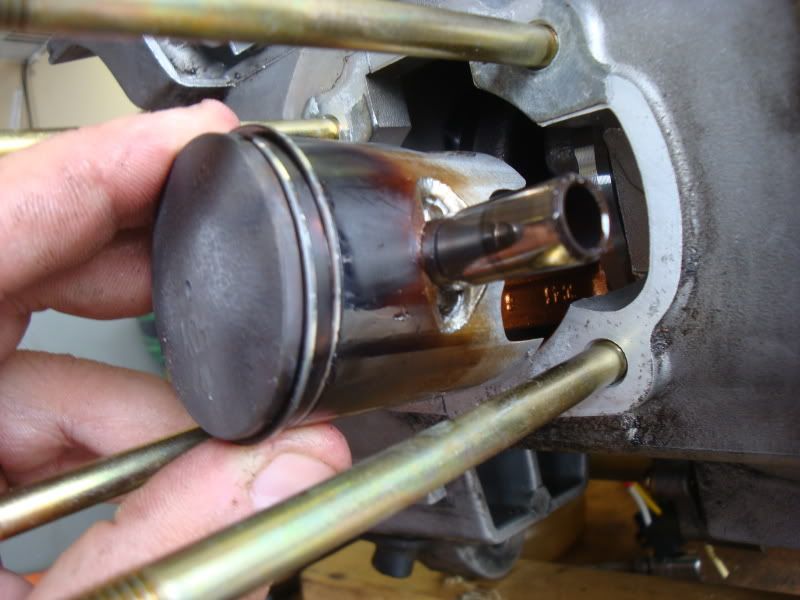
Remove the c-clips on the piston and slide out the wrist pin.
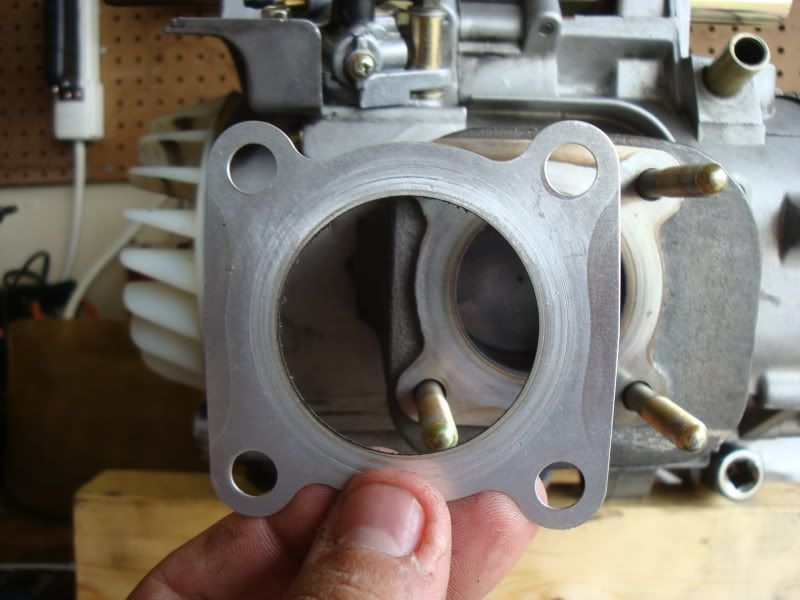
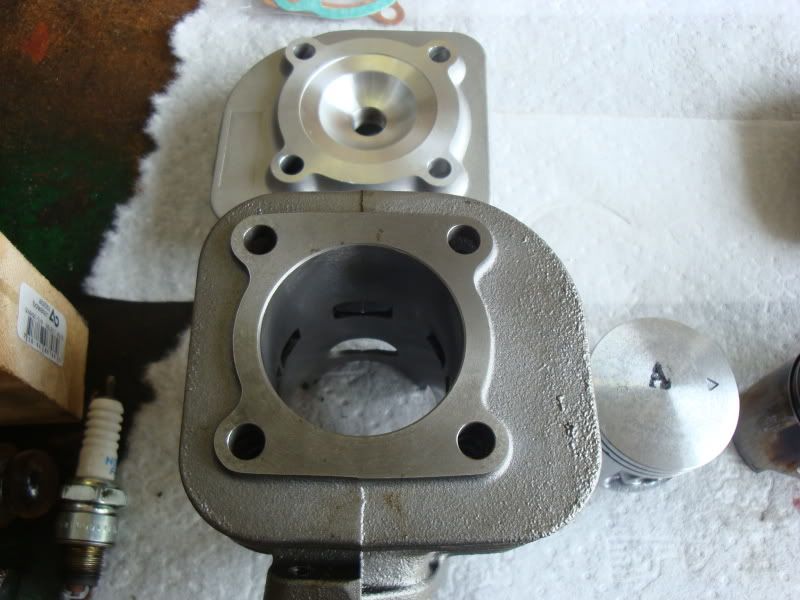
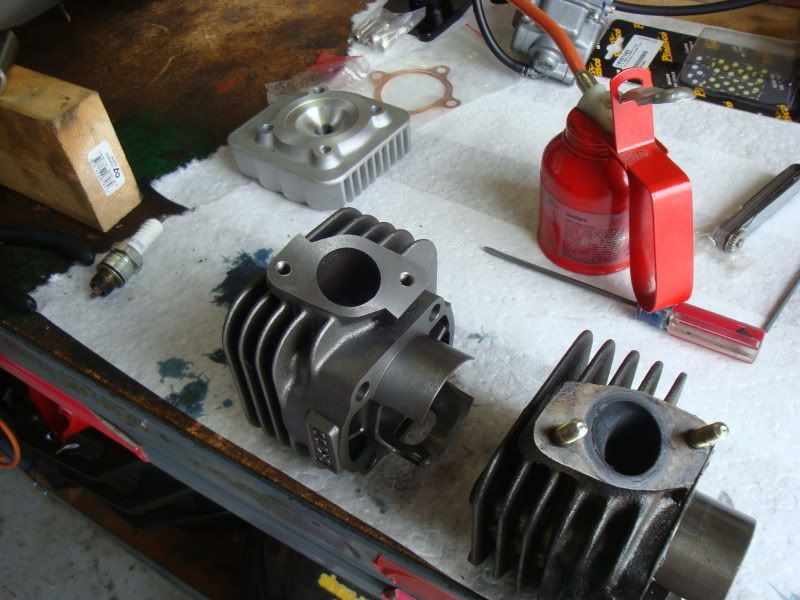
Prima 72cc kit vs stock
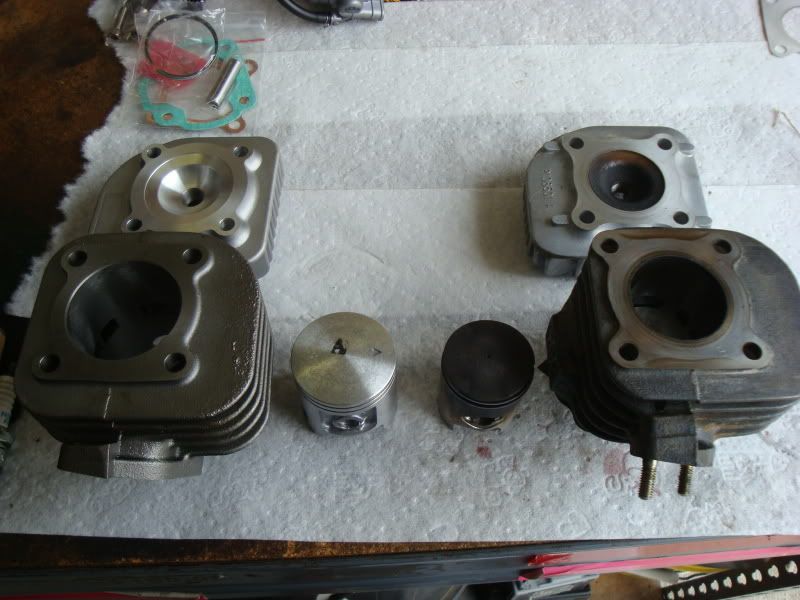
As you can see the bore is much larger along with larger intake and exhaust ports.
At this point you need to inspect the new kit and prep it for installation.
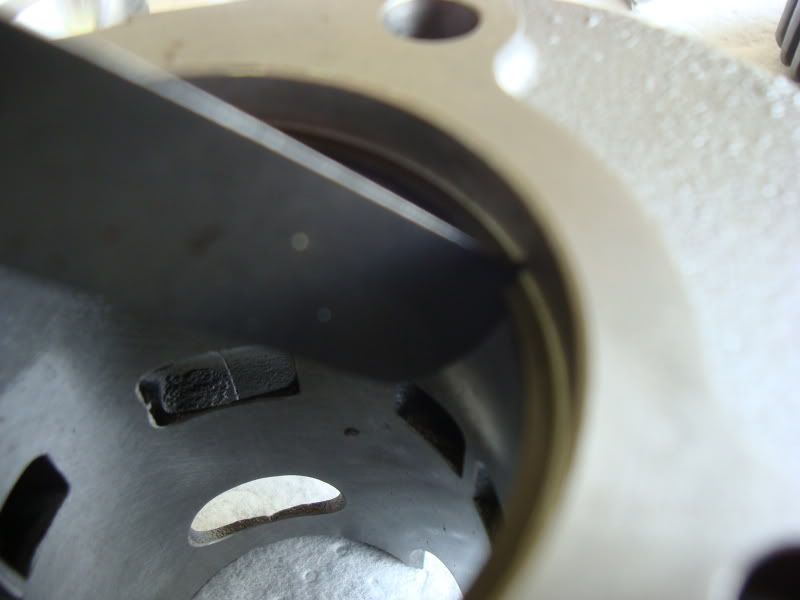
Take your handy feeler gauge .008 in and check your ring gap. Ring gap is the space between the ring ends when its compressed by the cylinder.
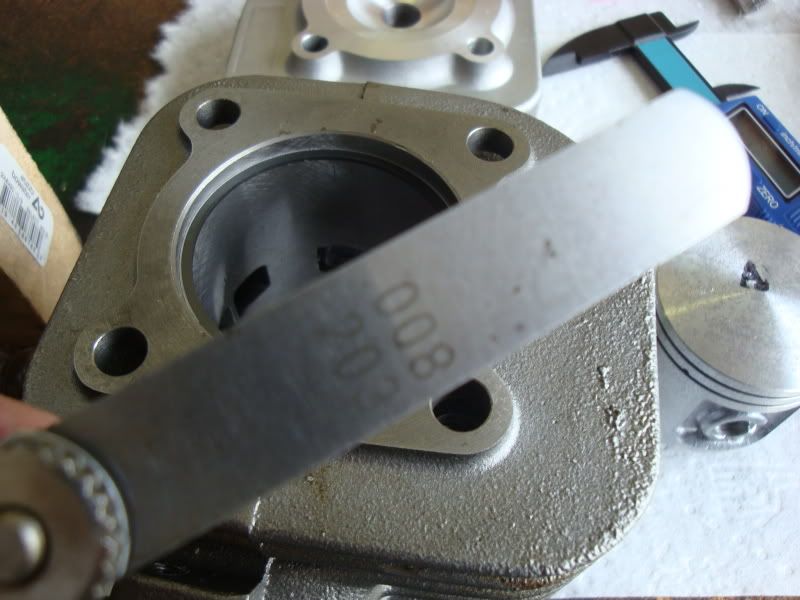
Install the ring in the jug and use the piston to push up against it making sure its flush.
Now measure. If the ring gap is to tight you will need to file it down until it meets spec. If its too large you will need to purchase a new set of rings. Fortunately for us the Prima kit was spot on, both rings.
Now remove all the old exhaust studs and install them in the new jug.
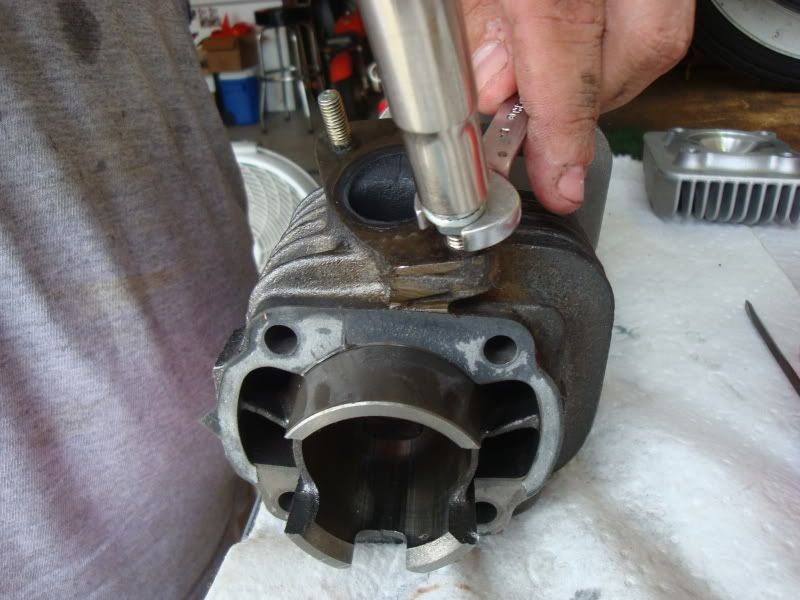
Next up (use special care here) is to chamfer the ports. Most of the time from the factory a cylinder will have sharp edges on the boost, intake, and exhaust ports. Those can hurt your rings during break in and you need to take a small file and remove all sharp edges.
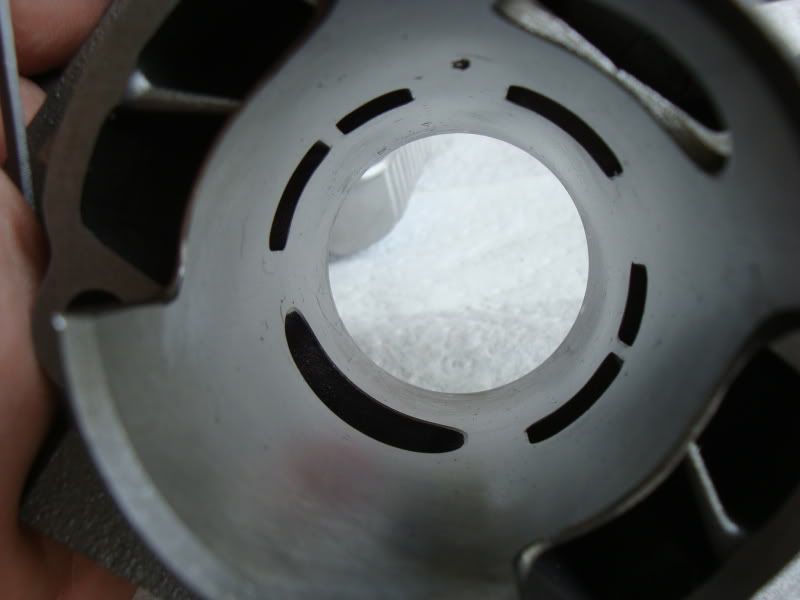
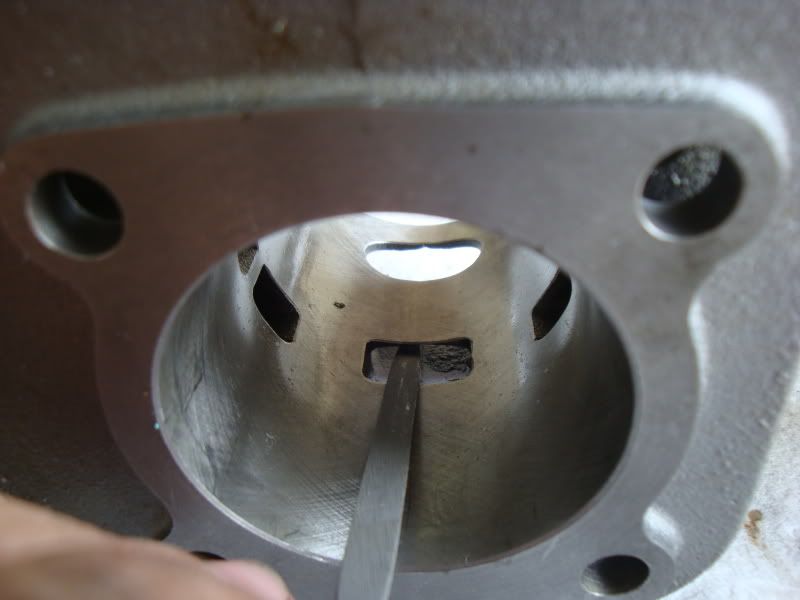
Now that all the edges are smooth its time to install the rings.
Take a look at your piston. You will see a small dowel on each ring groove. Make sure the end of each ring rests in its own dowel.
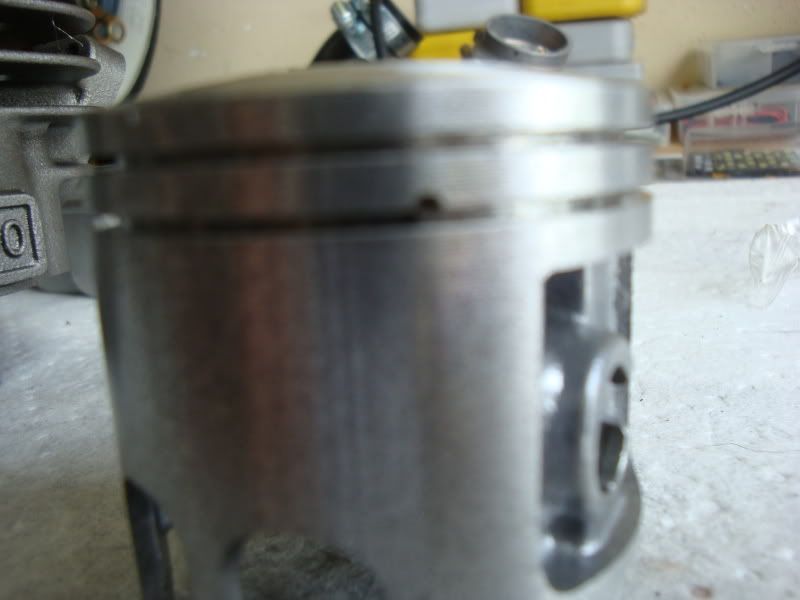
Apply a liberal amount of 2 stroke oil and install the rings. Be careful here not to over stretch or break a ring.
Now remove your old gasket from the block making sure not to get anything in the engine. Its best to stuff a clean rag inside the case to ensure nothing makes its way into the carters.
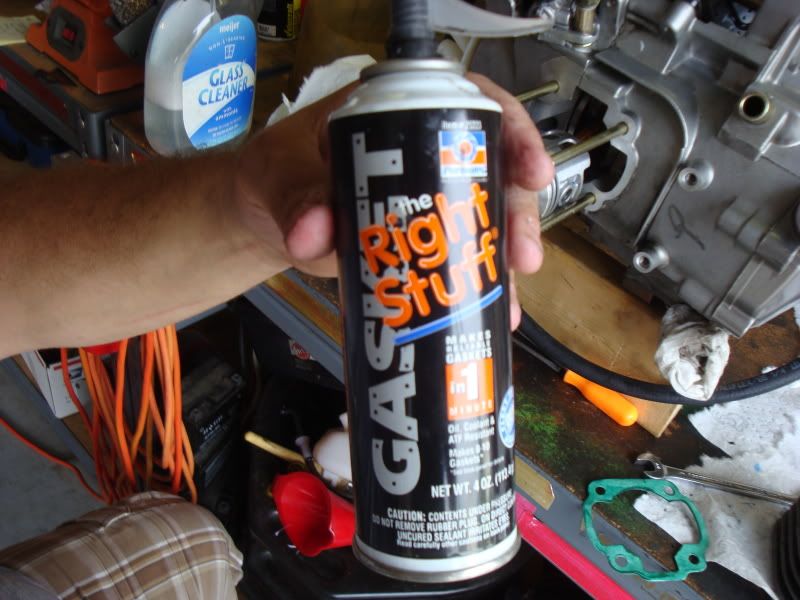
I always use a dab of "the right stuff" gasket maker to my base gaskets to ensure a good seal.
Install base gasket.
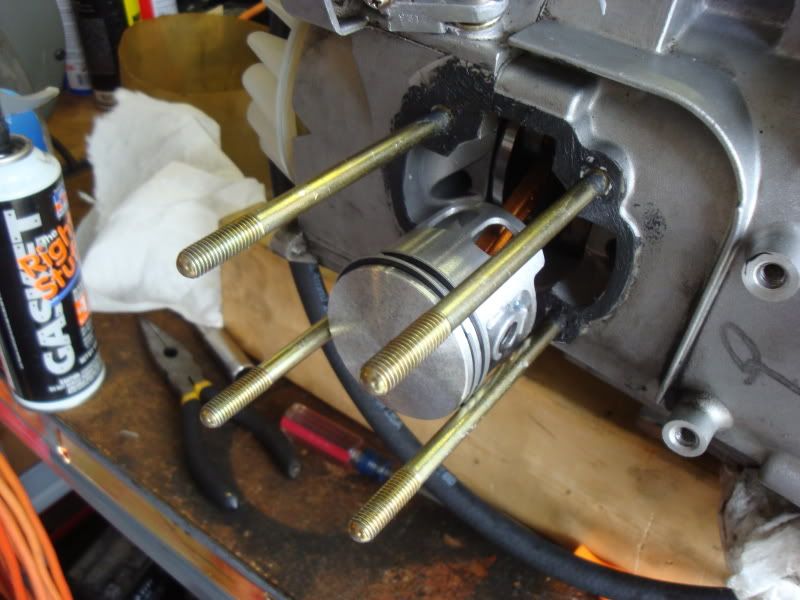
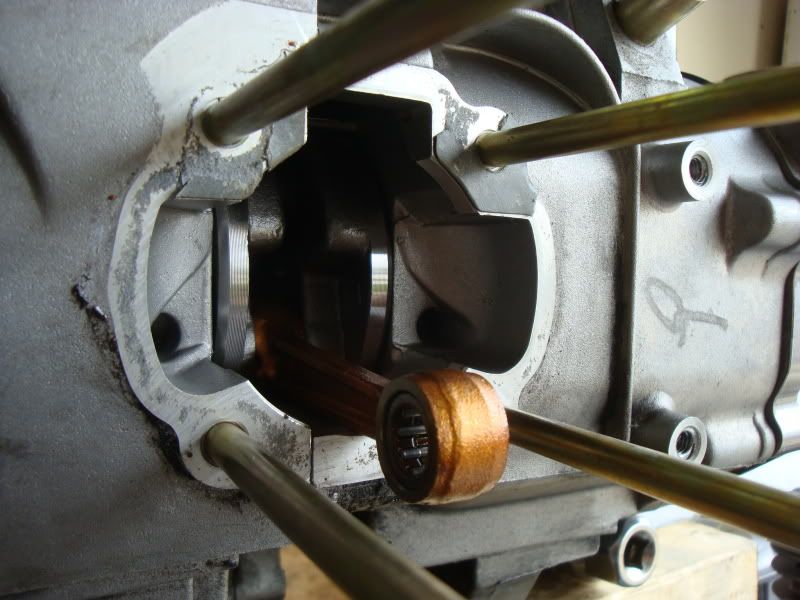
Next apply a liberal amount of 2t oil on your connecting rod small end, wrist pin, and on the needle bearing.
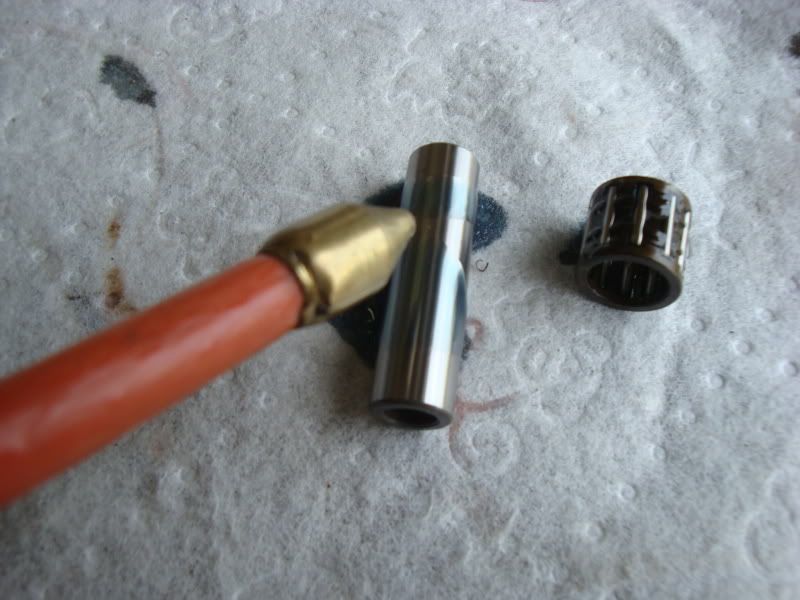
Install c-clip to one side of the piston.
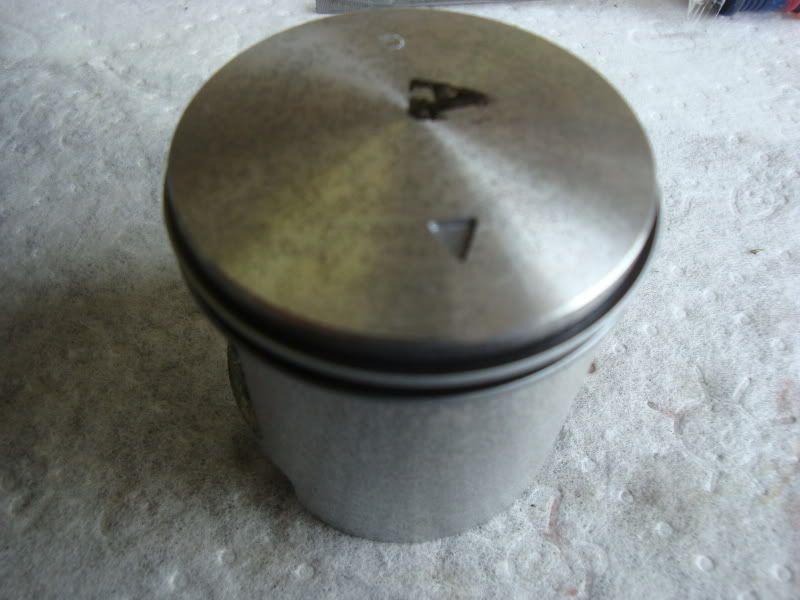
Install needle bearing back into the rod. Put the piston over the rod and push in the wrist pin. Make sure the arrow is pointing down towards the exhaust port.
Install the other c-clip, make sure you get the gap of the c-clip 180 degrees from the piston clip installation grove.
Apply a liberal amount of 2t oil to the piston and inside the jug.
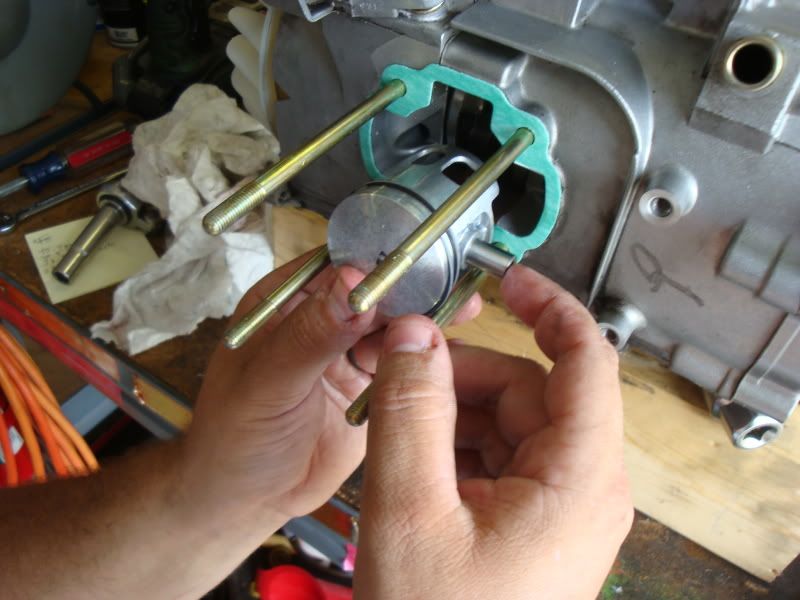
Now install the jug by lining it up on the four bolt studs.
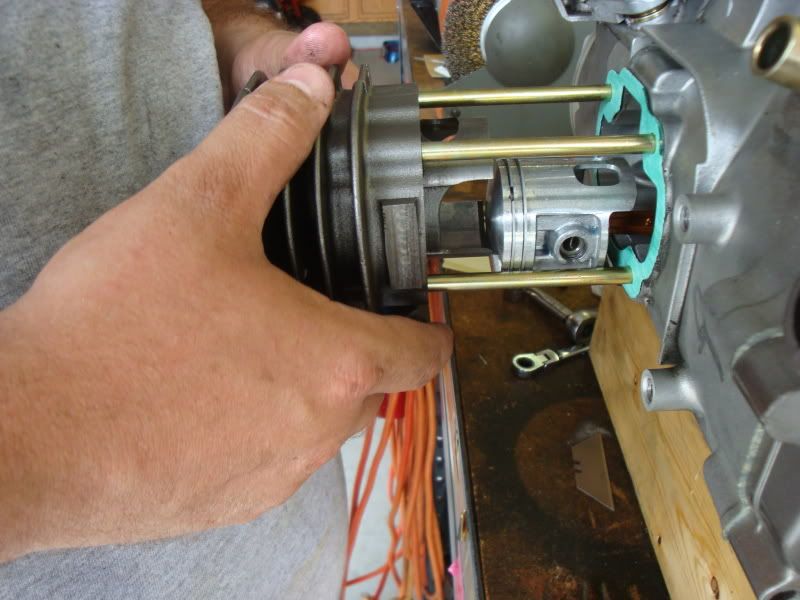
Carefully compress each ring and slide the jug over the piston. Exercise care here, you don't want to have to tear everything back down because you damaged a ring.
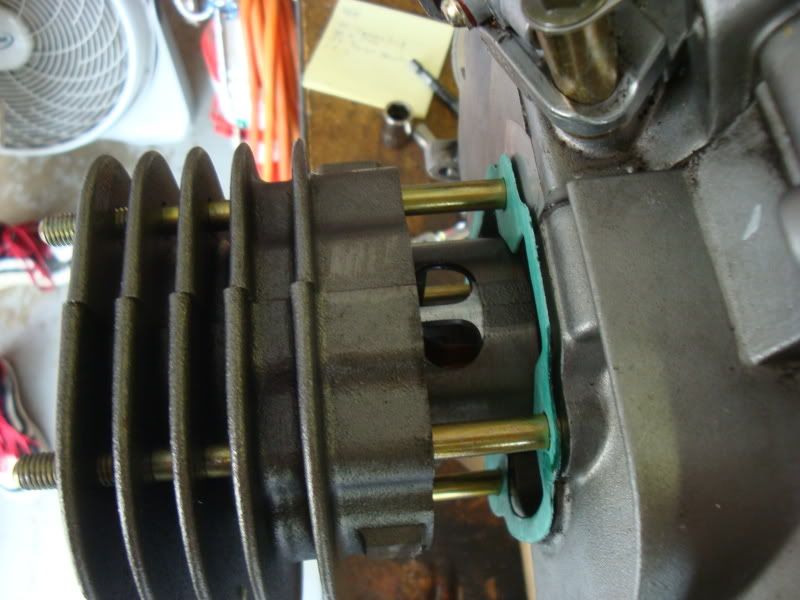
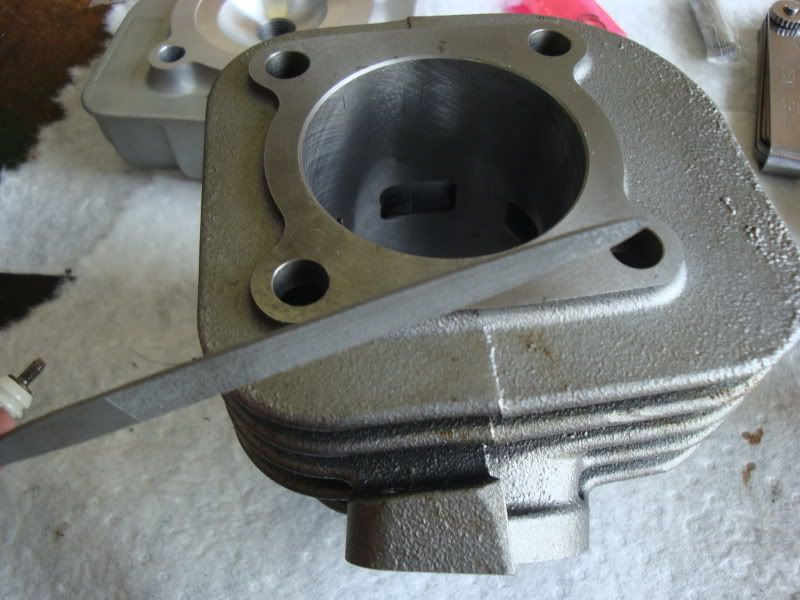
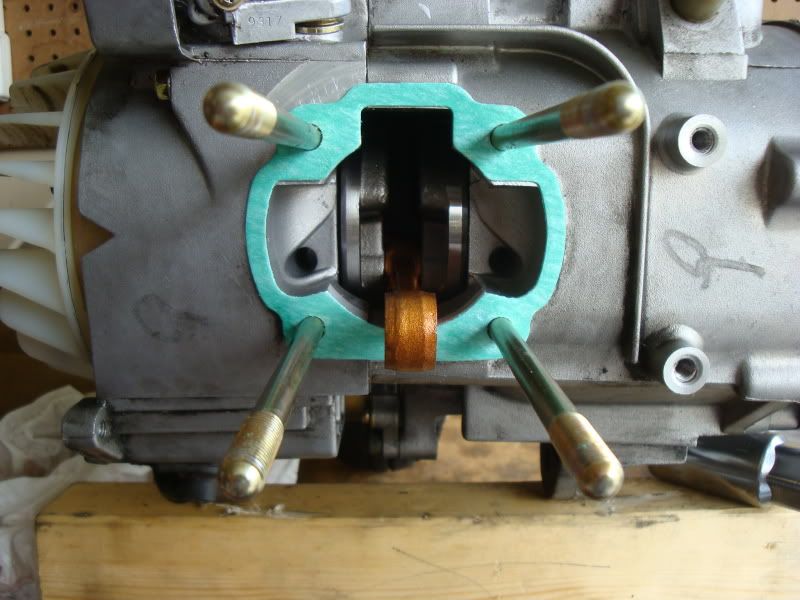
Install head gasket.
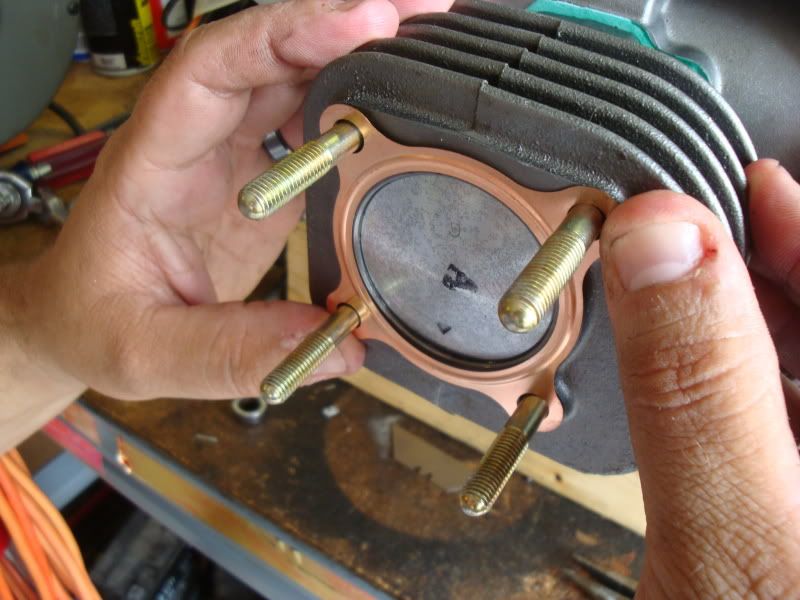
Install head and torque down to 15 inch pounds.
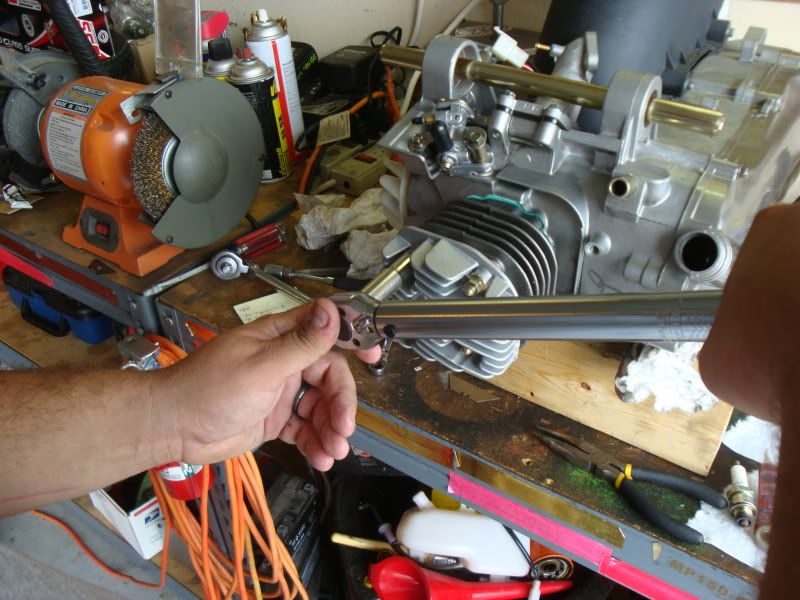
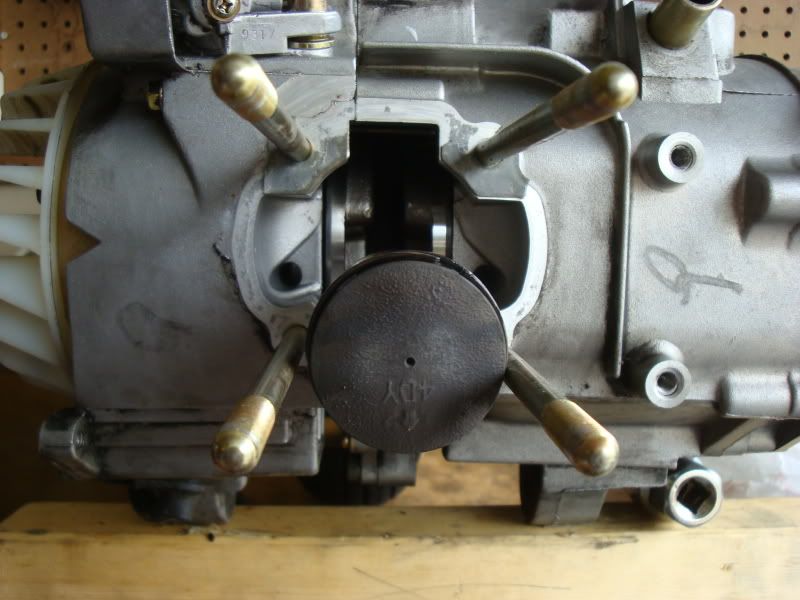
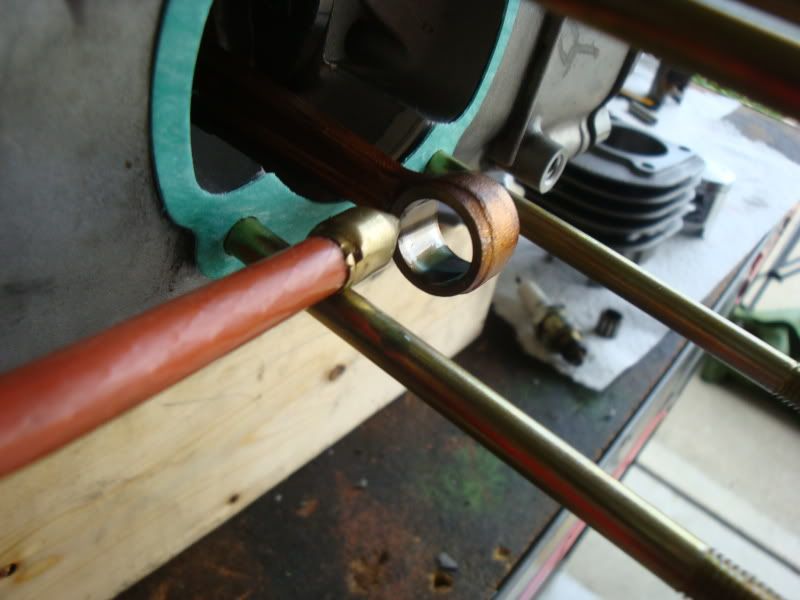
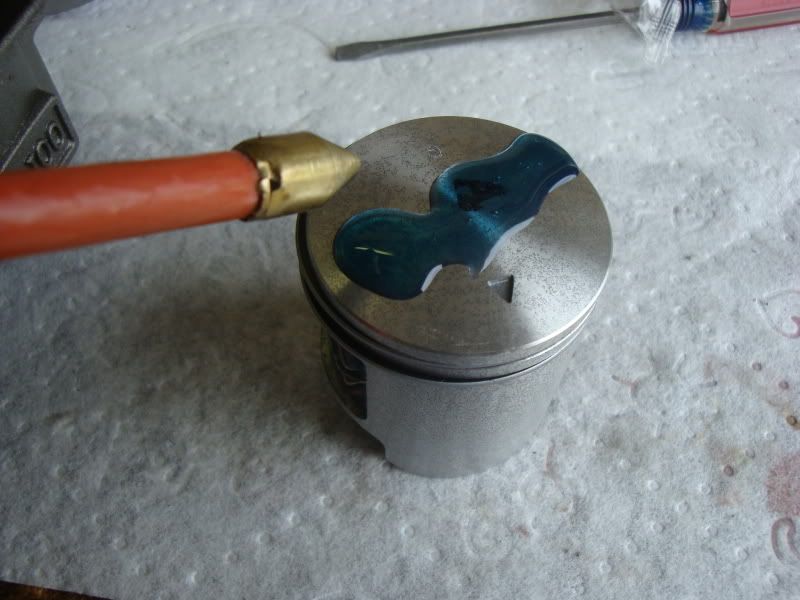
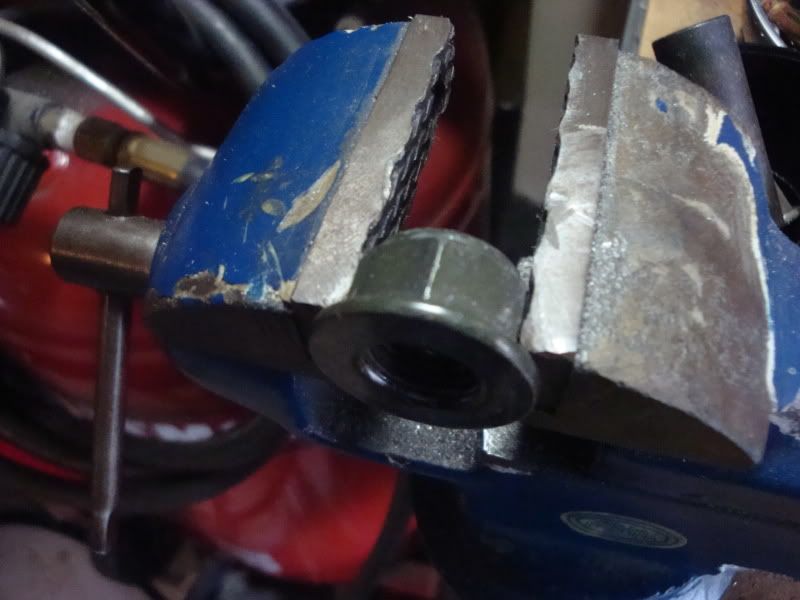
Now its time to check our squish clearance. Squish is the space between the piston and the head at top dead center. Too low of a squish and you have high compression, to high and you have poor performance. I like my squish for daily riders to be between 1-1.3mm
To check your squish you will need some solder and a mic.
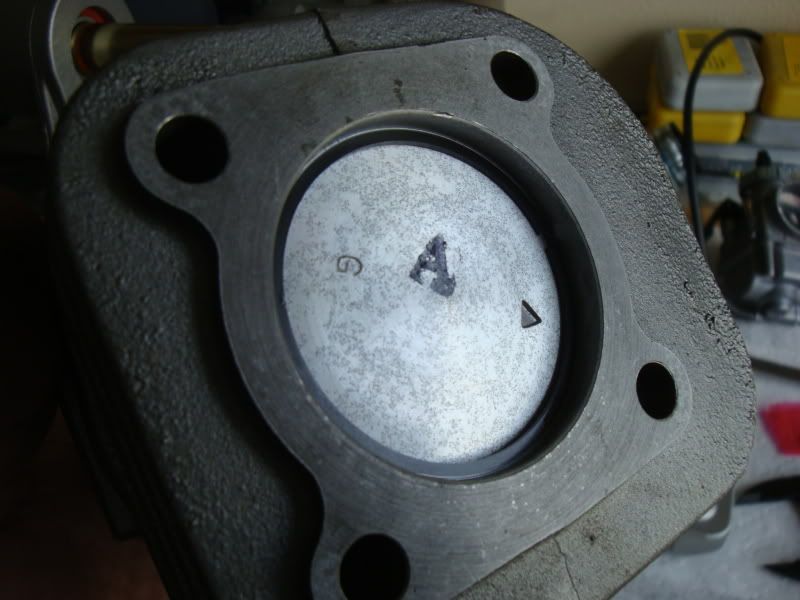
Take a small piece of solder and make a (L) shape and place it inside the jug through the sparkplug hole making sure it touches the side of the jug.
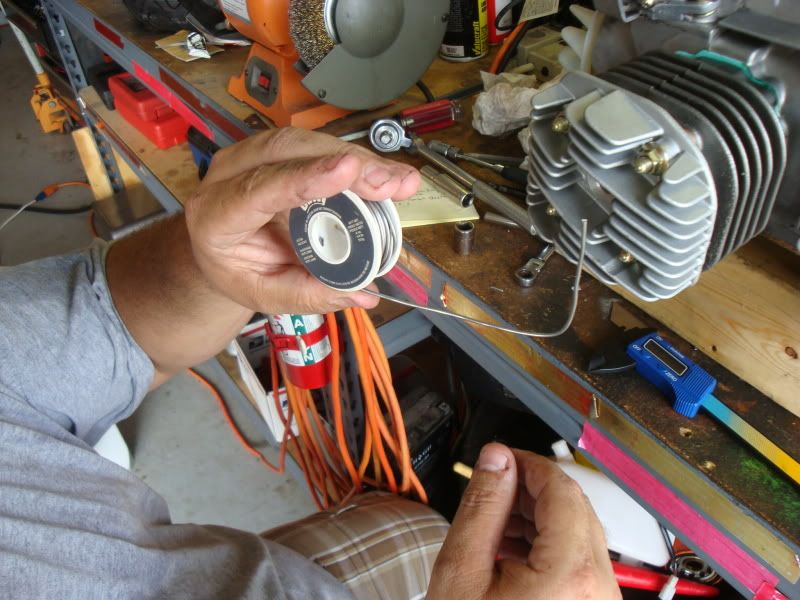

Rotate the motor by hand a few times and remove solder.
See how the piston smashed the solder. Measure this with your mic.
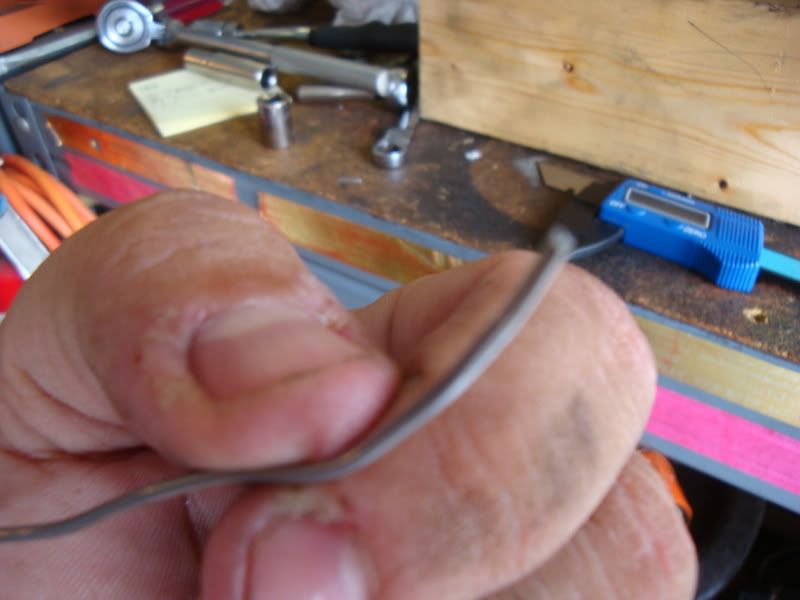
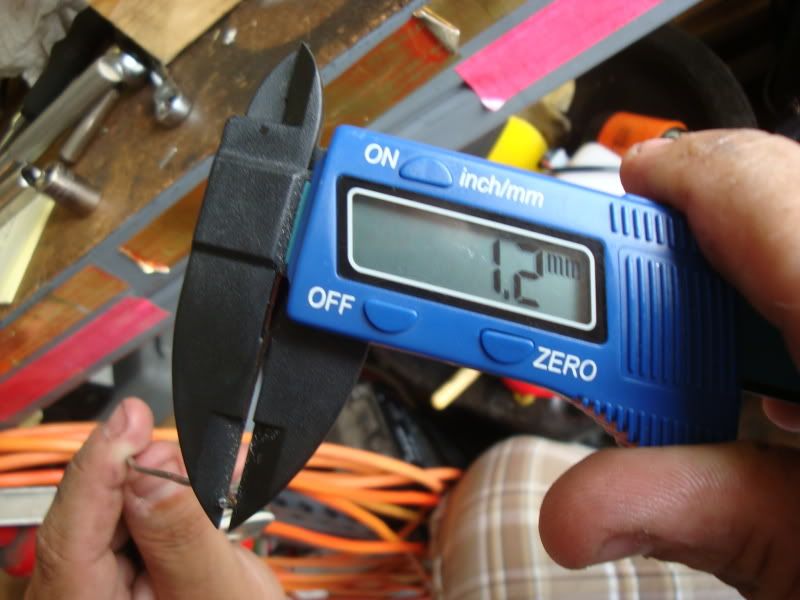
1.2mm looks like we are in good shape. These Prima kits are truly bolt on and go
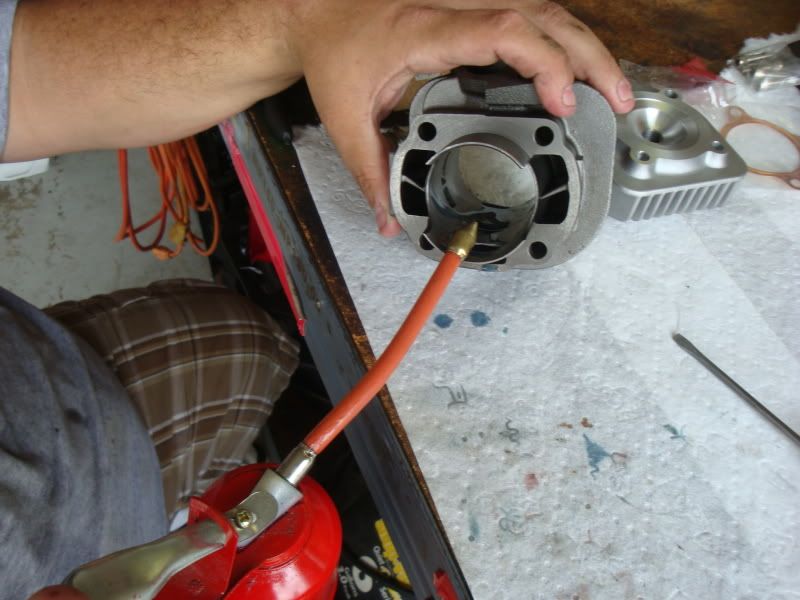
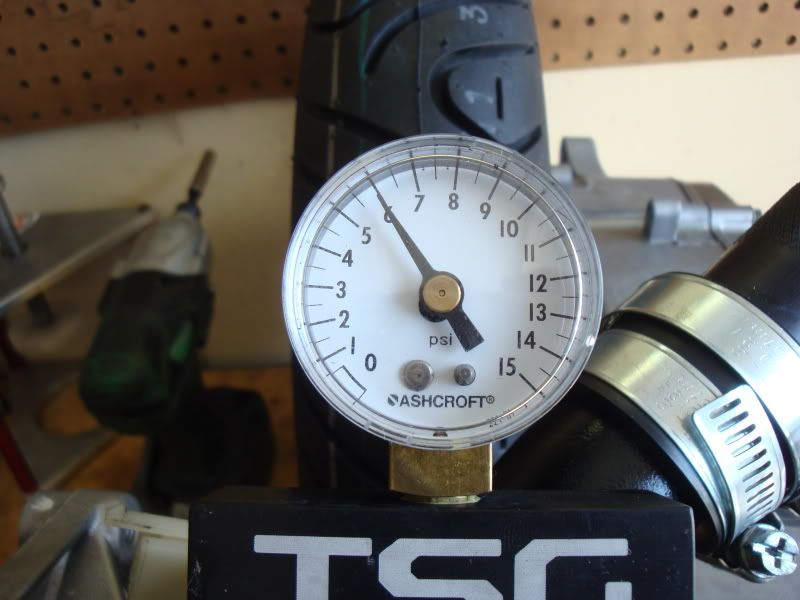
Now its time to do a pressure test on the engine. 2 Strokes are air pumps and if there is a leak in the system you will run lean and have one heck of a time trying to tune your motor. I have a expensive tester but you can make your own for only a few bucks, google it.
Ok hook your tester up to the engine by installing the spark plug, capping the exhaust port, and installing the coupler to the intake.
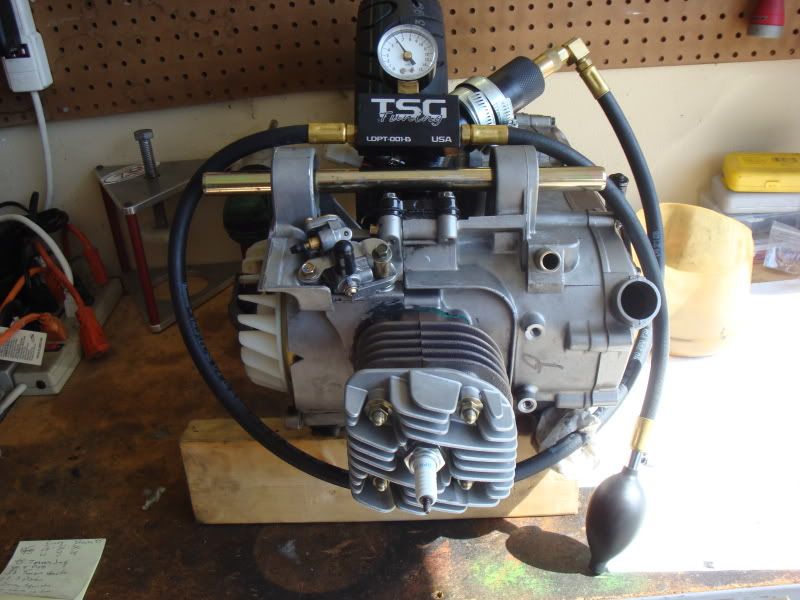
Pressurize the engine to 6 pounds and wait 6 minutes. If you loose no pressure your good to go. If you do you need to re-pressurize and use soapy water to find your leak. Repair leak and retest as needed.
We are good to go.
Install sparkplug, shrouding and re-install your engine by following the above removal steps backwards. If your already running a 95 main jet with your stage 1 kit go ahead and keep running it and do a plug chop, if its lean you can tune from there. Also when you get everything put back together heat cycle your motor a couple times before you ride it to get everything working together and temper the rings. Heat cycle means starting the motor bringing it to operating temp and then shut off letting it cool completely. Then to break it in vary the rpms avoiding wide open throttle for a few hundred miles.
At this point you have installed up to Scooterworks stage 2 kit and your top speed should easily be in the 50's. We took things a bit further and will update soon.
How to install a Prima 72cc Iron Big Bore Kit in your Buddy 50 2t.
Remove seat bucket.
Remove gas cap.
Remove 4 10mm bolts and bucket slides out.
Disconnect the starter wiring.
Disconnect the stator wiring.
Remove the coil from the plug.
Remove rear brake cable.
Remove the fuel line from the carb along with the top of the carburetor so you can remove the engine without having to undo the throttle cable.
Remove cable guide from engine.
At this point I put a jack under the scooter and strap the scooter to the lift. This way I can lift the front end and remove the motor without having to play twister.
Remove rear shock and let the tire rest on the lift.
Locate and remove engine mount bolt.
Make sure at this point that all of your wires are removed and and cables unhooked and slide the motor out and place on bench. I use a block of wood to hold the motor in place since this one no longer has a center stand. However your center stand will hold the motor nicely and will provide a excellent working platform.
Next remove the exhaust.
Remove sparkplug and engine shrouding.
Remove the 4 head nuts.
Remove head.
Remove gasket.
Remove jug.
Remove the c-clips on the piston and slide out the wrist pin.
Prima 72cc kit vs stock
As you can see the bore is much larger along with larger intake and exhaust ports.
At this point you need to inspect the new kit and prep it for installation.
Take your handy feeler gauge .008 in and check your ring gap. Ring gap is the space between the ring ends when its compressed by the cylinder.
Install the ring in the jug and use the piston to push up against it making sure its flush.
Now measure. If the ring gap is to tight you will need to file it down until it meets spec. If its too large you will need to purchase a new set of rings. Fortunately for us the Prima kit was spot on, both rings.
Now remove all the old exhaust studs and install them in the new jug.
Next up (use special care here) is to chamfer the ports. Most of the time from the factory a cylinder will have sharp edges on the boost, intake, and exhaust ports. Those can hurt your rings during break in and you need to take a small file and remove all sharp edges.
Now that all the edges are smooth its time to install the rings.
Take a look at your piston. You will see a small dowel on each ring groove. Make sure the end of each ring rests in its own dowel.
Apply a liberal amount of 2 stroke oil and install the rings. Be careful here not to over stretch or break a ring.
Now remove your old gasket from the block making sure not to get anything in the engine. Its best to stuff a clean rag inside the case to ensure nothing makes its way into the carters.
I always use a dab of "the right stuff" gasket maker to my base gaskets to ensure a good seal.
Install base gasket.
Next apply a liberal amount of 2t oil on your connecting rod small end, wrist pin, and on the needle bearing.
Install c-clip to one side of the piston.
Install needle bearing back into the rod. Put the piston over the rod and push in the wrist pin. Make sure the arrow is pointing down towards the exhaust port.
Install the other c-clip, make sure you get the gap of the c-clip 180 degrees from the piston clip installation grove.
Apply a liberal amount of 2t oil to the piston and inside the jug.
Now install the jug by lining it up on the four bolt studs.
Carefully compress each ring and slide the jug over the piston. Exercise care here, you don't want to have to tear everything back down because you damaged a ring.
Install head gasket.
Install head and torque down to 15 inch pounds.
Now its time to check our squish clearance. Squish is the space between the piston and the head at top dead center. Too low of a squish and you have high compression, to high and you have poor performance. I like my squish for daily riders to be between 1-1.3mm
To check your squish you will need some solder and a mic.
Take a small piece of solder and make a (L) shape and place it inside the jug through the sparkplug hole making sure it touches the side of the jug.
Rotate the motor by hand a few times and remove solder.
See how the piston smashed the solder. Measure this with your mic.
1.2mm looks like we are in good shape. These Prima kits are truly bolt on and go
Now its time to do a pressure test on the engine. 2 Strokes are air pumps and if there is a leak in the system you will run lean and have one heck of a time trying to tune your motor. I have a expensive tester but you can make your own for only a few bucks, google it.
Ok hook your tester up to the engine by installing the spark plug, capping the exhaust port, and installing the coupler to the intake.
Pressurize the engine to 6 pounds and wait 6 minutes. If you loose no pressure your good to go. If you do you need to re-pressurize and use soapy water to find your leak. Repair leak and retest as needed.
We are good to go.
Install sparkplug, shrouding and re-install your engine by following the above removal steps backwards. If your already running a 95 main jet with your stage 1 kit go ahead and keep running it and do a plug chop, if its lean you can tune from there. Also when you get everything put back together heat cycle your motor a couple times before you ride it to get everything working together and temper the rings. Heat cycle means starting the motor bringing it to operating temp and then shut off letting it cool completely. Then to break it in vary the rpms avoiding wide open throttle for a few hundred miles.
At this point you have installed up to Scooterworks stage 2 kit and your top speed should easily be in the 50's. We took things a bit further and will update soon.
Amerivespa Indy 2015.
Scooterists start your engines!
#AVINDY15
Scooterists start your engines!
#AVINDY15
-
NASRA
- Member
- Posts: 72
- Joined: Fri Jun 25, 2010 7:31 pm
- Location: Indy
- Contact:
AtlBuddy wrote:You dont want to run a contra on a stock motor. With the stage 1 kit you do because the pipe takes a bit away from the bottom end. Installing the spring gives you your takeoff back and the pipe helps on the top end.NASRA wrote:Thanks for answering all my questions. I am still trying to understand all of this. So you say I shouldn't run the after market contra spring; so why does scooterworks sell it in the stage 1 kit?AtlBuddy wrote: The Buddy 50 2t transmission components are the exact same one's the 139QMB GY6 50cc engine uses. If you need any parts pm me and Ill direct you to the right spot.
You dont want to run contra spring unless you have a big bore kit installed. The engine wont have enough power to pull the spring and you will end up loosing top end. The stall is why you put in a larger spring, it lets you rev higher before takeoff. We have a 1000 rpm spring installed now and it pulls all the way through the powerband.
Amerivespa Indy 2015.
Scooterists start your engines!
#AVINDY15
Scooterists start your engines!
#AVINDY15


-
TVB
-
jasondavis48108
- Member
- Posts: 2919
- Joined: Fri Apr 24, 2009 12:36 pm
- Location: Ann Arbor
-
NASRA
- Member
- Posts: 72
- Joined: Fri Jun 25, 2010 7:31 pm
- Location: Indy
- Contact:
-
NASRA
- Member
- Posts: 72
- Joined: Fri Jun 25, 2010 7:31 pm
- Location: Indy
- Contact:
We intend to get way more complicated with port timing, mapping in the future with the Prima Ceramic kit we have. From what Scooterworks have told me I can expect a 2 hp increase in power with this kit alone. This I dont doubt beings it has a bridged exhaust port and many other nice features.TVB wrote:[70-ish steps of installation deleted]Yeah, that's pretty much plug-and-play.NASRA wrote:These Prima kits are truly bolt on and go
And here I thought it might be complicated.
Next on the agenda is documenting our 26mm carb installation, intake, and tuning. If work allows Ill be back here tomorrow am to get everything caught up.
Amerivespa Indy 2015.
Scooterists start your engines!
#AVINDY15
Scooterists start your engines!
#AVINDY15
-
SYMbionic Duo
- Member
- Posts: 356
- Joined: Sun Jul 11, 2010 3:06 am
- Location: Minneapolis
-
wifiducky

- Member
- Posts: 234
- Joined: Tue Sep 07, 2010 1:23 am
- Location: houston texas
- Contact:
 on the back of my buddy but then i was all << nm
-
NASRA
- Member
- Posts: 72
- Joined: Fri Jun 25, 2010 7:31 pm
- Location: Indy
- Contact:
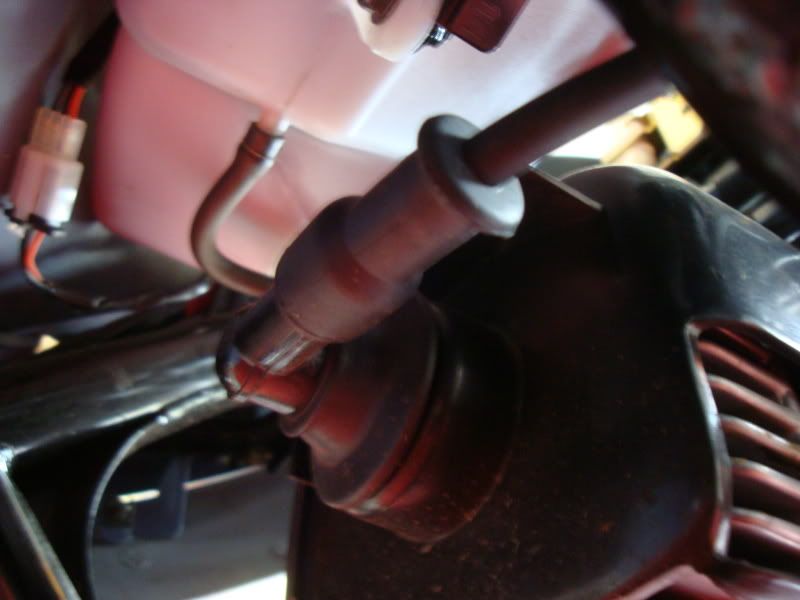
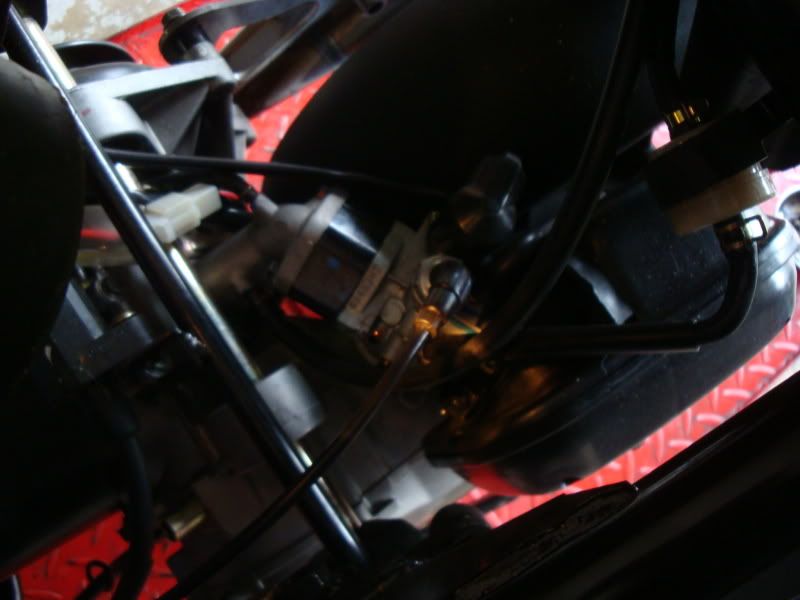
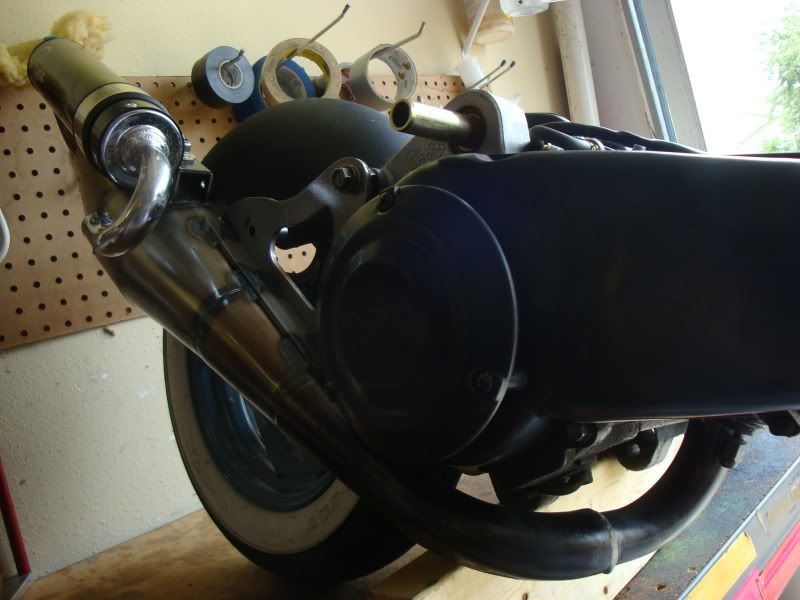
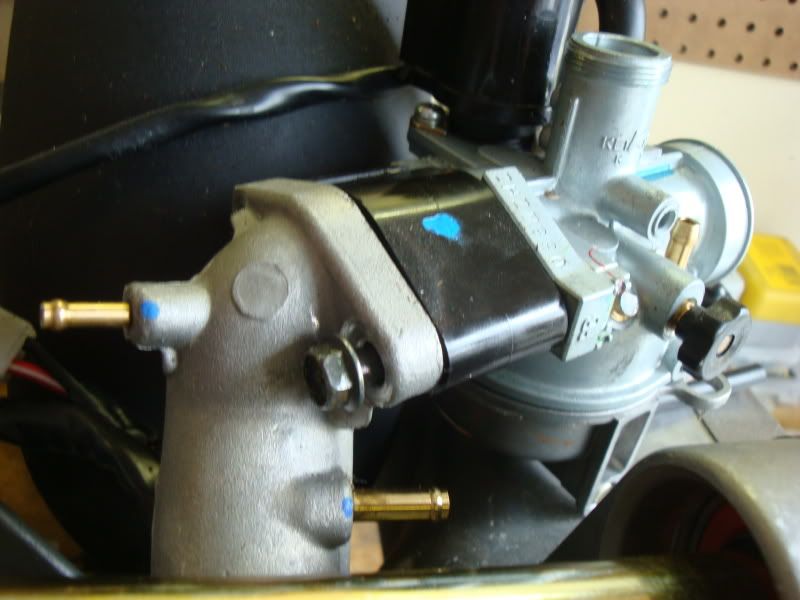
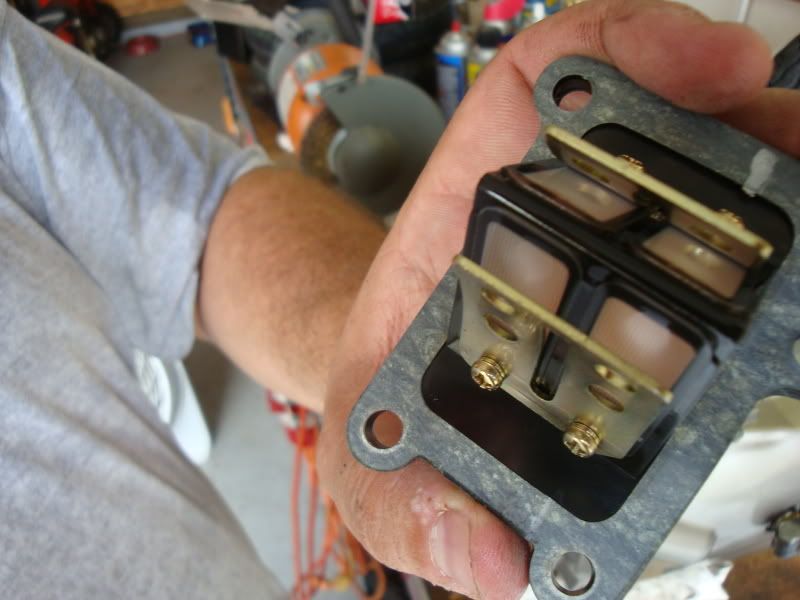
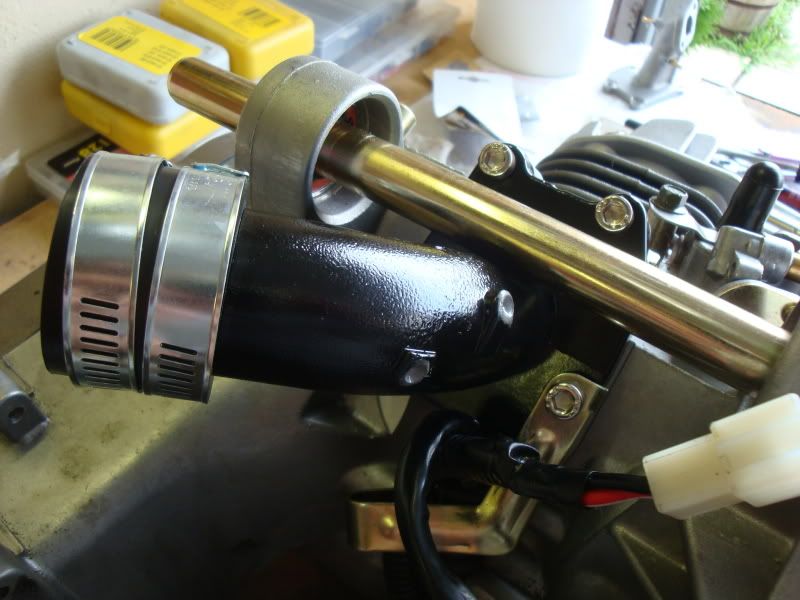
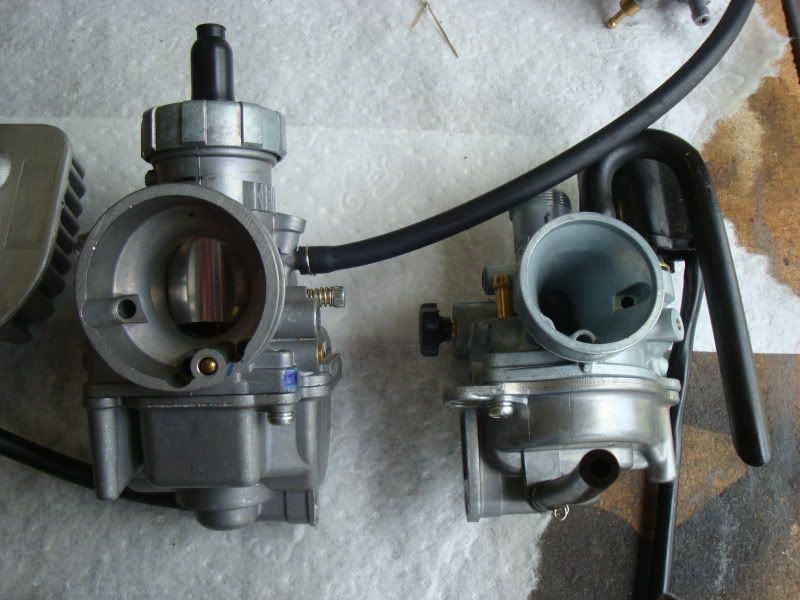
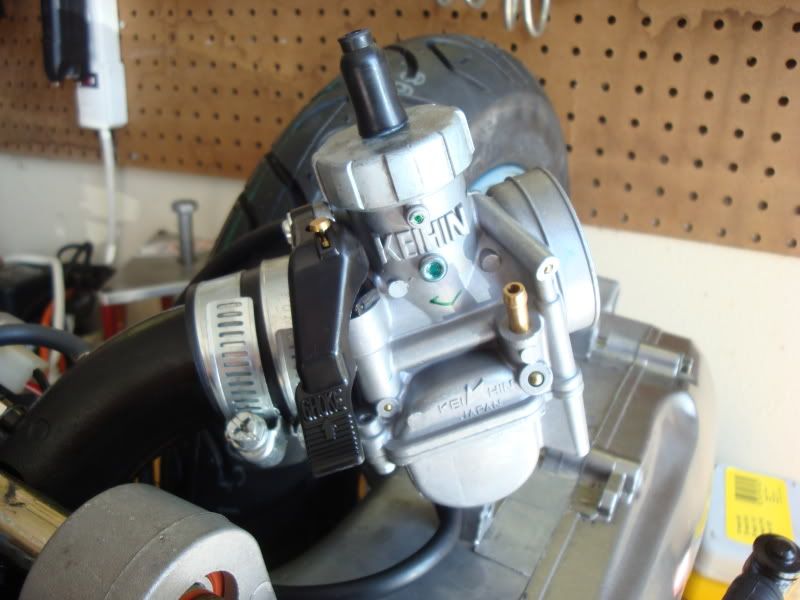
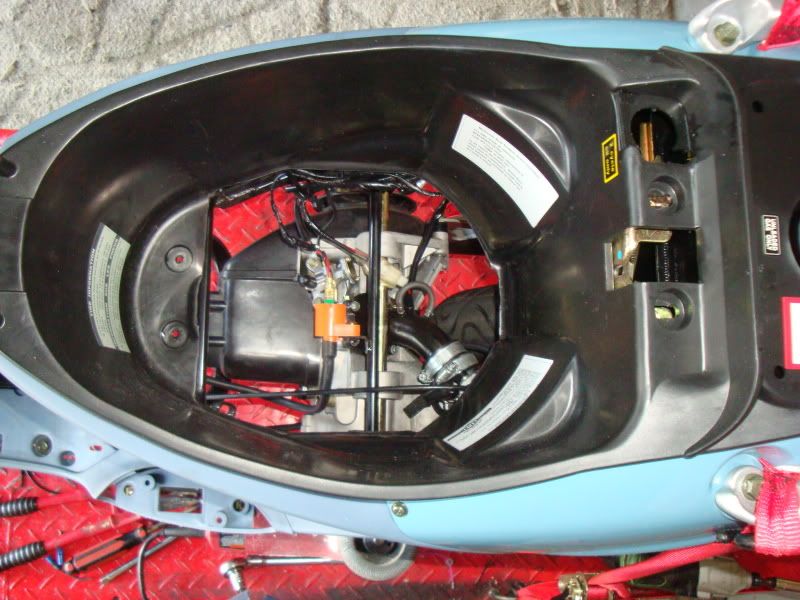
Before we put the motor in we installed the Keihin PE- 26mm carburetor, Pinasco Reeds, and NCY intake.
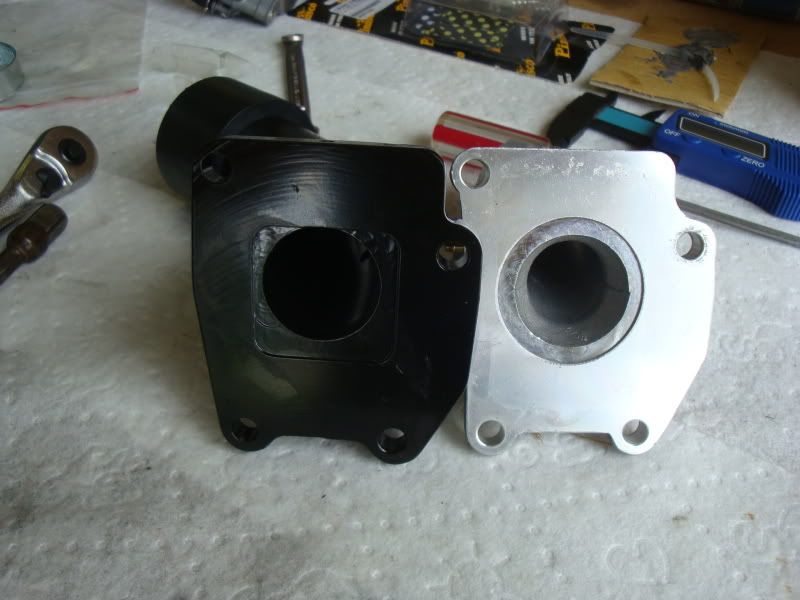
You can see the difference in size. Somebody threw away my notes on this one but believe me its a HUGE difference in performance and money well spent as long as you dont care about your fuel mileage.
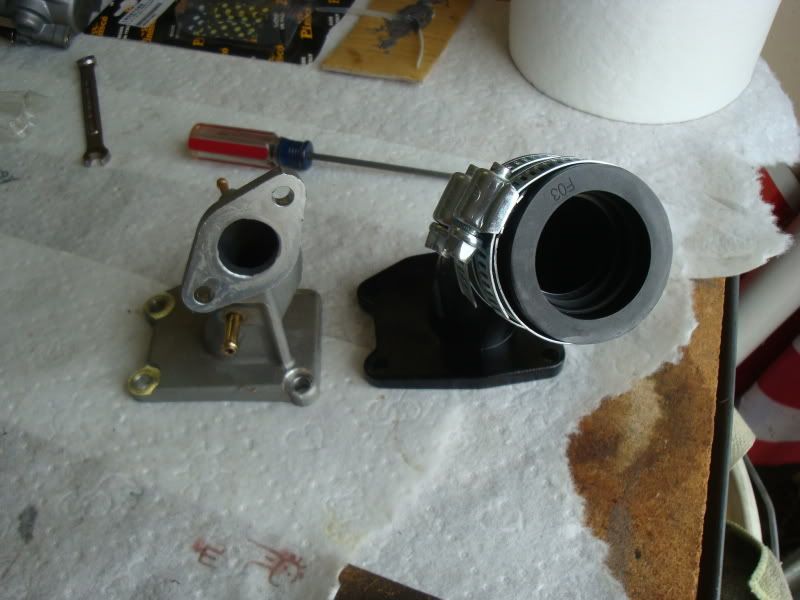
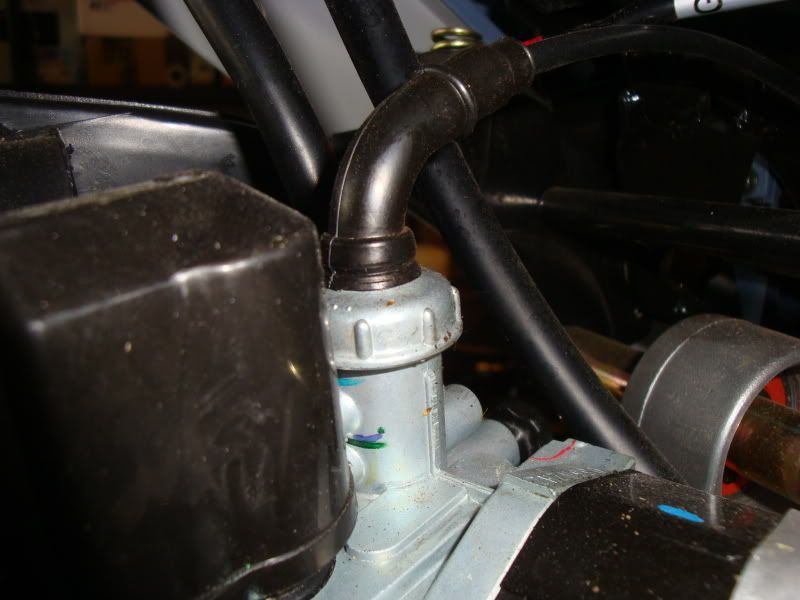
Remove carb from intake via the two 8mm bolts.
Remove stock intake
While we have this apart go ahead and install the new reeds. We with with the .30 thickness reeds.

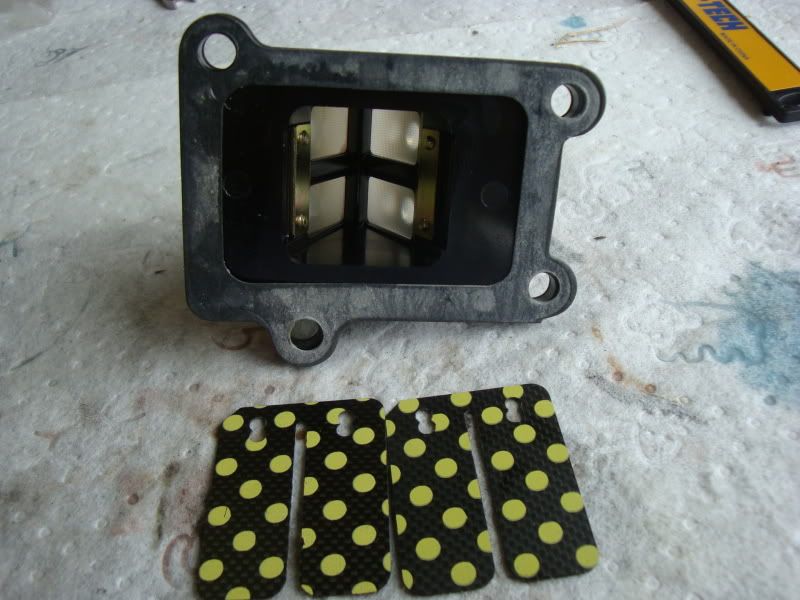
Pokadots how cute
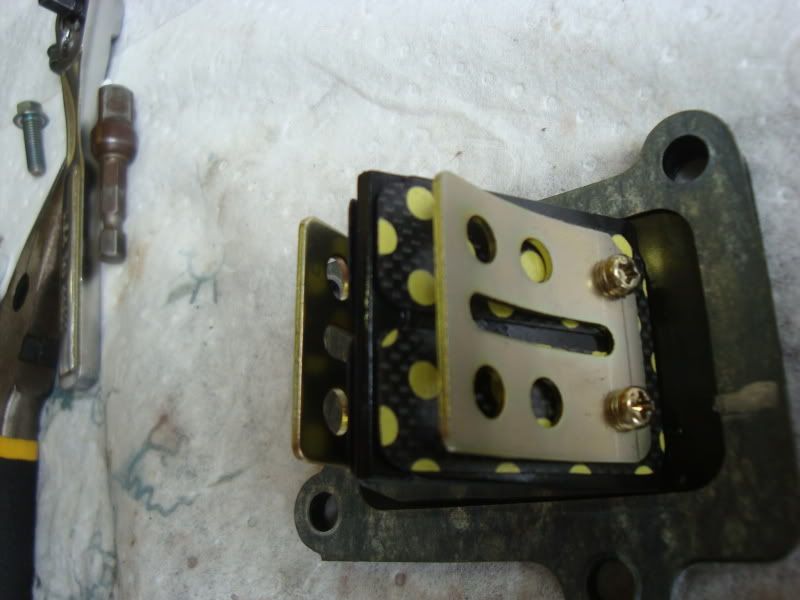
Install NCY intake via the 4 stainless hex head bolts provided. Make sure to be careful here. Dont want any leaks from the reed gasket.
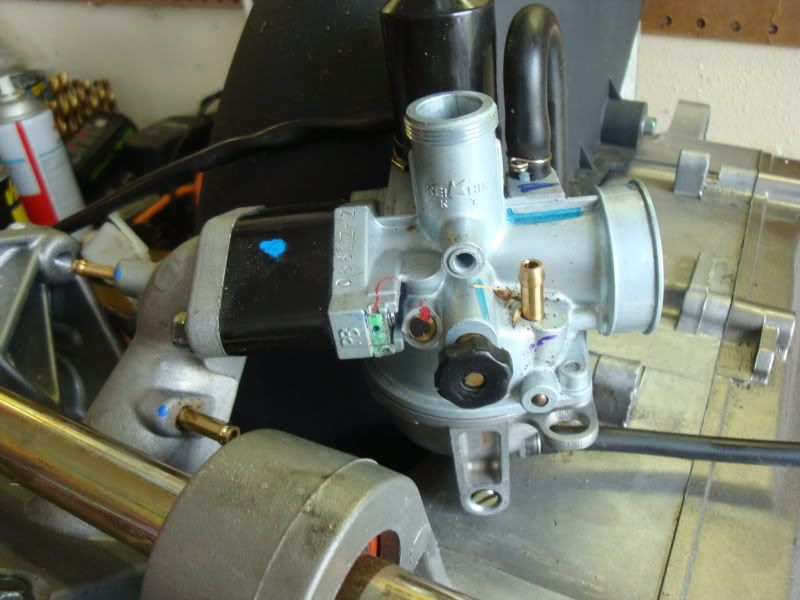
Check out this monster carb.
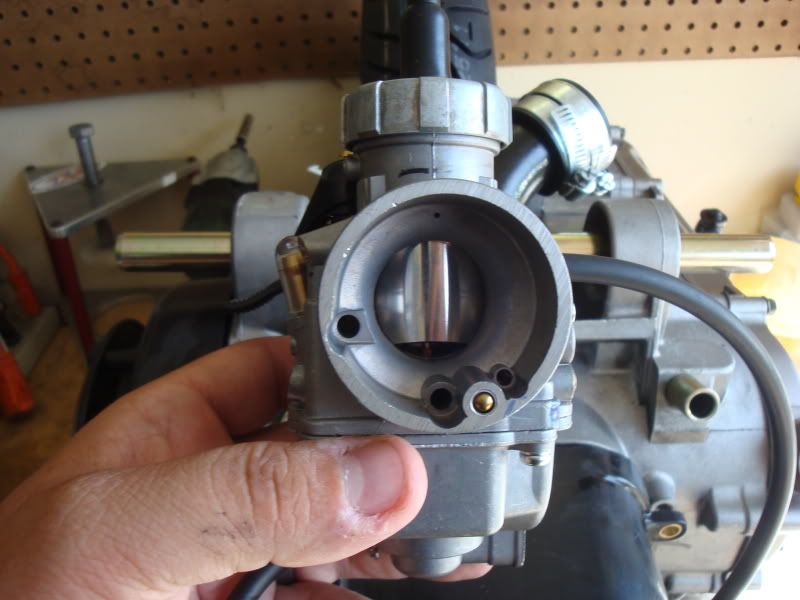
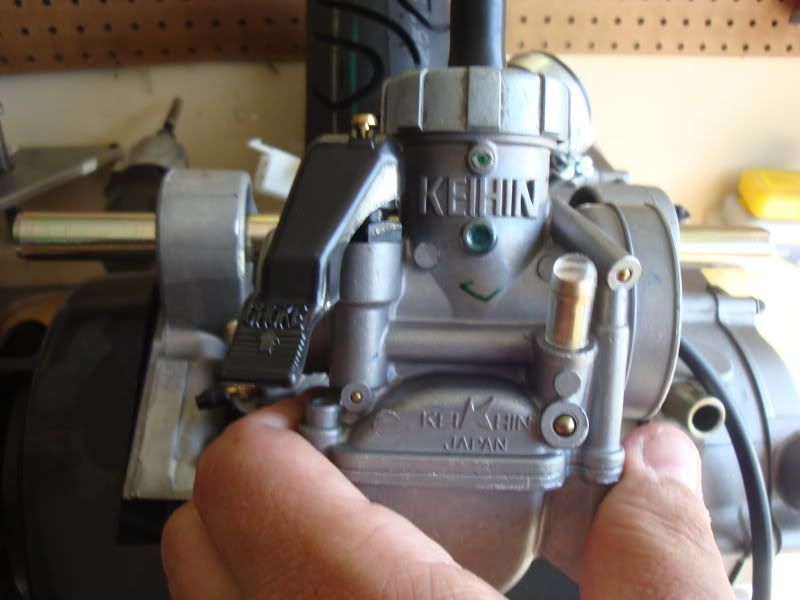
New vs stock
Easy installation.
We jetted ours to a 140 main and left the pilot jet stock. This setup is for race only and is not recommend for street use. It lost a bit off the bottom due to the large carb and open intake but once the pipe hits, your rollin'
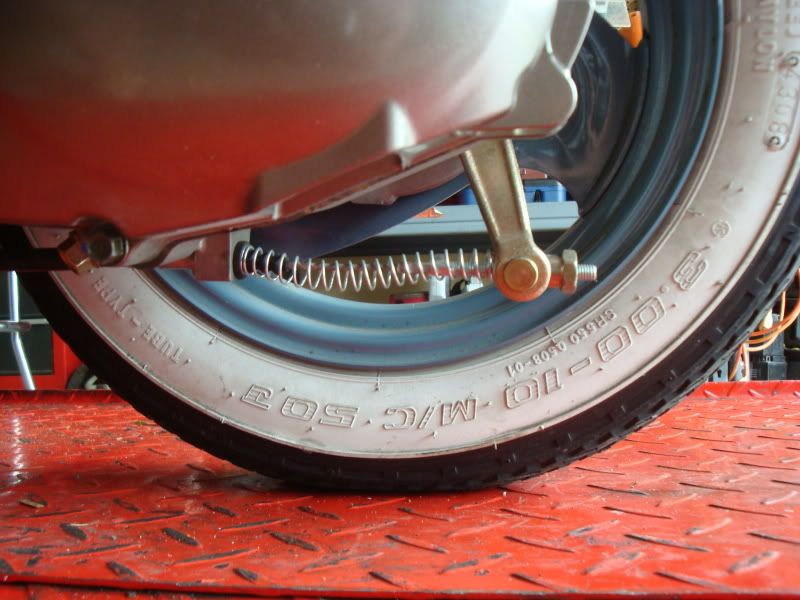
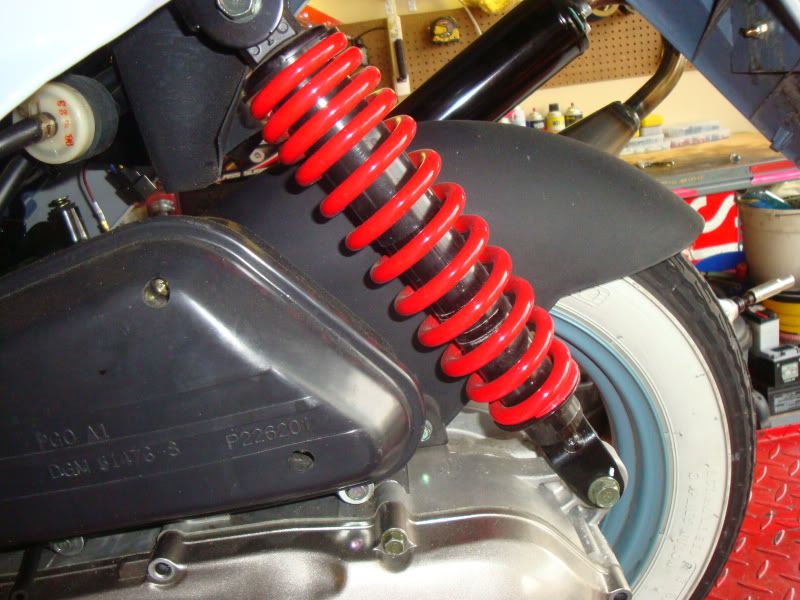
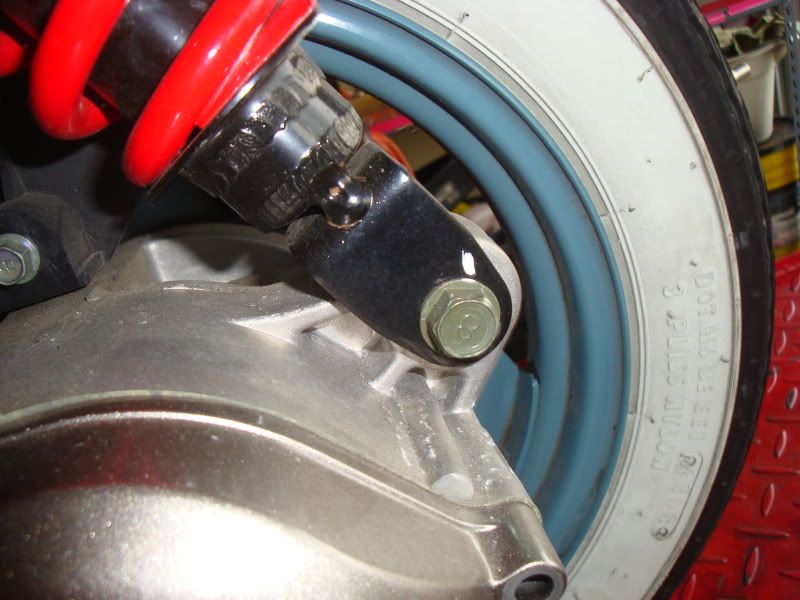
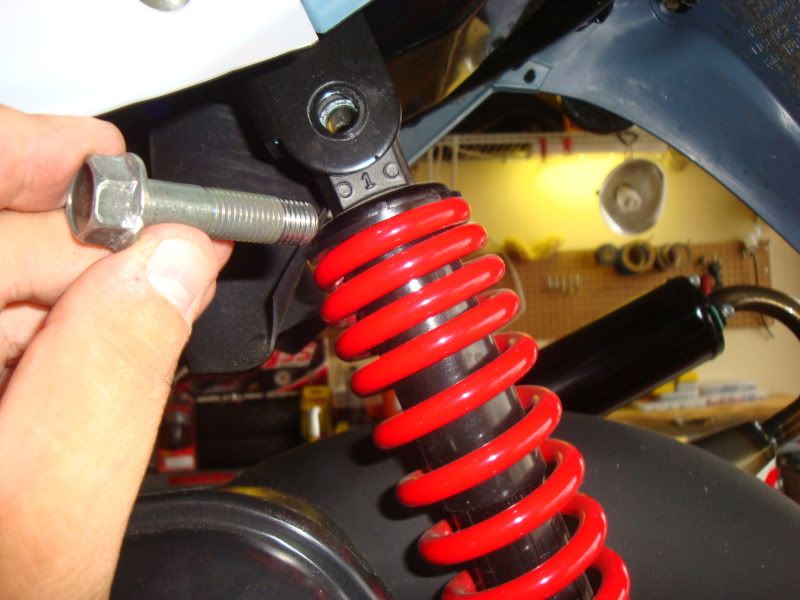
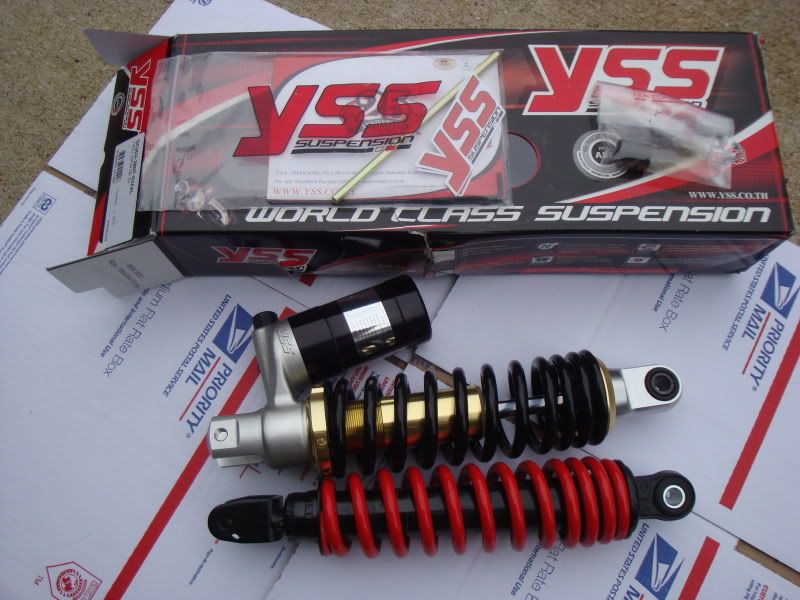
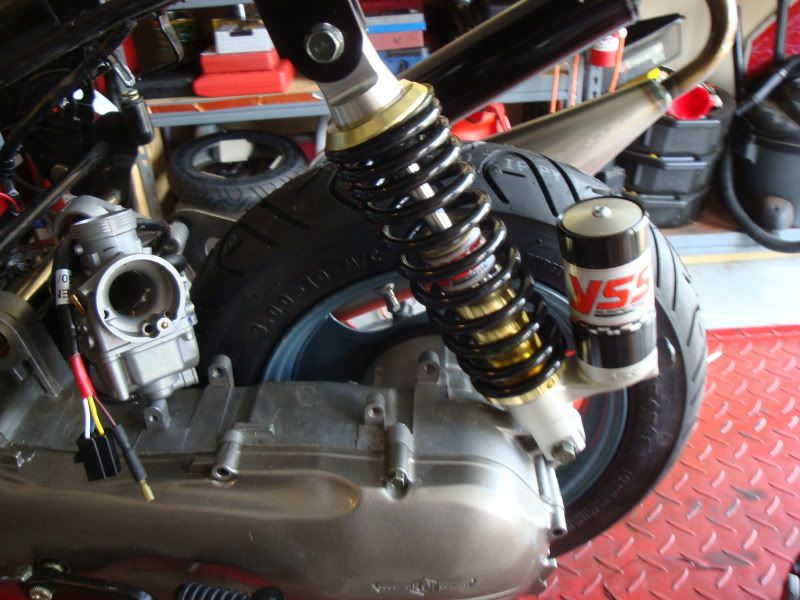
We also went ahead and put our YSS racing shock on. This thing looks and works great. I think a rear shock is one of the best things you can do to the Buddy since the stock one is just too stiff and don't handle well in the corners. This shock you can adjust the dampening, and spring rate, dial it in and say goodbye to back pain.
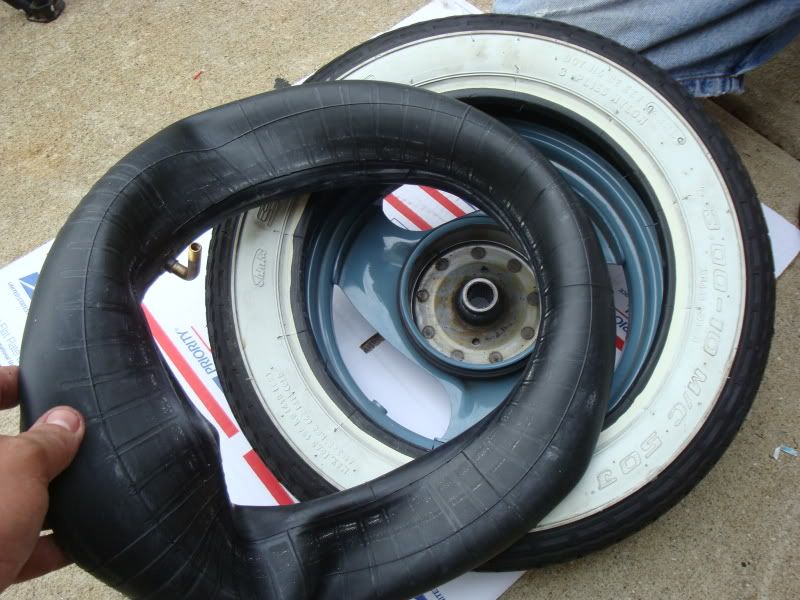
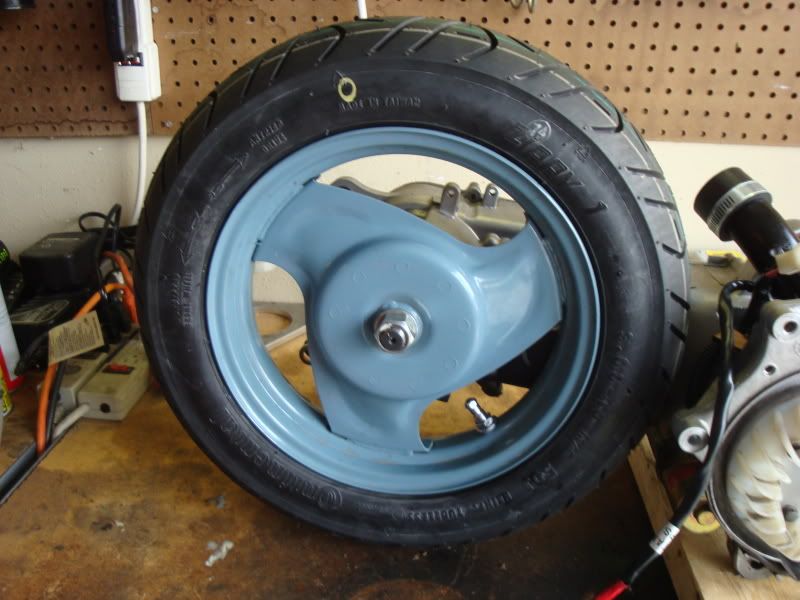
We also swapped out the whitewalls for some Continetal Zippy's. These stick to the track better than any other we know of at this time. 3.00 x 10 performance tires are hard to come by.
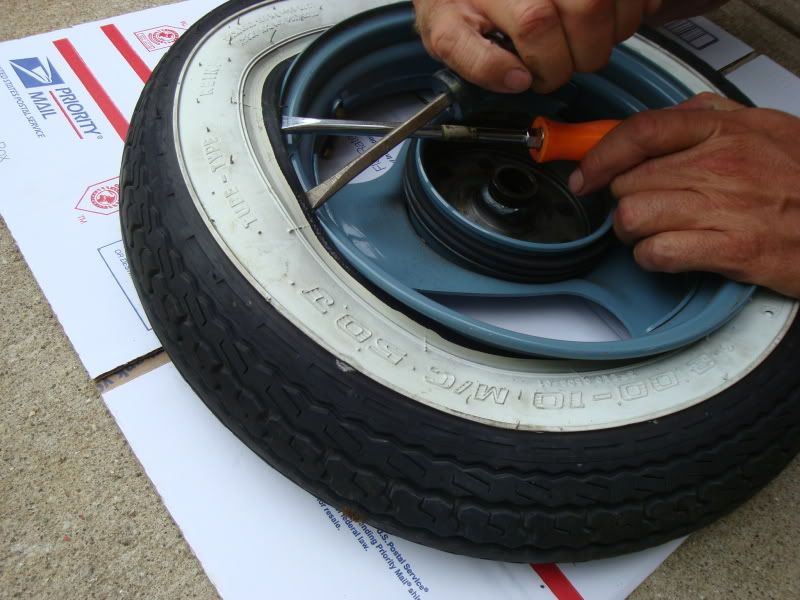
Remove tire and rim.
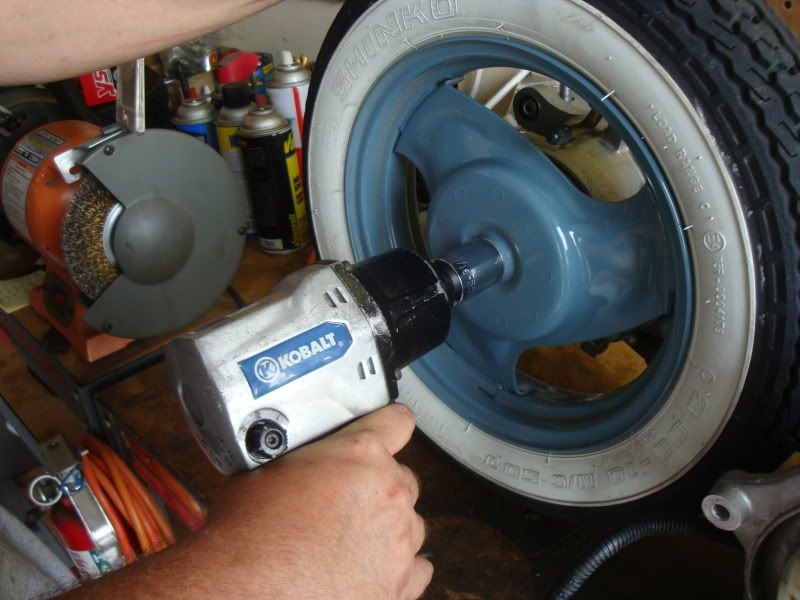
Deflate tire by removing the valve core. Break the bead on the tire with your feet or knee. Then use a couple good screwdrivers to work the tire off of the rim.

Remove inner tube and tire from rim.

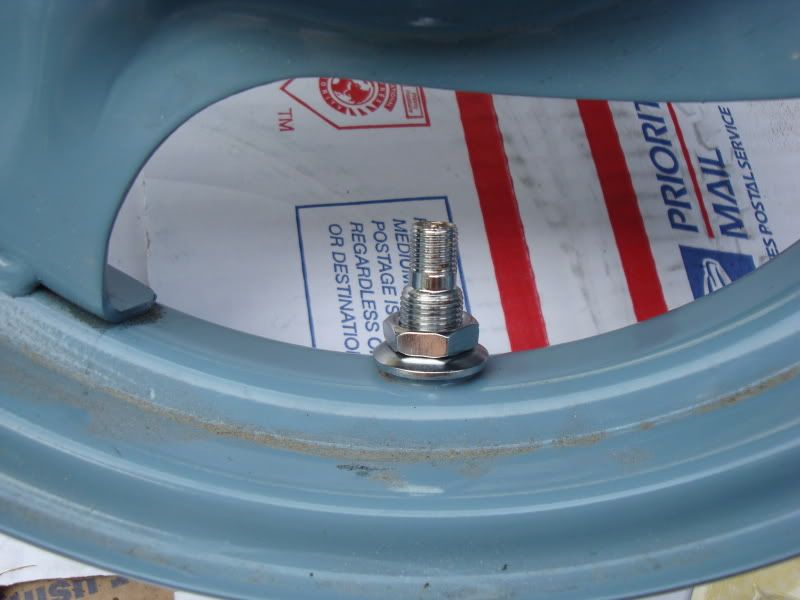
We went down to the autoparts store and installed tubleless valve stems. The straight kind are not advisable, buy the 90 degree valve stems from Scooterworks, trust me
Then simply use your screwdrivers to pop the tire back on rim, and inflate.
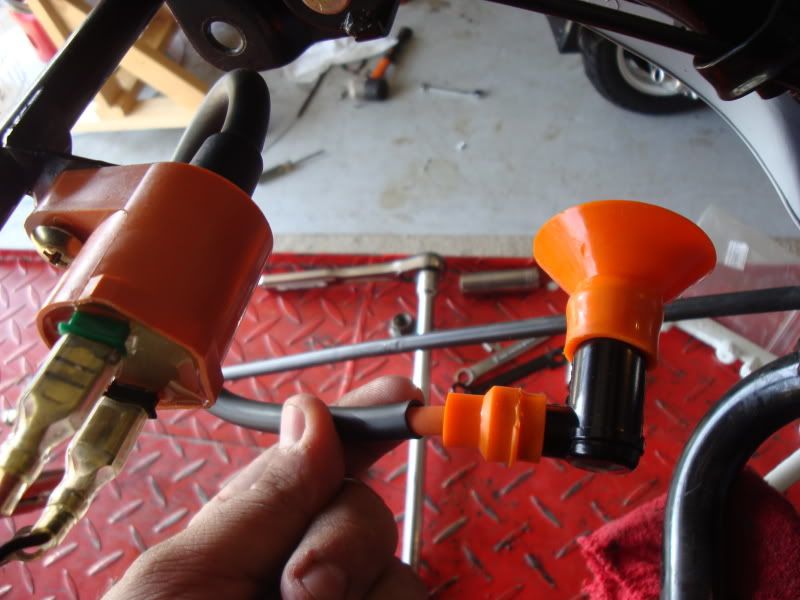
We also installed a high performance coil to help burn the extra fuel, easy peasy.
Next the Handlebar conversion.
You can see the difference in size. Somebody threw away my notes on this one but believe me its a HUGE difference in performance and money well spent as long as you dont care about your fuel mileage.
Remove carb from intake via the two 8mm bolts.
Remove stock intake
While we have this apart go ahead and install the new reeds. We with with the .30 thickness reeds.
Pokadots how cute
Install NCY intake via the 4 stainless hex head bolts provided. Make sure to be careful here. Dont want any leaks from the reed gasket.
Check out this monster carb.
New vs stock
Easy installation.
We jetted ours to a 140 main and left the pilot jet stock. This setup is for race only and is not recommend for street use. It lost a bit off the bottom due to the large carb and open intake but once the pipe hits, your rollin'
We also went ahead and put our YSS racing shock on. This thing looks and works great. I think a rear shock is one of the best things you can do to the Buddy since the stock one is just too stiff and don't handle well in the corners. This shock you can adjust the dampening, and spring rate, dial it in and say goodbye to back pain.
We also swapped out the whitewalls for some Continetal Zippy's. These stick to the track better than any other we know of at this time. 3.00 x 10 performance tires are hard to come by.
Remove tire and rim.
Deflate tire by removing the valve core. Break the bead on the tire with your feet or knee. Then use a couple good screwdrivers to work the tire off of the rim.
Remove inner tube and tire from rim.
We went down to the autoparts store and installed tubleless valve stems. The straight kind are not advisable, buy the 90 degree valve stems from Scooterworks, trust me
Then simply use your screwdrivers to pop the tire back on rim, and inflate.
We also installed a high performance coil to help burn the extra fuel, easy peasy.
Next the Handlebar conversion.
Amerivespa Indy 2015.
Scooterists start your engines!
#AVINDY15
Scooterists start your engines!
#AVINDY15
-
NASRA
- Member
- Posts: 72
- Joined: Fri Jun 25, 2010 7:31 pm
- Location: Indy
- Contact:
Alright boys we know the bar setup on the buddy looks good but it just dont work that great at the track. Not only that but we just like the way the motocross style bars "feel", no speedo or crap to get in our way.
Goodbye stock bars.
Remove front cover
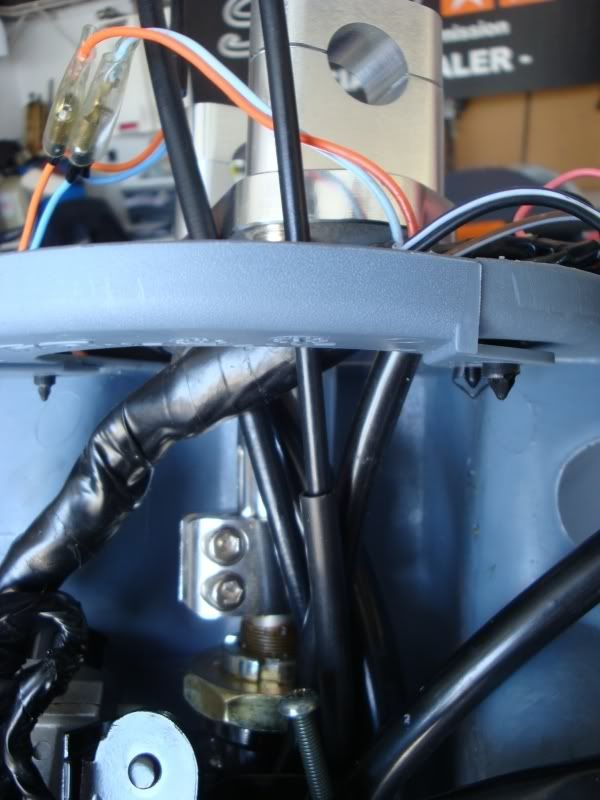
Remove top cover of bar assembly via 4 screws, speedo cable, and a few connectors.
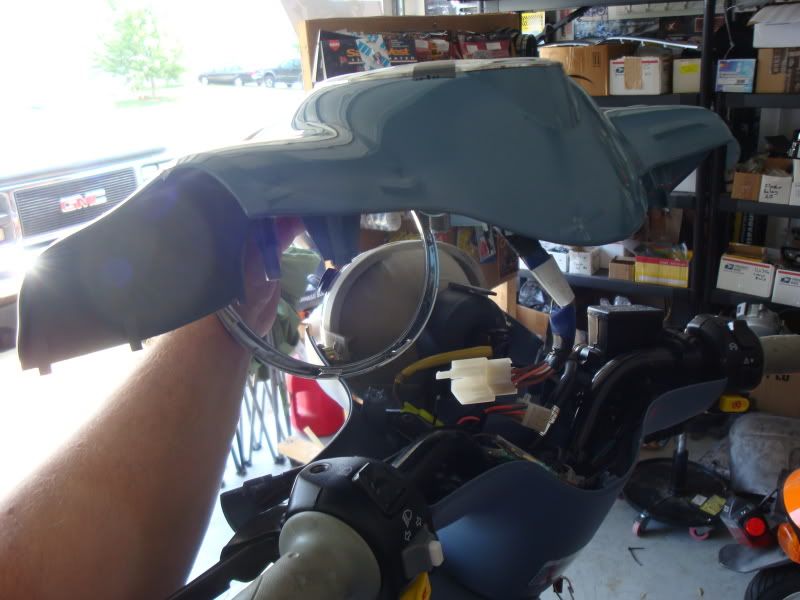
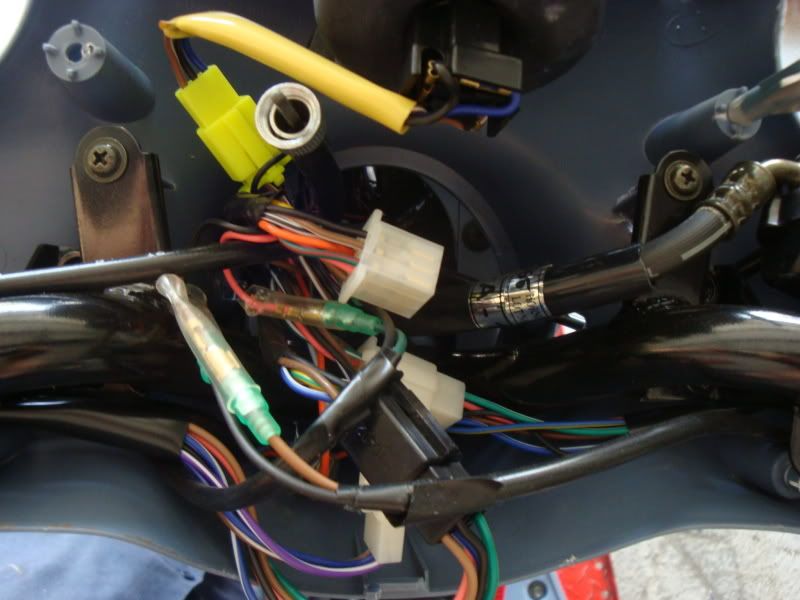
Now go ahead and remove all the controls from the stock bars. Be careful here not to strip out any phillip head screws. Use a impact screwdriver for this job.
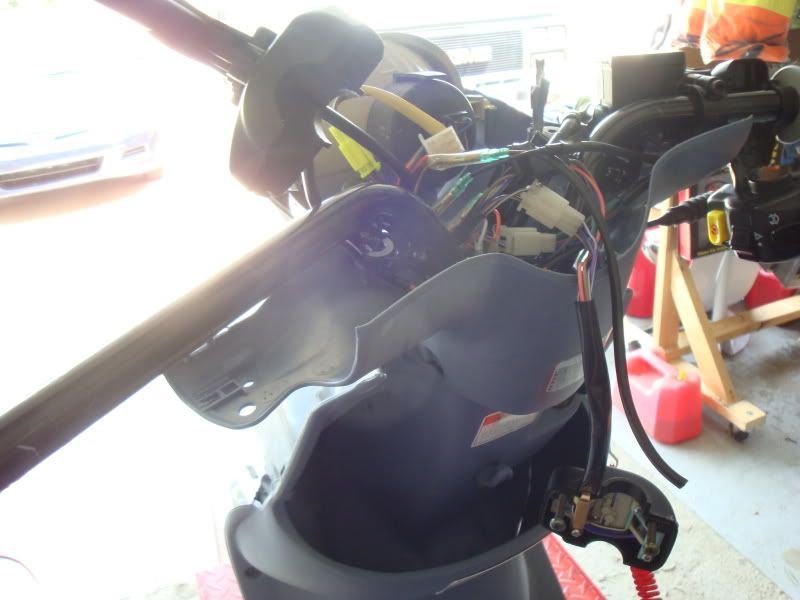
Remove bolt and put the bars to the side.
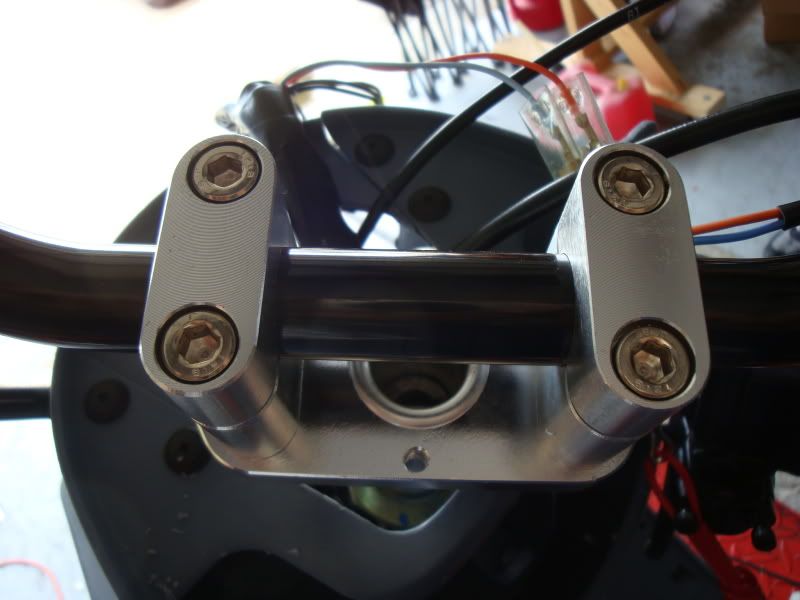
We used the Zuma 50 steering stem from NCY. Bolts right in.
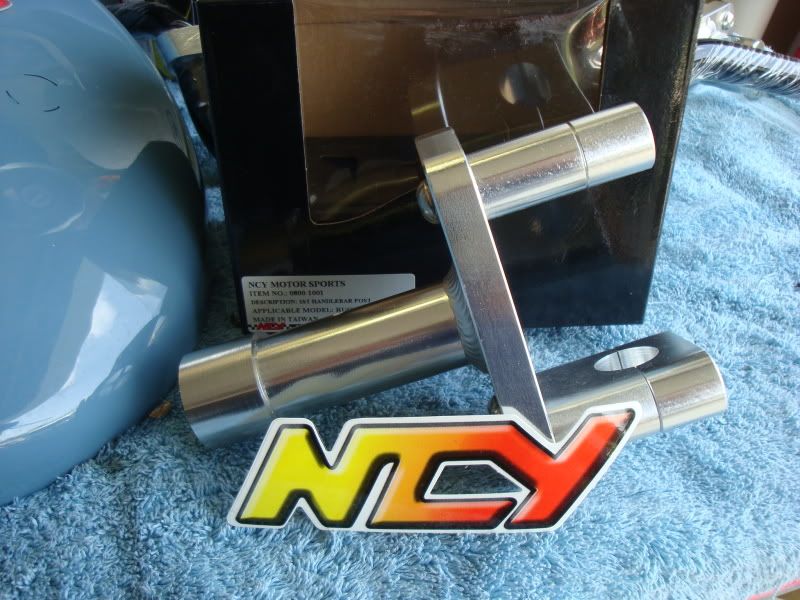
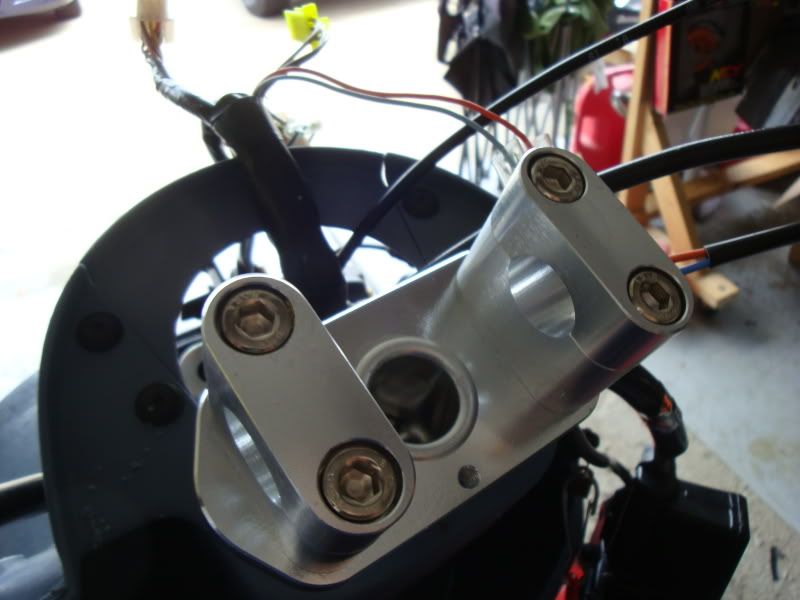
Now its time for the NCY Bars.
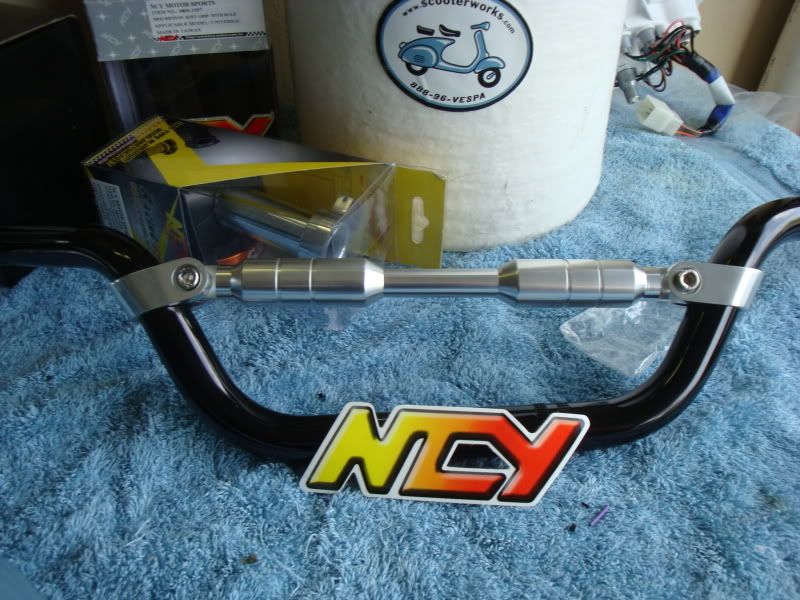
Simply remove the 4 bolts and install the bars.
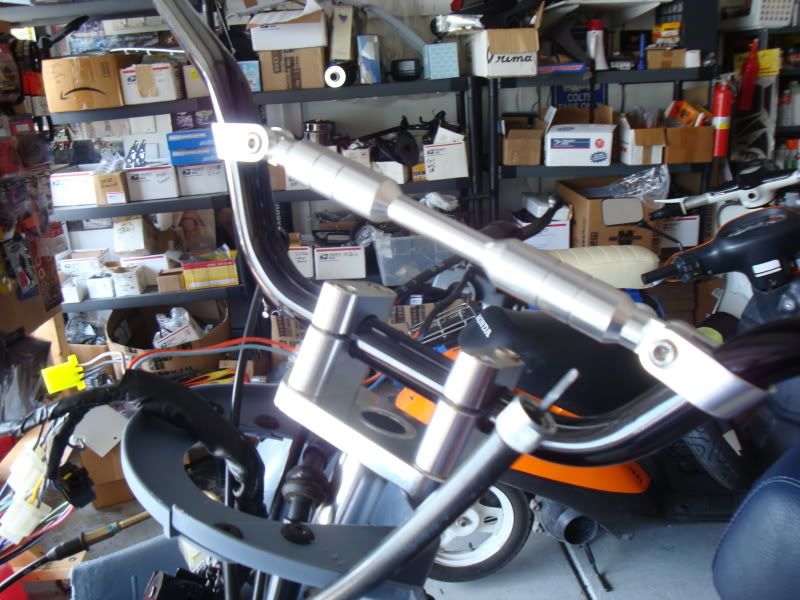
Measure the bars and chop.
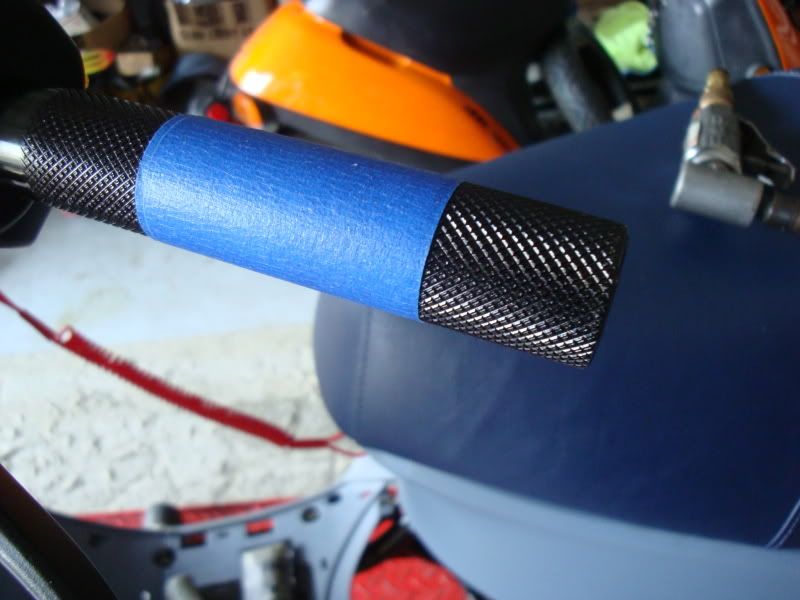
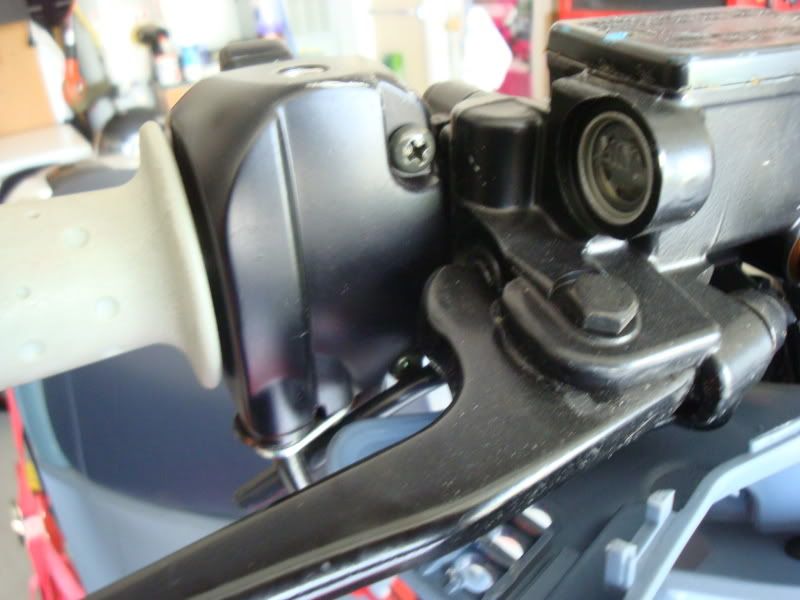
Install controls

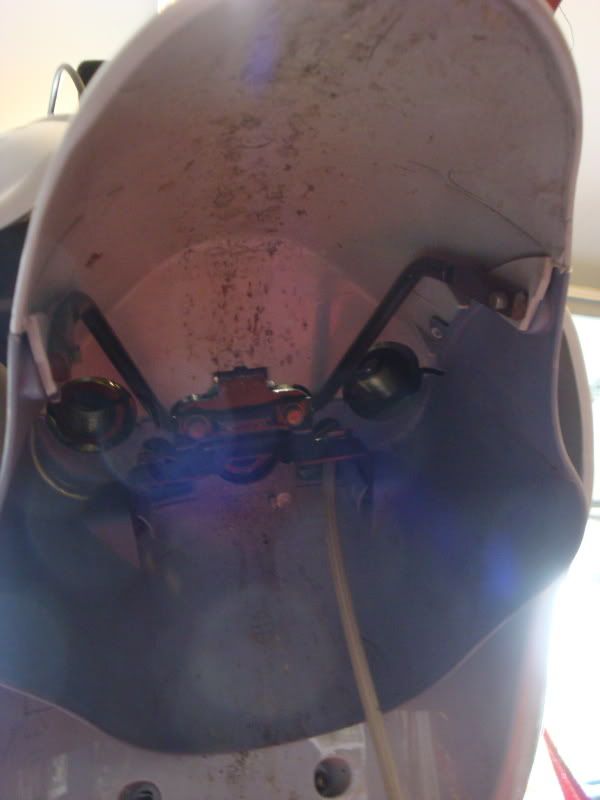
While we were in there we moved the turn signals down to the front shield. It couldn't have been easier as Genuine left all the connectors and bulbs in place. Just a simple plug and chug.
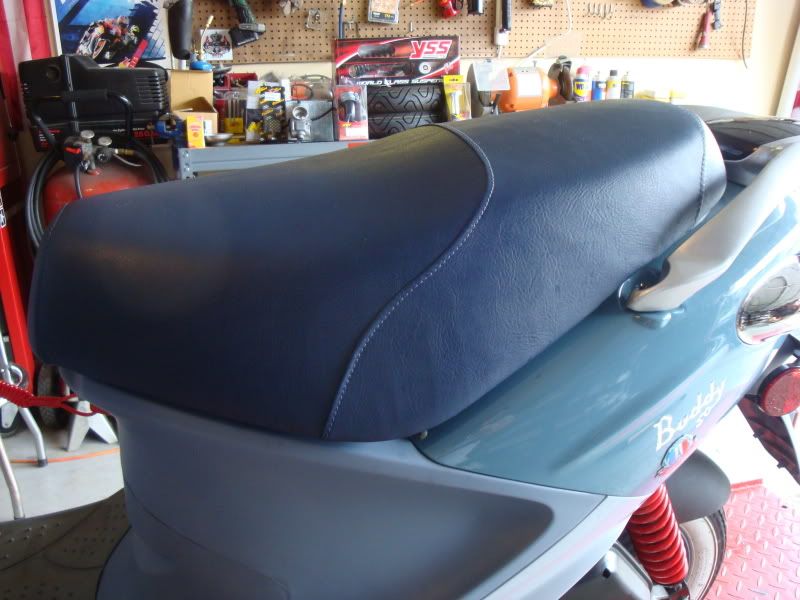
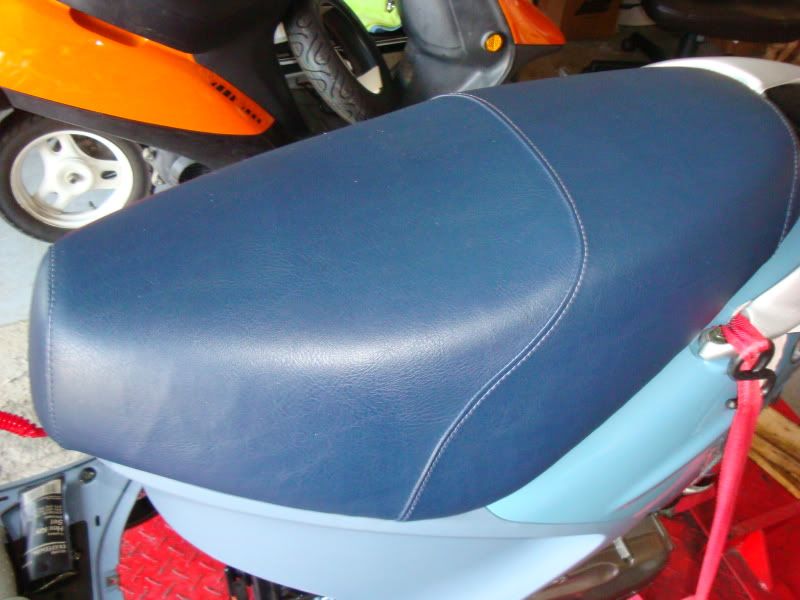
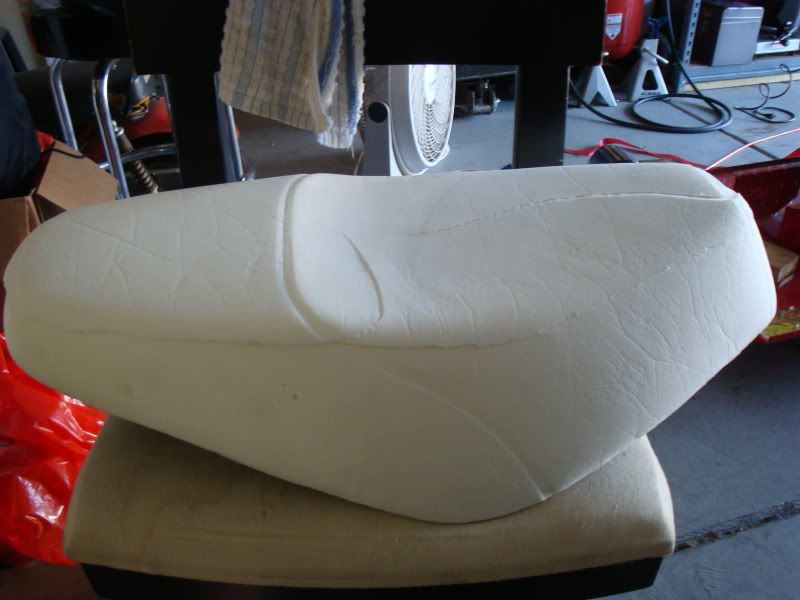
To make the bike more manageable on the track I tried my hand at shaving down the seat. It turned out ok but it needs a little more attention before its ready for the show circuit.
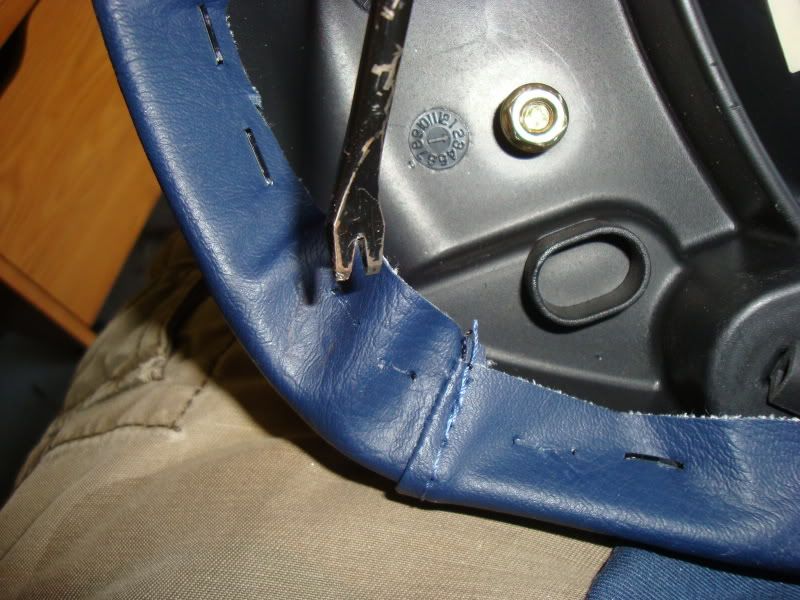
Remove cover and plastic liner.
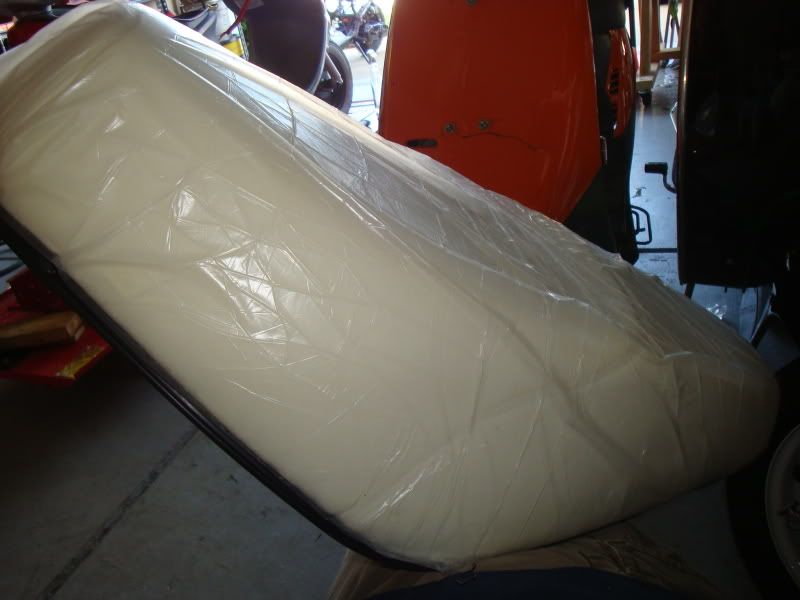
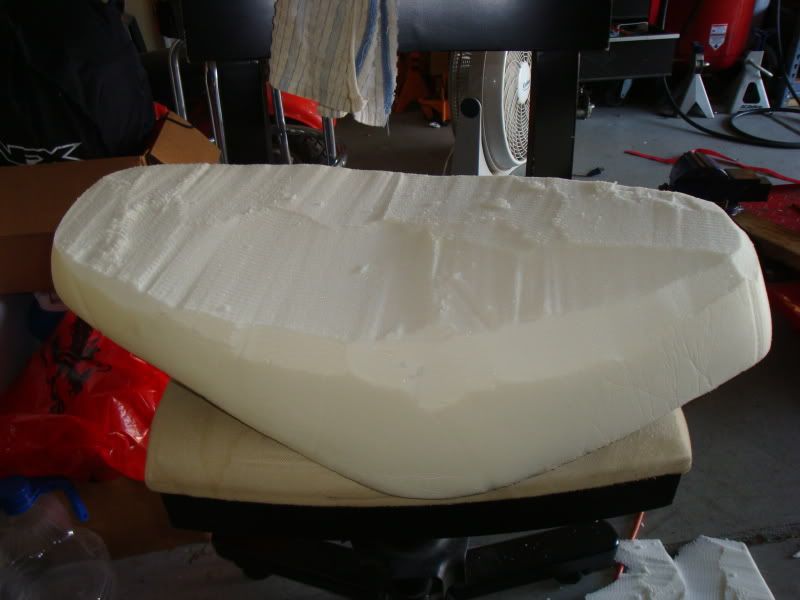
Now take your mom/wifes electric cutter and get to work.
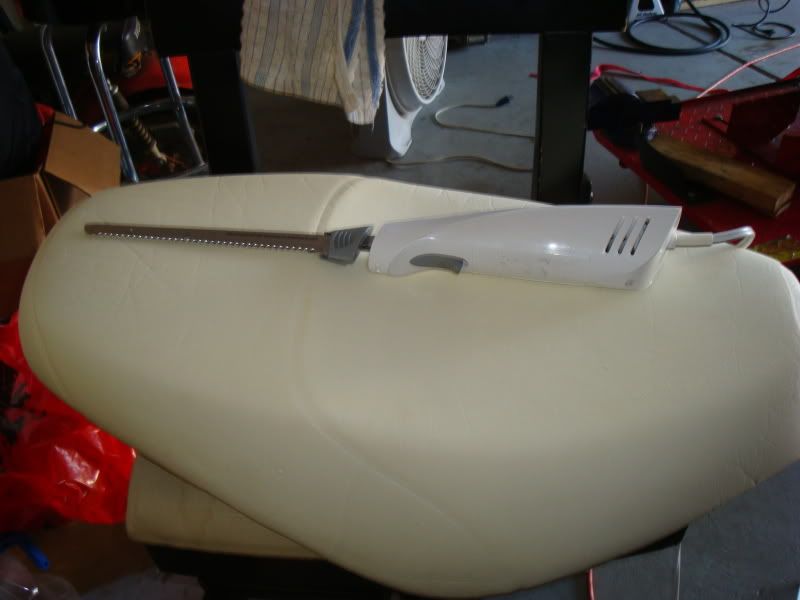
Chop.
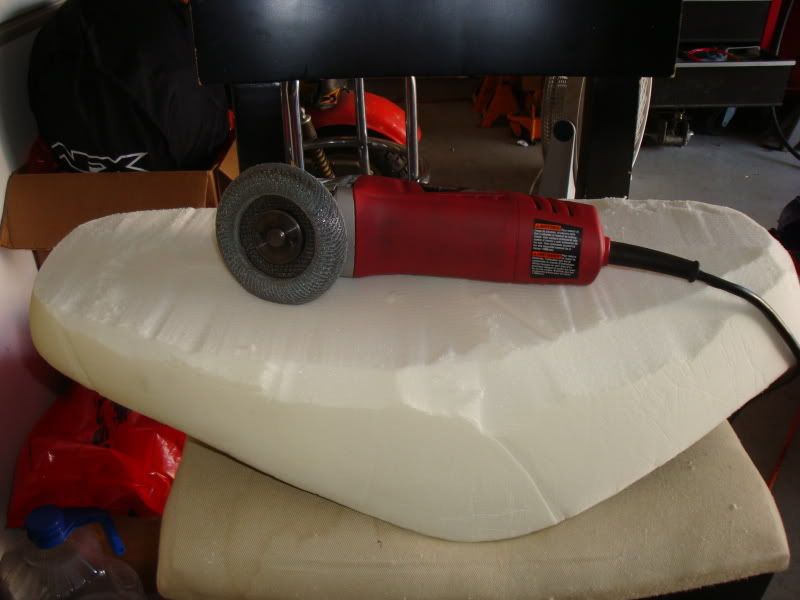
Now I took my grinder and a flap wheel to smooth things down, it worked ok but it tends to grab a bit and leave marks in the foam. I bought a good hand sander the other day and plan on cleaning it up a bit more later on down the road.
Now take your staple gun and put the cover back on.
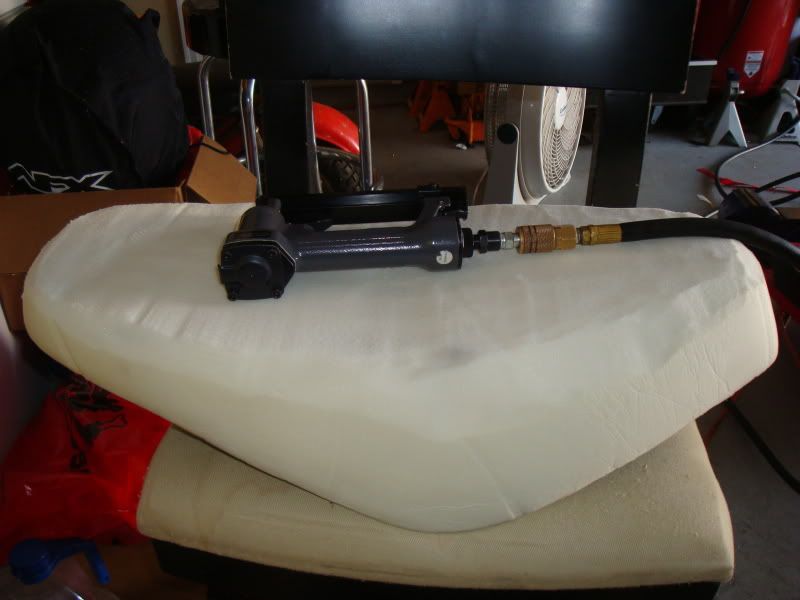
Works way better than it looks.
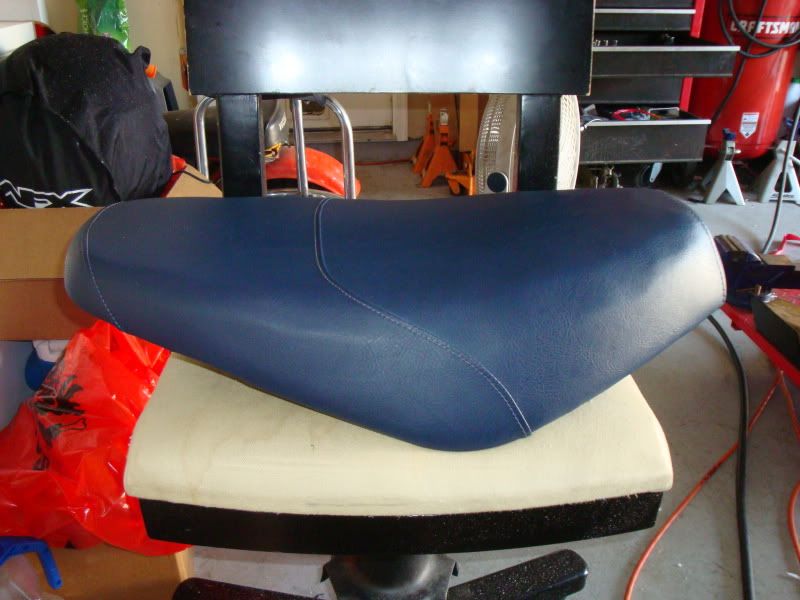
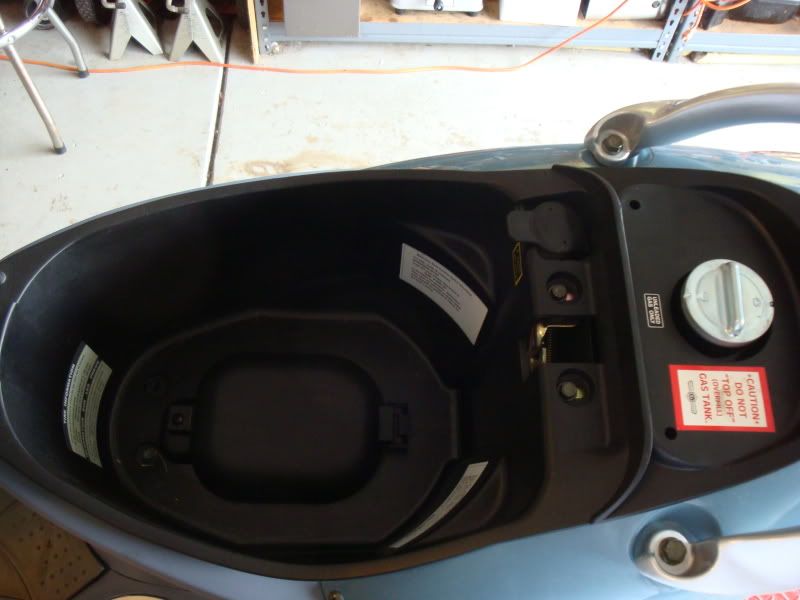
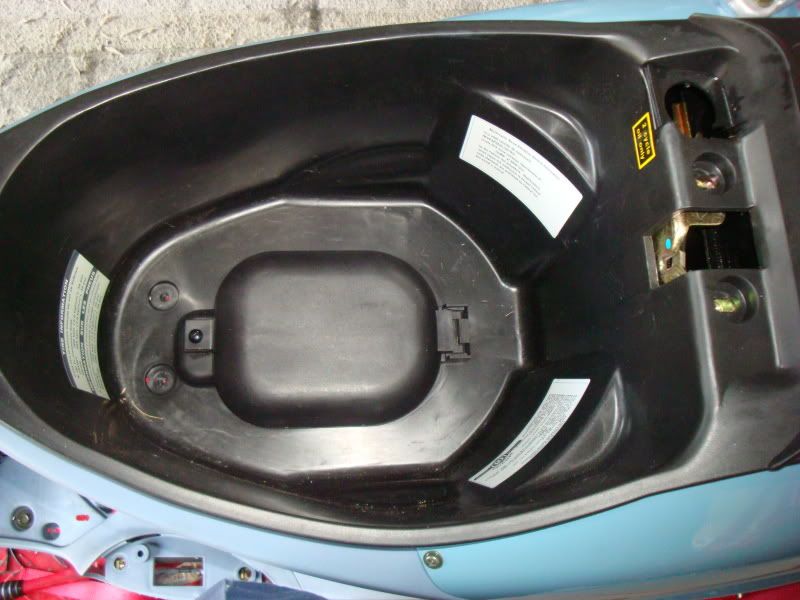
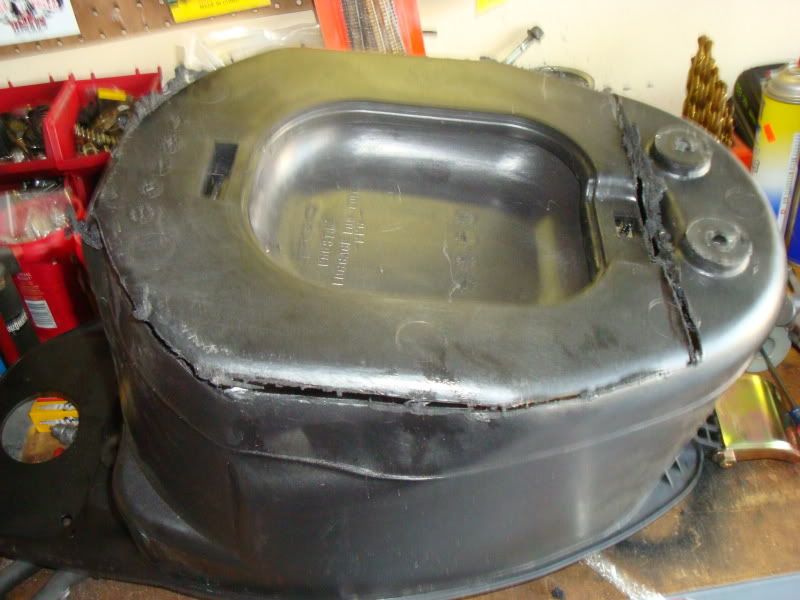
Also went ahead and cut the bottom out of the seat bucket for easy access.
More to come!
Goodbye stock bars.
Remove front cover
Remove top cover of bar assembly via 4 screws, speedo cable, and a few connectors.
Now go ahead and remove all the controls from the stock bars. Be careful here not to strip out any phillip head screws. Use a impact screwdriver for this job.
Remove bolt and put the bars to the side.
We used the Zuma 50 steering stem from NCY. Bolts right in.
Now its time for the NCY Bars.
Simply remove the 4 bolts and install the bars.
Measure the bars and chop.
Install controls
While we were in there we moved the turn signals down to the front shield. It couldn't have been easier as Genuine left all the connectors and bulbs in place. Just a simple plug and chug.
To make the bike more manageable on the track I tried my hand at shaving down the seat. It turned out ok but it needs a little more attention before its ready for the show circuit.
Remove cover and plastic liner.
Now take your mom/wifes electric cutter and get to work.
Chop.
Now I took my grinder and a flap wheel to smooth things down, it worked ok but it tends to grab a bit and leave marks in the foam. I bought a good hand sander the other day and plan on cleaning it up a bit more later on down the road.
Now take your staple gun and put the cover back on.
Works way better than it looks.
Also went ahead and cut the bottom out of the seat bucket for easy access.
More to come!
Amerivespa Indy 2015.
Scooterists start your engines!
#AVINDY15
Scooterists start your engines!
#AVINDY15
-
NASRA
- Member
- Posts: 72
- Joined: Fri Jun 25, 2010 7:31 pm
- Location: Indy
- Contact:
Scooterworks Drag Race Series Round 3 Results.
After we installed and tuned the Scooterworks stage 1 kit we ran a 16.11 @ 39.23 mph.
With the 72cc kit, intake, carb, and 5G rollers we ran 14.50's @ 47.07 mph!
Thats a 7.84mph increase in speed in the 1/8th mile. Top speed hasn't been recorded and wont be until we have a safe place to run. I can tell you that 60's are easily achievable with this setup, dont ask how I know
Click below for test run video.
Check out www.Scooter-Racing.net/ScooterworksDragRaceSeries for all the race action.
Amerivespa Indy 2015.
Scooterists start your engines!
#AVINDY15
Scooterists start your engines!
#AVINDY15
-
jasondavis48108
- Member
- Posts: 2919
- Joined: Fri Apr 24, 2009 12:36 pm
- Location: Ann Arbor
-
NASRA
- Member
- Posts: 72
- Joined: Fri Jun 25, 2010 7:31 pm
- Location: Indy
- Contact:
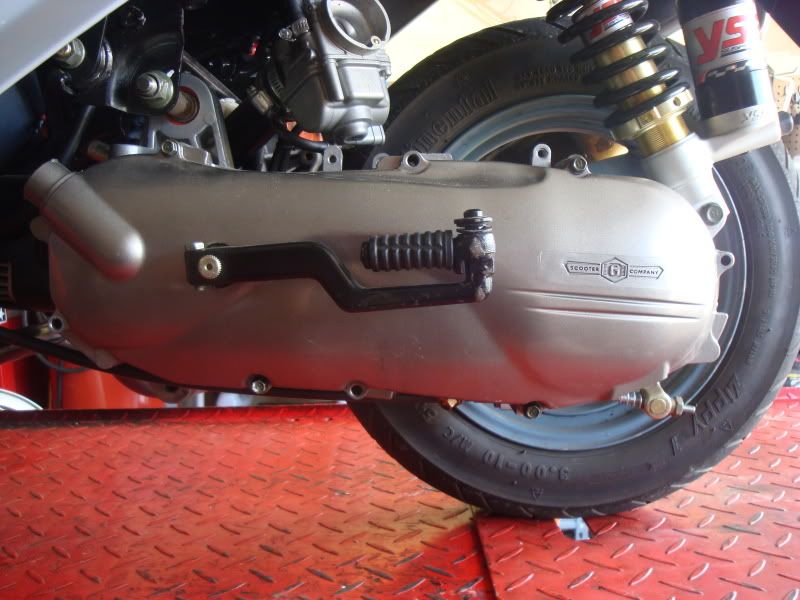
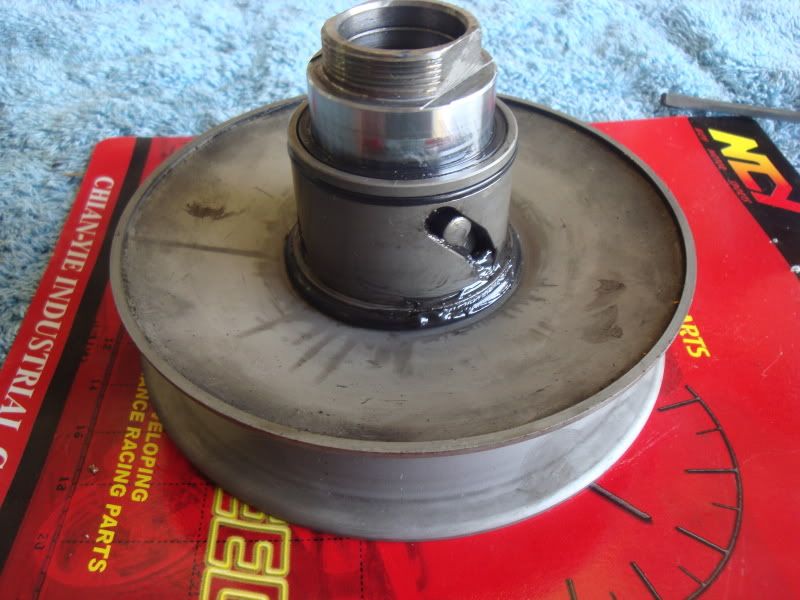
Time to tune the transmission.
Step one remove the CVT cover.
Now break out your impact gun and remove the variator and clutch.
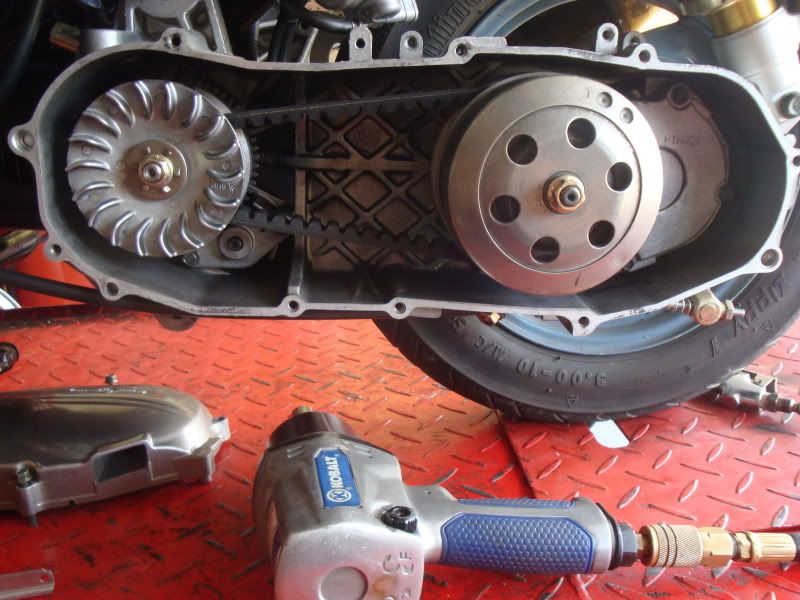
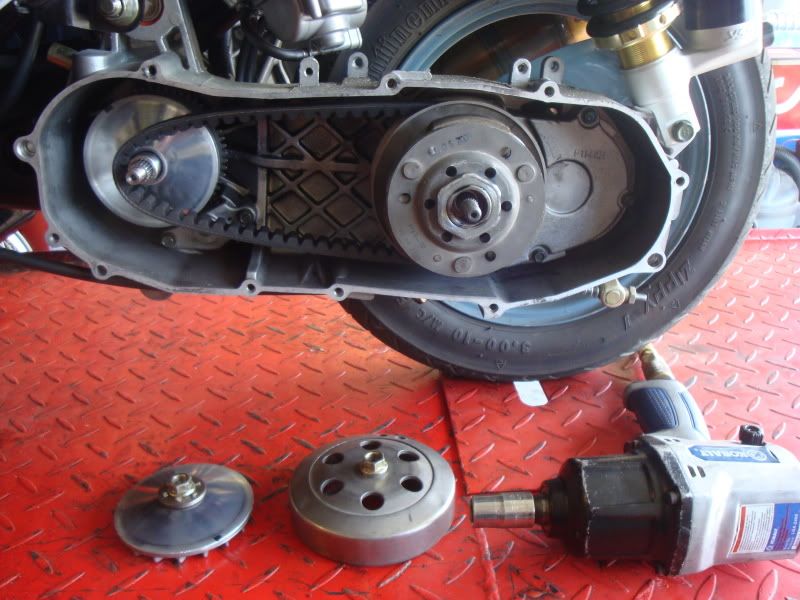
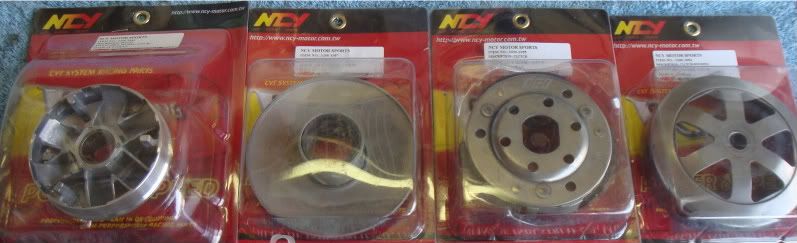
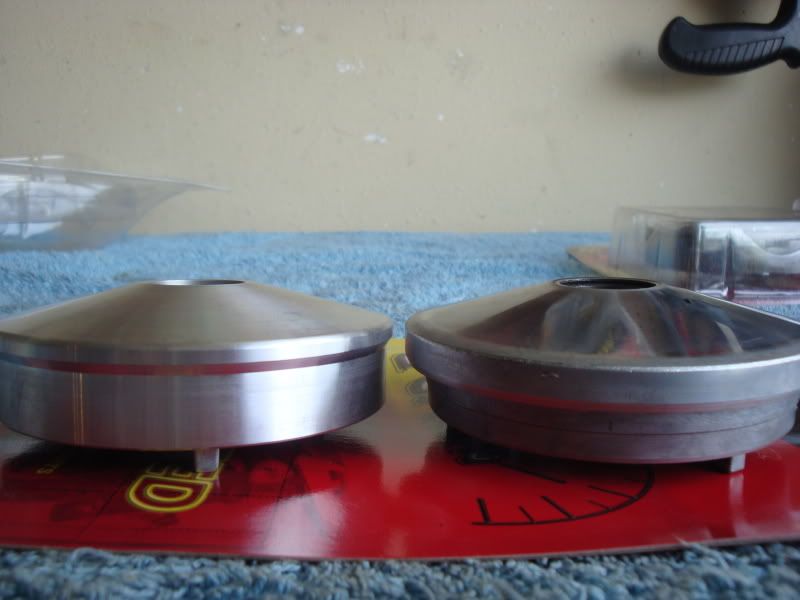
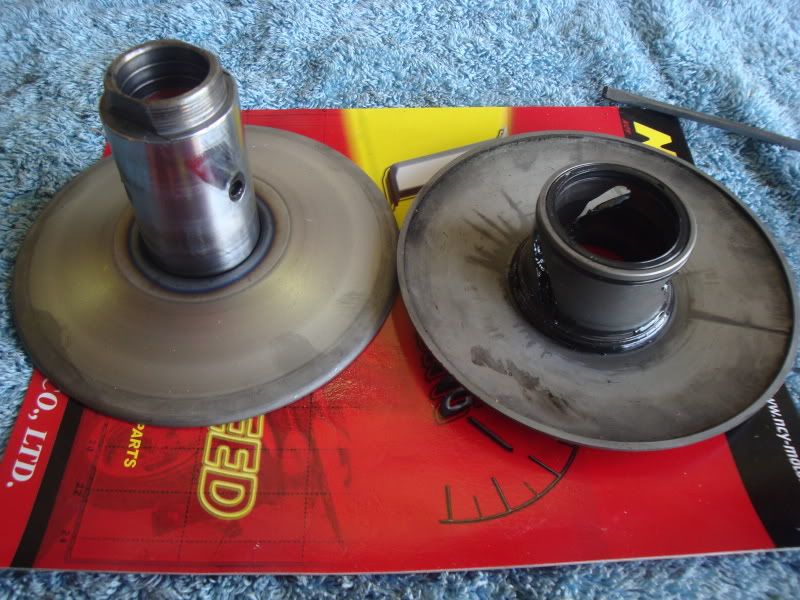
Now we take a look at our stock variator vs the NCY unit.
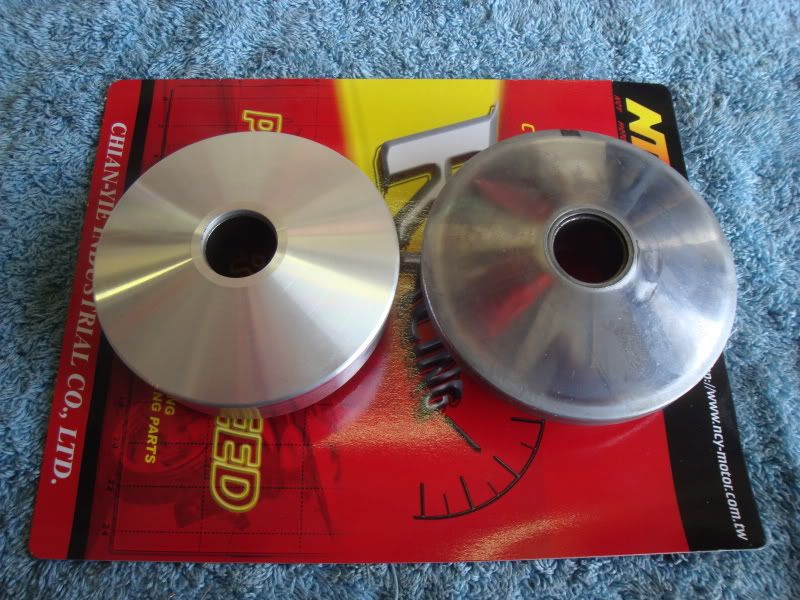
If you look closely at the one on the right (oem) you will notice a ring where the belt has been riding at wide open throttle. This is the max height the belt will ride with this belt. You can see that there is a good bit of material left that the belt will never be able to climb to.
The stock variator is 94mm outside diameter, the belt only climbs to 88mm. The NCY Variator has a outside diameter of 89mm allowing NCY to remove quite a bit of material from the variator lightening it, helping your engine rev faster.
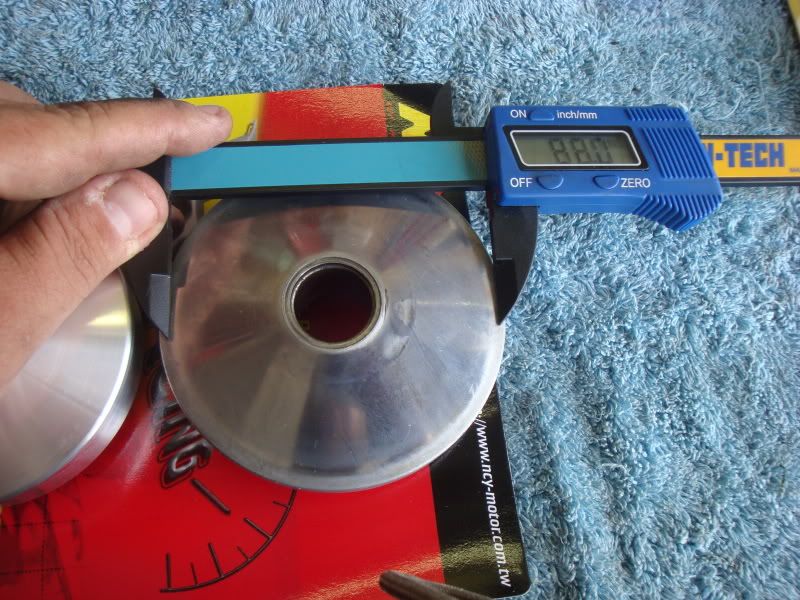
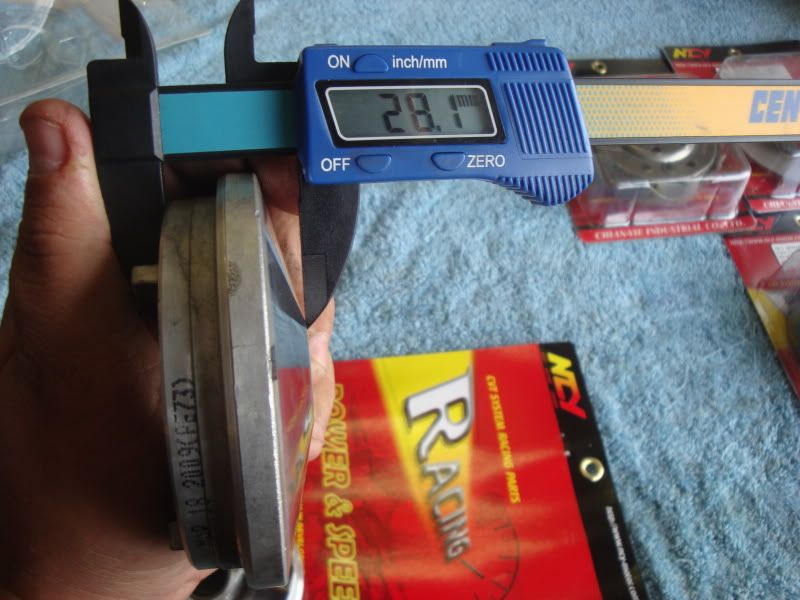
Now lets flip them over and examine the ramps.
The oem unit has 24.8mm long ramp with a very aggressive angle that makes it harder for the rollers to push against the backing plate.
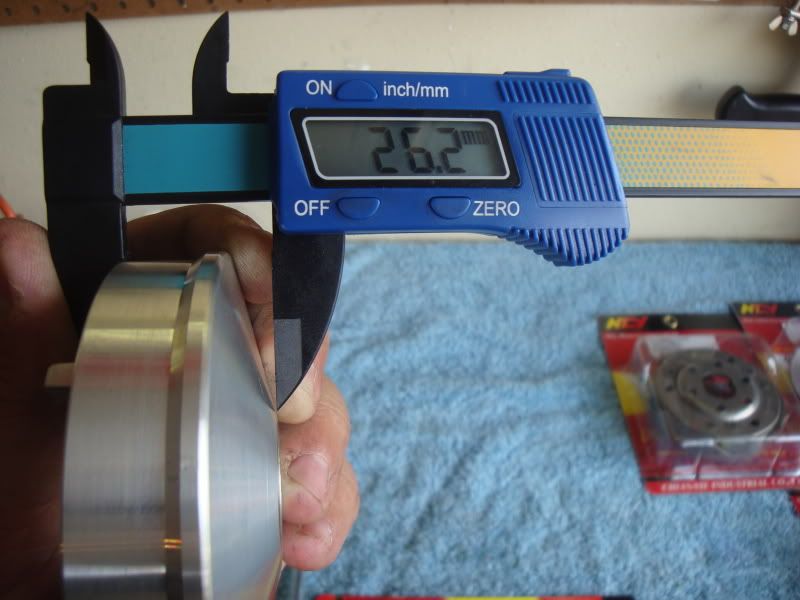
Now we take a look at the NCY variator.
The ramp length is 26.5mm with much smoother ramp angles letting the rollers roll up and down the ramp with the least amount of resistance.
Now we weigh them.
OEM came in at 6.9oz
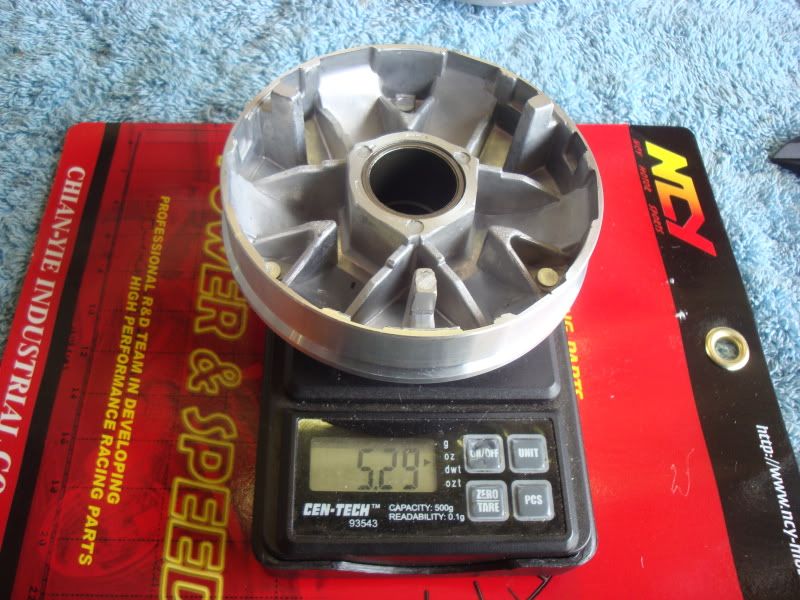
NCY 5.29oz a weight savings of 1.61oz. Thats considerable on such a light piece to begin with.
Now check out the width and drive angle.
The NCY unit has a more aggressive angle and is not as wide as the oem unit.
Stock 27.7mm (disregard the photo it moved a little on me, one hand camera shoot )
NCY is 26.2mm with a more aggressive angle. This allows you to accelerate quicker and maintain your momentum when you roll back on the throttle through a corner.
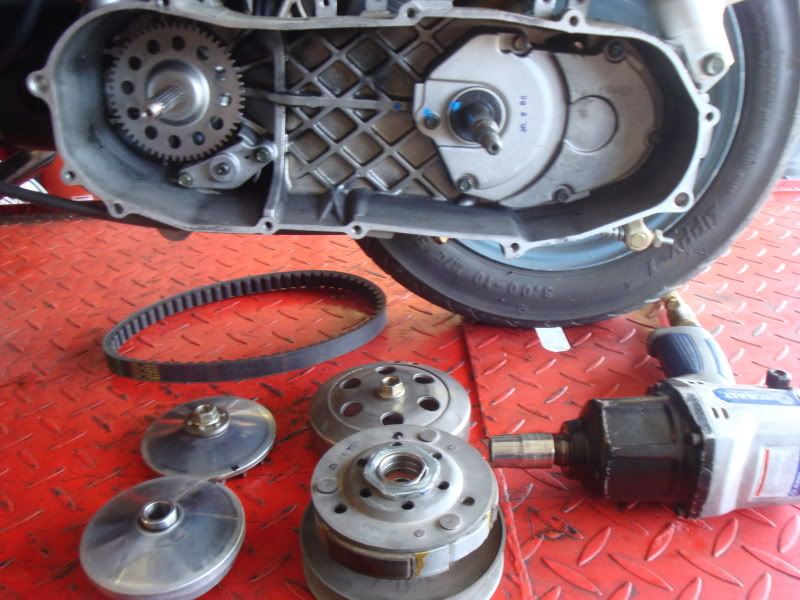
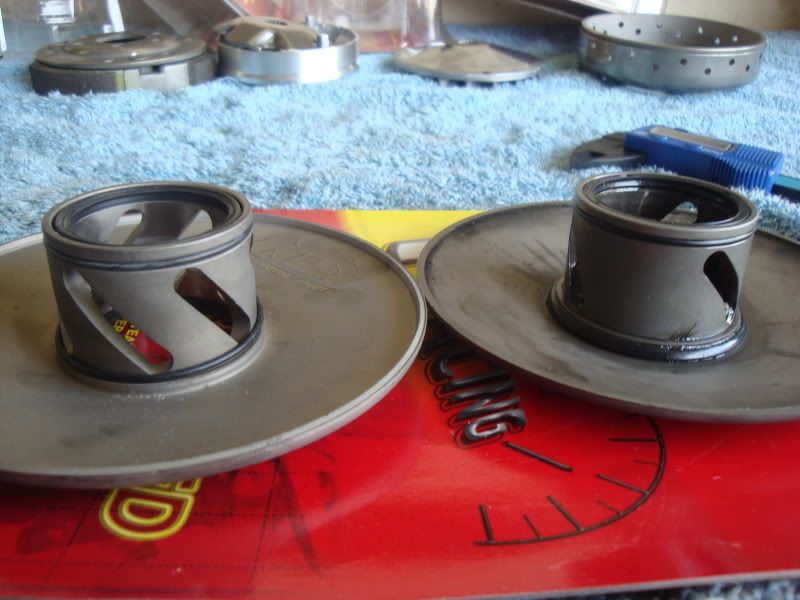
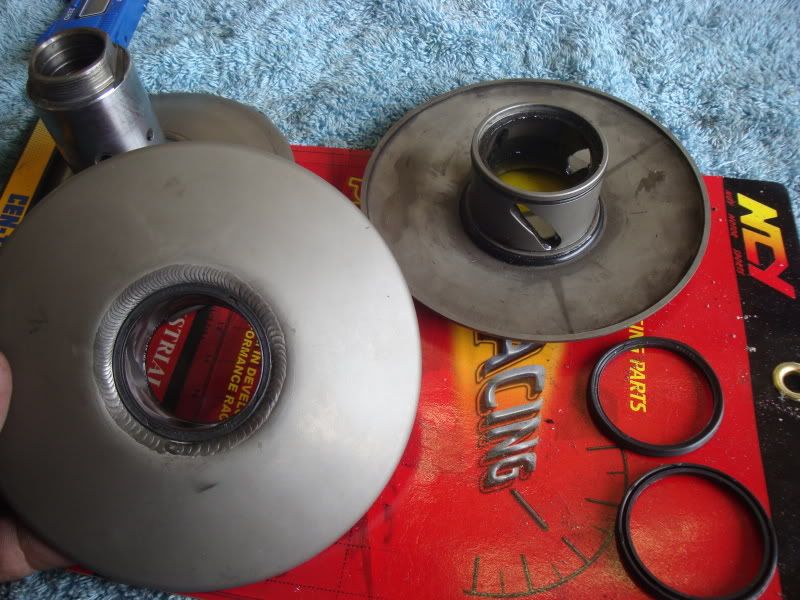
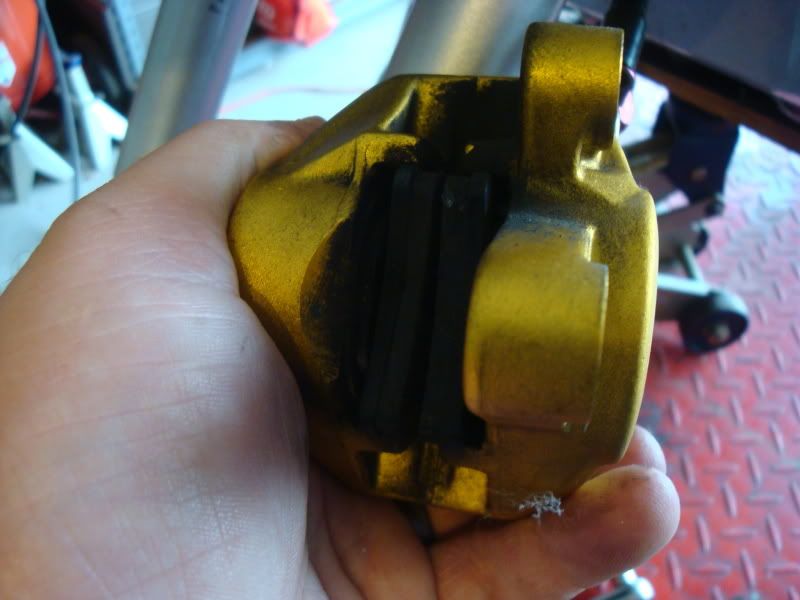
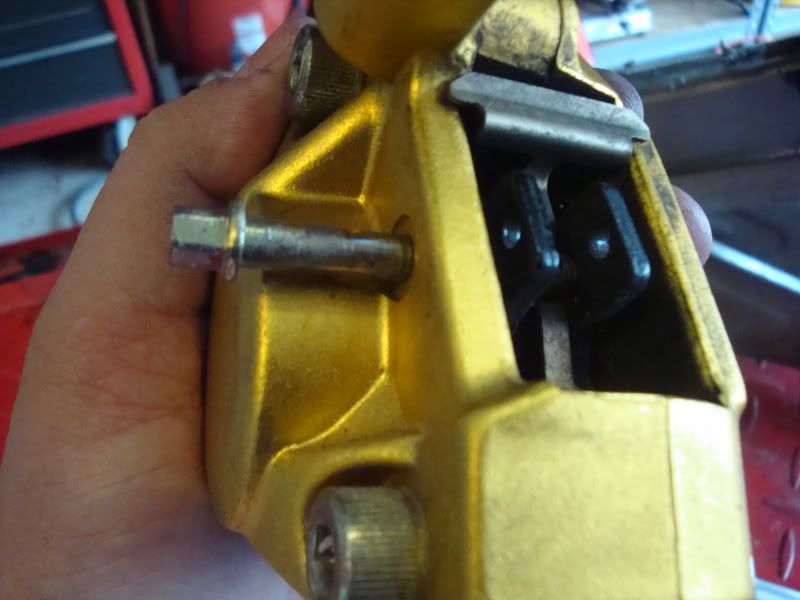
Now that we see how superior the variator is now lets look at the clutches.
NCY is on the left OEM right
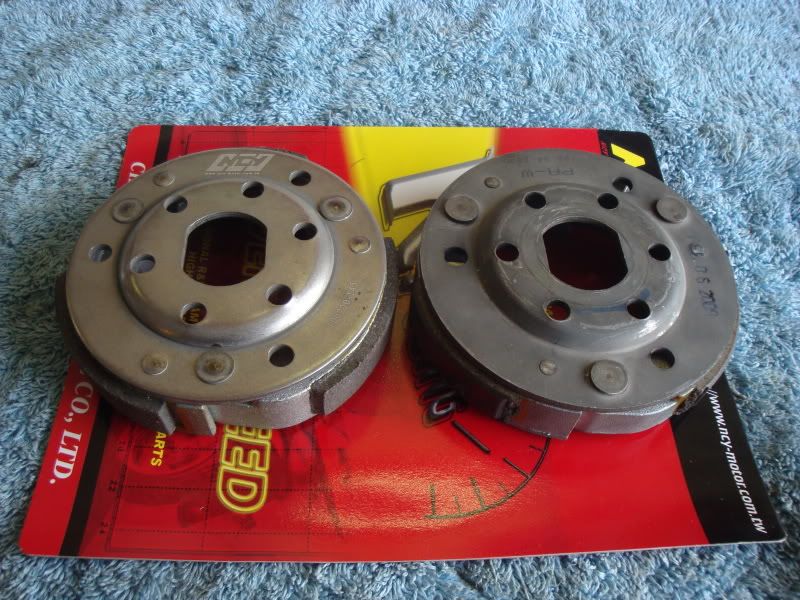
First thing you notice is the larger contact patches for the clutch bell to grab on to.
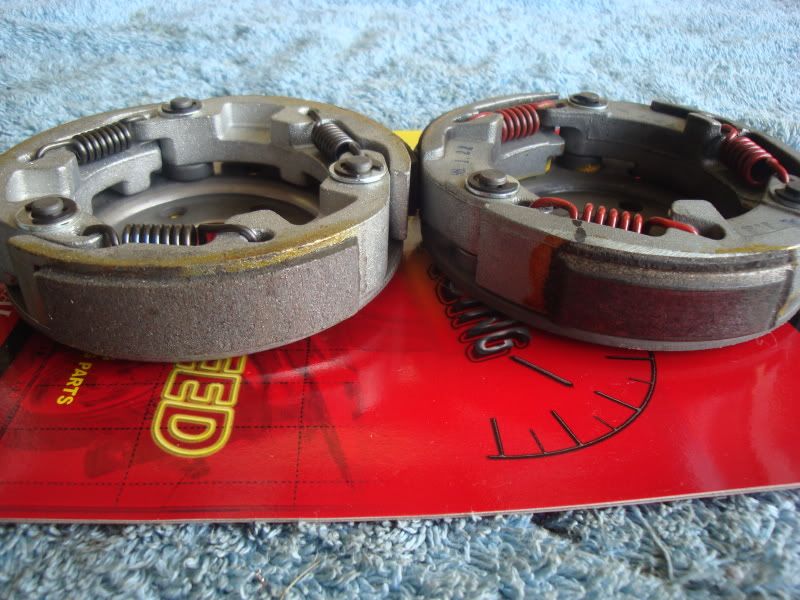
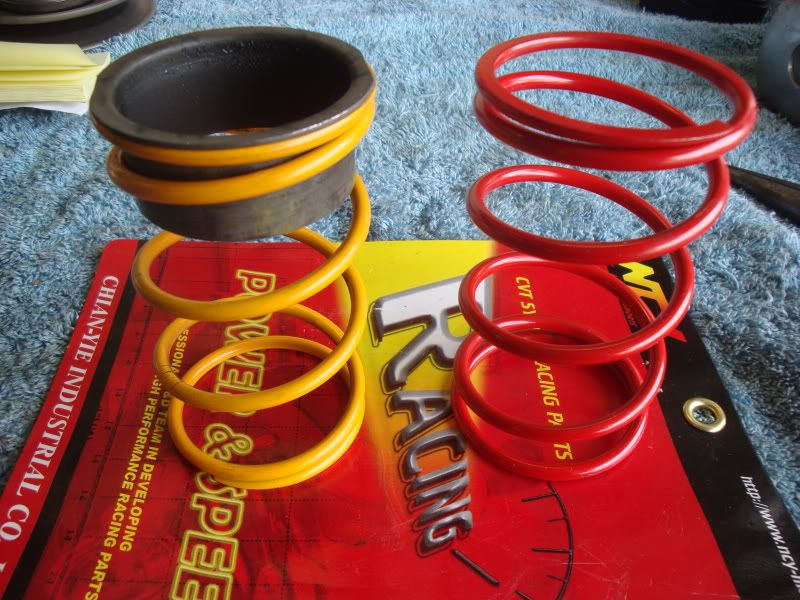
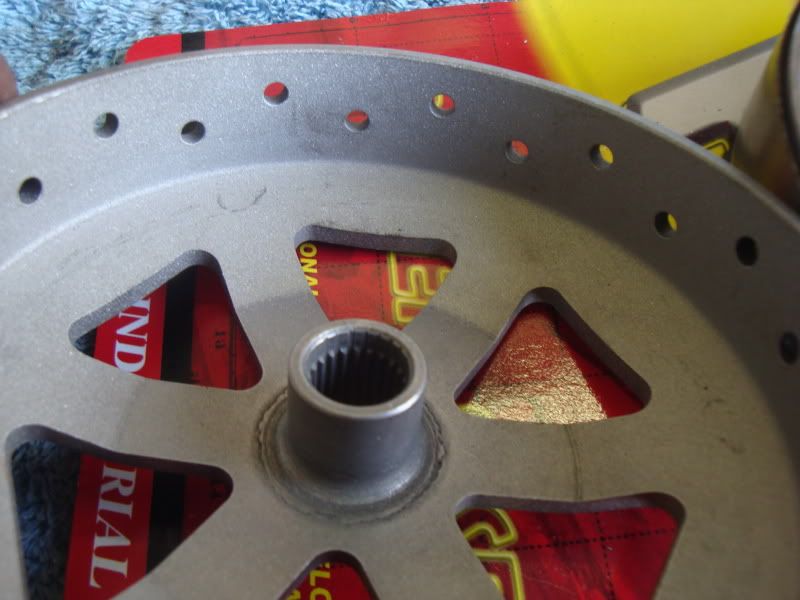
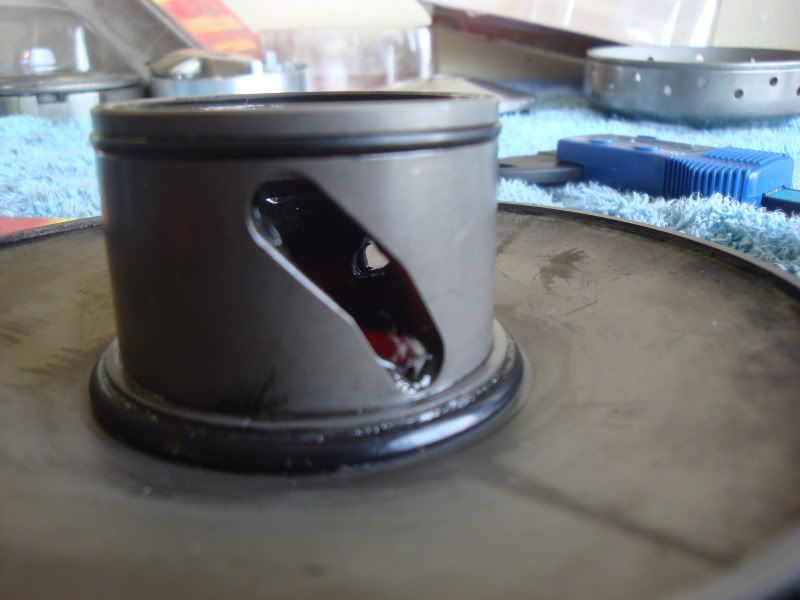
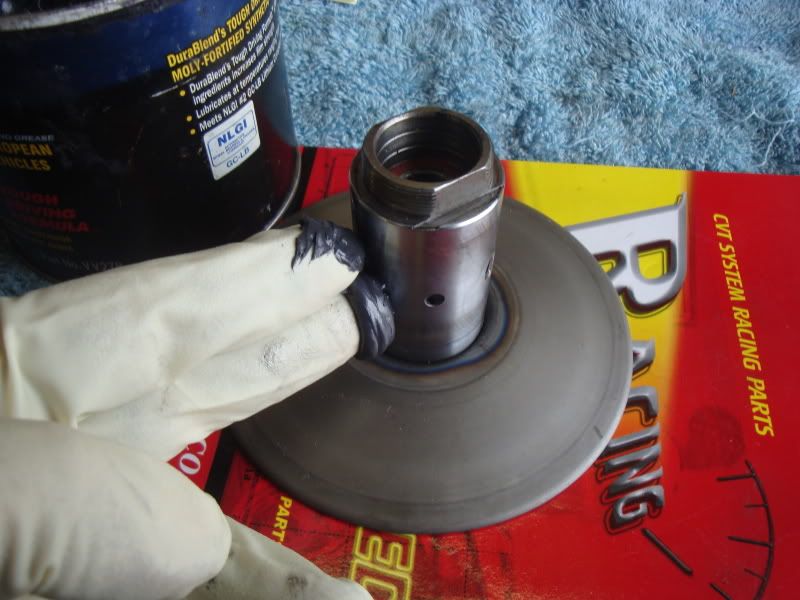
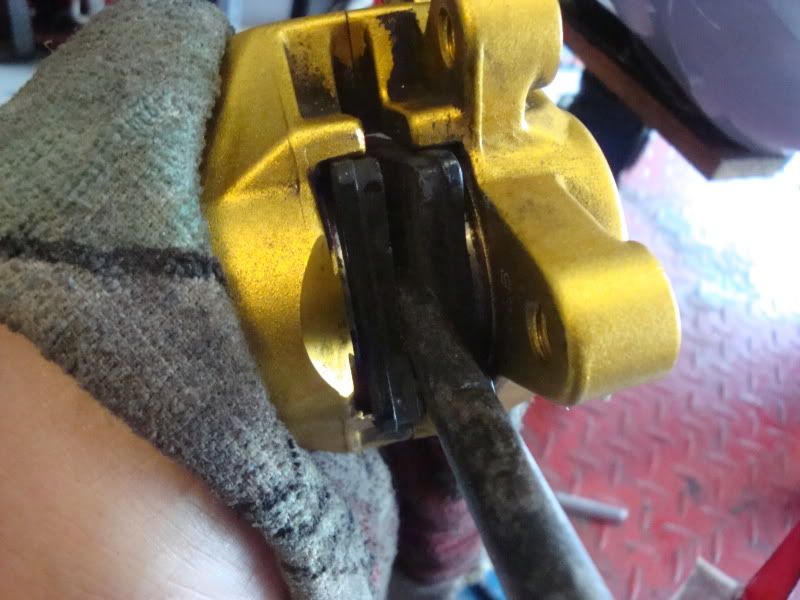
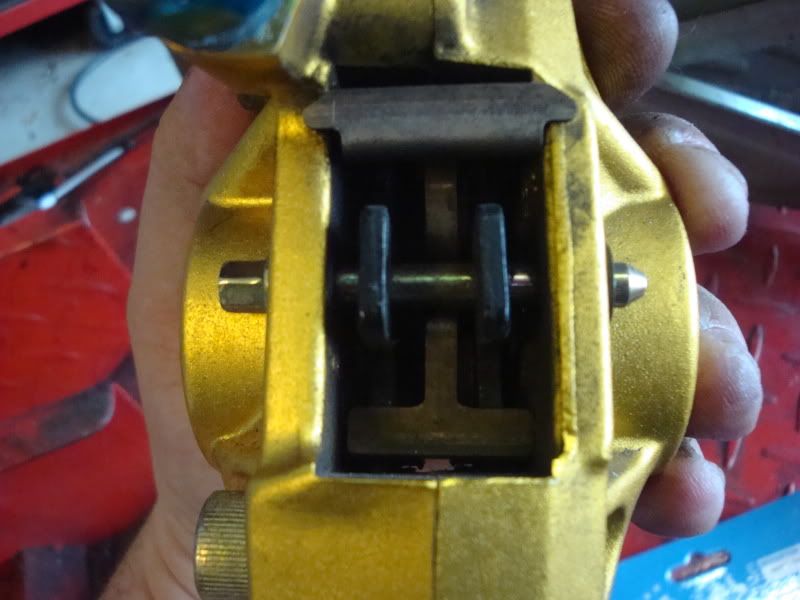
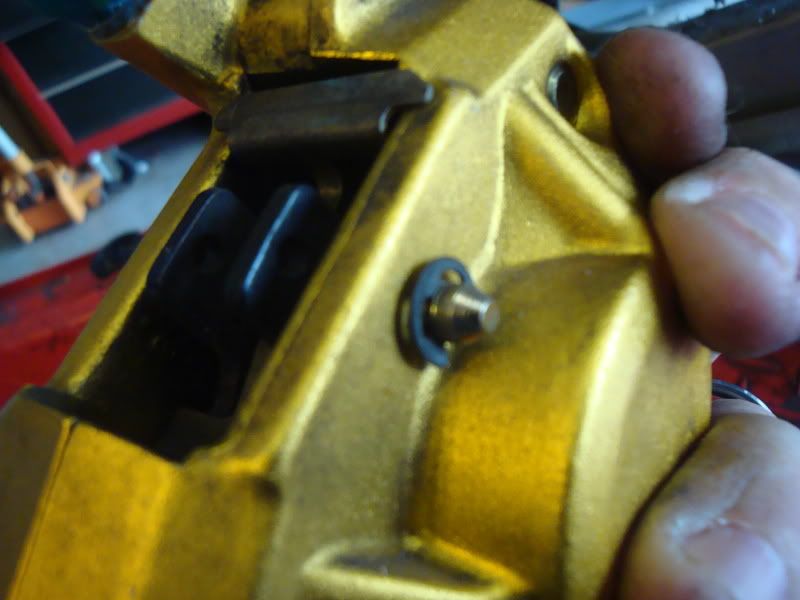
Now we break down the clutch by removing the pill springs and c-clips.

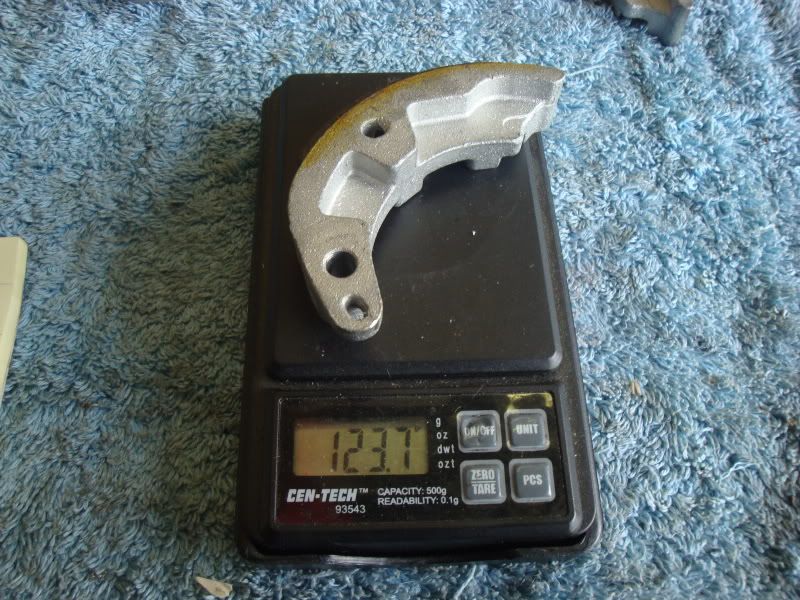
Now we weigh the pads.
The OEM comes in at 134.1g
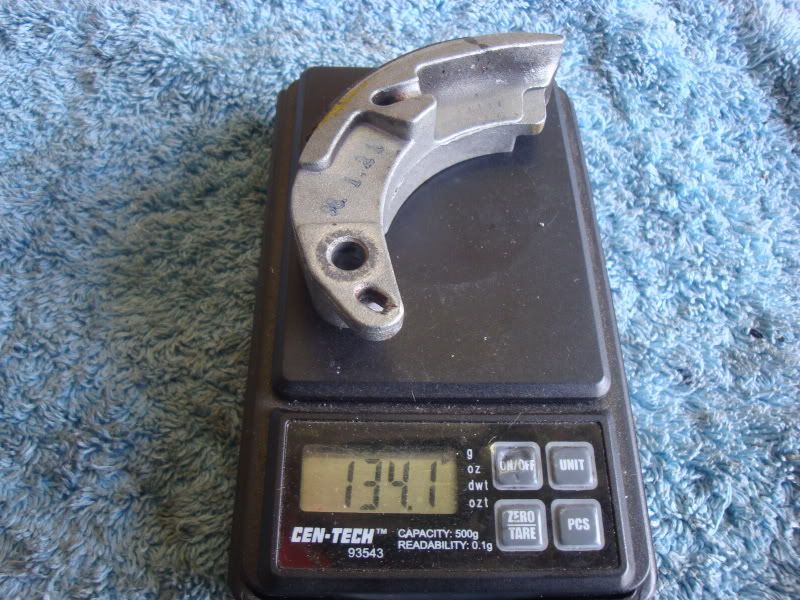
The NCY weighs 123.7g
While you have the clutch apart check all the other pads for consistency and lighten them if necessary by drilling a little material off at a time.
The lighter the clutch pads are the harder gravity has to act on them. This causes the motor to build more rpms before takeoff. When you add stiffer springs it only increases the force needed to engage the clutch. Good for when you want to launch at 2500 rpm or higher.
At this time I also installed the 2000rpm torque spring to get the most resistance resulting in much better take off for the drag strip. This is not recommend for daily riding as the more force you require the belt to push against the faster it will wear out. Not only that but you better be building some power before you get this aggressive with your tune.
Clutch bells

NCY vs OEM
From just looking at them you can see some major differences. First the holes to release gasses that can can build up simular to brake pads causing the pads to start slipping.
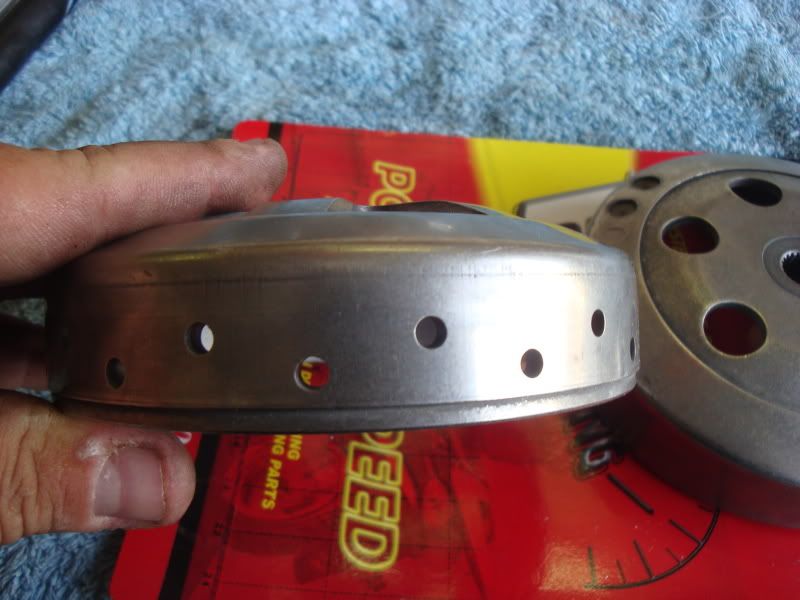
There is also sand like material on the inside of the bell to help the clutch pads hook up.
Last the NCY bell is much lighter than the oem bell.
OEM 17.32oz
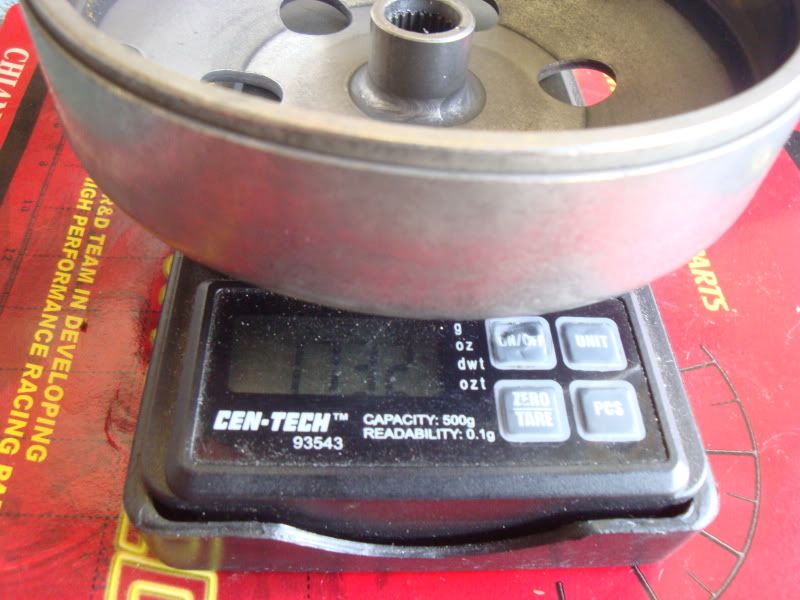
NCY 14.61oz
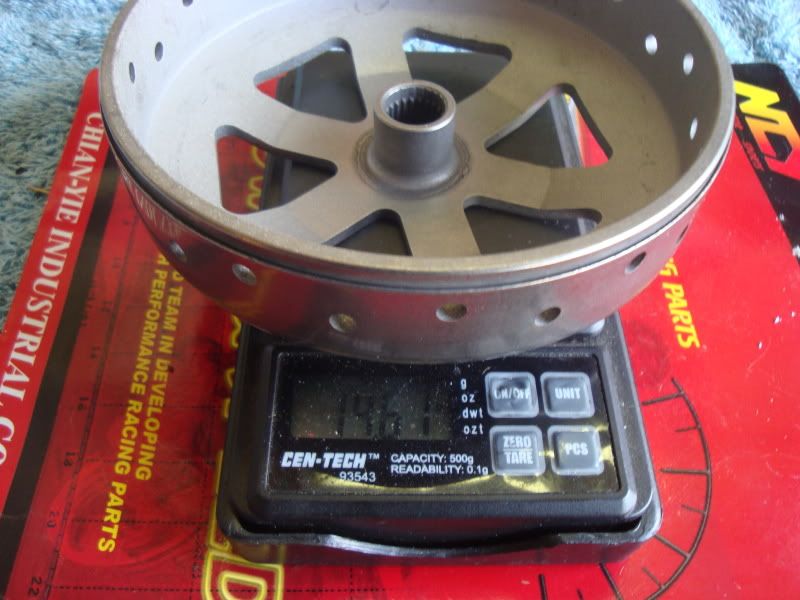
A weight savings of 2.71oz.
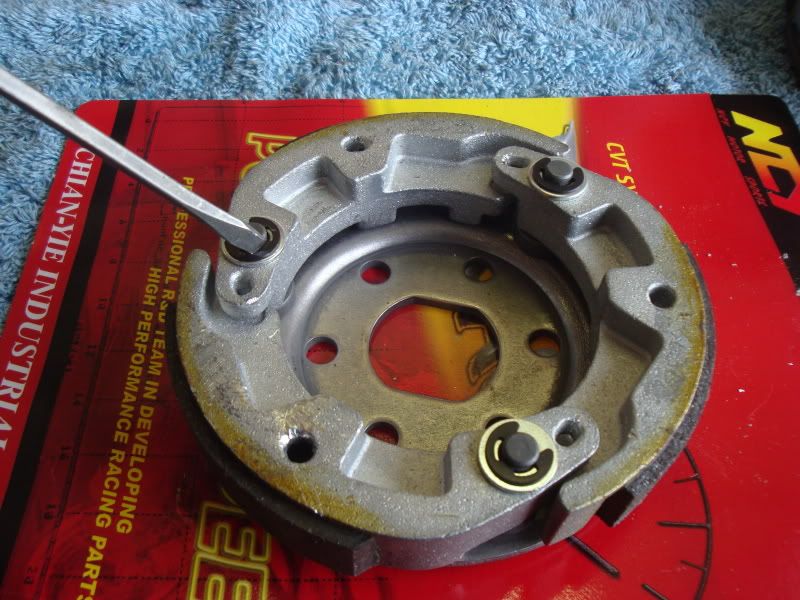
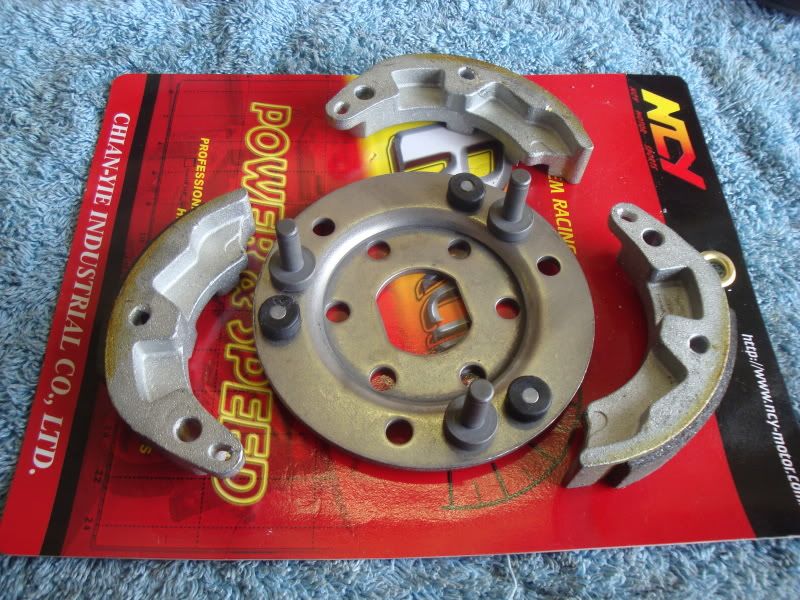
Last but not least the torque driver, or as some people call it secondary drive face. First remove the spring collar.
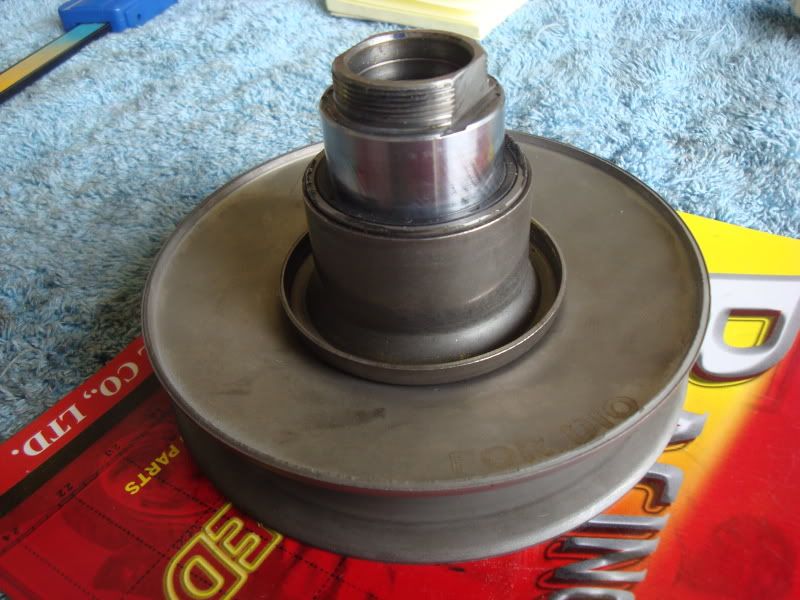

Now pull the little pins from the slots.

Remove torque driver.
Now take a close look at the slot. You'll see it doglegs a bit to make the engine work harder to get into high gear. The smoother it shifts the faster you will accelerate at the track.
OEM
NCY
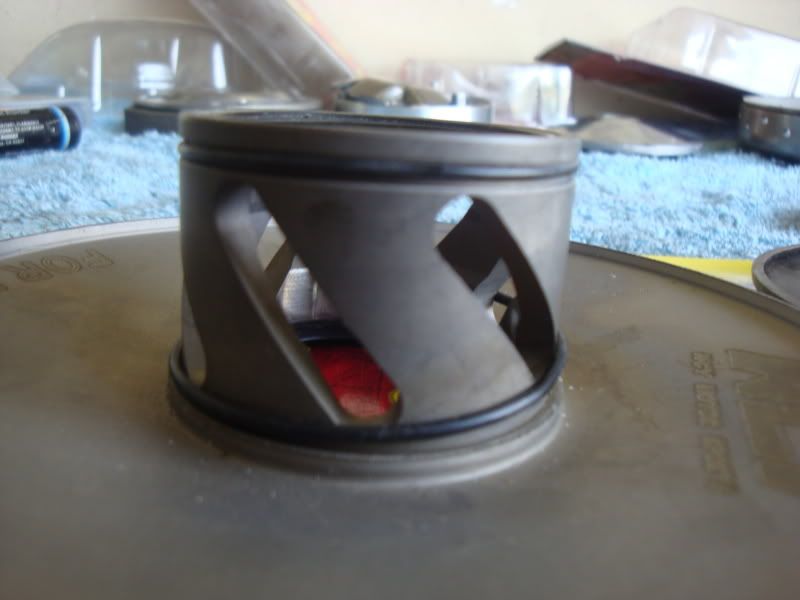
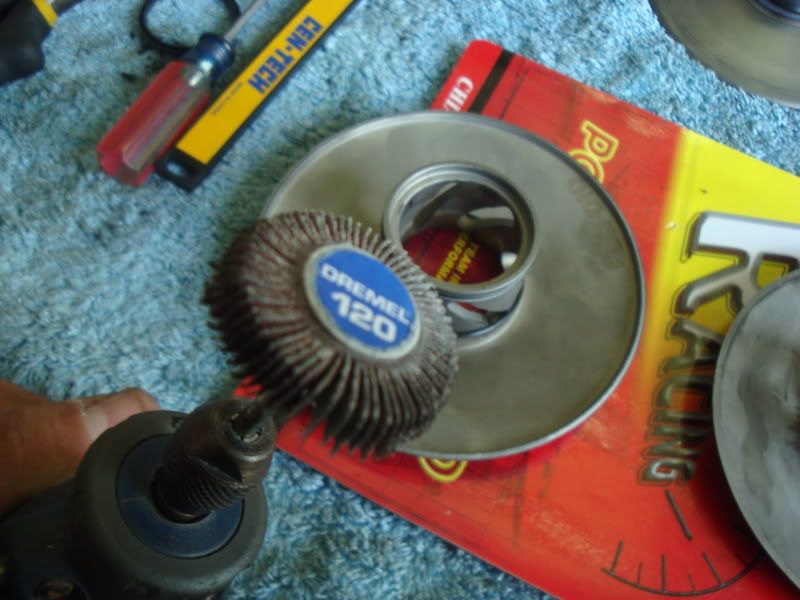
We went with the slot with most angle.
Uh oh looks like we have a problem. The NCY unit is .1mm too small. No worries I'll clean it up with my dremel tool. Flapwheels work well for this kind of situation.
Now clean it all up and put the larger seals in from the OEM driver.
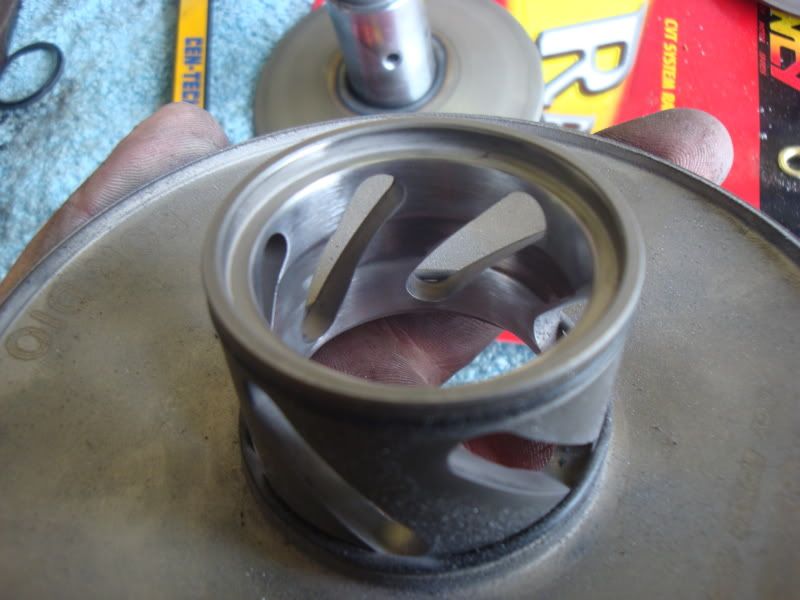
Take a little grease and reinstall the driver.
A few things to note, but not really performance gains.
OD NCY 118.3mm OEM 117.8mm
Weight NCY 8.82oz OEM 9.26oz
Alright now its time to put everything back together and reinstall.
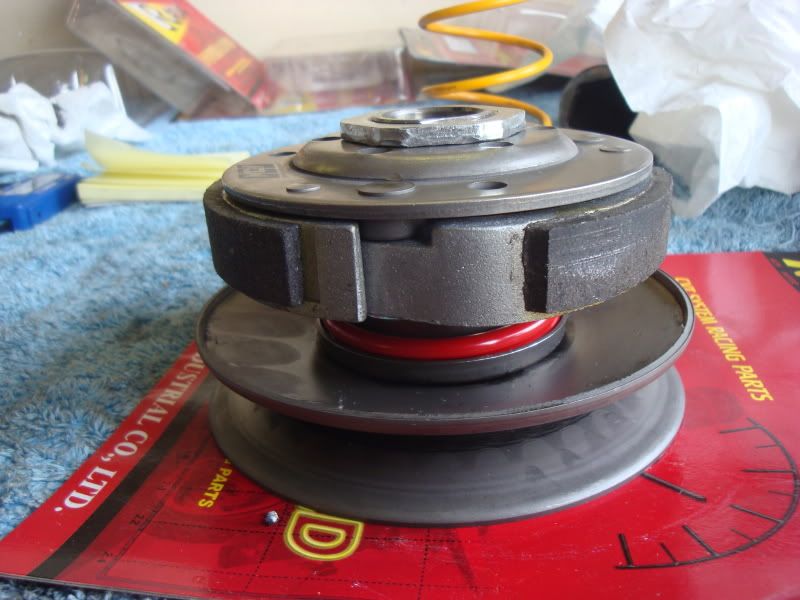
That is one good looking trans setup.

Step one remove the CVT cover.
Now break out your impact gun and remove the variator and clutch.
Now we take a look at our stock variator vs the NCY unit.
If you look closely at the one on the right (oem) you will notice a ring where the belt has been riding at wide open throttle. This is the max height the belt will ride with this belt. You can see that there is a good bit of material left that the belt will never be able to climb to.
The stock variator is 94mm outside diameter, the belt only climbs to 88mm. The NCY Variator has a outside diameter of 89mm allowing NCY to remove quite a bit of material from the variator lightening it, helping your engine rev faster.
Now lets flip them over and examine the ramps.
The oem unit has 24.8mm long ramp with a very aggressive angle that makes it harder for the rollers to push against the backing plate.
Now we take a look at the NCY variator.
The ramp length is 26.5mm with much smoother ramp angles letting the rollers roll up and down the ramp with the least amount of resistance.
Now we weigh them.
OEM came in at 6.9oz
NCY 5.29oz a weight savings of 1.61oz. Thats considerable on such a light piece to begin with.
Now check out the width and drive angle.
The NCY unit has a more aggressive angle and is not as wide as the oem unit.
Stock 27.7mm (disregard the photo it moved a little on me, one hand camera shoot
NCY is 26.2mm with a more aggressive angle. This allows you to accelerate quicker and maintain your momentum when you roll back on the throttle through a corner.
Now that we see how superior the variator is now lets look at the clutches.
NCY is on the left OEM right
First thing you notice is the larger contact patches for the clutch bell to grab on to.
Now we break down the clutch by removing the pill springs and c-clips.
Now we weigh the pads.
The OEM comes in at 134.1g
The NCY weighs 123.7g
While you have the clutch apart check all the other pads for consistency and lighten them if necessary by drilling a little material off at a time.
The lighter the clutch pads are the harder gravity has to act on them. This causes the motor to build more rpms before takeoff. When you add stiffer springs it only increases the force needed to engage the clutch. Good for when you want to launch at 2500 rpm or higher.
At this time I also installed the 2000rpm torque spring to get the most resistance resulting in much better take off for the drag strip. This is not recommend for daily riding as the more force you require the belt to push against the faster it will wear out. Not only that but you better be building some power before you get this aggressive with your tune.
Clutch bells
NCY vs OEM
From just looking at them you can see some major differences. First the holes to release gasses that can can build up simular to brake pads causing the pads to start slipping.
There is also sand like material on the inside of the bell to help the clutch pads hook up.
Last the NCY bell is much lighter than the oem bell.
OEM 17.32oz
NCY 14.61oz
A weight savings of 2.71oz.
Last but not least the torque driver, or as some people call it secondary drive face. First remove the spring collar.
Now pull the little pins from the slots.
Remove torque driver.
Now take a close look at the slot. You'll see it doglegs a bit to make the engine work harder to get into high gear. The smoother it shifts the faster you will accelerate at the track.
OEM
NCY
We went with the slot with most angle.
Uh oh looks like we have a problem. The NCY unit is .1mm too small. No worries I'll clean it up with my dremel tool. Flapwheels work well for this kind of situation.
Now clean it all up and put the larger seals in from the OEM driver.
Take a little grease and reinstall the driver.
A few things to note, but not really performance gains.
OD NCY 118.3mm OEM 117.8mm
Weight NCY 8.82oz OEM 9.26oz
Alright now its time to put everything back together and reinstall.
That is one good looking trans setup.
Amerivespa Indy 2015.
Scooterists start your engines!
#AVINDY15
Scooterists start your engines!
#AVINDY15
-
NASRA
- Member
- Posts: 72
- Joined: Fri Jun 25, 2010 7:31 pm
- Location: Indy
- Contact:
Scooterworks Drag Race Series round 4 update.

After we installed and tuned the Scooterworks stage 1 kit we ran a 16.11 @ 39.23 mph.
With the 72cc kit, intake, carb, and 5G rollers we ran 14.50's @ 47.07 mph
After we tuned the trans we ran a 13.87 @ 46.31mph.
A loss of top speed but the much improved acceleration helped our overall ET.
Next to upgrade the engine with the NCY Ceramic kit, stay tuned.
Amerivespa Indy 2015.
Scooterists start your engines!
#AVINDY15
Scooterists start your engines!
#AVINDY15

-
NASRA
- Member
- Posts: 72
- Joined: Fri Jun 25, 2010 7:31 pm
- Location: Indy
- Contact:
Just want to update everyone on where we are with this build. We installed the Prima Ceramic 72cc kit and its a beast. Problem is we only had one more race to tune it with and honestly its not ready. Now that the race season is over and the winter is setting in we will have to wait till next season to push the envelope.
Stay tuned...
Stay tuned...
Amerivespa Indy 2015.
Scooterists start your engines!
#AVINDY15
Scooterists start your engines!
#AVINDY15


-
NASRA
- Member
- Posts: 72
- Joined: Fri Jun 25, 2010 7:31 pm
- Location: Indy
- Contact:
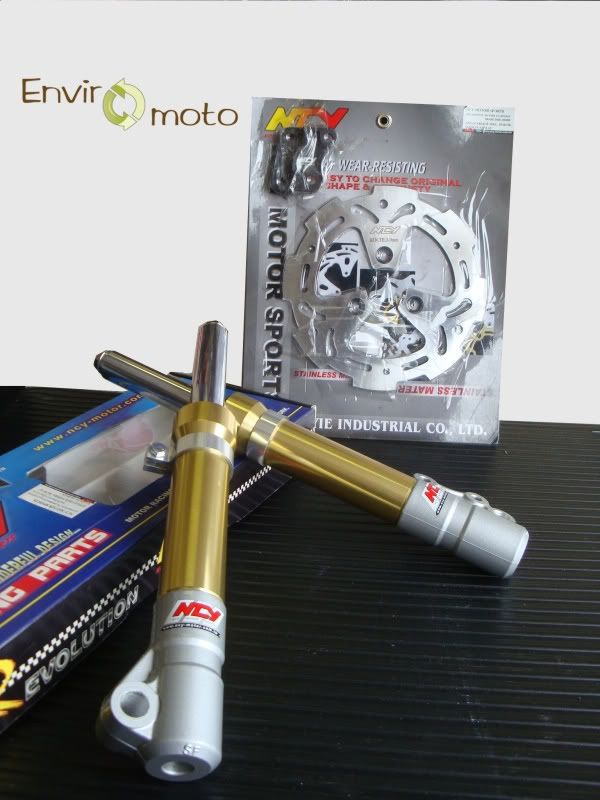
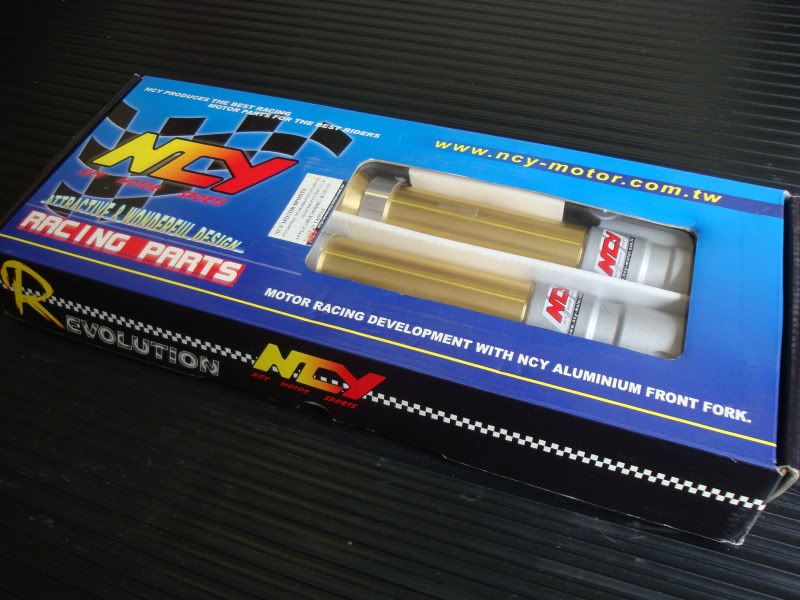
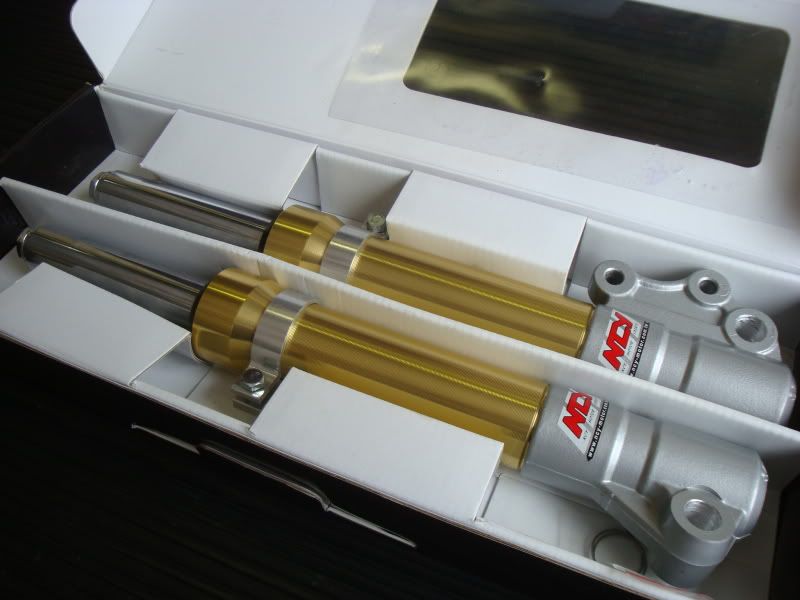
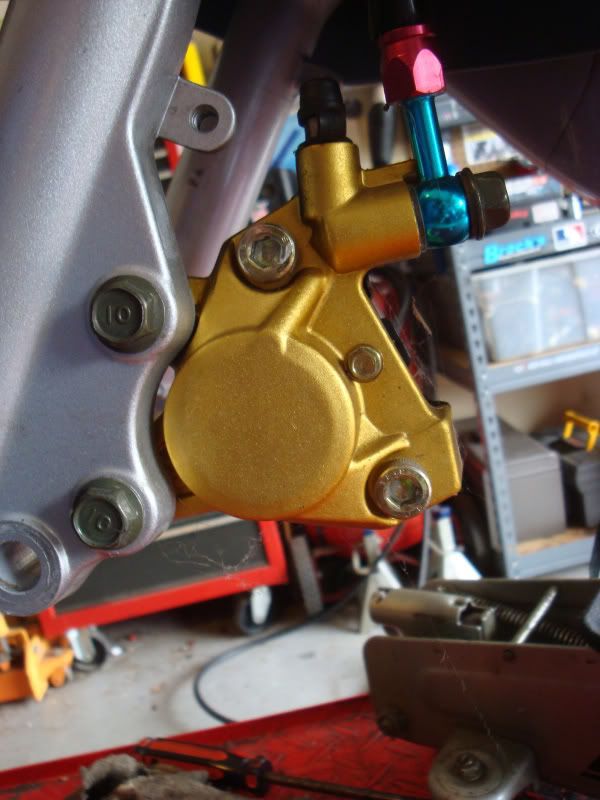
NCY 200mm Big Brake, NCY Performance Forks, and Safety Wire
Hello gang,
Today we are installing the NCY 200mm Big Brake Kit, NCY Performance Forks, and getting Frenchy ready for the road course with some safety wire.
We'll start with the forks.
Place scooter on lift and inspect for damage.
Remove front shield.
Lift front tire off the ground. We use a board and a jack, feel free to get creative here.
Remove front axle and tire.
Remove brake caliper.
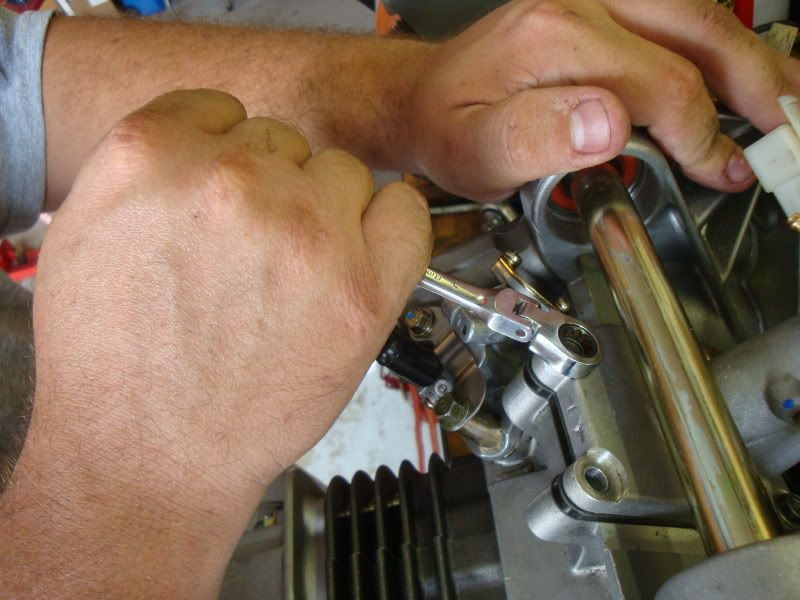
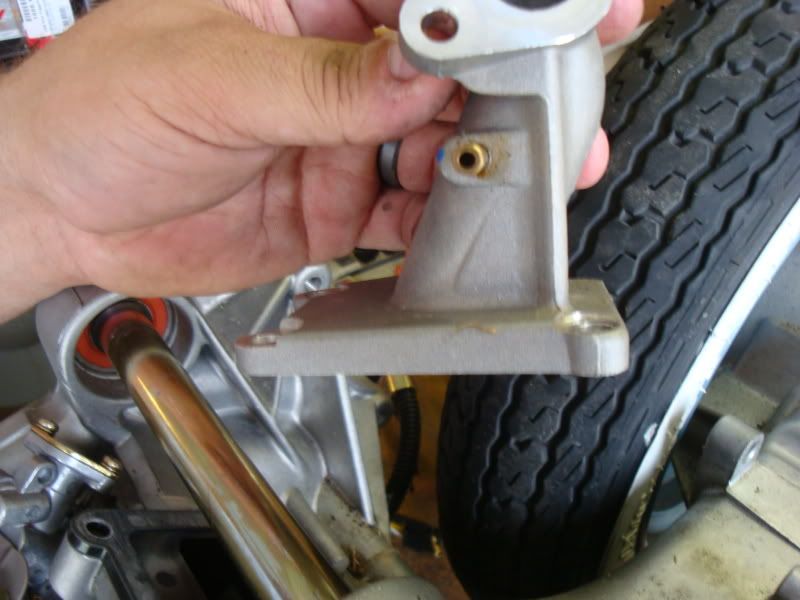
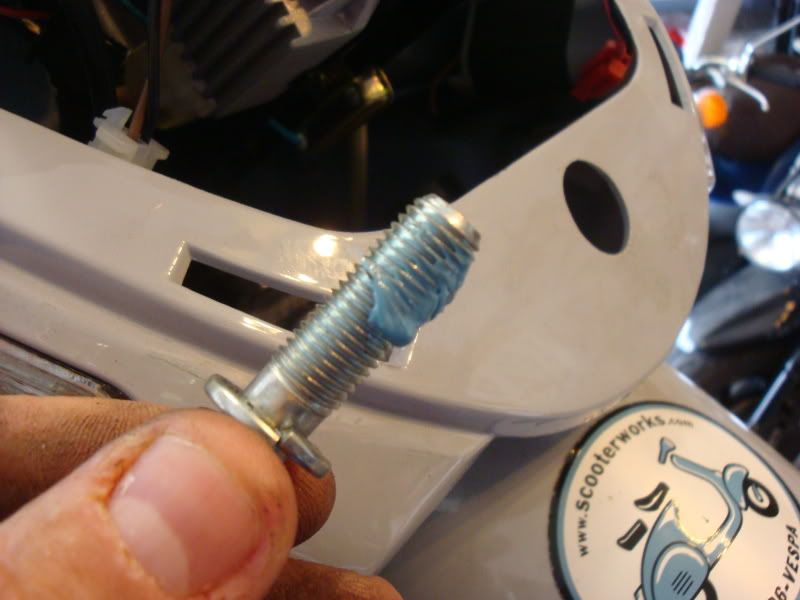
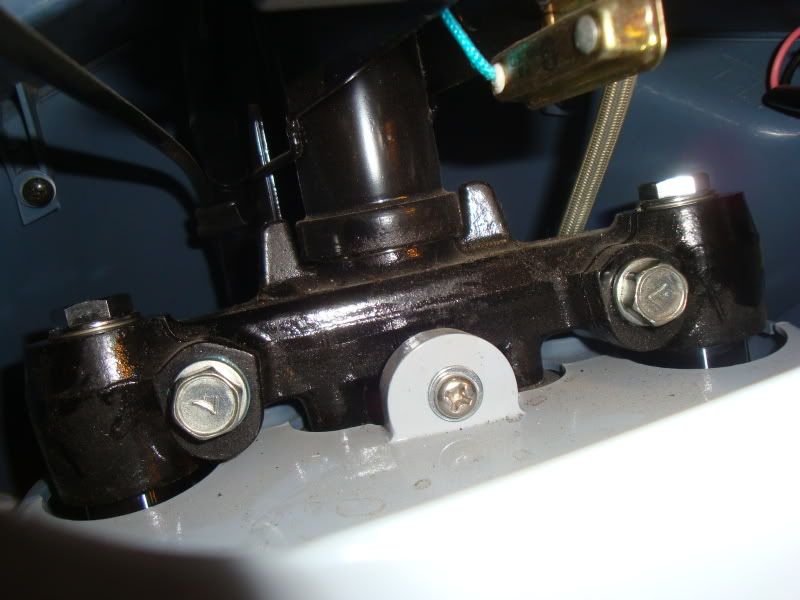
Remove front forks by removing the steering stem bolts and then removing the fork stay on top.
Remove fork and reinstall the stay on top of the fork.
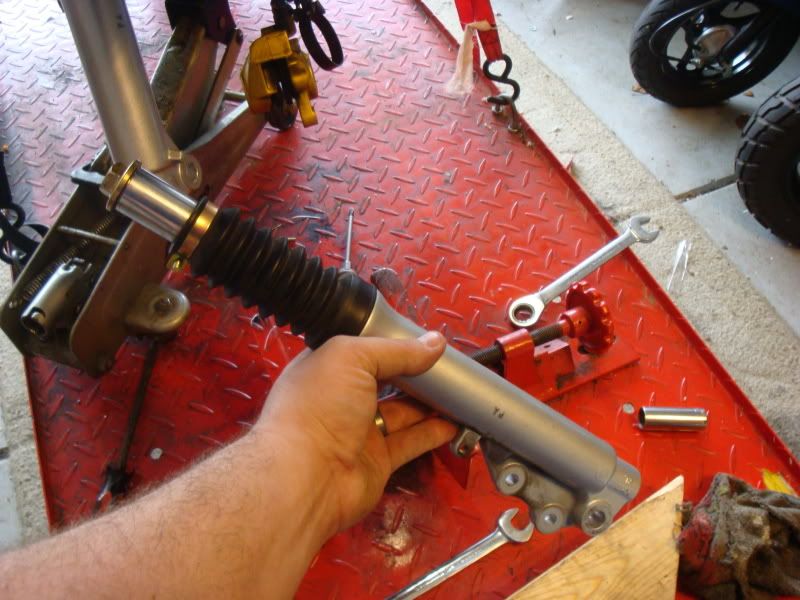
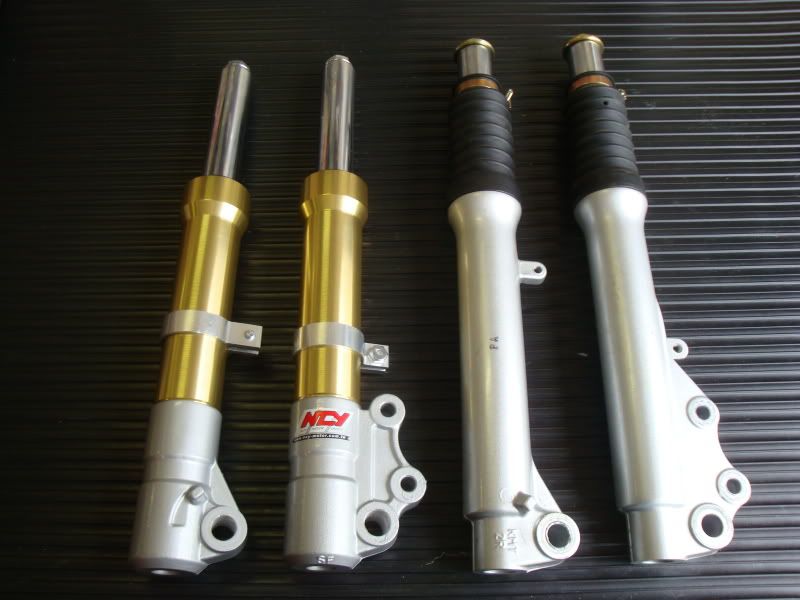
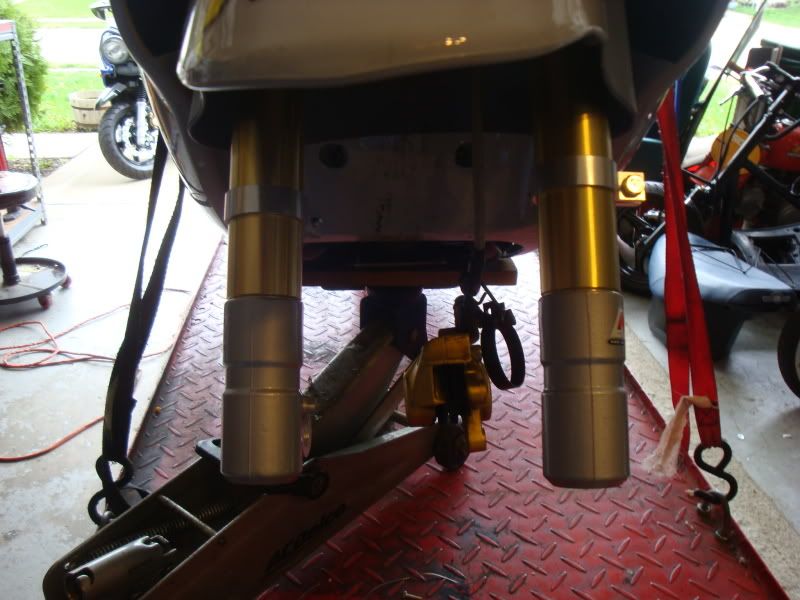
The NCY Performance Forks are far lighter and have better side load resistance and dampening than stock.
Not to mention we love gold!
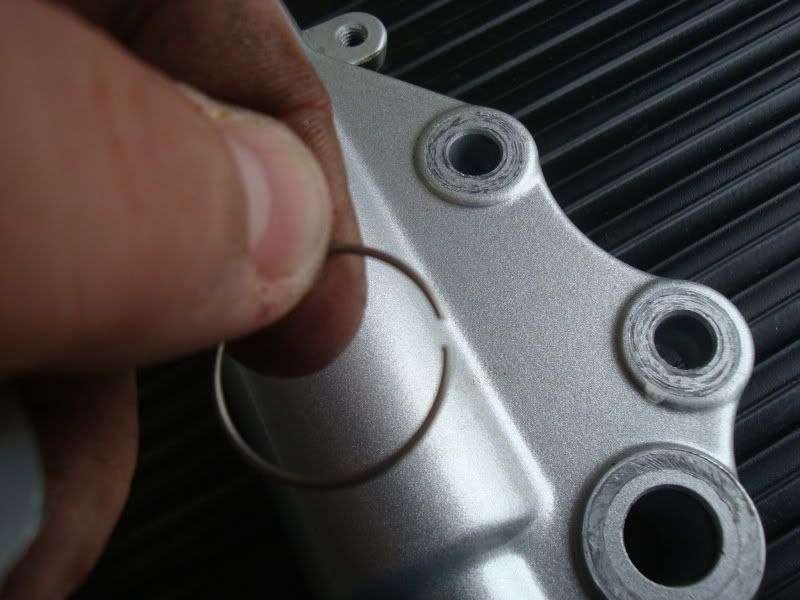
The shock stays are small enough to fit through the steering stem without having to remove them so installing is easier than removal. Just remember to install the little clip on top of the shock after install and use blue locktight on the bolt.
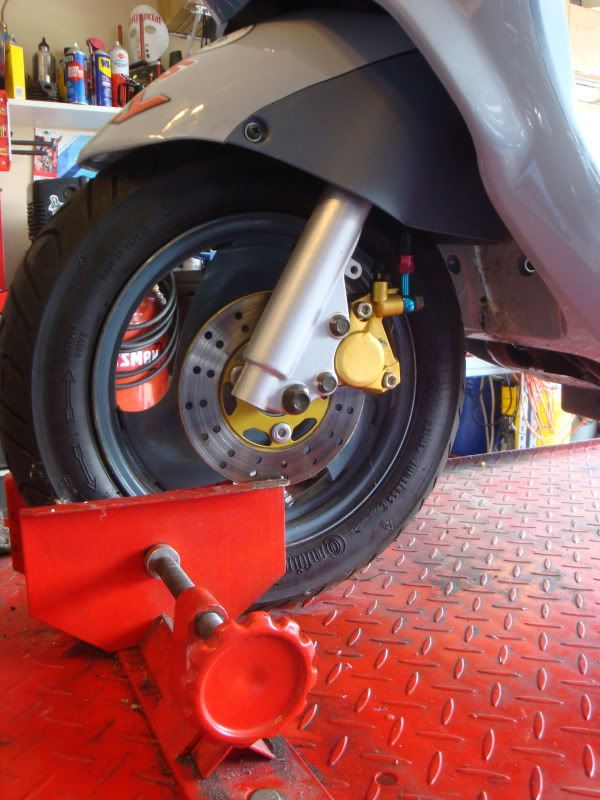
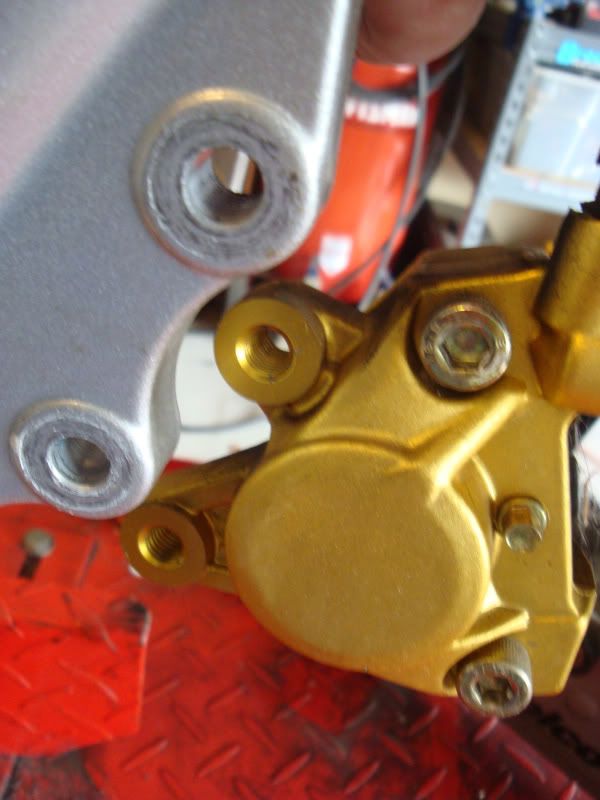
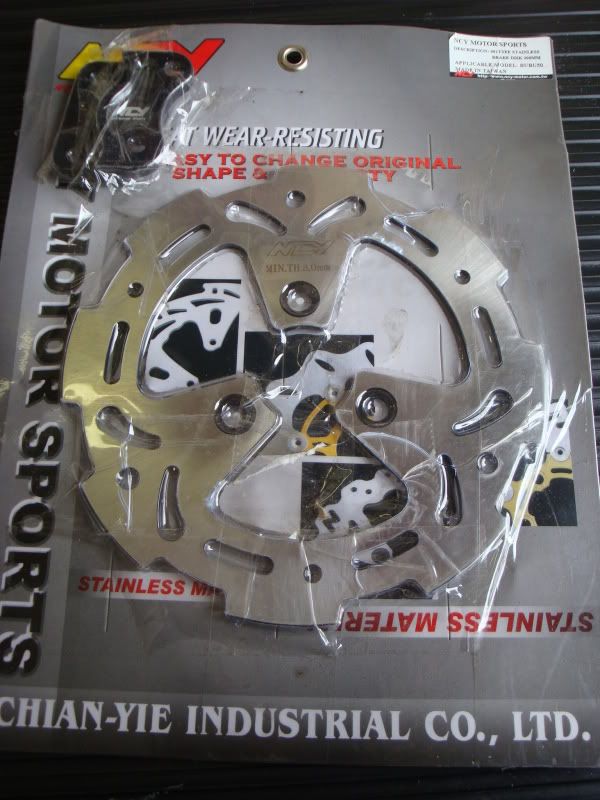
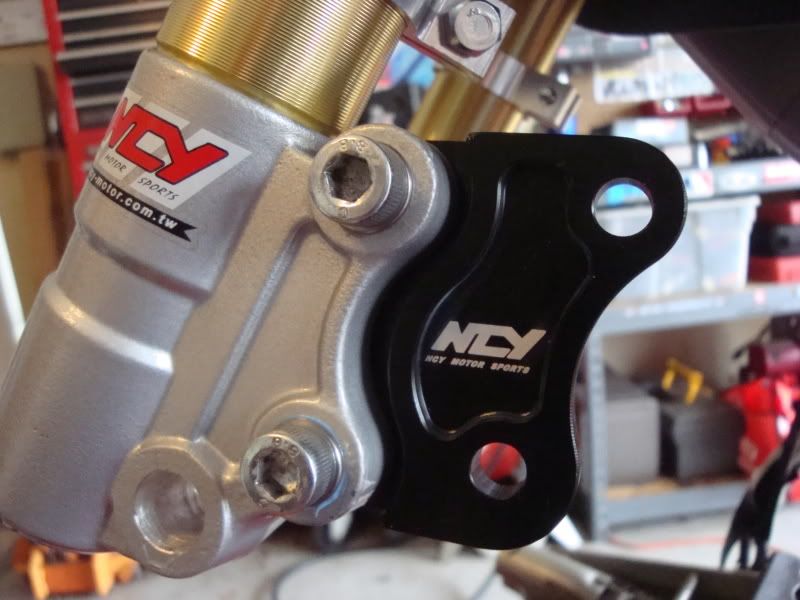
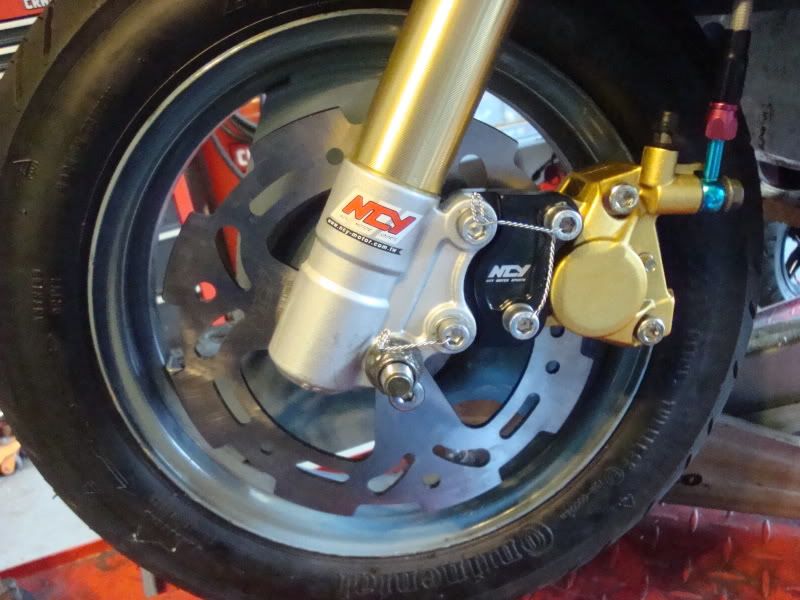
With the forks installed we move to the NCY 200mm Big Brake kit to reduce brake fade and improve our stopping distance on the track.
Nice thing about this kit it comes with the caliper bracket for a simple plug and play installation.
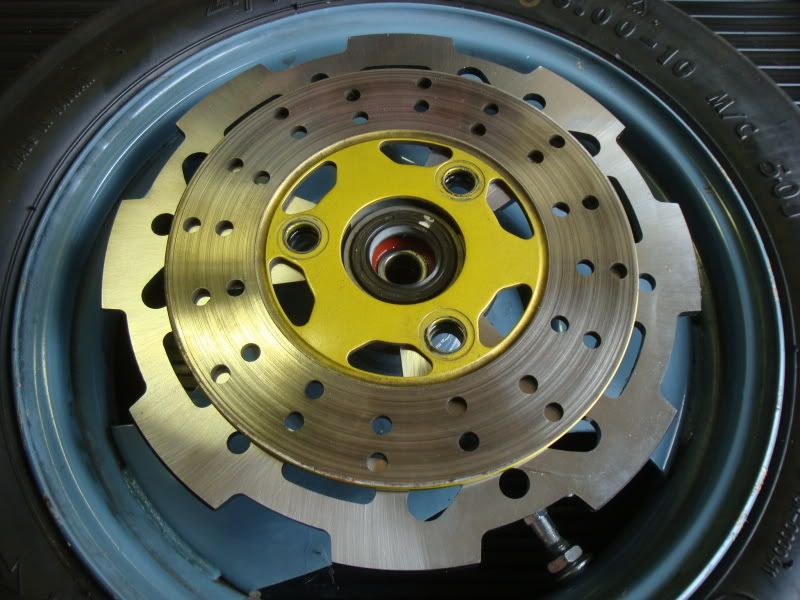
Remove stock disk.
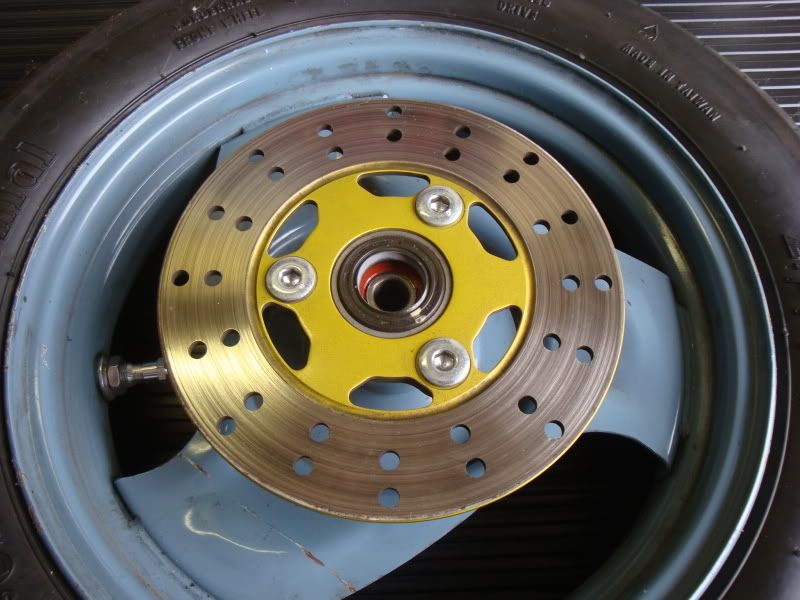
Install NCY 200mm disk.
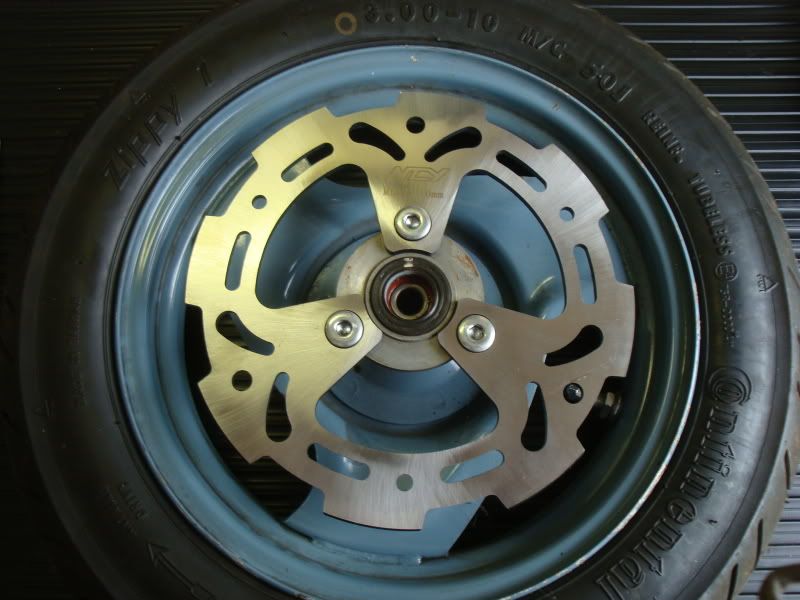
Stand in awe of how much larger it is than stock.
Now when you do a upgrade like this its always recommend to replace your brake pads.
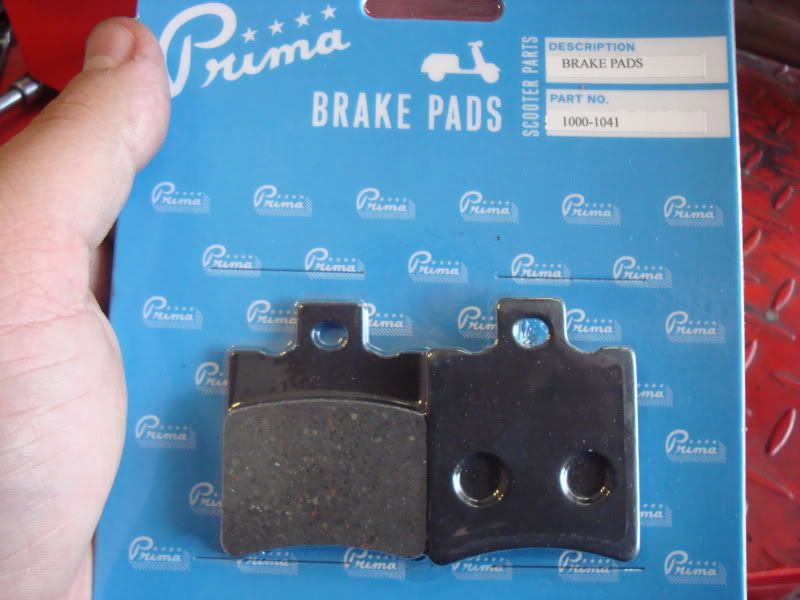
With the old pads in place use a screwdriver and pry the pistons back into the caliper gently. Do not forget this step as you'll never get the caliper back on the disk later without damaging your new pads.
Remove this stay by removing the c-clip and simply pulling it out.
Now simply remove the pads and reverse the steps. Takes about 10 mins.
From here you install the brake caliper bracket and install the rest of the front end assembly.
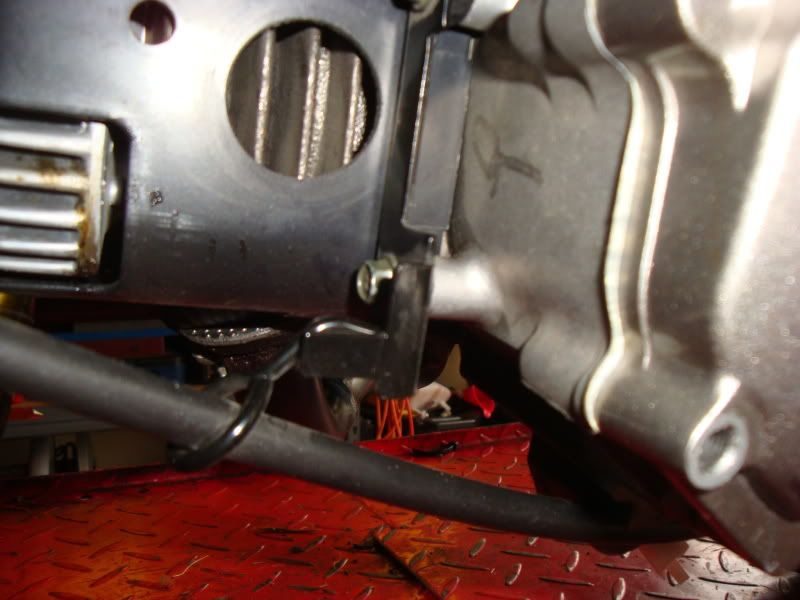
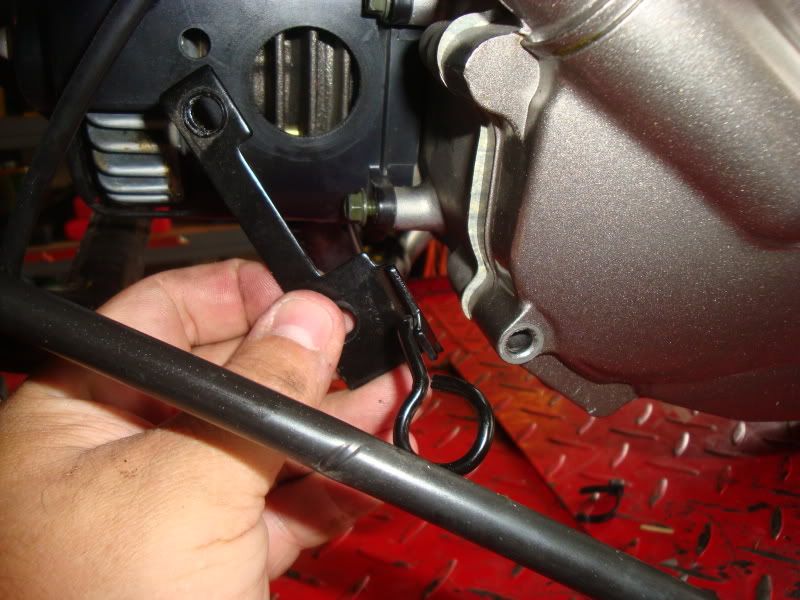
However we have a bit of safety wire to install.
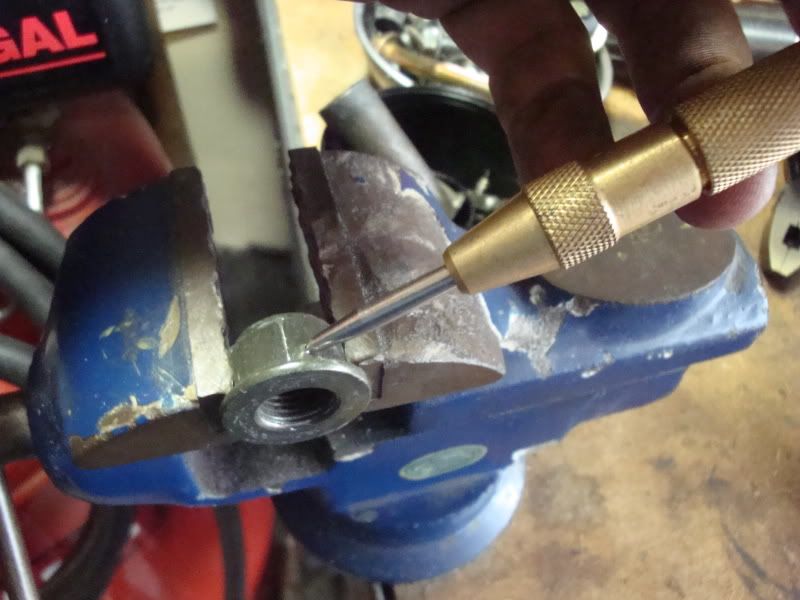
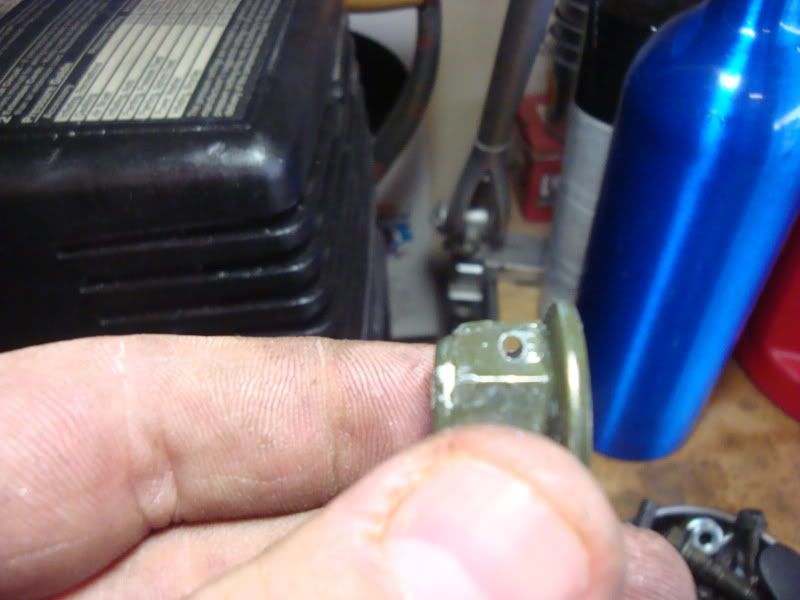
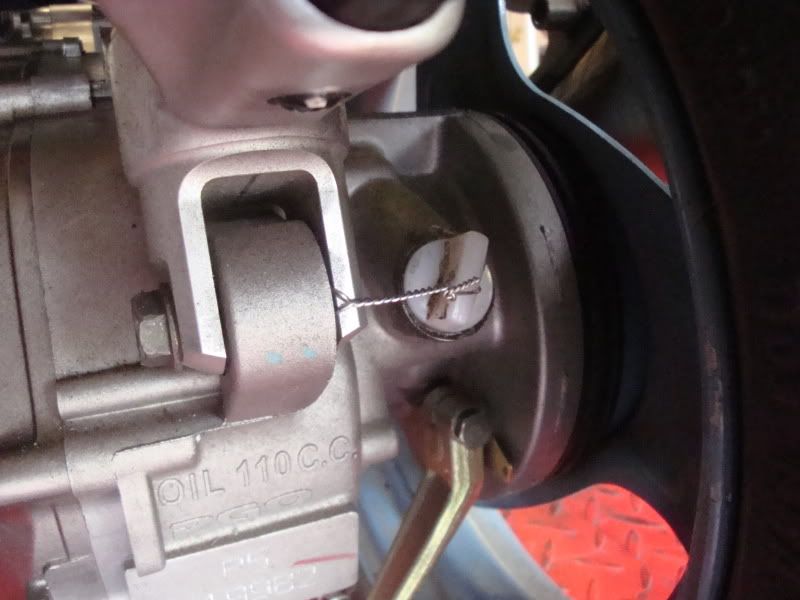
First you drill out the corner of the axle nut and brake caliper stays. Per NASRA regulations we will also be safety wiring the transmission fill plug as well.
Now simply install the front end (we reversed the axle nut side to attach the nut to the caliper stay with safety wire) and brake caliper.
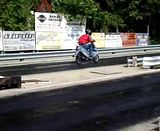
Dunski
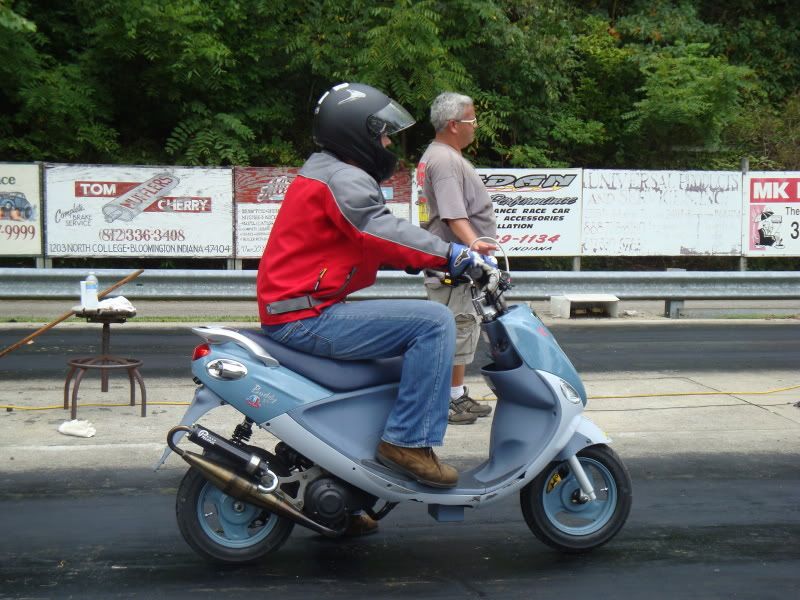
At the Thunderdrome this past weekend (our shakedown test) our upgraded front end performed beautifully, along with our YSS rear shock, soaking up the nasty bumps of the Thunderdrome with ease. Next round will be in September and if you get a chance make sure to stop by and say hi.
www.Thunderdrome.com


For those wondering we came in second due to the fact I didn't get the chance to warm up the motor before the race. Next time I'm just going to fog out the crowd and worry about it later.
LMTC FTW!
Today we are installing the NCY 200mm Big Brake Kit, NCY Performance Forks, and getting Frenchy ready for the road course with some safety wire.
We'll start with the forks.
Place scooter on lift and inspect for damage.
Remove front shield.
Lift front tire off the ground. We use a board and a jack, feel free to get creative here.
Remove front axle and tire.
Remove brake caliper.
Remove front forks by removing the steering stem bolts and then removing the fork stay on top.
Remove fork and reinstall the stay on top of the fork.
The NCY Performance Forks are far lighter and have better side load resistance and dampening than stock.
Not to mention we love gold!
The shock stays are small enough to fit through the steering stem without having to remove them so installing is easier than removal. Just remember to install the little clip on top of the shock after install and use blue locktight on the bolt.
With the forks installed we move to the NCY 200mm Big Brake kit to reduce brake fade and improve our stopping distance on the track.
Nice thing about this kit it comes with the caliper bracket for a simple plug and play installation.
Remove stock disk.
Install NCY 200mm disk.
Stand in awe of how much larger it is than stock.
Now when you do a upgrade like this its always recommend to replace your brake pads.
With the old pads in place use a screwdriver and pry the pistons back into the caliper gently. Do not forget this step as you'll never get the caliper back on the disk later without damaging your new pads.
Remove this stay by removing the c-clip and simply pulling it out.
Now simply remove the pads and reverse the steps. Takes about 10 mins.
From here you install the brake caliper bracket and install the rest of the front end assembly.
However we have a bit of safety wire to install.
First you drill out the corner of the axle nut and brake caliper stays. Per NASRA regulations we will also be safety wiring the transmission fill plug as well.
Now simply install the front end (we reversed the axle nut side to attach the nut to the caliper stay with safety wire) and brake caliper.
Dunski
At the Thunderdrome this past weekend (our shakedown test) our upgraded front end performed beautifully, along with our YSS rear shock, soaking up the nasty bumps of the Thunderdrome with ease. Next round will be in September and if you get a chance make sure to stop by and say hi.
www.Thunderdrome.com
For those wondering we came in second due to the fact I didn't get the chance to warm up the motor before the race. Next time I'm just going to fog out the crowd and worry about it later.
LMTC FTW!
Last edited by NASRA on Mon May 02, 2011 8:41 pm, edited 1 time in total.
Amerivespa Indy 2015.
Scooterists start your engines!
#AVINDY15
Scooterists start your engines!
#AVINDY15
-
NASRA
- Member
- Posts: 72
- Joined: Fri Jun 25, 2010 7:31 pm
- Location: Indy
- Contact:
-
jasondavis48108
- Member
- Posts: 2919
- Joined: Fri Apr 24, 2009 12:36 pm
- Location: Ann Arbor
-
Lagerhead
- Member
- Posts: 403
- Joined: Tue Jun 20, 2006 5:20 pm
- Location: Cincinnati
I test rode this bike last weekend, see my face? You can't - and now you know why.NASRA wrote:I did forget to mention that we upgraded the motor with the new NCY Ceramic Bridged port kit. The difference between the two will straight rock your face completely off.
Last edited by Lagerhead on Tue May 03, 2011 2:29 am, edited 1 time in total.

-
jasondavis48108
- Member
- Posts: 2919
- Joined: Fri Apr 24, 2009 12:36 pm
- Location: Ann Arbor
-
NASRA
- Member
- Posts: 72
- Joined: Fri Jun 25, 2010 7:31 pm
- Location: Indy
- Contact:
For the record the front end I used is not the same as the 150cc Buddy's and is currently be developed by Enviromoto.com. Once we feel the product does as advertised we will release it to the tuning community.jasondavis48108 wrote:that was awesome! I didn't even realize that the NCY forks were compatible with the Buddy 50s, What a great upgrade.
Amerivespa Indy 2015.
Scooterists start your engines!
#AVINDY15
Scooterists start your engines!
#AVINDY15